
Last summer, I found myself staring at my grandmother’s photo album, completely mesmerized by a picture of her wearing this gorgeous crocheted top at a garden party in 1972. The flowers, the colors, that beautiful mesh fabric. I could not stop thinking about it.
I asked her about it, and she laughed. She had made it herself but lost the pattern decades ago. So I did what any obsessed crafter would do. I spent weeks studying vintage crochet techniques, testing flower constructions, and figuring out how to recreate that retro magic with a modern fit.
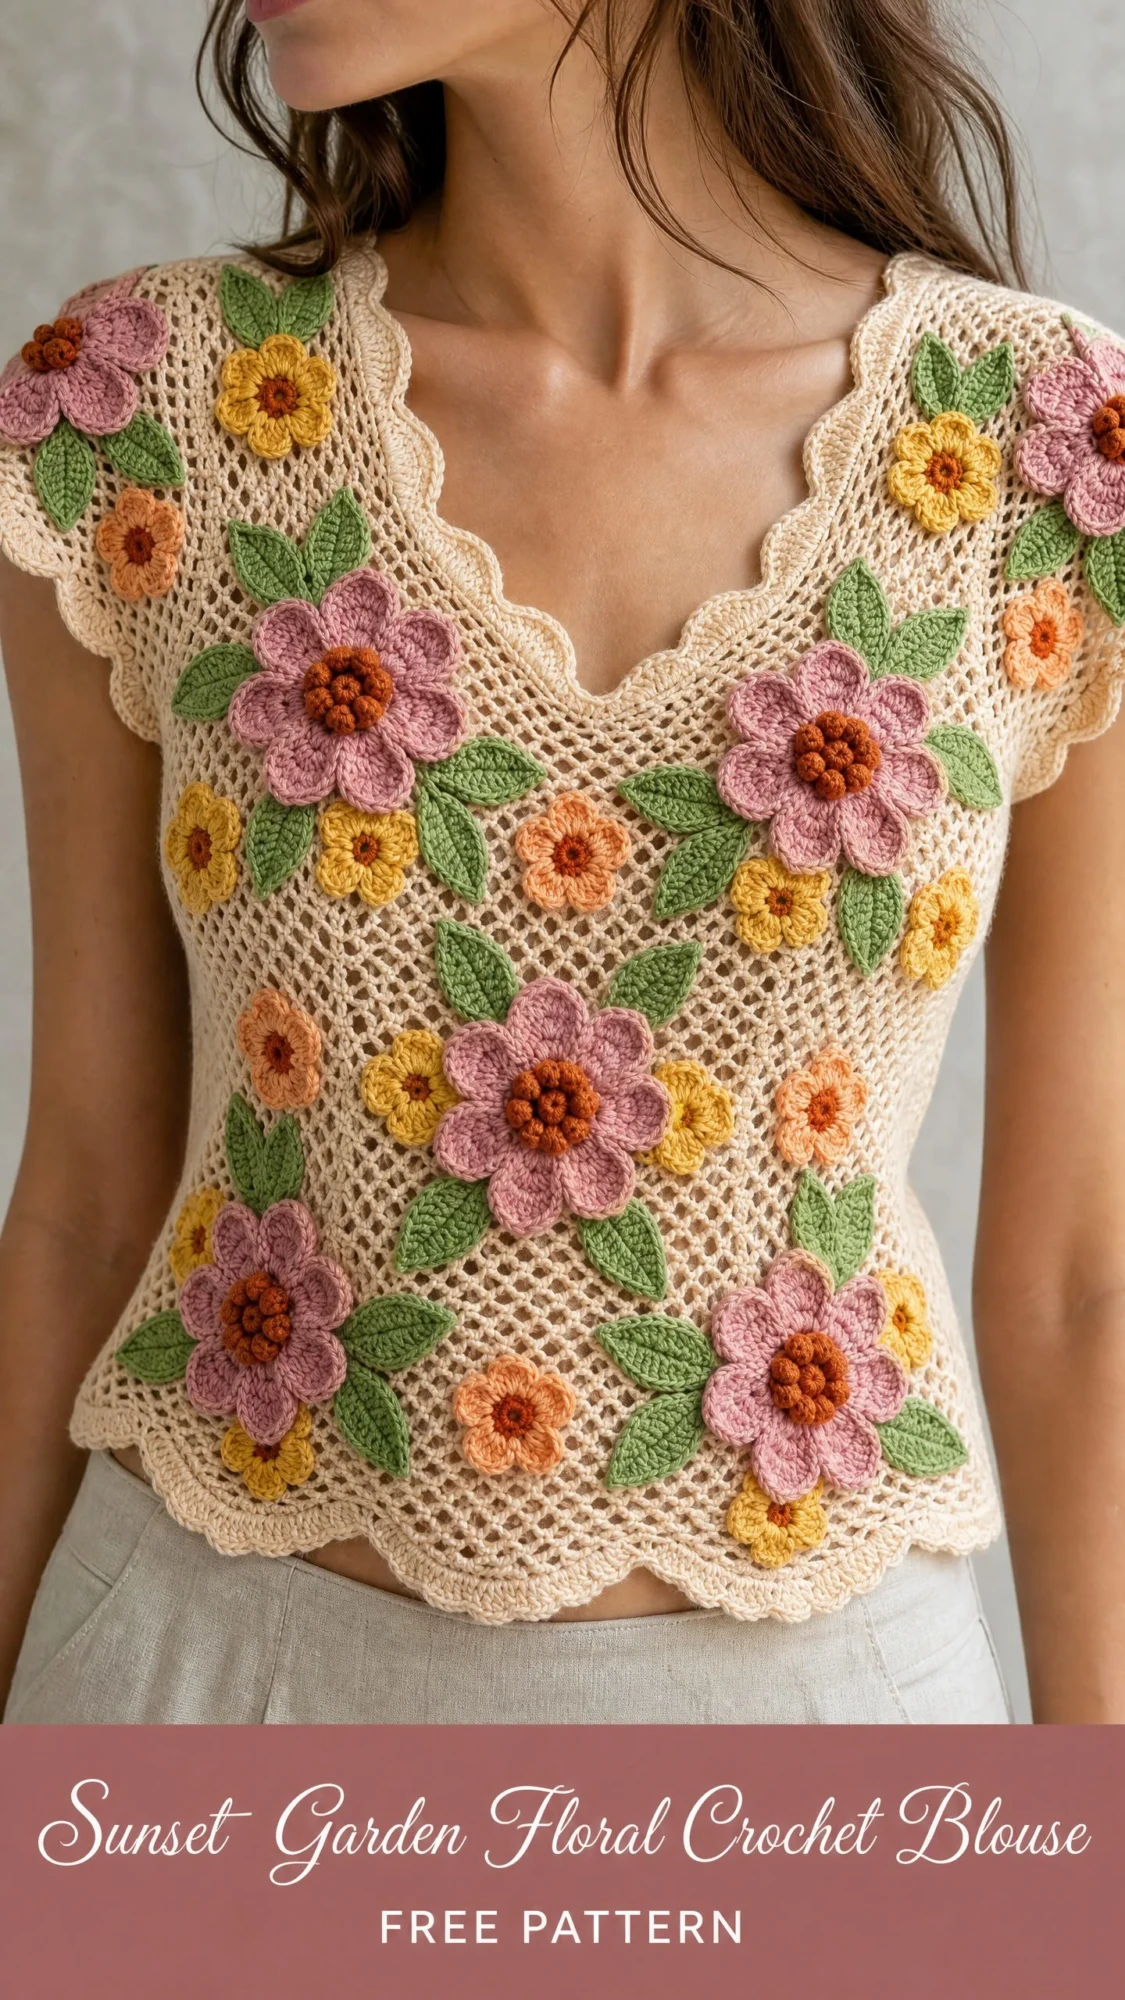
This Sunset Garden Floral Crochet Blouse is the result of that obsession. It turned out even better than I hoped, and now I get to share it with you. Fair warning: this one takes some time and patience, but the finished piece is absolutely stunning. Let me walk you through every single step.
What Makes This Crochet Blouse Pattern Special
This is not your average beginner project, but it is absolutely achievable if you are comfortable with basic stitches and willing to take your time. The blouse combines a few different techniques that come together beautifully.
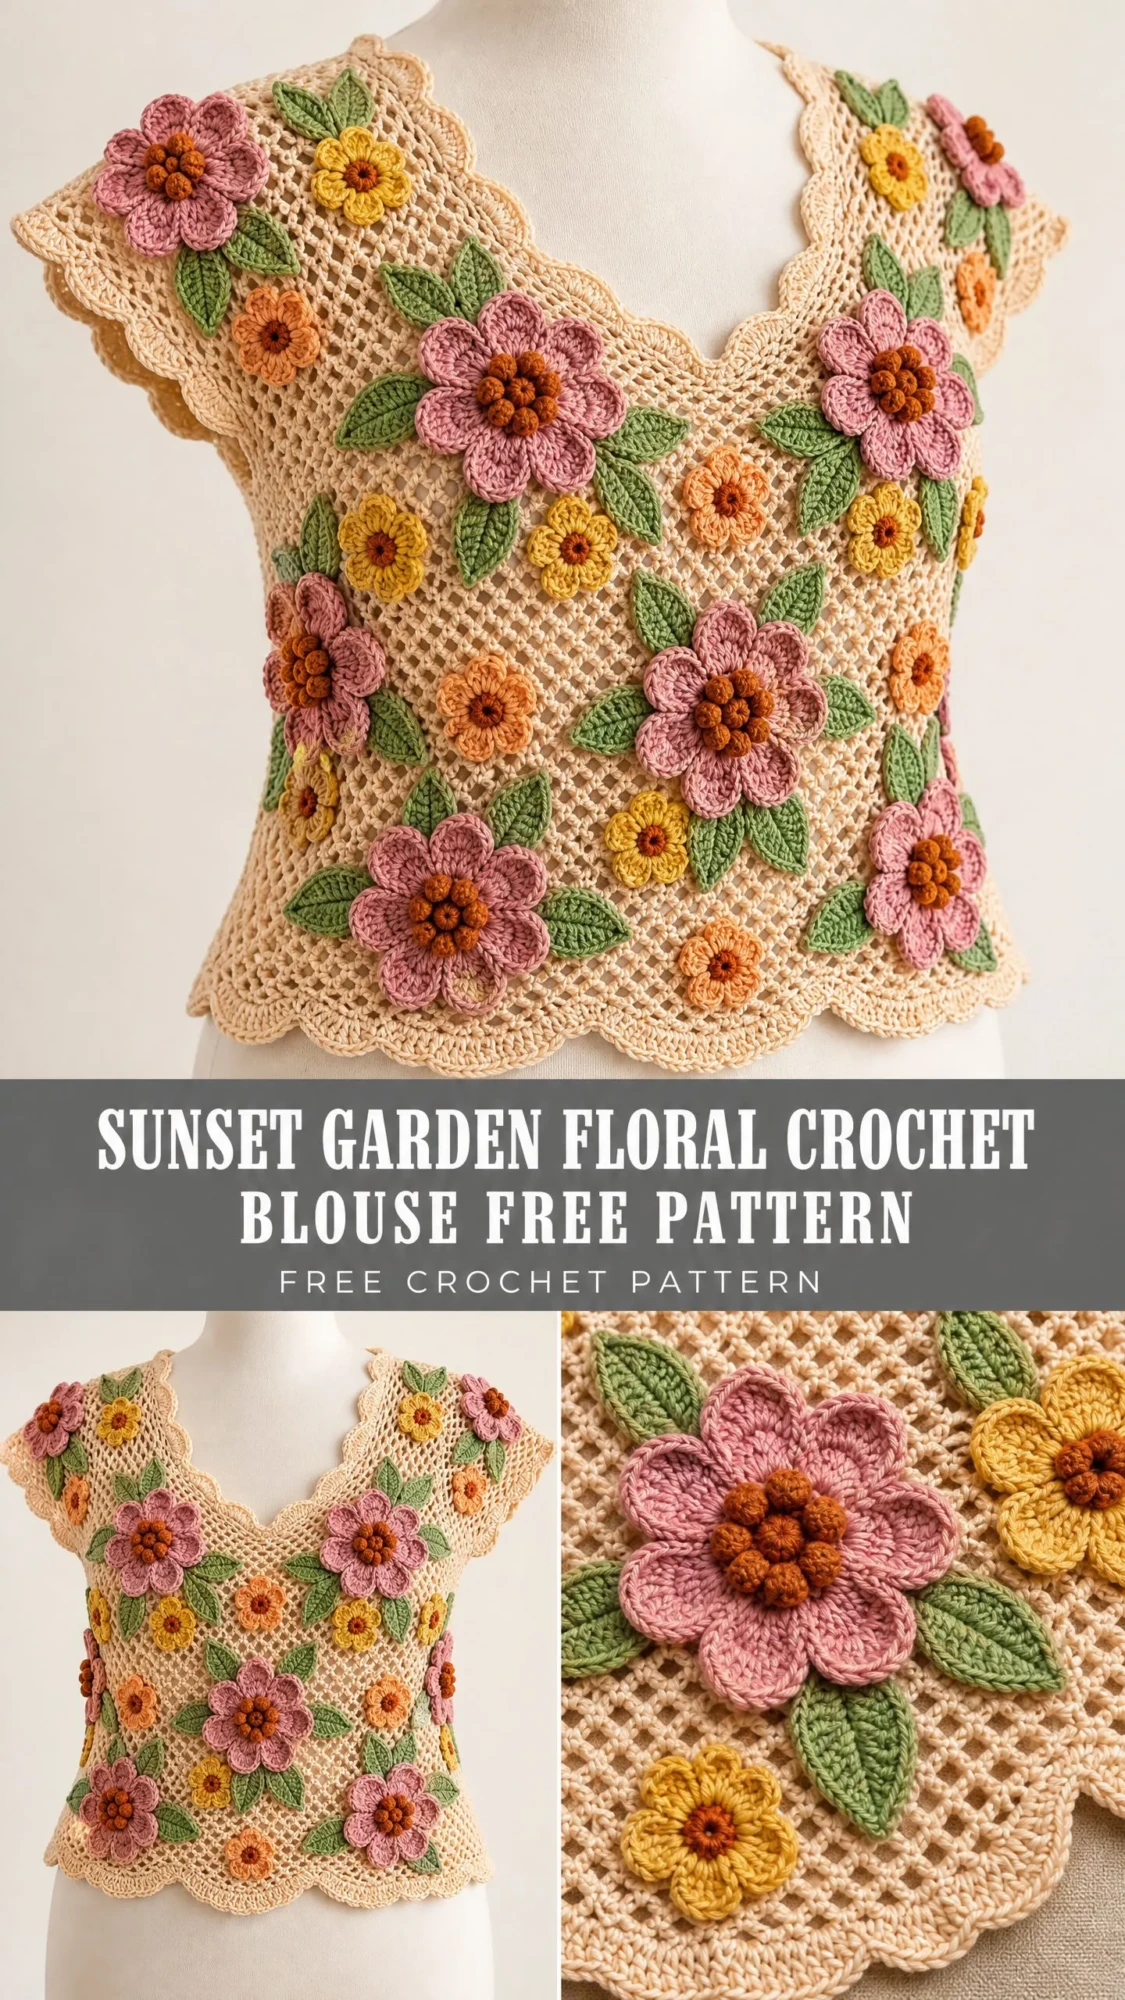
The body is worked in a filet mesh stitch, which creates that open, airy lattice fabric you see in vintage crochet garments. It is basically double crochet stitches separated by chain spaces, forming little windows throughout the fabric. Super breathable and perfect for warm weather.
The magic really happens with the three-dimensional flower appliques. These are crocheted separately and sewn on after you finish the body. There are three sizes of flowers in warm sunset colors, plus little leaves scattered throughout. The layered petals give the flowers genuine depth and dimension.
The construction order keeps things manageable: front panel first, then back panel, seaming, scallop edging on all edges, and finally attaching all those gorgeous flowers and leaves.
Skill Level and Time Commitment
I would call this advanced beginner to intermediate. The mesh body is straightforward once you get the rhythm going, but the shaping requires careful stitch counting. Working the dimensional flowers adds another layer of skill, and the assembly and finishing take patience.
Time estimate: Plan for 25 to 40 hours total. That breaks down to roughly 10 to 14 hours for the two body panels, 6 to 8 hours for all the floral motifs, 3 to 4 hours for seaming and edging, and 2 to 4 hours for blocking and applique work.
Yes, it is a commitment. But spread it out over a few weeks and you will have a wearable piece of art.
Finished Measurements
This pattern is written for size Small/Medium as the primary size. I have included customization tips later if you need to adjust.
The blouse is designed with 1 to 2 inches of positive ease at the bust, so it has a relaxed but flattering fit.
Materials You Will Need
Yarn
You will need DK weight yarn (also called light weight or #3) in several colors:
Yarn Suggestions
Paintbox Yarns Simply DK works wonderfully here. It is 100% acrylic, affordable, comes in all the colors you need, and holds its shape beautifully after blocking.
Drops Safran is another excellent choice if you prefer cotton. It gives that authentic vintage look with a slight sheen. Just know that cotton has less stretch, so swatching is extra important.
Any smooth DK weight yarn will work. Avoid fuzzy or bouclé yarns since they will obscure the pretty mesh openwork.
Hooks
The smaller hook keeps your flowers firm and dimensional.
Notions
Gauge (Do Not Skip This)
Body panel gauge using US E-4 hook in filet mesh pattern:
Flower gauge:
Gauge is mandatory for this garment. Even a quarter-inch difference per 4 inches results in a 2-inch size difference across the bust. Work a swatch of at least 6 inches by 6 inches, block it flat, and measure before starting.
Abbreviations
Let me define every abbreviation you will encounter. A single crochet (sc) is your shortest basic stitch: insert hook, yarn over, pull through, yarn over, pull through both loops. A double crochet (dc) is taller: yarn over first, insert hook, yarn over and pull through, then yarn over and pull through two loops twice. A half double crochet (hdc) falls between them in height.
Here is the complete list:
Special Stitches for This Crochet Blouse Tutorial
Filet Mesh Unit
This is the building block of your blouse body. One double crochet followed by chain 2, skip 2 stitches (or skip a ch-2 space), then work the next dc into the next anchor stitch. Each mesh unit occupies 3 stitches along the foundation chain.
Shell Stitch
Used for the scallop edging. Work 5 dc all into the same stitch or space.
Three-Dimensional Large Flower
Round 1: Using D-3 hook and petal color, make a magic ring. Ch 1. Work 10 sc into ring. Join with sl st to first sc. Pull ring closed. (10 sc)
Round 2: Ch 1. Work 2 sc into each st around. Join with sl st to first sc. (20 sc)
Round 3 (inner petal layer): [Ch 4, skip 1 st, sl st into next st] 10 times. (10 ch-4 loops)
Round 4 (inner petals): For each ch-4 loop, work (sc, hdc, 3 dc, hdc, sc) into the loop. (10 petals completed)
Round 5 (outer petal base): Working behind the inner petals, insert hook into the skipped sts of Round 2 from RS to WS, sl st into each of the 10 skipped sts to establish outer petal anchors. (10 sl sts)
Round 6 (outer petal loops): [Ch 6, sl st into next outer anchor] 10 times. (10 ch-6 loops)
Round 7 (outer petals): For each ch-6 loop, work (sc, hdc, 2 dc, 3 tr, 2 dc, hdc, sc) into the loop. (10 outer petals completed)
Fasten off leaving a 12-inch tail for sewing.
Flower Center Bobble
Make a magic ring. Ch 3. [Yo, insert hook into ring, yo, pull up loop, yo, pull through 2 loops] 4 times into same ring. Yo, pull through all 5 loops on hook. Ch 1 to close. Work 6 sc around outer edge of bobble. Fasten off leaving tail. Sew bobble into center of large or medium flower.
Three-Dimensional Medium Flower
Round 1: Using D-3 hook and petal color, make a magic ring. Ch 1. Work 8 sc into ring. Join with sl st. Pull ring closed. (8 sc)
Round 2: Ch 1. [2 sc into next st] 8 times. Join with sl st. (16 sc)
Round 3 (petal loops): [Ch 4, skip 1 st, sl st into next st] 8 times. (8 ch-4 loops)
Round 4 (petals): For each ch-4 loop, work (sc, hdc, 3 dc, hdc, sc). (8 petals)
Fasten off leaving a 10-inch tail. Add a small Color D center bobble or a cluster of 3 French knots.
Three-Dimensional Small Flower
Round 1: Using D-3 hook, make a magic ring. Ch 1. Work 6 sc into ring. Join with sl st. Pull ring closed. (6 sc)
Round 2 (petal loops): [Ch 3, sl st into next st] 6 times. (6 ch-3 loops)
Round 3 (petals): For each ch-3 loop, work (sc, 3 dc, sc). (6 petals)
Fasten off leaving a 10-inch tail.
Leaf Motif
Using D-3 hook and Color E, ch 12.
Row 1: Sc into 2nd ch from hook, hdc into next ch, dc into next 3 ch, hdc into next ch, sc into next ch, hdc into next ch, dc into next 2 ch. Now working along the opposite side of the foundation chain: dc into next 2 ch, hdc into next ch, sc into next ch, hdc into next ch, dc into next 3 ch, hdc into next ch, sc into last ch. Join with sl st to first sc. (22 sts around)
Row 2 (raised vein): Ch 1. Surface sl st up the center spine of the leaf by inserting hook through the center of each stitch. Fasten off leaving a 10-inch tail.
Finished leaf measures approximately 2.25 inches (5.75 cm) long and 1 inch (2.5 cm) wide.
Step by Step Crochet Pattern Instructions
Front Panel
Foundation Chain:
Using MC and E-4 hook, ch 91.
Row 1 (RS): Dc into 7th ch from hook (counts as first mesh unit including the t-ch as first dc and 2 skipped chs). [Ch 2, skip 2 ch, dc into next ch] across. Turn. (29 mesh units / 30 dc posts including t-ch dc)
Row 2: Ch 5 (counts as dc + ch 2). Skip first ch-2 sp. Dc into next dc. [Ch 2, dc into next dc] across, ending with dc into the 3rd ch of t-ch. Turn. (29 mesh units)
Rows 3 through 6: Rep Row 2. (29 mesh units each row)
After Row 6 your piece should measure approximately 3 inches (7.5 cm) from the foundation chain edge.
Waist Shaping
You will decrease 1 mesh unit at each side edge every other row.
To decrease at the beginning of a row: Sl st across the first dc and the ch-2 space (3 sl sts total). Sl st into the next dc. Ch 5, and continue in mesh pattern across, stopping 1 mesh unit before the last dc. Work dc into the last dc before the final mesh unit. Turn.
Row 7 (decrease row): Decrease 1 mesh unit at each edge. (27 mesh units)
Row 8: Rep Row 2. (27 mesh units)
Row 9 (decrease row): Decrease 1 mesh unit at each edge. (25 mesh units)
Row 10: Rep Row 2. (25 mesh units)
Row 11 (decrease row): Decrease 1 mesh unit at each edge. (23 mesh units)
Row 12: Rep Row 2. (23 mesh units)
Row 13 (decrease row): Decrease 1 mesh unit at each edge. (21 mesh units)
Row 14: Rep Row 2. (21 mesh units)
After Row 14 your piece should measure approximately 7 inches (18 cm) tall and 13 to 14 inches (33 to 35.5 cm) wide.
Hip and Bust Shaping
Now you will increase back to full width.
To increase at the beginning of a row: Ch 8 (counts as ch 5 turn + 3 extra chs for 1 new mesh unit). Work dc into the 6th ch from hook (establishing 1 new mesh unit), then ch 2, and dc into the first dc of the previous row, and continue across in pattern. At the end of the row, after the last dc of the pattern, ch 2, and work dc into the top of the t-ch from the previous row, then ch 2 and work dc into the 3rd ch of the same t-ch. Turn.
Row 15 (increase row): Increase 1 mesh unit at each edge. (23 mesh units)
Row 16: Rep Row 2. (23 mesh units)
Row 17 (increase row): Increase 1 mesh unit at each edge. (25 mesh units)
Row 18: Rep Row 2. (25 mesh units)
Row 19 (increase row): Increase 1 mesh unit at each edge. (27 mesh units)
Row 20: Rep Row 2. (27 mesh units)
Row 21 (increase row): Increase 1 mesh unit at each edge. (29 mesh units)
Row 22: Rep Row 2. (29 mesh units)
After Row 22 your piece should measure approximately 11 inches (28 cm) tall and 17 inches (43 cm) wide.
Rows 23 through 26: Continue even in mesh pattern. (29 mesh units each row)
After Row 26 your piece should measure approximately 13 inches (33 cm) from the cast-on edge.
Armhole Shaping
Row 27 (armhole setup row): Sl st across 3 mesh units (9 sl sts total into dc posts and ch spaces). Sl st into the next dc to anchor. Ch 5. Continue in mesh pattern across until 3 mesh units remain. Work dc into last dc before those 3 rem units. Turn. (23 mesh units)
Row 28: Rep Row 2. (23 mesh units)
Row 29 (armhole row 2): Sl st across 1 mesh unit (3 sl sts). Ch 5. Continue in mesh pattern across until 1 mesh unit remains. Dc into last dc before remaining unit. Turn. (21 mesh units)
Rows 30 through 32: Rep Row 2. (21 mesh units each row)
After Row 32 your piece should measure approximately 16 inches (40.5 cm) from the cast-on edge.
V-Neckline Shaping: Left Shoulder
Row 33 (left shoulder, RS): Work 10 mesh units in pattern. Leave remaining sts unworked for right shoulder. Turn. (10 mesh units)
Row 34: Rep Row 2 across 10 mesh units. (10 mesh units)
Row 35 (neck decrease): Ch 5. Work 9 mesh units. Turn, leaving last mesh unit unworked at neck edge. (9 mesh units)
Row 36: Rep Row 2 across 9 mesh units. (9 mesh units)
Row 37 (neck decrease): Ch 5. Work 8 mesh units. (8 mesh units)
Row 38: Rep Row 2. (8 mesh units)
Row 39 (neck decrease): Ch 5. Work 7 mesh units. (7 mesh units)
Row 40: Rep Row 2. (7 mesh units)
Fasten off MC.
V-Neckline Shaping: Right Shoulder
With RS facing, skip the center dc of Row 32. Attach MC with sl st to the dc that begins the 11th mesh unit.
Row 33 (right shoulder, RS): Ch 5. Work 10 mesh units across to the panel edge. Turn. (10 mesh units)
Row 34: Rep Row 2. (10 mesh units)
Row 35 (neck decrease): Work 9 mesh units, ending before the last unit at the neck edge. Turn. (9 mesh units)
Row 36: Rep Row 2. (9 mesh units)
Row 37 (neck decrease): Work 8 mesh units. Turn. (8 mesh units)
Row 38: Rep Row 2. (8 mesh units)
Row 39 (neck decrease): Work 7 mesh units. Turn. (7 mesh units)
Row 40: Rep Row 2. (7 mesh units)
Fasten off MC. Front panel is complete.
Back Panel
Work identically to the front panel through Row 32. (21 mesh units)
Back Neckline Shaping
Row 33 (left back shoulder): Work 8 mesh units. Leave remaining 13 mesh units unworked. Turn. (8 mesh units)
Rows 34 through 40: Rep Row 2 across 8 mesh units. (8 mesh units)
Fasten off MC.
Row 33 (right back shoulder): With RS facing, skip the center 5 mesh units of Row 32 and attach MC to the dc at the start of the 14th mesh unit. Ch 5. Work 8 mesh units. Turn. (8 mesh units)
Rows 34 through 40: Rep Row 2 across 8 mesh units. (8 mesh units)
Fasten off MC.
Assembly
Step 1: Block each panel separately before seaming. Pin to measurements: 17 inches wide at bust, 14 inches wide at waist, 18 inches long. Allow to dry completely.
Step 2: Hold front and back panels with RS together. Seam each shoulder using a whipstitch, spanning 7 mesh units of width.
Step 3: With RS together, seam from the hem edge upward to the armhole using a whipstitch. Leave the armhole opening un-seamed. The side seam spans Rows 1 through 26.
Scallop Edging
Using MC and E-4 hook, work the scallop edging around all open edges.
Edging Row 1: Starting at any seam point on the hem edge, attach MC with RS facing. Ch 1. Work 1 sc into every dc post and 2 sc across each ch-2 space around the entire edge. Join with sl st to first sc.
Edging Row 2 (scallop): Sl st into next sc. [Skip 2 sc, 5 dc into next sc (shell), skip 2 sc, sl st into next sc] around. Join with sl st.
Fasten off. Repeat for both armhole openings and the neckline.
For the V-point of the front neckline, place 3 sl sts into the center dc of the V to accentuate the point rather than placing a shell there.
How Many Flower and Leaf Motifs to Make
Large flowers: 4 in Color A (dusty rose), 2 in Color C (soft peach)
Medium flowers: 6 in Color B (golden yellow), 4 in Color A
Small flowers: 6 in Color C, 4 in Color B
Leaves: 30 to 36 in Color E
Center bobbles: One for each large and medium flower in Color D
Flower and Leaf Placement
Pin all motifs to the blocked and seamed blouse before sewing. Each large flower cluster consists of 1 large flower at center, 2 to 3 medium flowers surrounding it, 2 to 3 small flowers at the outer edge, and 4 to 6 leaves filling gaps. Space clusters approximately 4 to 5 inches apart.
Sew using the long tail and yarn needle. Catch the mesh stitches beneath each motif so flowers sit securely without puckering.
Size Customization Tips
To adjust bust circumference, change the number of mesh units in your foundation chain. Each mesh unit adds approximately 0.75 inch (1.9 cm) to panel width. For every size up or down, add or subtract 4 mesh units to the starting count. Adjust the foundation chain by multiples of 3 to maintain the mesh repeat.
To lengthen the blouse, add rows evenly between the armhole rows and the hem.
Final Blocking and Care
Weave in all ends before final blocking. Wet block using lukewarm water and gentle wool wash. Pin to finished measurements with scallop edges pinned open and flowers shaped so they stay dimensional. Allow 24 to 48 hours to dry.
For acrylic yarn, steam lightly instead of wet blocking. Do not press directly onto the fabric.
Hand wash in cool water with gentle detergent. Lay flat to dry. Do not machine wash or tumble dry. Store folded flat to preserve the mesh shape.
You Did It!
Thank you so much for choosing this pattern for your next project. I truly hope you love making this blouse as much as I loved designing it. There is something so satisfying about creating a wearable piece with this much personality and vintage charm.
If you make this Sunset Garden Floral Crochet Blouse, I would absolutely love to see it! Tag me on Instagram or share a photo in my Facebook group. Seeing your finished projects is genuinely the best part of my day.
If you want to come back to this crochet tutorial later, save it to your Pinterest boards so you can find it easily. And please drop a comment below if you give this one a try. I read every single one and love hearing how your projects turn out!
You Might Also Like
- Autumn Harvest Sunflower Granny Tote Free Crochet Pattern
- Dusty Rose Pink Crochet Backpack Free Pattern
- Mint Green Spring Purse Free Crochet Pattern
- Sunshine Yellow Baby Crochet Pinafore Free Pattern
