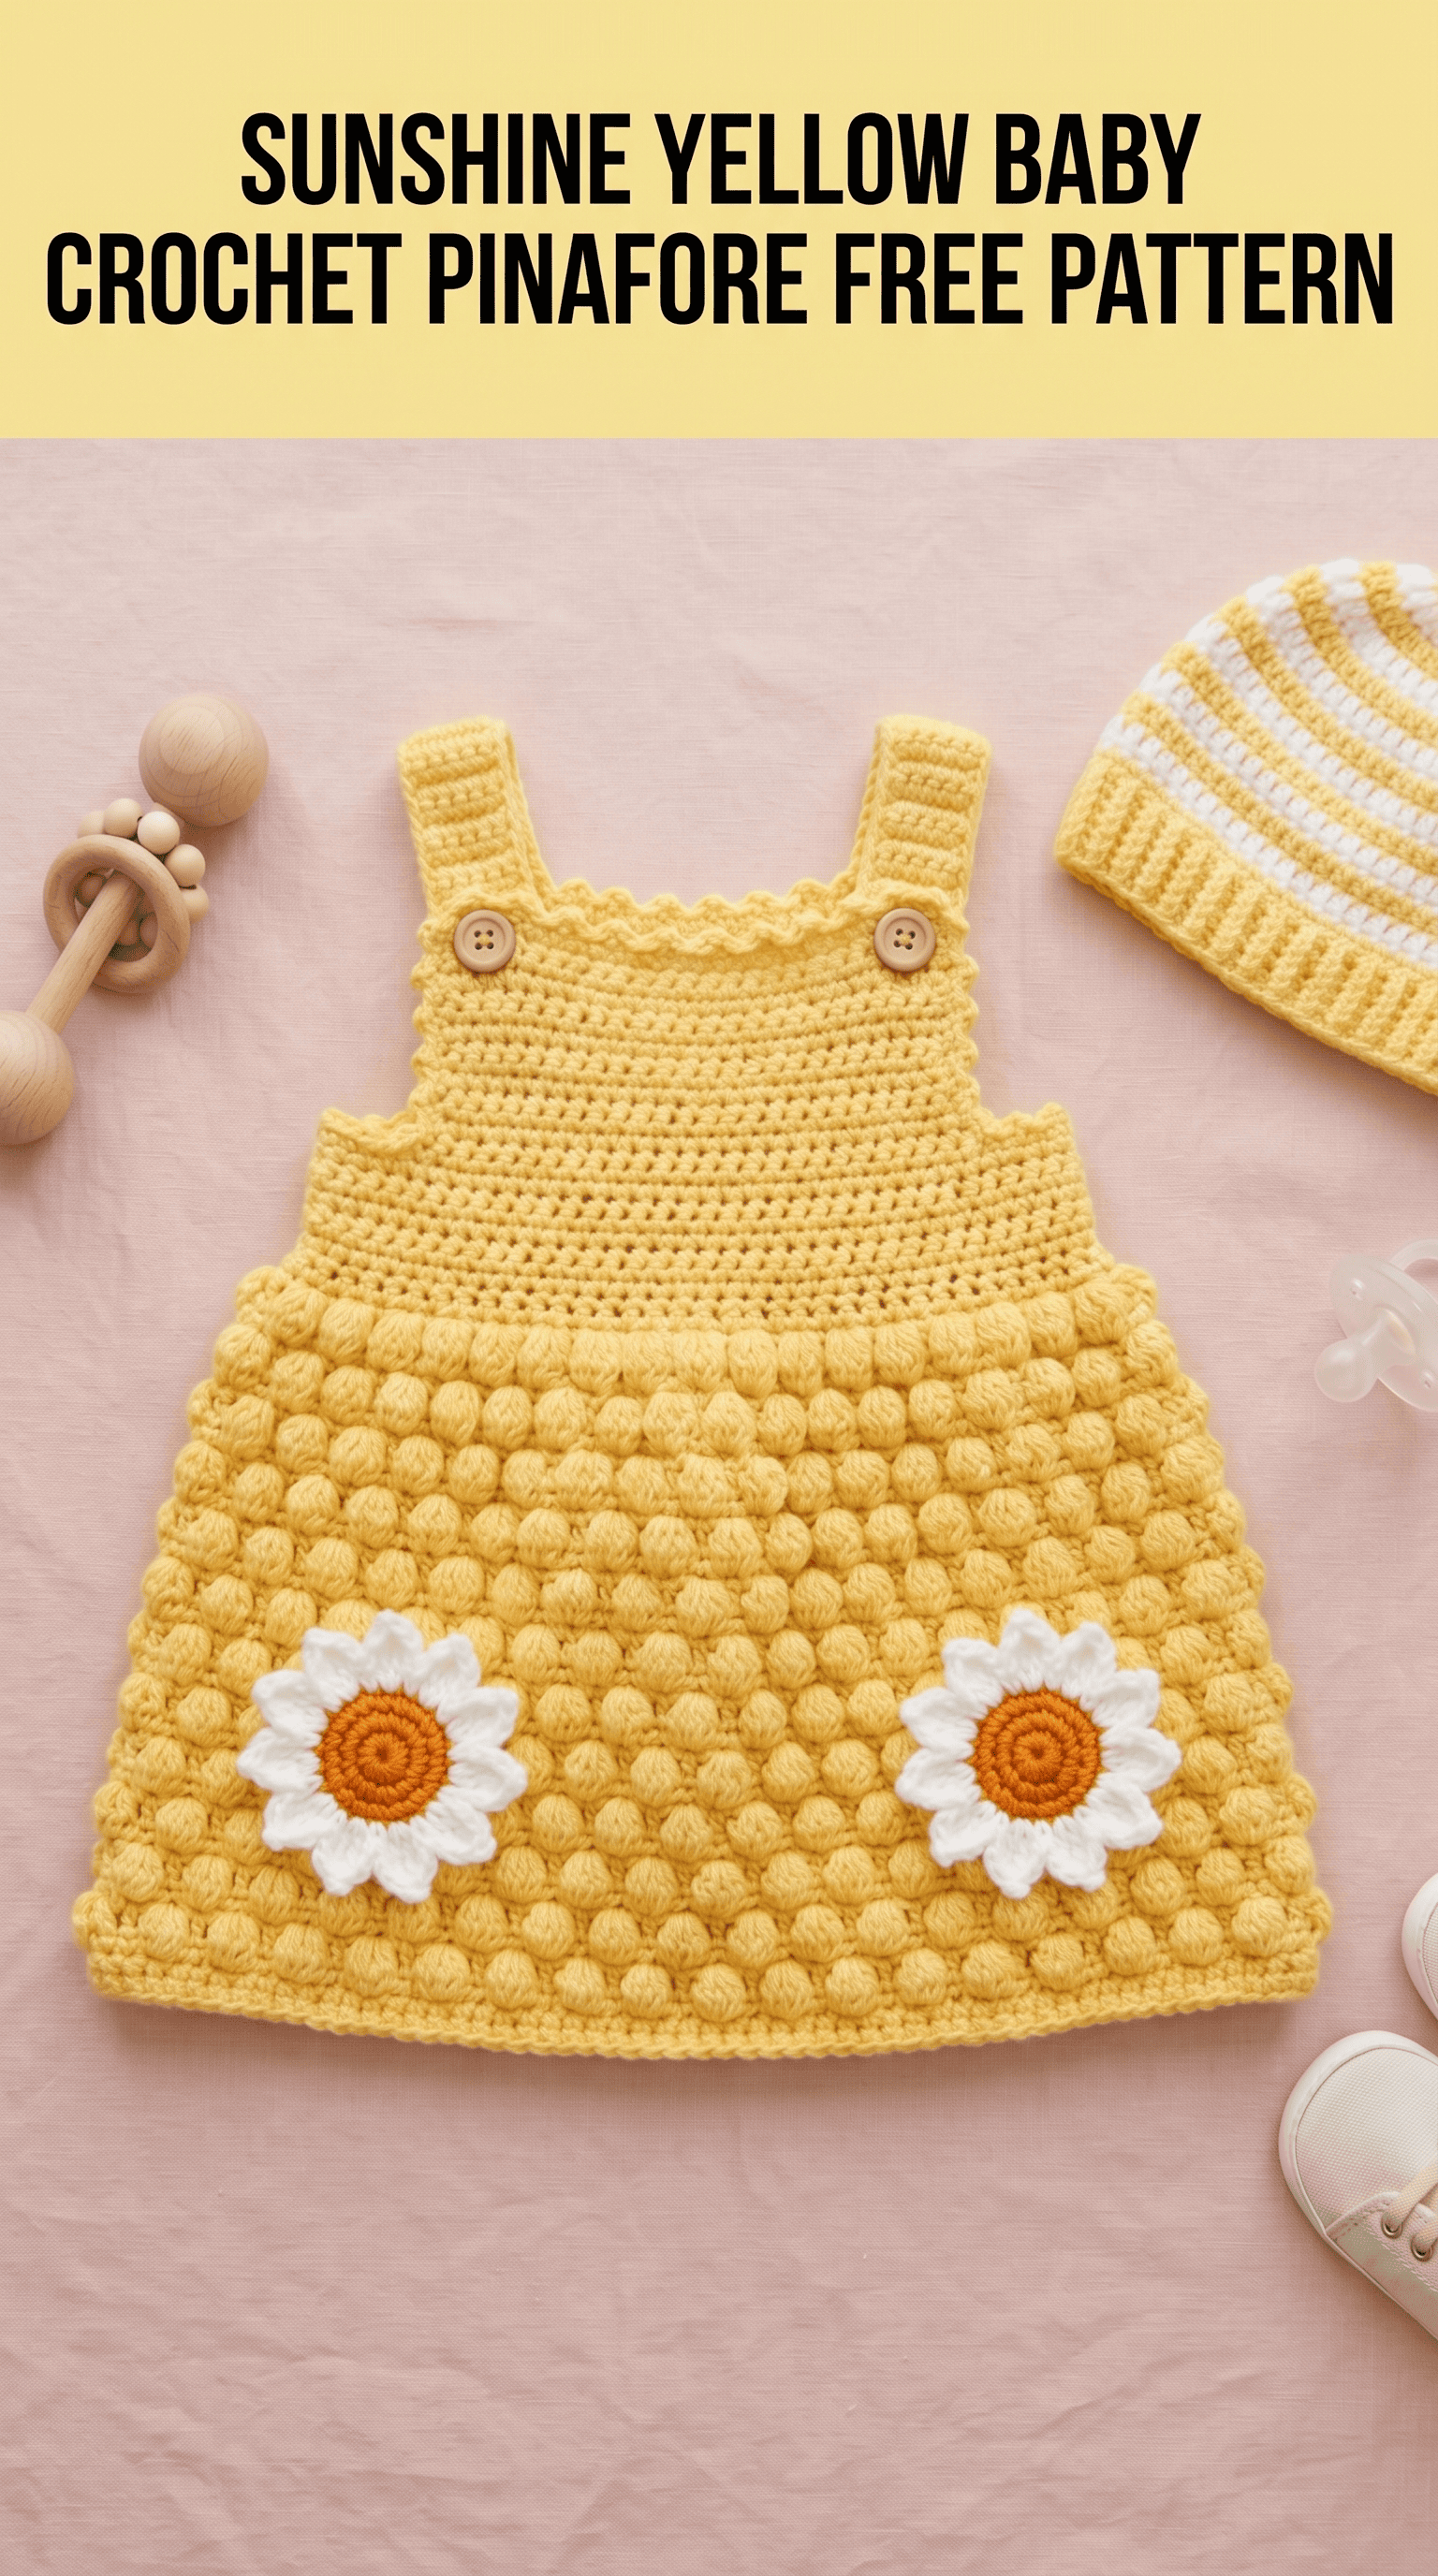
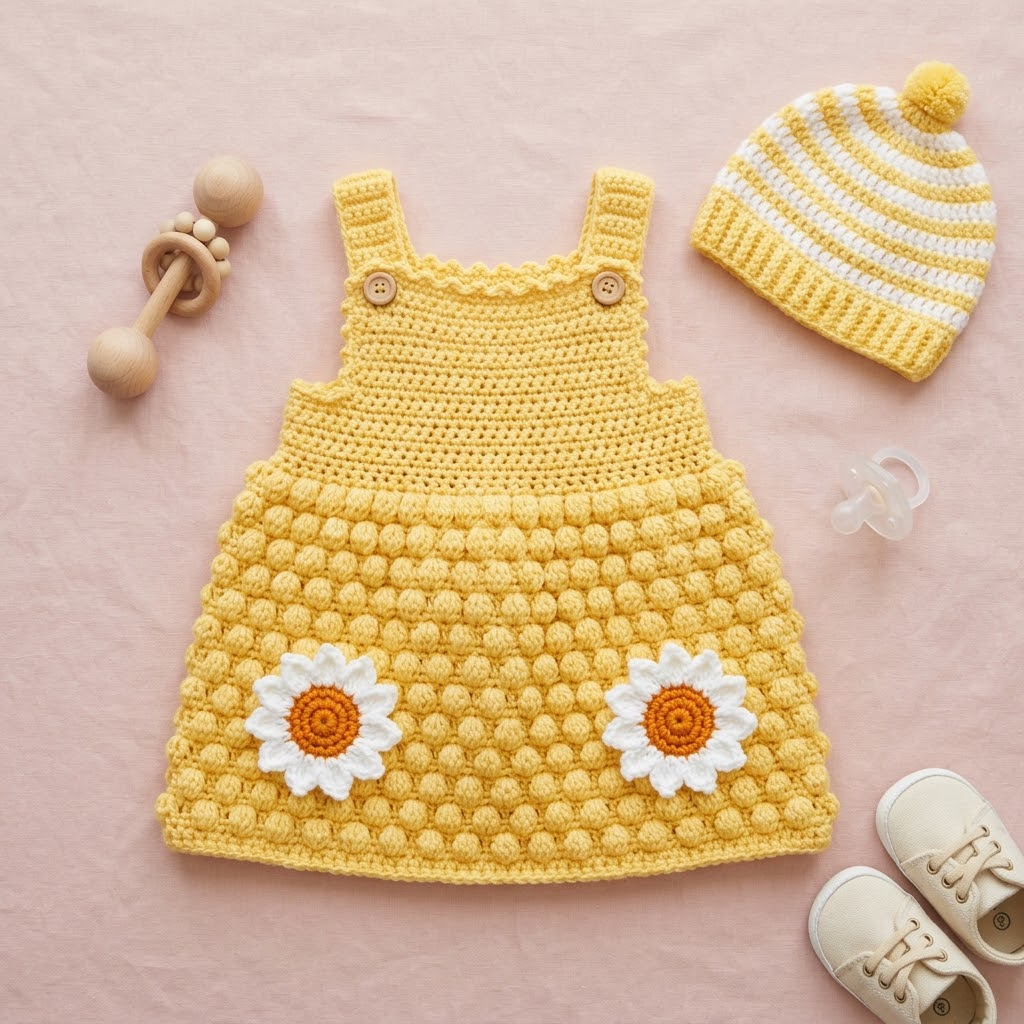
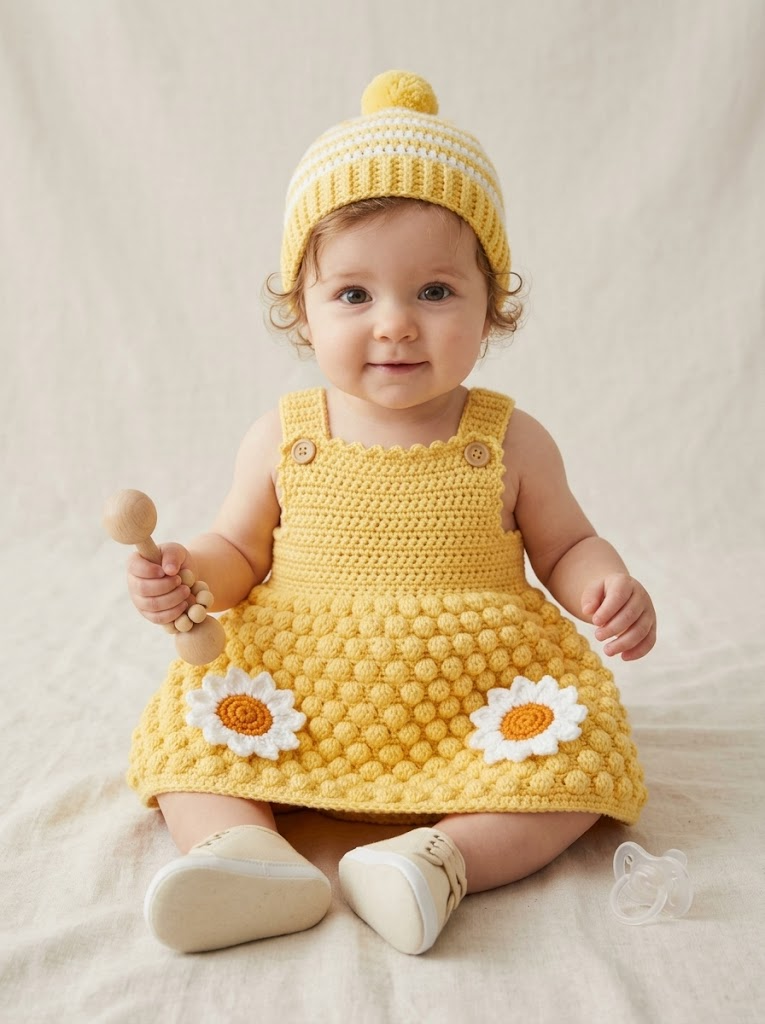
There’s something about a bright yellow baby dress that just radiates happiness. This sunshine yellow baby crochet pinafore with its adorable bobble stitch skirt and sweet daisy appliqués has become one of my absolute favorite projects to make. And the matching striped beanie with a pom pom? It takes the whole set to another level of cute.
I designed this pattern with confident beginners in mind. If you can work basic stitches and you’re ready to try something with a little texture, you’ve got this. The bobble stitch looks impressive but I promise it’s easier than it appears. I’ll walk you through every single step.
Let’s make something beautiful together.
Why You’ll Love This Baby Pinafore Crochet Pattern
This isn’t just another baby dress pattern. The combination of textures makes it truly special. You’ve got a smooth single crochet bodice up top, then that gorgeous bobble stitch skirt below that adds so much dimension and visual interest. The two crocheted daisy appliqués sewn onto the front give it a cheerful springtime feel.
The construction is straightforward. You’ll work the bodice flat, then join and work the skirt in rows. The straps attach with decorative wooden buttons for an adjustable fit. Smart, right? Baby grows, you move the button.
This pinafore fits approximately 6 to 12 months. The matching beanie fits the same size range.
Materials Needed for the Baby Pinafore Dress
Gather these supplies before you start. Having everything ready makes the process so much smoother.
Yarn:
For the matching beanie:
I recommend a soft acrylic or cotton blend yarn. Babies need something machine washable and gentle against sensitive skin. Look for yarns labeled “baby soft” or similar.
Hook:
Notions:
Gauge for This Crochet Tutorial
Getting gauge right matters here. It affects the final size of your pinafore.
Gauge: 14 single crochet stitches and 16 rows = 4 inches (10cm) using 5.0mm hook
Work a small swatch before starting. If your swatch is too big, go down a hook size. Too small? Go up a hook size. Don’t skip this step, especially for garments.
Abbreviations and Stitch Definitions
Let me explain every stitch you’ll use. Read through these before starting so nothing catches you off guard.
ch = chain: Wrap yarn over hook, pull through loop on hook. This creates your foundation.
sl st = slip stitch: Insert hook, yarn over, pull through stitch AND loop on hook in one motion. Used for joining.
sc = single crochet: Insert hook into stitch, yarn over and pull up a loop (2 loops on hook), yarn over and pull through both loops. Your most basic stitch.
hdc = half double crochet: Yarn over, insert hook into stitch, yarn over and pull up a loop (3 loops on hook), yarn over and pull through all 3 loops.
dc = double crochet: Yarn over, insert hook into stitch, yarn over and pull up a loop (3 loops on hook), yarn over and pull through 2 loops, yarn over and pull through remaining 2 loops.
bob = bobble stitch: Work 5 double crochet stitches into the same stitch, but stop before the final yarn over on each one (leaving 2 loops on hook each time). You’ll have 6 loops on your hook total. Yarn over and pull through all 6 loops at once. This creates that beautiful puffy texture. Push the bobble to the right side of your work as you complete it.
inc = increase: Work 2 stitches into the same stitch.
dec = decrease: Work 2 stitches together as one.
Step by Step Crochet Pattern for the Pinafore Bodice
Now we’re getting to the good part. Take a breath. You’ve got this.
Front Bodice Panel
Foundation: With MC and 5.0mm hook, ch 41.
Row 1: Sc in 2nd ch from hook and in each ch across. (40 sts)
Row 2: Ch 1, turn. Sc in each st across. (40 sts)
Rows 3 through 18: Repeat Row 2. (40 sts)
At this point, you have a rectangle measuring approximately 11 inches wide and 4.5 inches tall.
Shape Armholes
Row 19: Ch 1, turn. Sl st in first 4 sts, sc in next 32 sts, leave remaining 4 sts unworked. (32 sts)
Row 20: Ch 1, turn. Sc2tog over first 2 sts, sc across to last 2 sts, sc2tog. (30 sts)
Rows 21 through 24: Ch 1, turn. Sc in each st across. (30 sts)
Shape Neckline
Row 25: Ch 1, turn. Sc in first 10 sts. Leave remaining stitches unworked. You’ll come back for the other side.
Row 26: Ch 1, turn. Sc2tog, sc in remaining 8 sts. (9 sts)
Rows 27 through 30: Ch 1, turn. Sc in each st across. (9 sts)
Fasten off. This completes the left shoulder.
Right Shoulder
Join yarn with sl st in the 21st stitch of Row 24 (counting from the right edge).
Row 25: Ch 1, sc in same st and in next 9 sts. (10 sts)
Row 26: Ch 1, turn. Sc in first 8 sts, sc2tog. (9 sts)
Rows 27 through 30: Ch 1, turn. Sc in each st across. (9 sts)
Fasten off.
Back Bodice Panel
Work exactly the same as the Front Bodice Panel, including armhole and neckline shaping.
The Bobble Stitch Skirt Section
This is where the magic happens. The bobble stitch creates that gorgeous textured look you see in the photos. Don’t be intimidated. Once you get into a rhythm, it flows beautifully.
Joining Front and Back
Place front and back bodice pieces with wrong sides together. Using MC, join with sl st at the bottom right corner. Working through both layers, sc evenly along the bottom edge of both pieces to join them.
You should have approximately 80 stitches around the entire bottom edge when joined into a round. Place a stitch marker at the beginning of your round.
Working the Skirt
Round 1: Ch 1, sc in each st around. Join with sl st to first sc. (80 sts)
Round 2: Ch 1, sc in each st around. Join. (80 sts)
Round 3 (bobble round): Ch 1, sc in first st, *bob in next st, sc in next st* repeat around. Join. (40 bobbles, 40 sc)
Round 4: Ch 1, sc in each st around. Join. (80 sts)
Round 5: Ch 1, *sc in first st, bob in next st* repeat around. Join. (40 sc, 40 bobbles)
This creates the offset bobble pattern where the bobbles on Round 5 sit between the bobbles on Round 3. That checkerboard effect is what makes this skirt so visually appealing.
Rounds 6 through 25: Continue alternating bobble placement every other round, with a plain sc round between each bobble round.
Your skirt should measure approximately 7 inches from the bottom of the bodice.
Skirt Edging
Final Round: Ch 1, sc in each st around. Join. Fasten off. (80 sts)
Crocheted Straps for the Pinafore
The straps are simple but they need to be sturdy.
Make 2.
With MC and 5.0mm hook, ch 7.
Row 1: Sc in 2nd ch from hook and in each ch across. (6 sts)
Rows 2 through 30: Ch 1, turn. Sc in each st across. (6 sts)
Fasten off, leaving a long tail for sewing.
Each strap should measure approximately 7.5 inches long.
Daisy Appliqué Tutorial
These sweet daisies add so much personality. You’ll make 2.
Daisy Center
With CB (orange) and 4.0mm hook, create a magic ring.
Round 1: Ch 1, work 6 sc into ring. Pull ring closed tightly. Join with sl st. (6 sts)
Round 2: Ch 1, 2 sc in each st around. Join. (12 sts)
Round 3: Ch 1, sc in each st around. Join. (12 sts)
Fasten off, leaving a tail for sewing.
Daisy Petals
Join CA (white) to any stitch of the orange center.
Petal Round: *Ch 6, sl st in 2nd ch from hook, sc in next ch, hdc in next ch, dc in next 2 ch, sl st in next st of center* repeat around. (12 petals)
Fasten off. Weave in ends on the back of the daisy.
Matching Striped Beanie Pattern
Let’s complete the set with this adorable coordinating hat.
Beanie Crown
With yellow and 5.0mm hook, create a magic ring.
Round 1: Ch 1, 6 sc into ring. Join. (6 sts)
Round 2: Ch 1, 2 sc in each st around. Join. (12 sts)
Round 3: Ch 1, *sc in first st, 2 sc in next st* around. Join. (18 sts)
Round 4: Ch 1, *sc in next 2 sts, 2 sc in next st* around. Join. (24 sts)
Round 5: Ch 1, *sc in next 3 sts, 2 sc in next st* around. Join. (30 sts)
Round 6: Ch 1, *sc in next 4 sts, 2 sc in next st* around. Join. (36 sts)
Round 7: Ch 1, *sc in next 5 sts, 2 sc in next st* around. Join. (42 sts)
Round 8: Ch 1, *sc in next 6 sts, 2 sc in next st* around. Join. (48 sts)
Beanie Body with Stripes
Now work even in stripes, alternating 2 rounds yellow and 2 rounds white.
Rounds 9 through 24: Ch 1, sc in each st around. Join. Change colors every 2 rounds. (48 sts)
Ribbed Brim
Continue with yellow only.
Rounds 25 through 30: Ch 1, working in back loops only, sc in each st around. Join. (48 sts)
Working in back loops creates that stretchy ribbed texture you see at the bottom of the hat.
Fasten off. Weave in all ends.
Making the Pom Pom
Wrap yellow yarn around a 2 inch piece of cardboard approximately 50 times. Slide yarn off carefully. Tie a piece of yarn tightly around the center. Cut the loops on both sides. Trim into a neat sphere. Sew securely to the top of the beanie.
Assembly and Finishing
Almost done. Let’s put it all together.
Sew the side seams of the bodice from the armhole down to where the skirt begins. Use a yarn needle and mattress stitch for a nearly invisible seam.
Attach the straps to the back bodice at the shoulder area. Position them about 2 inches from each side edge. Sew securely.
Sew buttons to the front bodice where the straps will attach. Space them to match your strap width. The buttonhole naturally forms between stitches on the strap ends.
Attach the daisies to the lower front of the skirt, positioning them a few inches apart and a couple inches up from the bottom edge. Use white yarn and small stitches through the center only, so the petals stay free and dimensional.
Weave in all remaining ends. I cannot stress this enough. A garment with loose ends will unravel over time.
Block if desired. Lay flat on a towel, shape gently, and let dry completely.
Tips for Success
A few things I’ve learned making this pattern multiple times:
Push those bobbles firmly to the front as you work them. They can be shy and try to hide on the wrong side.
Count your stitches after each row of the bodice. Getting off count here will throw off your armhole shaping later.
Use stitch markers liberally. Mark the beginning of rounds, mark where you need to make increases, mark anything that helps you stay on track.
When changing colors on the beanie, carry the unused yarn up the inside loosely. This prevents a lot of extra ends to weave in.
Wrapping Up This Baby Pinafore Crochet Pattern
You just worked through a complete crochet pattern for a beautiful sunshine yellow baby pinafore with a matching striped beanie. That’s no small accomplishment. The bobble stitch skirt, the sweet daisy details, the coordinating hat. You created a keepsake that any baby would look adorable wearing.
I truly hope you enjoyed making this project as much as I enjoyed designing it for you. These are the kinds of pieces that become treasured gifts, photographed and remembered for years.
Thank you so much for choosing this pattern and trusting me to guide you through it. It means more than you know.
I would absolutely love to see your finished pinafore. Tag me on Instagram or share your photos on Facebook. Seeing your creations genuinely makes my day brighter.
Happy crocheting, friend. You did something wonderful today.
