
THIS is the project that will have everyone asking where you bought it. Seriously. The Coastal Blue Wave Stitch Bodysuit looks like something straight off a boutique rack, but you can crochet it yourself in about 20 to 30 hours. The wave stitch creates those gorgeous horizontal ripples across the entire piece, and the fitted silhouette flatters like nothing else.
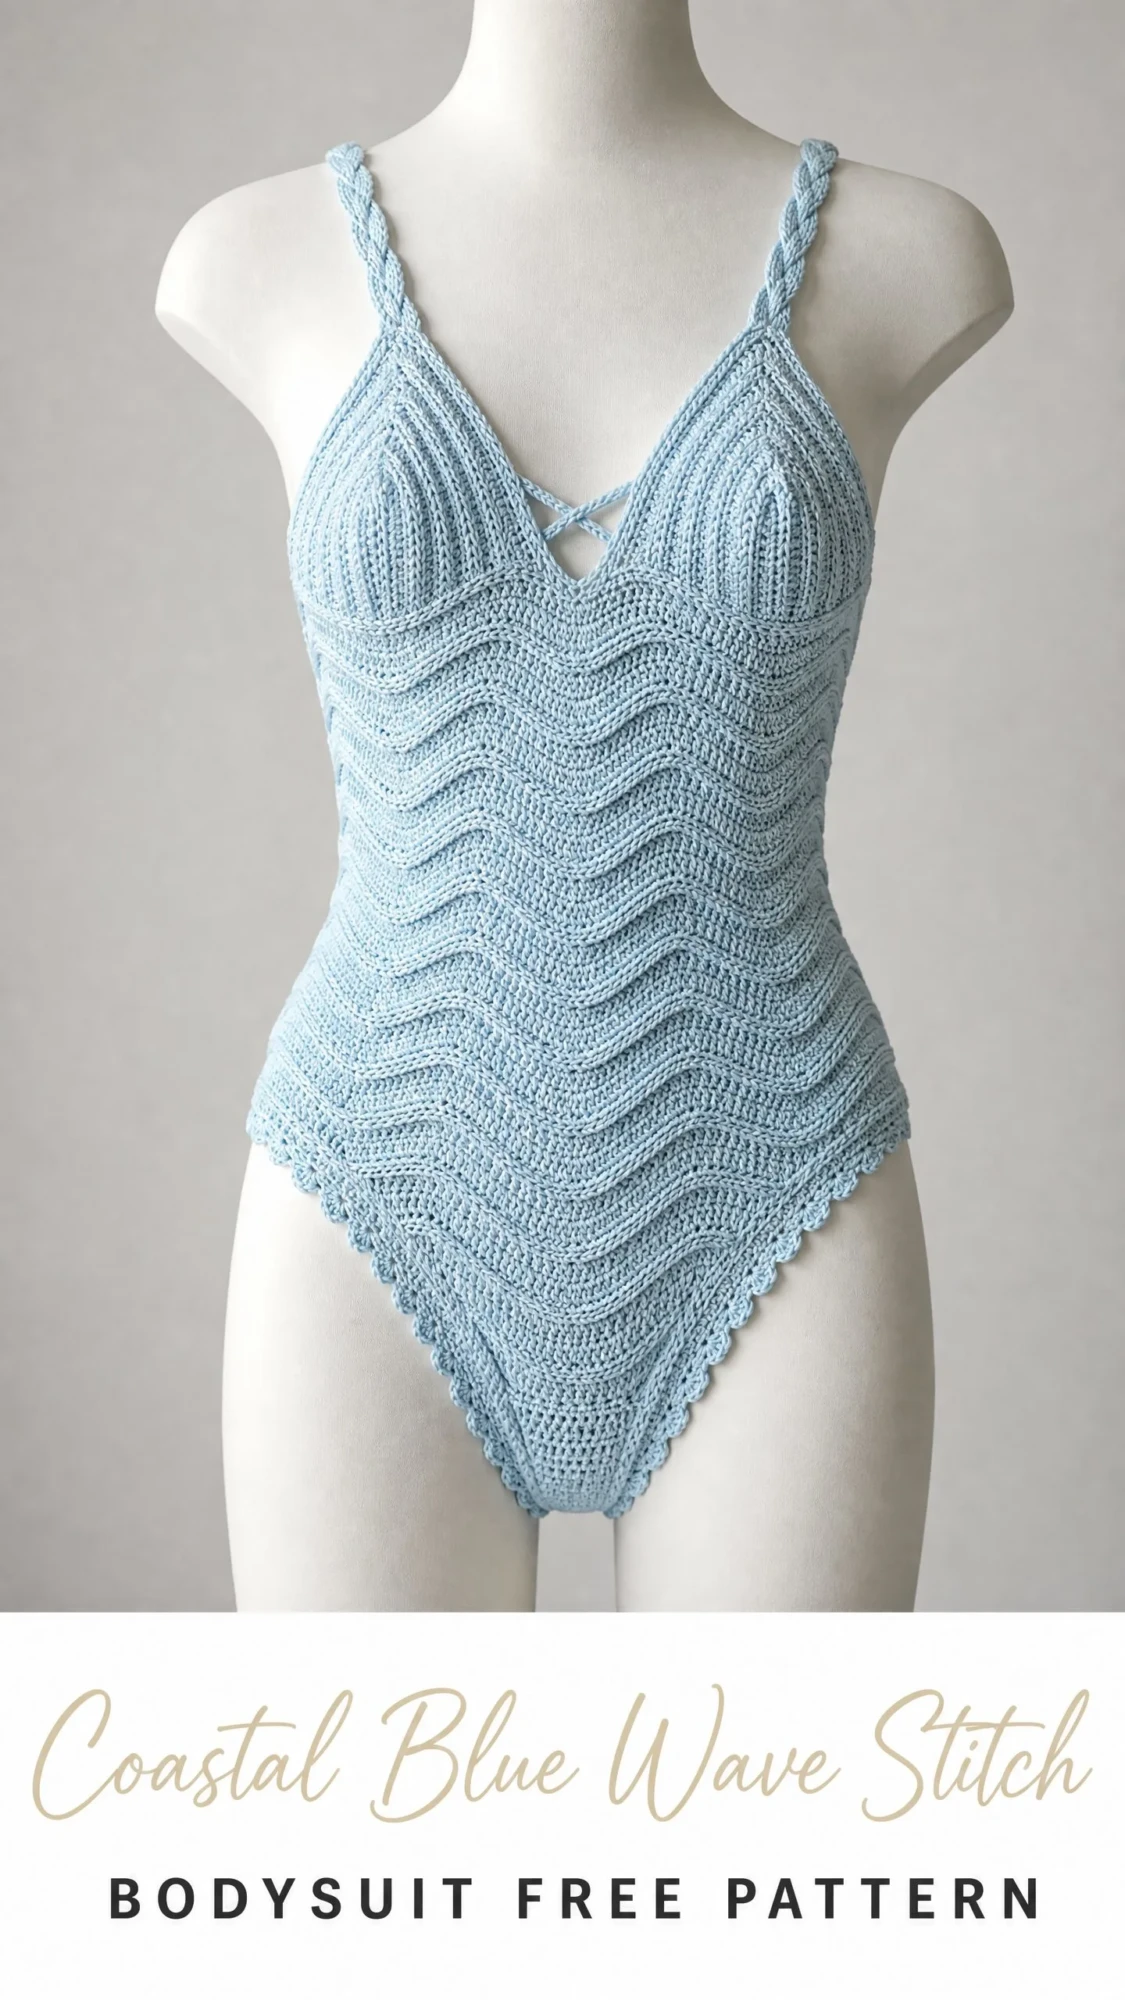
I know what you might be thinking. A crocheted bodysuit sounds complicated. But here is the thing. If you can single crochet and double crochet, you can absolutely make this. The wave pattern has a rhythm to it, and once you get going, your hands just know what to do next.
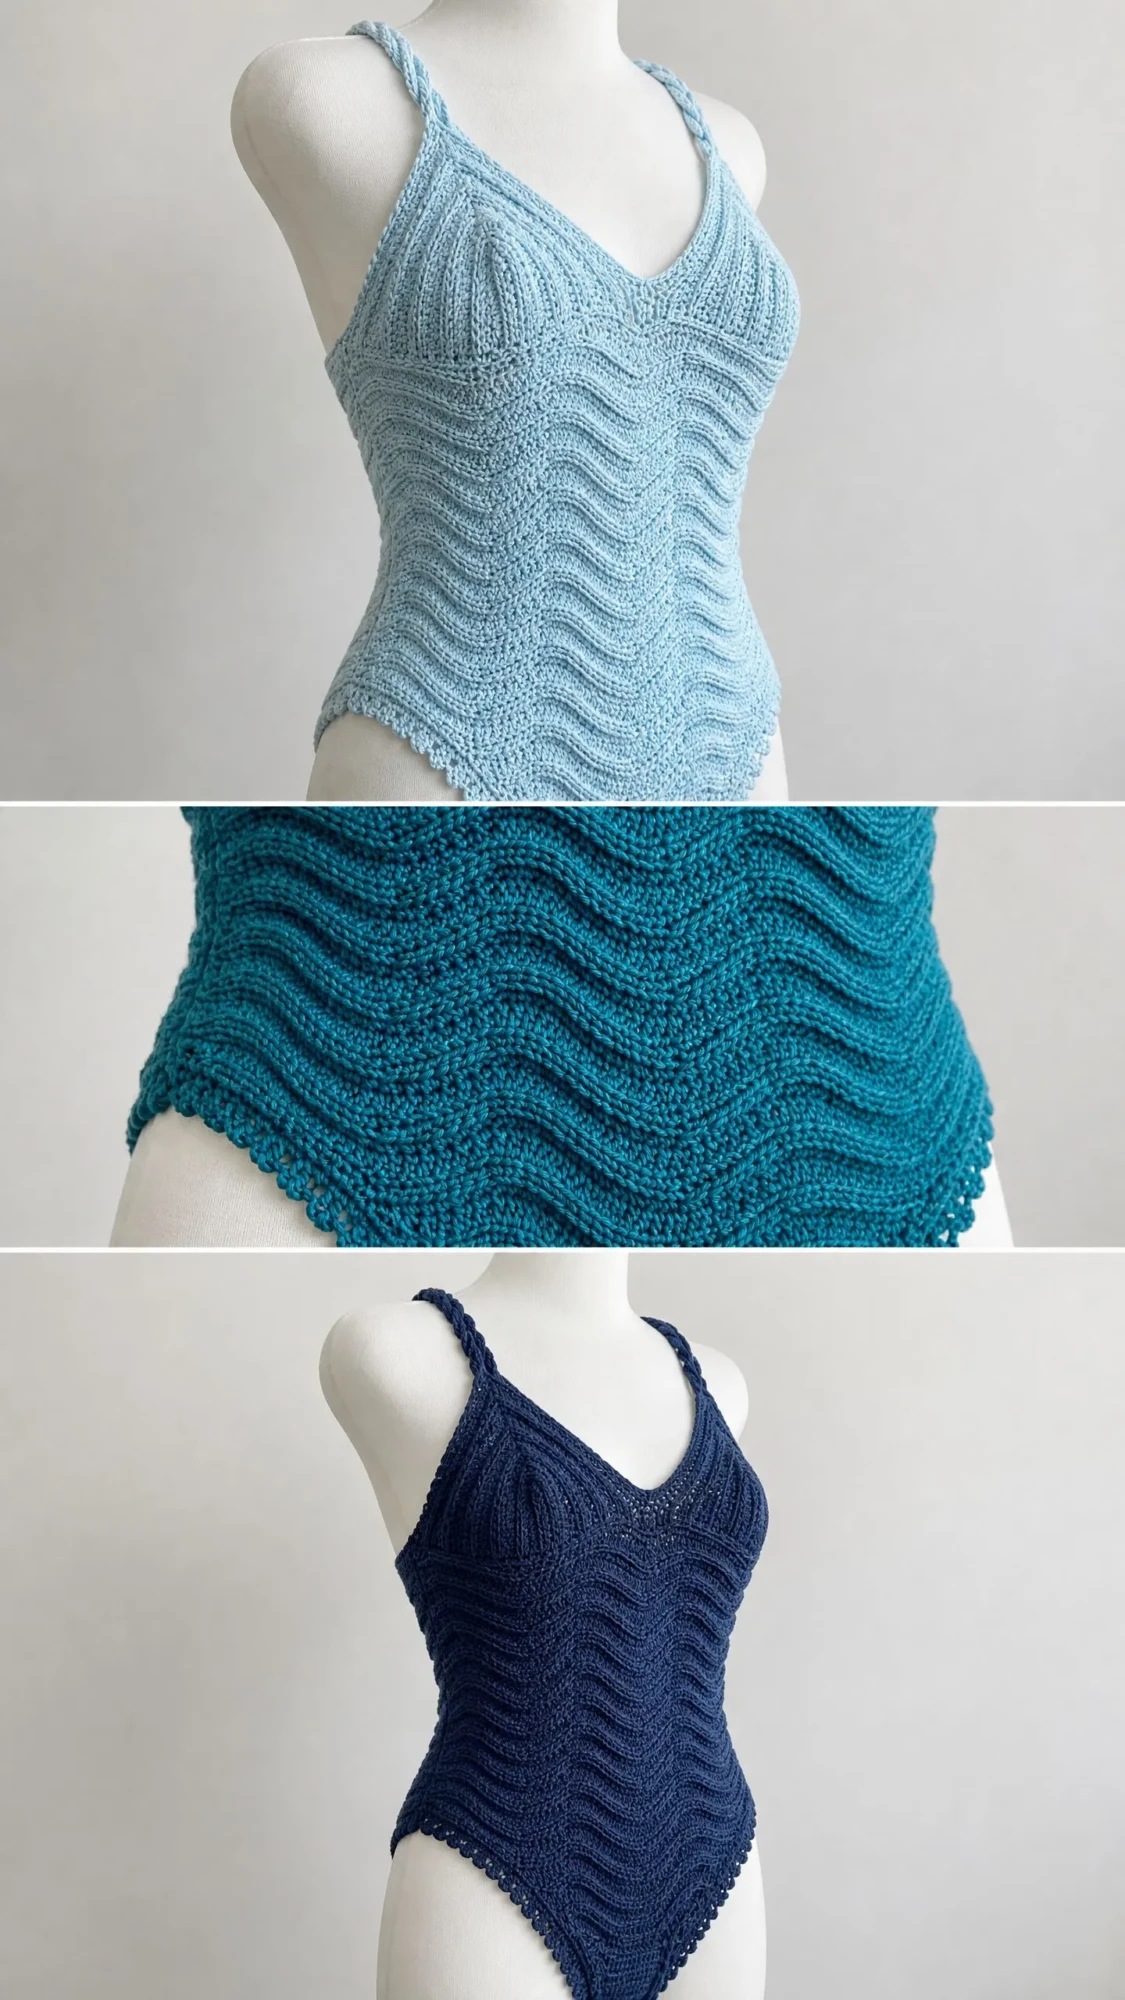
Whether you make it in pale sky blue, deep teal, or rich navy like the samples shown, this bodysuit is going to become your favorite summer statement piece. Let me walk you through everything you need to know to create your own.
Why This Crochet Bodysuit Pattern Works So Well
The wave stitch, sometimes called ripple stitch or chevron wave stitch, creates that beautiful undulating texture you see running horizontally across the torso. It looks intricate, but the stitch pattern is actually quite straightforward once you understand the rhythm.
The bodysuit is constructed as two flat panels, a front and a back, that you seam together at the sides. This means no working in the round, no complicated joins mid-project, and easy shaping along the way. The V-neckline on both front and back gives it that elegant vintage swimsuit vibe, while the braided shoulder straps add a beautiful handcrafted detail that crosses at the back.
The scallop edge hem at the leg openings provides a feminine finish that elevates the whole piece. Every element works together to create something that looks designer but is completely achievable at home.
Materials You Will Need
Gathering your supplies before you start keeps the project flowing smoothly. Here is everything the pattern calls for.
Yarn: Approximately 500 to 650 yards of size 3 light DK weight cotton or cotton blend yarn. Cotton is strongly recommended because it holds its shape, has good stretch recovery, and feels comfortable against skin.
Some excellent yarn options include:
Hook: US size D-3 / 3.25 mm crochet hook, or whatever size you need to match gauge.
Additional tools:
Gauge (Do Not Skip This)
22 stitches x 20 rows = 4 inches / 10 cm in wave stitch pattern worked flat, blocked.
I cannot stress this enough. Gauge matters so much for a fitted garment like this. A difference of even one stitch per inch will completely change how this fits. Crochet a swatch that covers at least one full repeat of the wave stitch (11 stitches equals one repeat). Block your swatch before measuring because cotton relaxes with washing.
If your swatch is too small, go up a hook size. Too large, go down. Take the time to get this right and you will be so happy with the results.
Finished Measurements
This pattern is written for a women’s size Small (US 4-6) with the following measurements:
Size customization tips are included at the end of the pattern.
Abbreviations and Stitch Definitions
Let me break down every abbreviation you will see in this pattern. If you are newer to crochet patterns, bookmark this section.
Special Stitches Explained
Wave Stitch
This is the signature stitch that creates those beautiful ripples. It is worked over a multiple of 11 stitches plus 2 for the border.
Wave Row (RS): Ch 1 (does not count as a stitch), 1 sc in first st, [skip 1 st, 5 dc in next st (shell made), skip 1 st, sc in next st, sc in next st, sc in next st, sc2tog over next 2 sts, sc in next st, sc in next st] across, ending with 1 sc in last st.
Plain Row (WS): Ch 1, 1 sc in each stitch across.
These two rows alternate throughout the body of the bodysuit.
Here is the clever part. Each shell of 5 double crochets adds stitches, but each sc2tog (single crochet two together) removes one stitch. They balance out perfectly, so your stitch count stays the same across every row.
SC2TOG (Single Crochet Two Together)
This is your decrease stitch. Insert hook in next stitch, pull up loop, insert hook in following stitch, pull up loop, yarn over, draw through all 3 loops on hook. This counts as 1 stitch.
Shell
Work 5 double crochets all into the same stitch. This fans out and creates the peak of each wave. It counts as 5 stitches.
Scallop Edge
[Skip 2 sts, 5 dc in next st, skip 2 sts, sl st in next st] across. Each scallop uses 6 stitches.
Braided Strap
Make 3 separate crochet chains of equal length. Align them together and braid as you would braid hair. Knot or stitch the ends securely.
Step by Step Crochet Pattern Instructions
Front Panel
The front panel is worked in one piece from the bottom crotch edge up to the start of the V-neck split, then divided into left and right cups.
Starting Chain and Foundation
Ch 90.
Foundation Row (WS): Sc in 2nd ch from hook, sc in each ch across. Turn. (88 sc)
Scallop Hem
Row 1 (RS, Scallop): Ch 1, 1 sc in first st, [skip 2 sts, 5 dc in next st, skip 2 sts, sl st in next st] 14 times, 1 sc in last st. Turn. (14 scallops completed; 88 stitches maintained across edge)
Pick-up Row (WS): Ch 1, working into the tops of the scallop stitches, sc 88 stitches evenly across. Turn. (88 sc)
Hip Section (Rows 1 to 16)
This section measures approximately 3.2 inches / 8 cm.
Row 1 (RS, Wave Row): Ch 1, 1 sc in first st, [sk 1 st, 5 dc in next st, sk 1 st, sc in next st, sc in next st, sc in next st, sc2tog, sc in next st, sc in next st] 8 times, 1 sc in last st. Turn. (88 sts)
Row 2 (WS, Plain Row): Ch 1, sc in each st across. Turn. (88 sc)
Rows 3 to 16: Rep Rows 1 and 2 seven more times. (88 sc after every row)
After Row 16, your panel should measure approximately 3.2 inches from the pick-up row. Width should be approximately 16 inches. This is the fullest hip point.
Waist Shaping (Rows 17 to 28)
This section measures approximately 2.4 inches / 6 cm. You will decrease on the Plain Rows only, at each end of the row.
Row 17 (RS, Wave Row): Rep Row 1. Turn. (88 sts)
Row 18 (WS, Decrease Row): Ch 1, sc2tog over first 2 sts, sc in each st across to last 2 sts, sc2tog. Turn. (86 sc)
Row 19 (RS, Wave Row): Ch 1, 1 sc in first st, [sk 1 st, 5 dc in next st, sk 1 st, sc in next st, sc in next st, sc in next st, sc2tog, sc in next st, sc in next st] 7 times, sk 1 st, 5 dc in next st, sk 1 st, sc in next st, sc in next st, sc in next st, 1 sc in last st. Turn. (86 sts)
Row 20 (WS, Decrease Row): Ch 1, sc2tog over first 2 sts, sc across to last 2 sts, sc2tog. Turn. (84 sc)
Row 21 (RS, Wave Row): Ch 1, 1 sc in first st, [sk 1, 5 dc in next, sk 1, sc, sc, sc, sc2tog, sc, sc] 7 times, sk 1, 5 dc in next, sc, 1 sc in last. Turn. (84 sts)
Row 22 (WS, Decrease Row): Ch 1, sc2tog, sc across to last 2 sts, sc2tog. Turn. (82 sc)
Row 23 (RS, Wave Row): Work wave row across 82 sts as established. Turn. (82 sts)
Row 24 (WS, Plain Row): Ch 1, sc across. Turn. (82 sc)
Row 25 (RS, Wave Row): Work wave row across 82 sts. Turn. (82 sts)
Row 26 (WS, Decrease Row): Ch 1, sc2tog, sc across to last 2 sts, sc2tog. Turn. (80 sc)
Row 27 (RS, Wave Row): Work wave row across 80 sts. Turn. (80 sts)
Row 28 (WS, Plain Row): Ch 1, sc across. Turn. (80 sc)
After Row 28, your panel should measure approximately 5.6 inches from pick-up row. Width at Row 28 should be approximately 14.5 inches, representing the narrowest waist point.
Bust Shaping (Rows 29 to 44)
This section measures approximately 3.2 inches / 8 cm. You will increase on Plain Rows at each end.
Row 29 (RS, Wave Row): Work wave row across 80 sts. Turn. (80 sts)
Row 30 (WS, Increase Row): Ch 1, 2 sc in first st, sc across to last st, 2 sc in last st. Turn. (82 sc)
Row 31 (RS, Wave Row): Work wave row across 82 sts. Turn. (82 sts)
Row 32 (WS, Increase Row): Ch 1, 2 sc in first st, sc across to last st, 2 sc in last st. Turn. (84 sc)
Row 33 (RS, Wave Row): Work wave row across 84 sts. Turn. (84 sts)
Row 34 (WS, Increase Row): Ch 1, 2 sc in first st, sc across to last st, 2 sc in last st. Turn. (86 sc)
Row 35 (RS, Wave Row): Work wave row across 86 sts. Turn. (86 sts)
Row 36 (WS, Increase Row): Ch 1, 2 sc in first st, sc across to last st, 2 sc in last st. Turn. (88 sc)
Row 37 (RS, Wave Row): Work wave row across 88 sts. Turn. (88 sts)
Row 38 (WS, Plain Row): Ch 1, sc across. Turn. (88 sc)
Rows 39 to 44: Rep Rows 37 and 38 three more times. (88 sc after every row)
After Row 44, your panel should measure approximately 8.8 inches from the pick-up row. Width is back to 16 inches at the bust.
V-Neck Cup Split
Place a stitch marker at stitch 44 (the center stitch). You will work each half separately.
Right Cup (Stitches 1 to 44)
Row 45 (RS, Wave Row, right cup): Ch 1, 1 sc in first st, [sk 1, 5 dc in next, sk 1, sc, sc, sc, sc2tog, sc, sc] 3 times, sk 1, 5 dc in next, sk 1, sc, sc, sc, sc2tog, 1 sc in last (44th) st. Turn. (44 sts)
Row 46 (WS, Plain Row): Ch 1, sc across 44 sts. Turn. (44 sc)
Now you will decrease 1 stitch at the inner (center) edge of each RS row to create the V-neckline slope.
Row 47 (RS, Wave Row with neck decrease): Work wave row across to last 2 sts at center edge, sc2tog. Turn. (43 sts)
Row 48 (WS, Plain Row): Ch 1, sc across. Turn. (43 sc)
Row 49 (RS, Wave Row with neck decrease): Work wave row across to last 2 sts at center edge, sc2tog. Turn. (42 sts)
Row 50 (WS, Plain Row): Ch 1, sc across. Turn. (42 sc)
Row 51 (RS, neck dec): Work wave row to last 2 center edge sts, sc2tog. Turn. (41 sts)
Row 52 (WS, Plain Row): Ch 1, sc across. Turn. (41 sc)
Row 53 (RS, neck dec): Work wave row to last 2 center edge sts, sc2tog. Turn. (40 sts)
Row 54 (WS, Plain Row): Ch 1, sc across. Turn. (40 sc)
Row 55 (RS, neck dec): Work wave row to last 2 center edge sts, sc2tog. Turn. (39 sts)
Row 56 (WS, Plain Row): Ch 1, sc across. Turn. (39 sc)
Row 57 (RS, neck dec): Work wave row to last 2 center edge sts, sc2tog. Turn. (38 sts)
Row 58 (WS, Plain Row): Ch 1, sc across. Turn. (38 sc)
Row 59 (RS, no further neck dec): Work wave row across. Turn. (38 sts)
Row 60 (WS, Plain Row): Ch 1, sc across. Turn. (38 sc)
Rows 61 to 64: Rep Rows 59 and 60 two more times. (38 sc)
Shoulder Edge: After Row 64, fasten off, leaving a 12 inch / 30 cm tail for strap attachment.
Left Cup (Stitches 45 to 88)
Rejoin yarn at center (stitch 45) with RS facing.
Row 45 (RS, Wave Row, left cup): Ch 1, sc2tog over first 2 sts (neck edge), [sk 1, 5 dc in next, sk 1, sc, sc, sc, sc2tog, sc, sc] 3 times, sk 1, 5 dc in next, sk 1, sc, sc, sc, 1 sc in last st. Turn. (44 sts)
Row 46 (WS, Plain Row): Ch 1, sc across. Turn. (44 sc)
Row 47 (RS, neck dec at beg): Ch 1, sc2tog over first 2 sts at center neck edge, continue in wave row across. Turn. (43 sts)
Row 48 (WS, Plain Row): Ch 1, sc across. Turn. (43 sc)
Continue mirroring the right cup neck decreases on every RS row at the center edge for Rows 49 to 58, then work even through Row 64.
Row 49 dec: (42 sts)
Row 50 plain: (42 sc)
Row 51 dec: (41 sts)
Row 52 plain: (41 sc)
Row 53 dec: (40 sts)
Row 54 plain: (40 sc)
Row 55 dec: (39 sts)
Row 56 plain: (39 sc)
Row 57 dec: (38 sts)
Row 58 plain: (38 sc)
Rows 59 to 64: Work even. (38 sc)
Fasten off, leaving a 12 inch / 30 cm tail for strap attachment.
Back Panel
The back panel is worked identically to the front panel through Row 44 (88 sts at bust). The V-neck shape at the back is shallower, with only 4 decrease rows instead of 6.
Work Foundation Row through Row 44 exactly as for the Front Panel. (88 sc)
Back V-Neck Cup Split
Right Back Cup (Stitches 1 to 44)
Row 45 (RS): Work wave row across 44 sts. Turn. (44 sts)
Row 46 (WS): Sc across. Turn. (44 sc)
Row 47 (RS, neck dec): Work wave row to last 2 center sts, sc2tog. Turn. (43 sts)
Row 48 (WS): Sc across. Turn. (43 sc)
Row 49 (RS, neck dec): Work wave row to last 2 center sts, sc2tog. Turn. (42 sts)
Row 50 (WS): Sc across. Turn. (42 sc)
Row 51 (RS, neck dec): Work wave row to last 2 center sts, sc2tog. Turn. (41 sts)
Row 52 (WS): Sc across. Turn. (41 sc)
Row 53 (RS, neck dec): Work wave row to last 2 center sts, sc2tog. Turn. (40 sts)
Row 54 (WS): Sc across. Turn. (40 sc)
Rows 55 to 64 (RS and WS alternating): Work even in wave pattern. (40 sc after every plain row)
Fasten off, leaving a 12 inch / 30 cm tail.
Left Back Cup (Stitches 45 to 88)
Rejoin at stitch 45 with RS facing. Work to mirror the right back cup with neck decreases at the center edge on RS rows 47, 49, 51, 53. Work even rows 55 to 64. (40 sc)
Fasten off, leaving a 12 inch / 30 cm tail.
The back shoulder width is 40 stitches, which equals approximately 7.3 inches. The back cup is slightly wider than the front cup to allow room for the straps to cross.
Seaming the Panels
With wrong sides together (so the seam appears on the inside), align the front panel and back panel at both side edges.
Using a tapestry needle and matching yarn, whip stitch or sc seam the side seams from the bottom hem up to the armhole (approximately the top of Row 44 on each panel). Leave the armhole and shoulder areas open for straps.
Side seam length: approximately 8.8 inches / 22.4 cm along each side.
Crotch Strip
The crotch joins the lower front panel to the lower back panel.
Ch 13.
Row 1: Sc in 2nd ch from hook, sc across. Turn. (12 sc)
Rows 2 to 14: Ch 1, sc across. Turn. (12 sc per row)
The crotch strip should measure approximately 2.5 inches / 6.5 cm wide and 2.75 inches / 7 cm long.
Using mattress stitch or whip stitch, sew one long edge of the crotch strip to the lower center edge of the front panel and the opposite long edge to the lower center edge of the back panel. The short ends of the crotch strip align with the inner leg opening edges.
Leg Opening Finishing
After the crotch strip is attached, two leg opening holes are formed. Finish each with one round of scallop edging.
Leg Opening Scallop (worked in the round):
Join yarn at any point along the leg opening. Sc evenly around the entire leg opening, placing approximately 60 sc total around each opening. Join with sl st to first sc. (60 sc)
Adjust your sc pickup count to the nearest multiple of 6 for the scallop to work out evenly.
Scallop Round: Ch 1, [skip 2 sts, 5 dc in next st, skip 2 sts, sl st in next st] 10 times around. Join with sl st. Fasten off.
Each leg opening: 60 sts divided into 10 scallops of 6 sts each.
Neckline Finishing
Front Neckline:
Starting at the right shoulder of the front, join yarn and sc evenly along the right V-neck edge (approximately 18 sc down the right slope), 1 sc at center V point, sc evenly up the left V-neck slope (approximately 18 sc). (37 sc total)
Do not work a round. Fasten off and weave in ends. The neckline is left as a clean sc edge without an additional scallop to keep the V-line sharp.
Back Neckline:
Work the same way along the back V-neck edge. Approximately 12 sc down each slope plus 1 sc at center. (25 sc total). Fasten off.
Braided Straps (Make 2)
Each strap crosses from the front shoulder, over the shoulder, and crosses at the back.
Measure from front shoulder edge, over the shoulder, to the back shoulder attachment point on the opposite side. For a size Small this is approximately 14 inches / 35.5 cm per strap.
For each strap, make 3 chains each measuring 16 inches / 40.5 cm (slightly longer than needed to allow for braid tension):
Chain A: Ch 90 (approximately 16 inches / 40.5 cm)
Chain B: Ch 90
Chain C: Ch 90
Align all 3 chains at one end. Sl st the three ends together. Braid all three chains together until the full length is braided. Sl st the opposite ends together.
Trim each strap braid to 14 inches / 35.5 cm finished length and knot or tightly sl st both ends.
Strap attachment:
Use the long yarn tails left at shoulder edges to stitch straps in place. Reinforce with several passes of yarn for security.
Size Customization Tips
To size up or down, adjust the starting chain by 11 stitches per size step (one full wave repeat equals 11 stitches, which is approximately 2 inches / 5 cm in width).
Extra Small (US 0-2): Start with ch 79, work 79 sc foundation (7 full repeats equals 77 sts plus 2 border). Adjust all stitch counts down by 11 throughout.
Medium (US 8-10): Start with ch 101, work 99 sc foundation (9 full repeats equals 99 sts). Adjust all stitch counts up by 11 throughout.
Large (US 12-14): Start with ch 112, work 110 sc foundation (10 full repeats equals 110 sts). Adjust all stitch counts up by 22 throughout.
For length adjustments: Add or remove 2-row pairs (1 wave row plus 1 plain row) in the hip section or bust section. Each 2-row pair adds approximately 0.4 inches / 1 cm in length.
For longer torso: Add 6 to 10 rows to the hip section before beginning waist shaping.
For cup depth: Add or remove 2-row pairs in the cup section (Rows 45 to 64) before the strap attachment.
Finishing and Blocking
Weave in all ends securely with a tapestry needle.
Wet block the finished bodysuit by submerging it in cool water for 15 minutes. Gently squeeze out excess water without wringing. Lay flat on a blocking mat or clean towel. Pin the bodysuit to the finished measurements: 16 inches / 40.5 cm wide at bust and hip, 14.5 inches / 37 cm at waist. Allow to dry completely flat before unpinning.
Blocking cotton significantly improves the appearance and drape of the wave stitch pattern and relaxes the fibers for better fit. Do not skip this step.
Care Instructions
Hand wash in cool water with a gentle detergent. Do not wring or twist. Lay flat to dry away from direct sunlight. If machine washing, use a delicate cycle in a mesh laundry bag with cold water. Do not tumble dry. Do not iron directly on the crochet fabric. Store folded flat, not on a hanger, to preserve the shape of the crocheted structure.
You Made It!
Thank you so much for choosing this pattern. I really hope you love making your Coastal Blue Wave Stitch Bodysuit as much as I loved designing it. If you make one, I would absolutely love to see it! Tag me on Instagram or share a photo in our Facebook group. Seeing your finished projects is honestly the best part of sharing patterns.
If this pattern is calling your name, go ahead and save it to your Pinterest boards so you can find it easily when you are ready to start. And if you do make this bodysuit, please drop a comment below. I would love to hear which color you chose and how it turned out for you!
You Might Also Like
- Sage Green Natural Minimalist Braided Bag Free Crochet Pattern
- Mint Green Rose Granny Square Bag Free Crochet Pattern
- Terracotta Earthy Granny Square Backpack Crochet Pattern
- Sunset Coral Ruffle Dress Free Crochet Pattern
