
I don’t know about you, but I have been dreaming about that perfect summer dress for years. Something romantic enough for a beachside dinner, fitted enough to feel special, and handmade enough to feel like a true accomplishment.
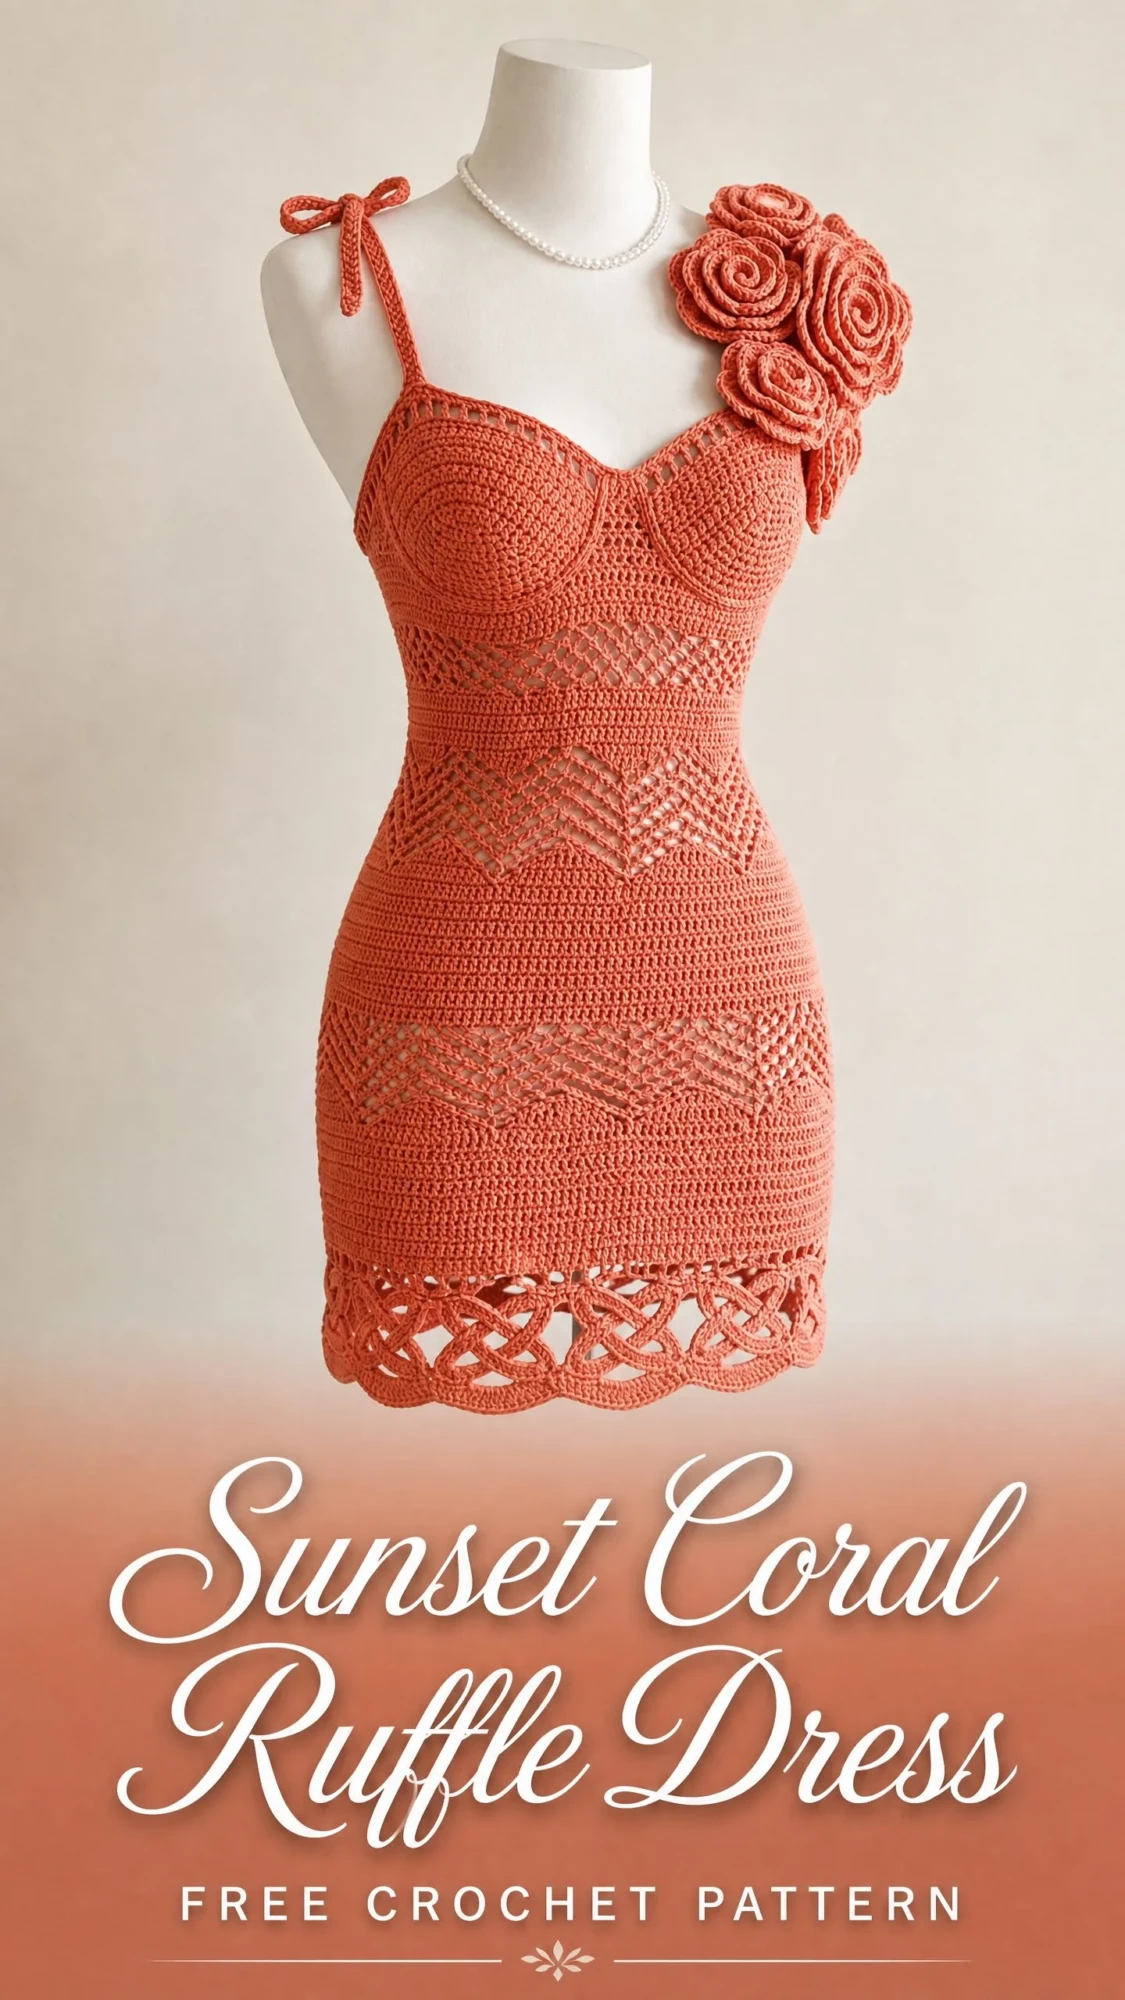
This coral beauty is exactly that dress. The moment I saw those sculptural spiral roses cascading down the shoulder, I knew this was the kind of project that separates a casual crocheter from someone who can truly say they’ve mastered the craft.
Is this pattern ambitious? Absolutely. Will you learn techniques that elevate every future garment you make? Without question. Let me walk you through everything you need to bring this stunning fitted mini dress to life.
About This Crochet Dress Pattern
This body-hugging mini dress features a sweetheart neckline, thin adjustable tie straps, a textured diamond lace bodice, a Celtic knot inspired hem border, and a cluster of three dimensional spiral roses adorning the left shoulder. The overall aesthetic is romantic and resort-ready, perfect for summer weddings, vacation dinners, or any occasion where you want to turn heads.
The dress is worked in the round from the hem upward. The hem border gets constructed separately and seamed on, and those gorgeous roses are made last and attached. A zipper or snap closure at the center back allows the dress to be put on and removed comfortably.
Skill Level: Advanced. This pattern requires comfort with working in the round, reading written lace stitch patterns with multiple stitch types per row, executing integrated bust shaping, constructing a Celtic braid style hem border, and making three dimensional sculptural roses. I recommend completing at least two fitted garments before attempting this project.
Time Estimate: Plan for approximately 40 to 60 hours for an average sized adult, depending on your experience and tension consistency.
Finished Measurements
This pattern is written for a size Small/Medium, which corresponds to US dress sizes 4 to 8.
The fabric has moderate stretch due to the open lace sections. A well fitted garment worn with a slip liner is recommended for both modesty and a polished look.
Materials Needed
Yarn
You will need sport weight or light DK weight yarn (CYCA #2 or light #3), approximately 1,400 to 1,600 yards (1,280 to 1,460 meters) total in a warm coral orange solid color. A smooth, tightly spun cotton or cotton blend yarn is strongly recommended for stitch definition and for the roses to hold their sculptural shape.
Specific yarn suggestions:
1. Lion Brand 24/7 Cotton (100% mercerized cotton, 186 yards/170 m per 3.5 oz/100 g skein) in colorway Tangerine or Grapefruit. Purchase 8 skeins. This yarn gives excellent stitch definition and a slight sheen that photographs beautifully.
2. Paintbox Yarns Cotton DK (100% cotton, 137 yards/125 m per 1.75 oz/50 g skein) in colorway Burnt Orange. Purchase 12 skeins. This is a budget friendly option with a matte finish and consistent twist.
3. Drops Safran (70% cotton, 30% viscose, 175 yards/160 m per 1.75 oz/50 g skein) in colorway Coral. Purchase 9 skeins. The viscose content adds a subtle drape that helps the dress cling gently to the body.
Important substitution note: Choose any sport or light DK weight smooth yarn with minimal halo. Fuzzy or textured yarns will obscure the lace diamond texture and prevent the hem border cables from reading cleanly. Avoid yarns with more than 20% synthetic content if you plan to block with steam, as synthetics can melt or lose shape.
Hooks
Additional Materials
Gauge
Gauge is mandatory for a fitted garment. A difference of even half a stitch per inch will result in a dress that is 2 to 4 inches too large or too small in circumference.
With US E-4 (3.5 mm) hook and sport/DK cotton yarn:
For the diamond lace texture section:
Work a swatch of at least 6 inches by 6 inches, wash and dry it the way you will wash the finished garment, and remeasure before beginning.
Abbreviations (US Terms)
Let me break down every abbreviation you will encounter in this pattern:
Special Stitches and Techniques
Shell Stitch (Shell)
Work 5 dc into the same stitch or space. This creates a fan shaped shell used in the hem border transition row.
V-Stitch (V-st)
Work [dc, ch 2, dc] all into the same stitch or space. Used in the lower diamond lace section.
Diamond Lace Pattern
This pattern is worked over a multiple of 8 stitches plus 4. Here is one complete cycle:
Row/Rnd A: \sk 1, [dc, ch 1, dc] in next st, sk 1, sc in next, sk 1, [dc, ch 1, dc] in next st, sk 1, sc in next; rep from \ across/around, ending sc in final st.
Row/Rnd B: ch 3 (counts as dc), \[sc, ch 2, sc] in ch-1 sp, dc in sc, [sc, ch 2, sc] in next ch-1 sp, dc in sc; rep from \ around/across.
Row/Rnd C: \sc in dc, [dc, ch 1, dc] in ch-2 sp, sc in next dc, [dc, ch 1, dc] in next ch-2 sp; rep from \ around/across, sc in last dc.
Row/Rnd D: repeat Row/Rnd B.
These 4 rows/rounds form one full diamond lace repeat. Continue cycling through A, B, C, D for the lace section.
Spiral Rose
Each rose is worked in a flat spiral, then rolled:
Step 1: Ch 46.
Step 2: Row 1: Work 2 dc in 4th ch from hook (beg ch counts as dc). Work 3 dc in each remaining ch across. (129 dc total)
Step 3: Do not turn. Beginning at the starting tail end, roll the petal strip tightly inward toward yourself, with the WS of the strip facing inward (RS forming the outer visible spiral).
Step 4: As you roll, use the yarn needle threaded with a length of yarn to tack the base of the coils together every 2 to 3 rounds of rolling to secure the rose shape.
Step 5: The rose should measure approximately 2.5 inches (6.5 cm) in diameter when finished.
Celtic Braid Hem Border
This border is worked as a long flat strip that is seamed at center back and then whipstitched to the lower edge of the main dress body.
Foundation ch: Multiple of 12 plus 3.
Row 1 (RS): Sc in 2nd ch from hook and in each ch across. Turn.
Row 2: Ch 1, sc in each sc across. Turn.
Row 3 (cable setup, RS): Ch 1, sc in first 2 sts, \FPdc around st 2 rows below, sk st behind FPdc, sc in next 2 sts, FPdc around same st 2 rows below as last FPdc (crossing cable), sk st behind FPdc, sc in next 2 sts, FPdc around next st 2 rows below, sk behind, sc in next 2 sts, FPdc around same st 2 rows below (second crossing cable); rep from \ across, ending sc in last 2 sts. Turn.
Row 4: Ch 1, hdc in each st across. Turn.
Row 5: Ch 1, sc in first 2 sts, \BPdc around corresponding post below, sk behind, sc 2, BPdc around same post below (crossing back), sc 2; rep from \ to last 2 sts, sc 2. Turn.
Row 6: Ch 1, hdc across. Turn.
Repeat Rows 3 through 6 two more times for a total border depth of approximately 3 inches (8 cm).
Adjustable Tie Strap
Ch 80 (approximately 14 inches/36 cm). Sl st in each ch back to form a double stranded cord, OR work sc in each ch for a sturdier strap. Tie ends in a bow. Make 2.
Pattern Notes Before You Begin
1. The dress body is worked in continuous rounds from the hem upward. Place a stitch marker at the beginning of each round and move it up as you go.
2. The center back seam opening for the zipper is created by working back and forth in rows for the top 8 inches (20 cm) of the dress body instead of in the round.
3. The hem border is worked separately and seamed on. This allows you to block it flat before attachment for crisp cable definition.
4. The bodice sweetheart cups are shaped with short rows and decreases using the smaller D-3 hook for added density and support.
5. The roses are made separately and sewn onto the left shoulder strap and bodice edge after all blocking is complete.
6. All rounds are worked with RS facing unless otherwise noted.
7. The dress is designed with approximately 1 to 2 inches (2.5 to 5 cm) of negative ease at the bust for a fitted look.
8. Read each section fully before beginning.
Step by Step Instructions
Section 1: Hem Border (Make 1)
The hem border is worked as a flat horizontal strip and later seamed to the lower edge of the dress body.
Foundation: Ch 147. (This is a multiple of 12 plus 3, yielding 145 working stitches.)
Row 1 (RS): Sc in 2nd ch from hook and in each ch across. Turn. (145 sc)
Row 2: Ch 1, sc in each sc across. Turn. (145 sc)
Row 3 (cable row, RS): Ch 1, sc in first 2 sts. \[FPdc around the sc 2 rows below the next st, sk the st behind the FPdc, sc in next 2 sts] twice, [BPdc around the corresponding sc 2 rows below, sk behind, sc in next 2 sts] twice; rep from \ 10 times total (pattern covers 140 sts), end sc in last 3 sts. Turn. (145 sts)
Row 4: Ch 1, hdc in each st across. Turn. (145 sts)
Row 5: Ch 1, sc in first 2 sts. \[BPdc around post below next st, sk behind, sc in next 2 sts] twice, [FPdc around post below, sk behind, sc in next 2 sts] twice; rep from \ 10 times, end sc in last 3 sts. Turn. (145 sts)
Row 6: Ch 1, hdc in each st across. Turn. (145 sts)
Row 7: Repeat Row 3. Turn. (145 sts)
Row 8: Ch 1, hdc in each st across. Turn. (145 sts)
Row 9: Repeat Row 5. Turn. (145 sts)
Row 10: Ch 1, hdc in each st across. Turn. (145 sts)
Row 11: Repeat Row 3. Turn. (145 sts)
Row 12: Ch 1, hdc in each st across. Fasten off, leaving a 24 inch sewing tail. (145 sts)
Block the hem border before attaching. Pin to finished measurements of 29 inches (74 cm) wide and 3 inches (8 cm) tall. Allow to dry completely.
Seam the short ends of the border together at center back with whipstitch to form a loop. (145 sts around the upper edge of the border loop)
Set the hem border aside.
Checkpoint: The hem border should measure 29 inches (74 cm) in circumference and approximately 3 inches (8 cm) deep after blocking and seaming.
Section 2: Main Dress Body (Worked in the Round, Bottom Up)
Round Setup: Ch 140. Sl st to first ch, being careful not to twist. Ch 1.
Rnd 1: Sc in each ch around. Sl st to first sc to join. (140 sc)
Rnd 2: Ch 1, sc in each sc around. Sl st to join. (140 sc)
Rnd 3: Ch 1, sc in each sc around. Sl st to join. (140 sc)
These 3 rounds of sc form the attachment ledge for the hem border.
Diamond Lace Section (Rounds 4 Through 35)
The diamond lace pattern is worked over a multiple of 8 stitches. Work the pattern over 136 stitches (17 full repeats of 8) with 4 stitches worked in sc at center back. These 4 stitches are the future zipper seam allowance and are always worked in sc throughout the lace section.
Rnd 4 (Diamond Lace Row A): Ch 1. Sc in first 2 sts (seam allowance). \Sk 1, [dc, ch 1, dc] in next st, sk 1, sc in next st, sk 1, [dc, ch 1, dc] in next st, sk 1, sc in next st; rep from \ 17 times around remaining 136 sts. Sc in last 2 sts (seam allowance). Sl st to join. (140 sts)
Rnd 5 (Diamond Lace Row B): Ch 3 (counts as dc). \[Sc, ch 2, sc] in ch-1 sp, dc in next sc, [sc, ch 2, sc] in next ch-1 sp, dc in next sc; rep from \ 17 times, sc in 2 seam allowance sts, sl st to top of ch-3 to join. (140 structural sts)
Rnd 6 (Diamond Lace Row C): Ch 1. \Sc in dc, [dc, ch 1, dc] in ch-2 sp, sc in next dc, [dc, ch 1, dc] in next ch-2 sp; rep from \ 17 times, sc in 2 seam allowance sts. Sl st to join. (140 structural sts)
Rnd 7 (Diamond Lace Row D): Repeat Rnd 5. (140 structural sts)
Rounds 4 through 7 form one full diamond lace cycle. Repeat this cycle 7 more complete times (rounds 8 through 35) for a total of 8 full cycles equaling 32 rounds of diamond lace.
Hip Shaping (Rounds 14 and 22)
On Rnd 14 (which falls on a Row A of the lace cycle), after completing the round as written, work 4 evenly spaced increases by working [dc, ch 1, dc, ch 1, dc] instead of [dc, ch 1, dc] in 4 of the lace V-points evenly spaced around (approximately every 34 stitches). This adds 4 dc total. (144 structural sts)
On Rnd 22 (Row A of lace cycle), repeat the same 4 increase technique. (148 structural sts)
Checkpoint: After completing round 35, the dress body should measure approximately 6.5 inches (16.5 cm) from the foundation round (not including the hem border). The circumference should be approximately 30 inches (76 cm) relaxed.
Waist Transition and Taper (Rounds 36 Through 44)
Switch from diamond lace to solid single crochet at the waist.
Rnd 36: Ch 1, sc in each st around, working sc into each dc, into the top of each sc, and into each ch-sp as a stitch (absorbing the chains). (148 sc)
Rnd 37: Ch 1, \sc in next 35 sts, sc2tog; rep from \ 3 more times, sc in rem 8 sts. (144 sc)
Rnd 38: Ch 1, sc in each sc around. (144 sc)
Rnd 39: Ch 1, \sc in next 34 sts, sc2tog; rep from \ 3 more times, sc in rem 8 sts. (140 sc)
Rnd 40: Ch 1, sc in each sc around. (140 sc)
Rnd 41: Ch 1, \sc in next 33 sts, sc2tog; rep from \ 3 more times, sc in rem 4 sts. (136 sc)
Rnd 42: Ch 1, sc in each sc around. (136 sc)
Rnd 43: Ch 1, \sc in next 32 sts, sc2tog; rep from \ 3 more times, sc in rem 4 sts. (132 sc)
Rnd 44: Ch 1, sc in each sc around. (132 sc)
Checkpoint: After round 44, the waist section should measure approximately 10.5 to 11 inches (26.5 to 28 cm) from the foundation, and the circumference should be approximately 26.5 inches (67 cm). This is the narrowest point of the dress.
Torso and Bust Expansion (Rounds 45 Through 60)
Rnd 45: Ch 1, \sc in next 32 sts, 2 sc in next st; rep from \ 3 more times. (136 sc)
Rnd 46: Ch 1, sc in each sc around. (136 sc)
Rnd 47: Ch 1, \sc in next 33 sts, 2 sc in next st; rep from \ 3 more times. (140 sc)
Rnd 48: Ch 1, sc in each sc around. (140 sc)
Rnd 49: Ch 1, \sc in next 34 sts, 2 sc in next st; rep from \ 3 more times. (144 sc)
Rnd 50: Ch 1, sc in each sc around. (144 sc)
Rnd 51: Ch 1, \sc in next 35 sts, 2 sc in next st; rep from \ 3 more times. (148 sc)
Rnd 52: Ch 1, sc in each sc around. (148 sc)
Rnd 53: Ch 1, \sc in next 36 sts, 2 sc in next st; rep from \ 3 more times. (152 sc)
Rnd 54: Ch 1, sc in each sc around. (152 sc)
Rnd 55: Ch 1, \sc in next 37 sts, 2 sc in next st; rep from \ 3 more times. (156 sc)
Rnd 56: Ch 1, sc in each sc around. (156 sc)
Rnd 57: Ch 1, \sc in next 38 sts, 2 sc in next st; rep from \ 3 more times. (160 sc)
Rnd 58: Ch 1, sc in each sc around. (160 sc)
Rnd 59: Ch 1, sc in each sc around. (160 sc)
Rnd 60: Ch 1, sc in each sc around. (160 sc)
Checkpoint: After round 60, the dress body should be approximately 15 inches (38 cm) tall from the foundation. The circumference should be 31 to 32 inches (79 to 81 cm).
Section 3: Bodice and Sweetheart Neckline Shaping
Switching From Rounds to Rows
On the next round, identify the center back point. Work to within 1 stitch of center back, sl st in the next 2 sts (these are the seam allowance stitches). Turn.
Bodice Row 1 (WS): Ch 1, sc in each sc across, stopping at the 2 seam allowance sl sts. Turn. (158 sc)
Bodice Row 2 (RS): Ch 1, sc in each sc across. Turn. (158 sc)
Bodice Row 3 (WS): Ch 1, sc in each sc across. Turn. (158 sc)
Repeat rows 2 and 3 until the flat bodice section measures 2 inches (5 cm) from the round to row transition.
Sweetheart Cup Shaping
Switch to the smaller D-3 hook for all bodice cup rows.
Divide the 158 stitches as follows:
Mark the 4 boundaries with stitch markers.
Left Cup Shaping:
Join yarn to left strap zone with RS facing.
Cup Row 1 (RS): Ch 1, sc in 4 strap sts, sc in 39 left cup sts. Turn. (43 sc)
Cup Row 2 (WS): Ch 1, sc2tog, sc to last 2 sts, sc2tog. Turn. (41 sc)
Cup Row 3 (RS): Ch 1, sc in each sc across. Turn. (41 sc)
Cup Row 4: Ch 1, sc2tog, sc to last 2 sts, sc2tog. Turn. (39 sc)
Cup Row 5: Ch 1, sc in each sc across. Turn. (39 sc)
Cup Row 6: Ch 1, sc2tog, sc to last 2 sts, sc2tog. Turn. (37 sc)
Cup Row 7: Ch 1, sc in each sc across. Turn. (37 sc)
Cup Row 8: Ch 1, sc2tog, sc to last 2 sts, sc2tog. Turn. (35 sc)
Cup Row 9: Ch 1, sc in each sc across. Turn. (35 sc)
Cup Row 10: Ch 1, sc2tog, sc to last 2 sts, sc2tog. Turn. (33 sc)
Continue decreasing 2 stitches every RS row (one at each end) and working even on WS rows until 15 sts remain.
Next RS row: Ch 1, sc2tog, sc in next 11 sts, sc2tog. Turn. (13 sc)
Next WS row: Ch 1, sc in each sc across. Turn. (13 sc)
Next RS row: Ch 1, sc2tog, sc in 9 sts, sc2tog. Turn. (11 sc)
Next WS row: Ch 1, sc in each sc across. Turn. (11 sc)
These 11 stitches form the strap base. Work even in sc for 4 more rows. Fasten off, leaving a 12 inch tail.
Right Cup Shaping: Join yarn to right cup zone with RS facing and repeat the left cup shaping mirror image. Work until 11 sts remain at strap base. Work 4 even rows. Fasten off, leaving a 12 inch tail.
Center Front Panel:
Join yarn to the 72 center front stitches with WS facing.
Center Panel Row 1 (WS): Ch 1, sc in each of 72 sc across. Turn. (72 sc)
Center Panel Row 2 (RS): Ch 1, sc2tog, sc to last 2 sts, sc2tog. Turn. (70 sc)
Center Panel Row 3: Ch 1, sc in each sc across. Turn. (70 sc)
Center Panel Row 4: Ch 1, sc2tog, sc to last 2 sts, sc2tog. Turn. (68 sc)
Center Panel Row 5: Ch 1, sc in each sc across. Turn. (68 sc)
Continue decreasing 2 stitches every RS row for 10 total decrease rows, until 50 sts remain. Do not fasten off.
Sweetheart Curve Edging: Work a single row of sl st evenly around the entire upper neckline edge (both cups and center panel), decreasing 2 stitches at the inner V point of the center dip for shaping. Work from right cup strap base, across the right cup decrease edge, across center panel top (50 sts), across left cup decrease edge, to left cup strap base. Fasten off.
Checkpoint: The dress body from foundation to the top of center front panel should measure approximately 18 to 19 inches (46 to 48 cm).
Section 4: Tie Straps (Make 2)
Ch 80.
Row 1: Sl st in 2nd ch from hook and in each ch across. (79 sl sts)
Fold the cord in half. Use the yarn tail to sew one end firmly to the cup strap base at the left strap base, then repeat for the right strap base.
Section 5: Spiral Roses (Make 3)
Each rose uses approximately 35 yards (32 m) of yarn.
Foundation ch: Ch 46.
Petal Strip Row 1: Work 2 dc in 4th ch from hook (beg ch-3 counts as first dc). Work 3 dc in each remaining ch across to end. Fasten off, leaving a 24 inch tail for rolling and sewing. (129 dc)
Rolling the rose: Beginning at the starting chain end, roll the strip tightly toward you with the RS of the petal ruffles facing outward. After every 2 to 3 wraps, thread the yarn needle with the long tail and tack the base of the coils together with 2 to 3 stitches to prevent unrolling.
Each finished rose should measure approximately 2.5 inches (6.5 cm) across.
Block each rose by pinning the base flat and lightly misting with water.
Arranging the roses: Position all 3 roses clustered on the left shoulder zone, with roses overlapping slightly. The largest rose sits at the top of the left strap base, and the two others cascade down toward the upper left bust. Pin in place before sewing to confirm placement.
Assembly and Finishing
1. Attach the hem border to the dress body using whipstitch along the foundation round edge.
2. Install your invisible zipper or snaps at the center back opening.
3. Sew roses securely to the left shoulder area.
4. Weave in all remaining ends.
5. Block the entire dress flat or on a dress form.
6. If desired, add the optional stretch mesh lining to the bodice and hip sections for added modesty and structure.
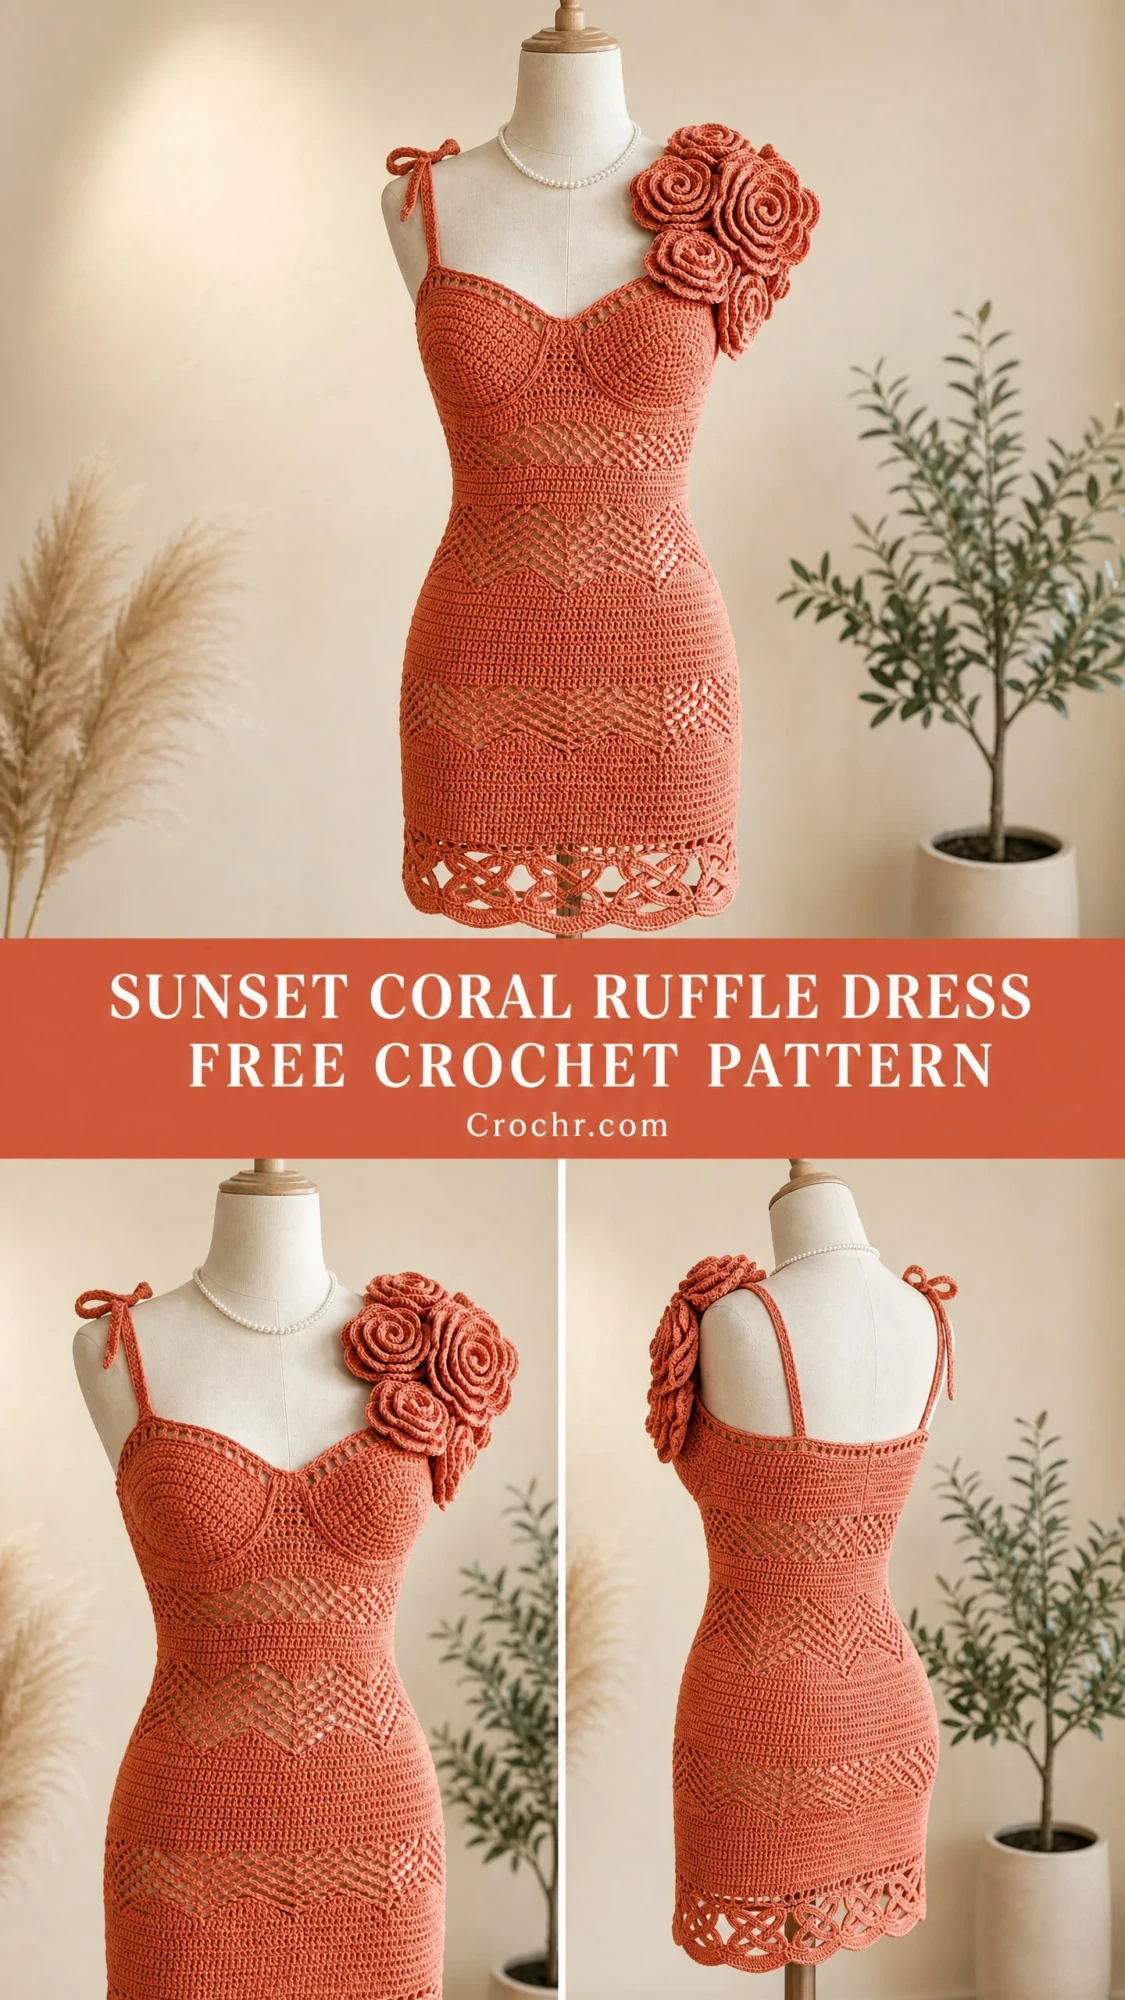
Final Thoughts on This Sunset Coral Crochet Dress Pattern
This dress is a labor of love, and every hour you put into it will show in the finished piece. The combination of techniques you will master, from the diamond lace texture to the sculptural roses to the Celtic braid hem, represents some of the most rewarding crochet skills you can develop.
Take your time with gauge swatching. Check your measurements at each checkpoint. And trust the process. When you slip this dress on for the first time and see those roses cascading over your shoulder, you will understand exactly why this project was worth every stitch.
I would absolutely love to see your finished Sunset Coral Ruffle Dress. Tag me on Instagram or share in the Facebook group so we can celebrate your incredible accomplishment together.
If this crochet dress pattern has you excited to start, go ahead and pin it to your Pinterest boards so you can find it when you are ready to begin. And please drop a comment below if you make one. I genuinely love seeing your versions and hearing about any modifications you try!
You Might Also Like
- Black Fishnet Crochet Bell Sleeve Shrug Free Pattern
- Dusty Rose Bobble Purse Free Crochet Pattern
- Charcoal Gray Bathroom Storage Basket Free Crochet Pattern
- Little Mermaid Baby Dress Set Free Crochet Pattern
