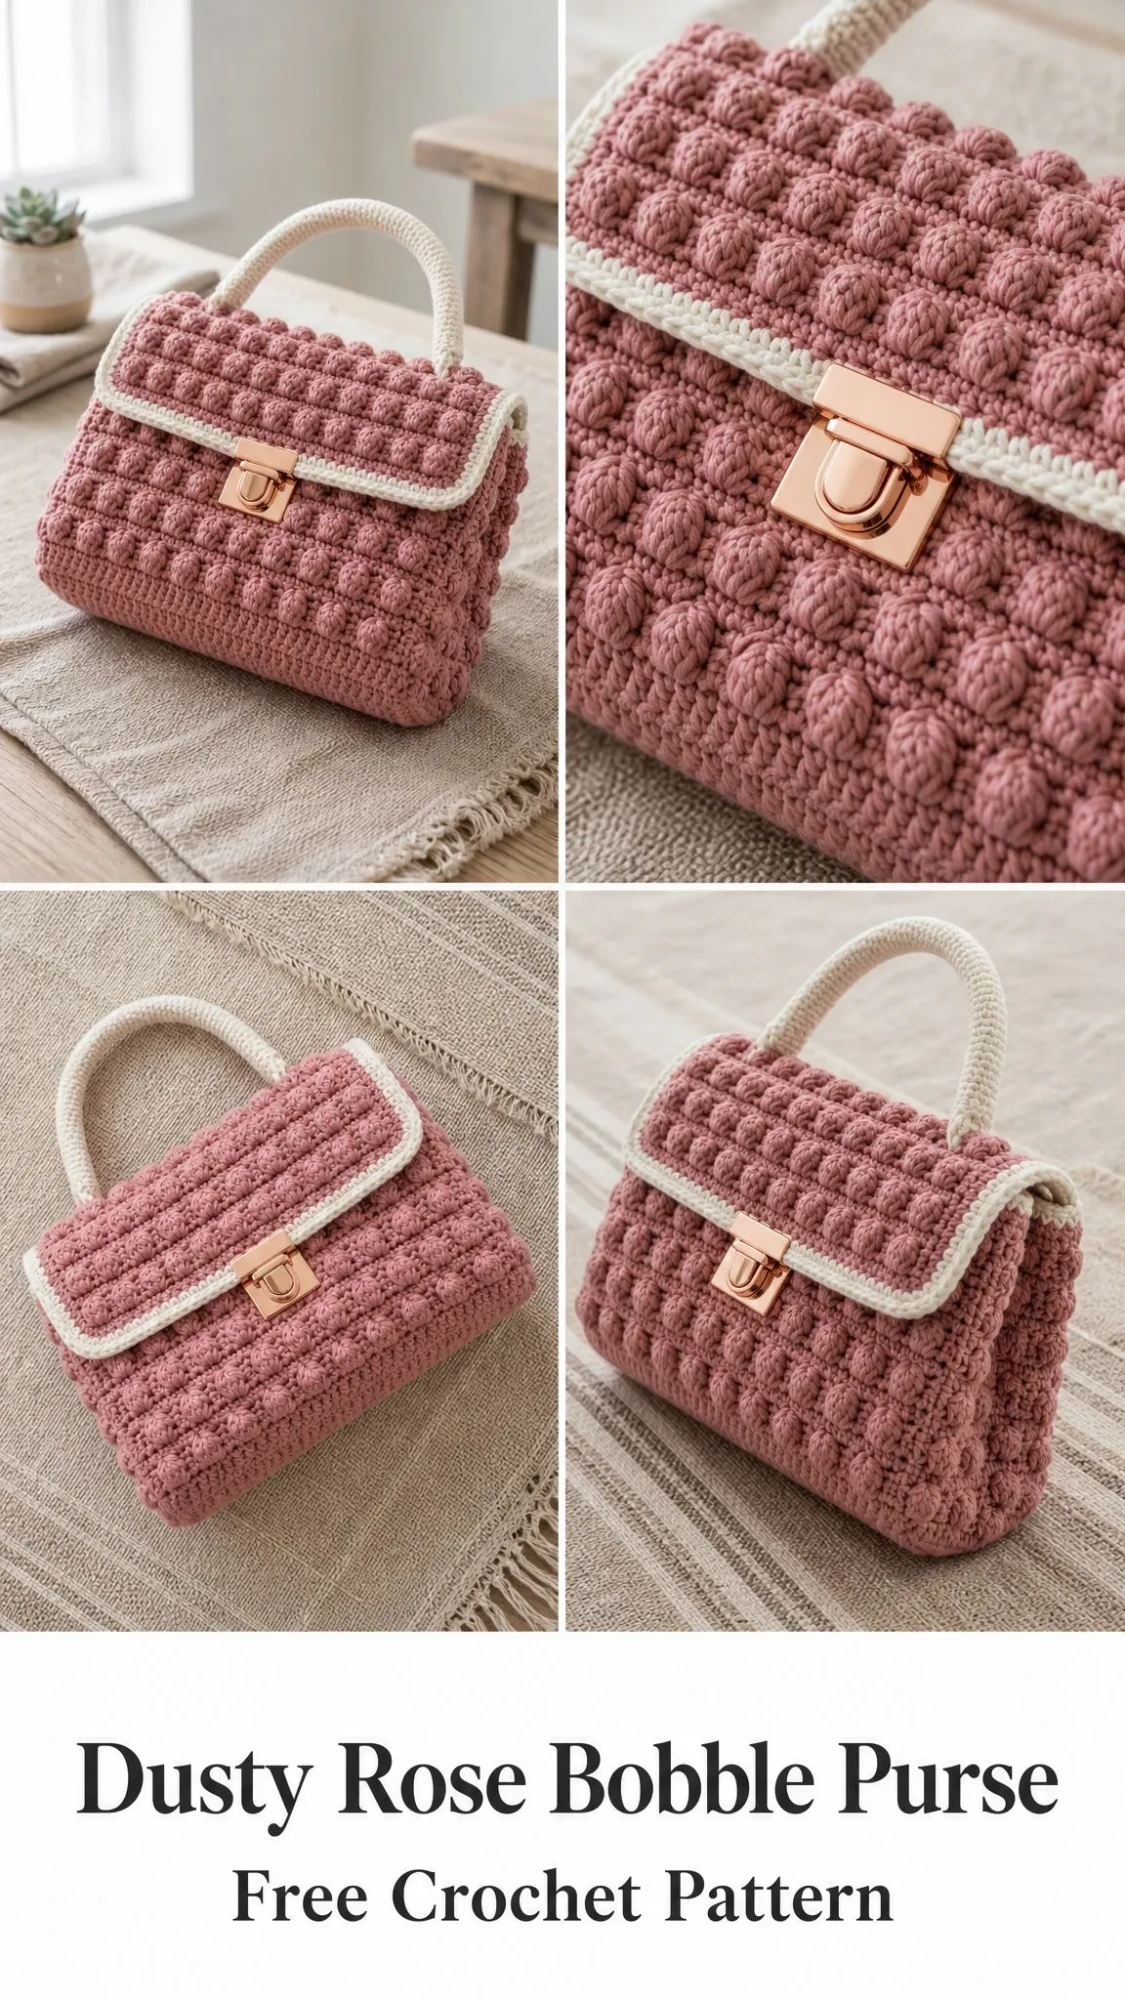
This structured bobble purse is one of my favorite makes. It looks like a designer handbag but uses just single crochet and bobble stitches. The box construction is straightforward, the texture is satisfying to create, and the finished piece gets compliments everywhere.
Get the Ad-Free PDF Pattern
You can find the free pattern below, or you can purchase the ad-free printable PDF from my shop.
Get the Printable PDF →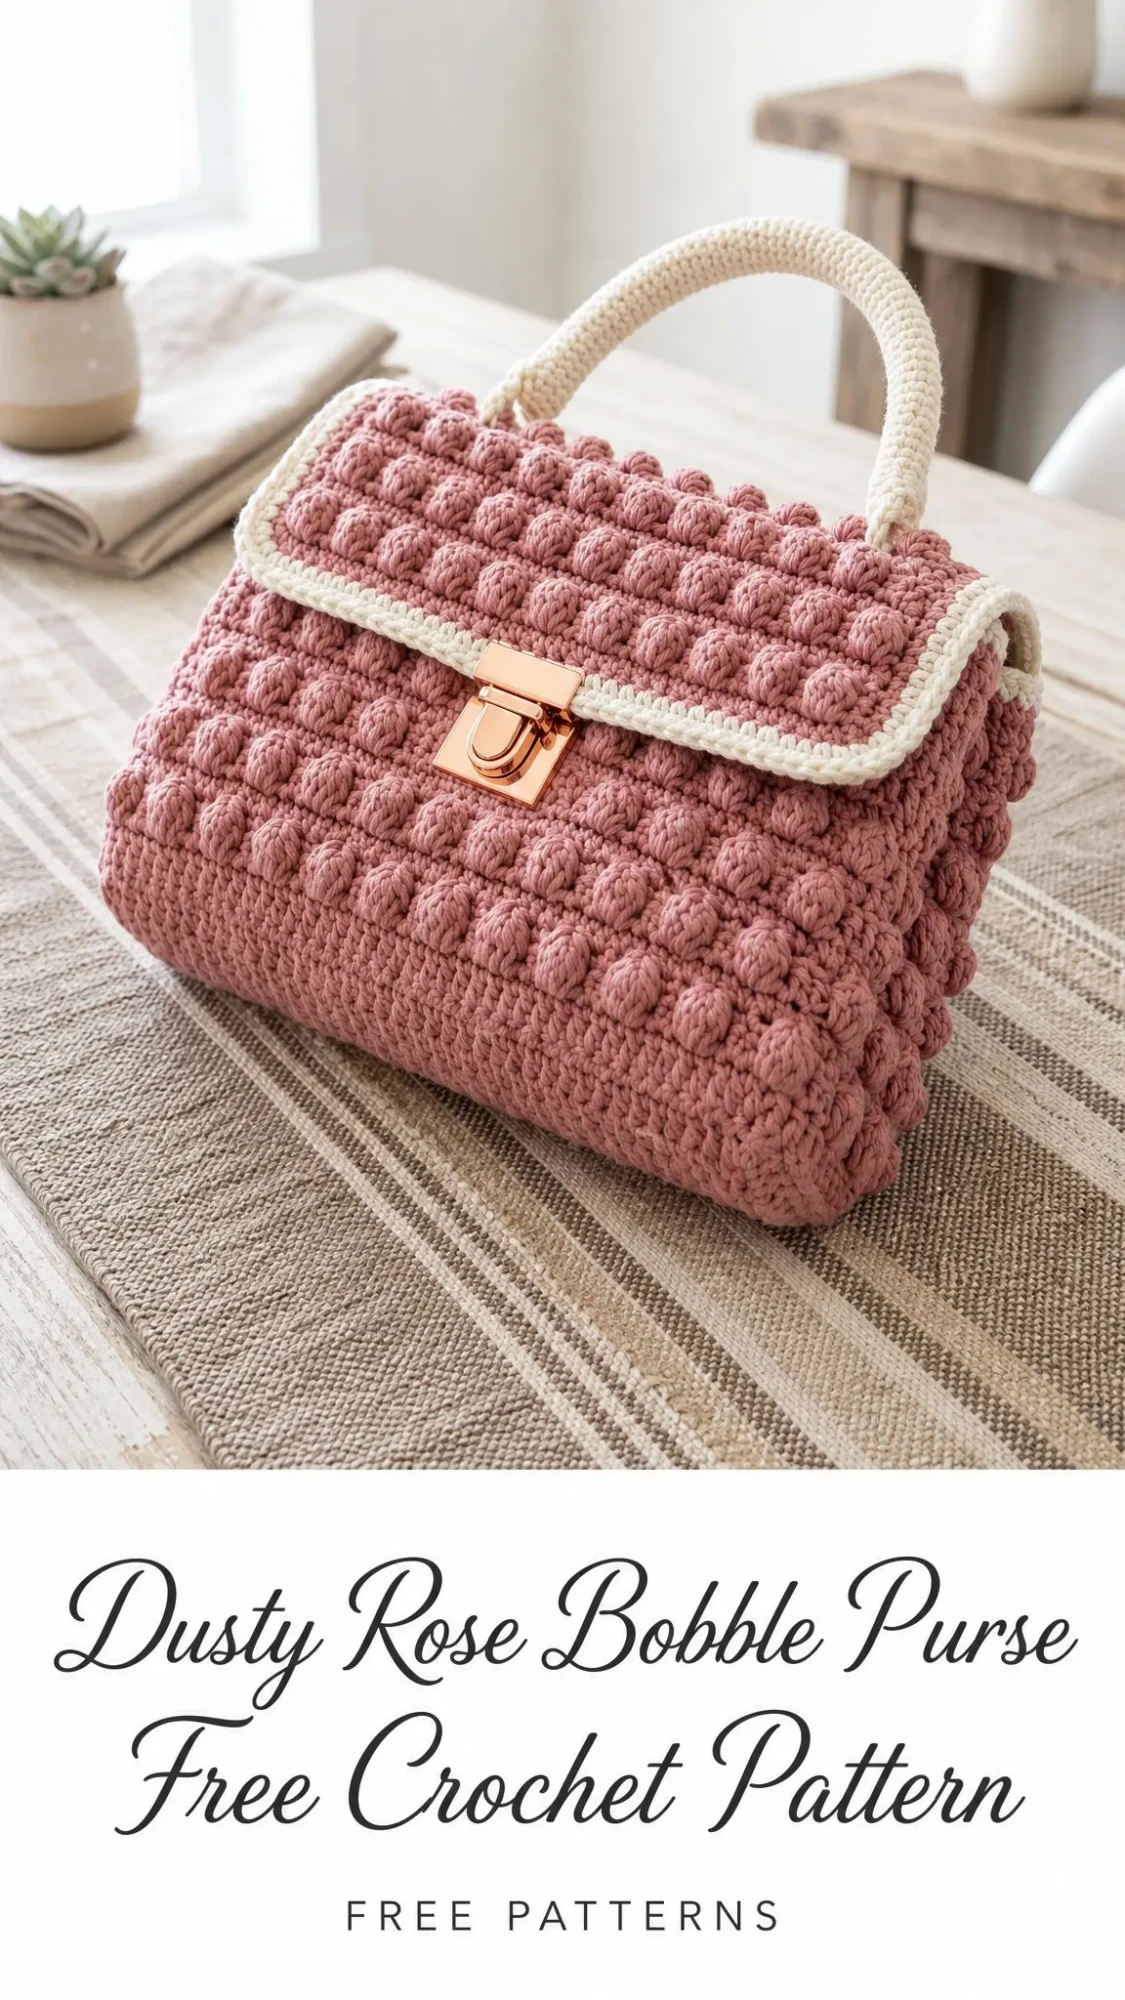
The Dusty Rose Bobble Purse combines firm cotton panels with raised bobble texture, cream trim, a rounded handle, and a rose gold push lock clasp. You will work flat panels, seam them into a box shape, and add finishing details. The result is a compact purse measuring 8.7 inches wide, 6.3 inches tall, and 3.1 inches deep.
If you can single crochet and follow a simple repeat pattern, you can absolutely make this bag. Let me walk you through everything you need to know.
Why This Bobble Purse Pattern Works So Well
The beauty of this design lies in its simplicity. You are essentially making four flat rectangles, a handle tube, and then assembling them. The bobble stitch creates all that gorgeous texture, but it is really just a series of partial double crochets pulled together. Once you get the rhythm going, it becomes almost meditative.
Cotton yarn gives this purse its structure and crisp edges. Unlike acrylic, cotton holds its shape beautifully and does not stretch over time. The cream contrast trim adds a polished, almost vintage feel that elevates the whole piece.
I especially love that this pattern includes built in checkpoints. You can measure your work as you go to make sure everything stays on track before you commit to seaming.
Materials You Will Need
Main Color (MC): Medium weight 4 cotton or cotton/acrylic blend yarn in dusty rose. You will need approximately 165 to 200 grams, which is about 270 to 330 yards.
Contrast Color (CC): Medium weight 4 cotton or cotton/acrylic blend yarn in cream. You will need approximately 30 to 45 grams, which is about 50 to 75 yards.
Crochet Hook: 4.0 mm hook, which is a US G-6. Use whatever size you need to match gauge.
Hardware: One small push lock clasp, approximately 1 to 1.25 inches wide. Rose gold looks stunning with the dusty pink.
Notions: Yarn needle, stitch markers, pins or clips, scissors, measuring tape. Optional plastic canvas or fabric lining for extra structure.
Yarn Suggestions
Here are some specific yarns that work beautifully for this project:
Choose a smooth medium weight yarn that creates a dense fabric. Cotton or cotton blend will give you the crispest structure.
Gauge Information
Gauge: 13 single crochet stitches by 14 rows equals 4 inches by 4 inches after gentle blocking.
Match both your stitch gauge and your row gauge before starting. This ensures the finished purse holds its intended proportions.
Checkpoint swatch: A 29 stitch panel should measure about 8.7 inches wide. A 22 row panel should measure about 6.3 inches tall.
Take the time to swatch. I know it feels tedious, but accurate gauge makes assembly so much easier.
Abbreviations Used in This Pattern
ch = chain
sc = single crochet. Insert hook, yarn over, pull up a loop, yarn over, pull through both loops.
sl st = slip stitch
st(s) = stitch(es)
RS = right side
WS = wrong side
MC = main color (dusty rose)
CC = contrast color (cream)
rep = repeat
beg = beginning
BLO = back loop only
UK Note: US single crochet (sc) is the same as UK double crochet (dc).
Special Stitch: The Bobble
The bobble stitch creates all that beautiful raised texture. Here is exactly how to work it:
Yarn over, insert your hook in the indicated stitch, yarn over and pull up a loop, yarn over and pull through 2 loops. You have just completed a partial double crochet.
Repeat this partial double crochet process 4 more times in the same stitch. You will now have 6 loops on your hook.
Yarn over and pull through all 6 loops at once.
Push the bobble to the right side of your work. This is important because the bobbles naturally want to pop toward the back. Give each one a gentle nudge forward as you complete it.
Front Panel Instructions
With MC, chain 30. Row 1 creates 29 working stitches. Chain 1 to turn at the end of every row. Turning chains do not count as stitches throughout this pattern.
Row 1: Single crochet in 2nd chain from hook and in each chain across. (29 sc)
Rows 2, 4, 6, 8, 10, 12, 14, 16, 18, 20, 22: Single crochet in first stitch, bobble in next stitch, single crochet in next stitch; repeat from across. (29 sts, 14 bobbles)
Rows 3, 5, 7, 9, 11, 13, 15, 17, 19, 21: Single crochet in each stitch across. (29 sc)
Front checkpoint: Your panel should measure about 8.7 inches wide and 6.3 inches tall. Fasten off, leaving a 12 inch seaming tail.
Back and Flap Panel Instructions
With MC, chain 30. Work Rows 1 through 22 exactly as for the Front Panel. Do not fasten off. You will continue directly into the flap extension.
Rows 23, 25, 27, 29, 31: Single crochet in each stitch across. (29 sc)
Rows 24, 26, 28, 30, 32: Single crochet in first stitch, bobble in next stitch, single crochet in next stitch; repeat from across. (29 sts, 14 bobbles)
Back and flap checkpoint: Rows 1 through 22 form the back of your purse. Rows 23 through 32 fold over the front to create a 2.75 to 3 inch flap.
Side Panel Instructions (Make 2)
Row 1: With MC, chain 11. Single crochet in 2nd chain from hook and in each chain across. (10 sc)
Rows 2, 4, 6, 8, 10, 12, 14, 16, 18, 20, 22: Bobble in next stitch, single crochet in next stitch; repeat from across. (10 sts, 5 bobbles)
Rows 3, 5, 7, 9, 11, 13, 15, 17, 19, 21: Single crochet in each stitch across. (10 sc)
Side checkpoint: Each side panel should measure about 3.1 inches wide and 6.3 inches tall. Make two identical panels.
Handle Instructions
Foundation: With CC, chain 43. Single crochet in 2nd chain from hook and across. (42 sc)
Round 1: Do not turn. Work 2 single crochet into the end, then 42 single crochet along the opposite side of the foundation chain, then 2 single crochet into the other end, then 42 single crochet along the top edge. Join with a slip stitch. (88 sc)
Rounds 2 through 4: Single crochet in each stitch around. Join each round. (88 sc)
Finishing the handle: Insert an optional cord or pipe cleaner for structure if desired. Seam the short ends closed, leaving tails for sewing the handle to the bag.
Assembly Instructions
Take your time with assembly. This is where your purse really comes together.
Step 1: Mark the fold. On the back and flap piece, place stitch markers between Rows 22 and 23. Rows 23 through 32 become your flap.
Step 2: Join sides to back. With wrong sides together, seam one long side panel edge to the left edge of the Back (Rows 1 through 22). Repeat on the right edge. Keep your 22 side rows aligned with the 22 back rows.
Step 3: Add the front. Seam the remaining long edge of each side panel to the front panel side edges. Seam the bottom edges closed to form the box base.
Step 4: Shape. Steam lightly or pin to your measurements. Add optional fabric lining or plastic canvas cut slightly smaller than each panel for extra structure.
Step 5: Fold the flap. Fold Rows 23 through 32 over the top toward the front. The flap should cover the upper 2.75 to 3 inches of the front panel.
Seaming tip: Use mattress stitch or whipstitch through the outer loops. Keep all bobbles facing outward on every panel.
Cream Trim Instructions
The cream trim gives this purse its polished, finished look.
Top opening trim: Join CC at the back top edge. Single crochet evenly around the opening beneath the flap, placing 1 single crochet in each stitch and about 1 single crochet in each row end where needed. Join and fasten off. (approximately 78 to 82 sc)
Flap edge, Round 1: Join CC at one upper flap corner. Work 29 single crochet across the front flap edge, 10 single crochet down one side, 29 single crochet across the lower flap edge, and 10 single crochet up the other side. Join. (78 sc)
Flap edge, Round 2: Single crochet in each stitch around the flap trim. Place 3 single crochet in each lower flap corner stitch to soften the curve. Join and fasten off. (82 sc)
Handle Placement
Pin the handle ends 1.25 inches in from each side edge on the top back panel. Sew securely through several layers using your contrast color yarn. Repeat with extra passes at each base of the handle for durability.
Clasp Placement
Center the clasp plate on the lower flap edge, about 0.5 inches above the trim. Fold the flap closed and mark where the receiving plate should go on the front panel. Sew or screw the hardware in place following the manufacturer instructions. Reinforce the inside with felt or lining if needed.
Troubleshooting Common Issues
Panel is too wide: Use a smaller hook or work with firmer tension. Your 29 stitch panel should measure close to 8.7 inches.
Bobbles sink inward: Push each bobble to the right side as you work it and keep your single crochet rows snug.
Flap cups or curls: Work the trim more loosely or remove extra corner stitches. Steam flat before attaching hardware.
Bag collapses: Add lining, plastic canvas, or firm interfacing between the lining and crochet shell for structure.
Clasp pulls the fabric: Reinforce the hardware area with felt, lining, or a small crocheted patch on the inside.
Size Customization Tips
Want a bigger or smaller bag? Here is how to adjust:
To adjust width, add or subtract stitches in multiples of 2 so the bobble repeat remains balanced.
To adjust height, add or subtract rows in pairs. One bobble row plus one single crochet row.
To adjust depth, add or subtract 2 side panel stitches at a time.
After resizing, cut your lining pieces to match the finished panels, not the written measurements.
Care Instructions
Spot clean gently with cool water and mild soap. Do not machine wash once hardware is attached. Reshape by hand and lay flat to dry. Store stuffed with tissue paper to protect the rounded handle and flap shape.
Your Maker Checklist
Use this quick reference while you crochet:
| Piece | Work | Checkpoint |
|---|---|---|
| Front | ch 30, Rows 1-22 | 29 sts each row, 8.7 x 6.3 in |
| Back/Flap | ch 30, Rows 1-32 | 29 sts each row, fold after Row 22 |
| Side 1 | ch 11, Rows 1-22 | 10 sts each row, 3.1 x 6.3 in |
| Side 2 | ch 11, Rows 1-22 | 10 sts each row, match Side 1 |
| Handle | ch 43, 4 rounds | 88 sts per round |
| Flap Trim | 2 rounds in CC | Round 1: 78 sc, Round 2: 82 sc |
Final Thoughts on the Dusty Rose Bobble Purse Crochet Pattern
This bobble purse is one of those projects that looks far more complex than it actually is. The combination of simple stitches, structured cotton yarn, and thoughtful finishing details creates something truly special. Whether you make it for yourself or as a gift, it is sure to impress.
I hope you enjoy making this Dusty Rose Bobble Purse as much as I enjoyed designing it. The bobble texture is so satisfying to work, and watching the panels come together into a finished bag never gets old.
If you found this pattern helpful, I would love it if you saved it to your Pinterest boards so you can find it easily when you are ready to start. And please leave a comment below if you make this purse. I genuinely love seeing your finished projects and hearing how the pattern worked up for you!
Want a Quick & Easy Printable Version?
Get a clean, beautifully formatted PDF of this pattern — easy to follow step by step, ready to print or save on any device. No scrolling, no distractions, just the pattern.
Get the Printable PDF →