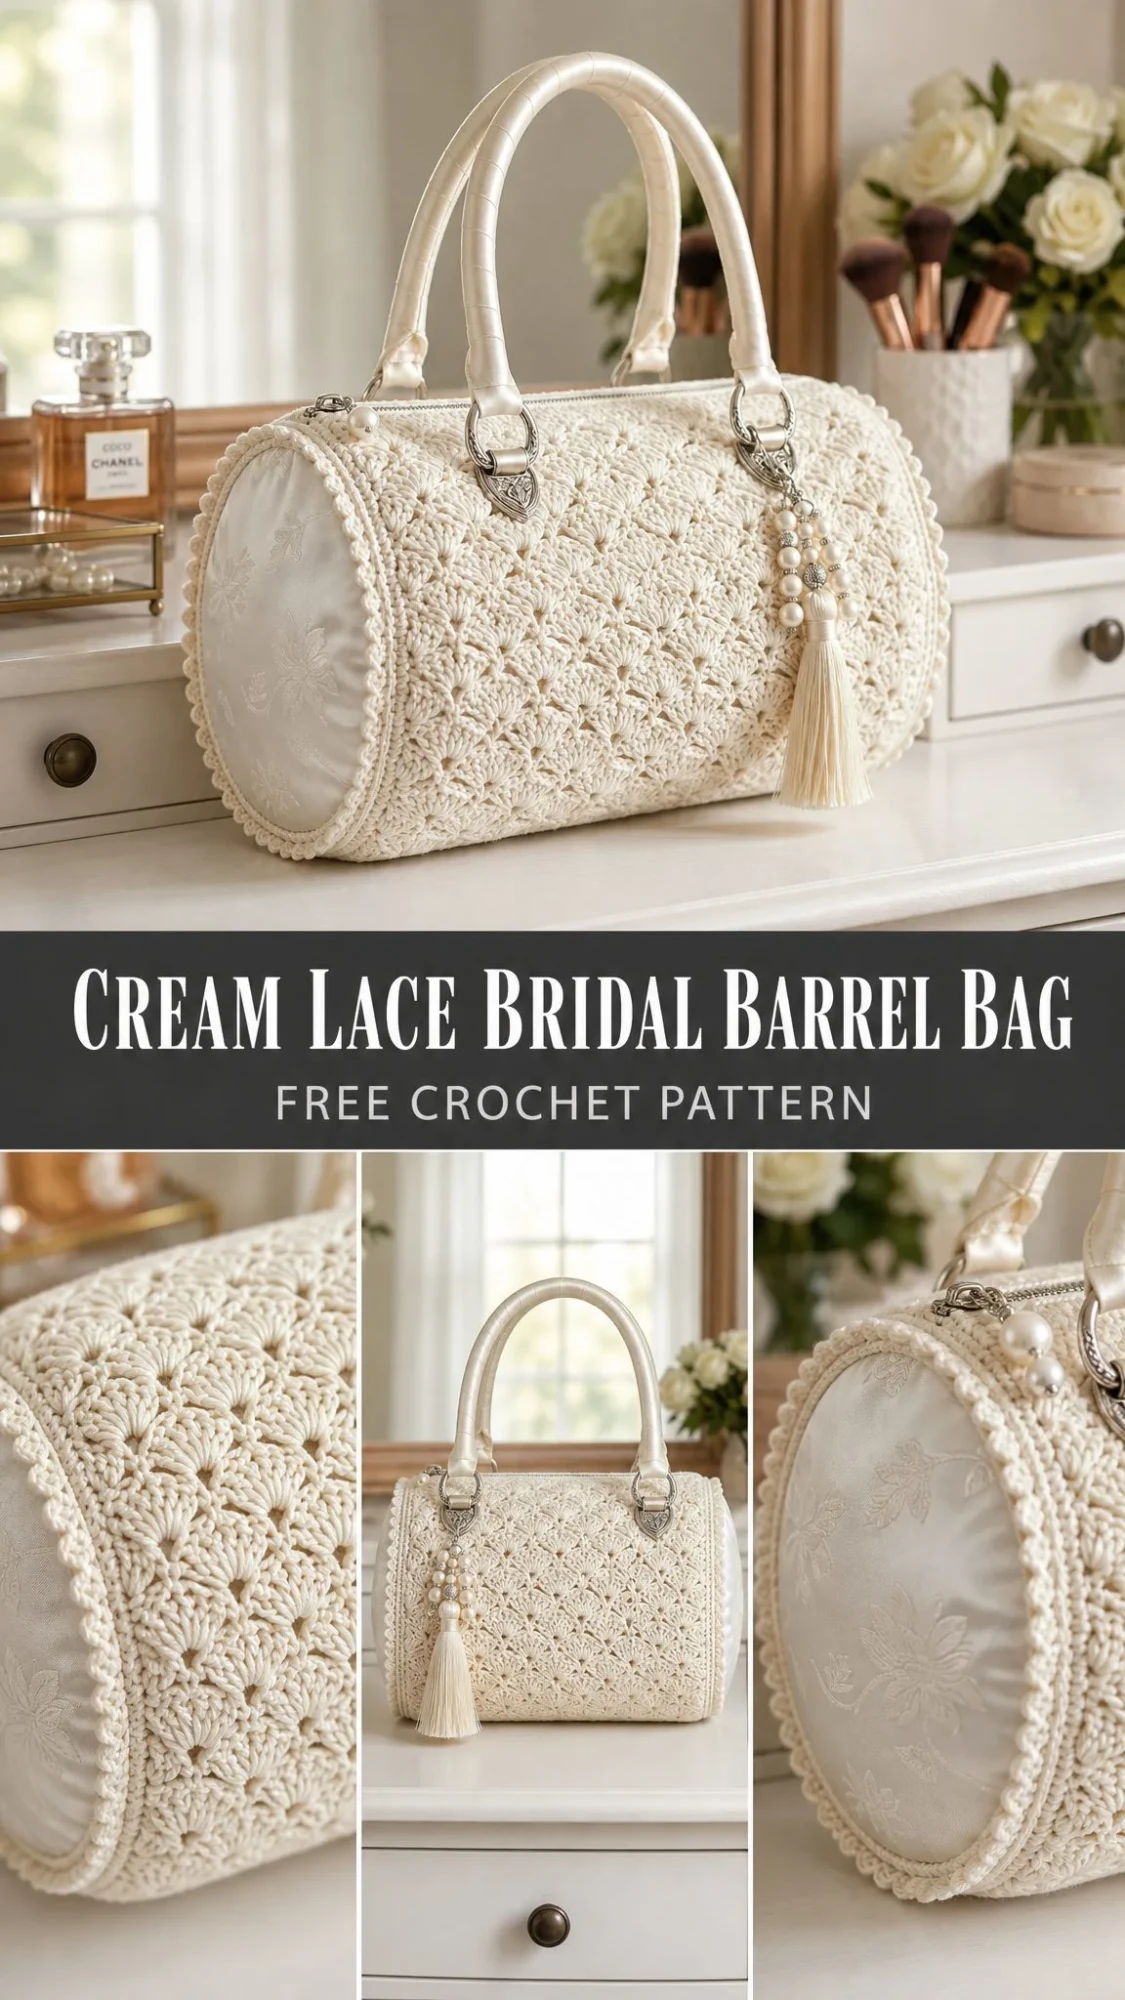
I’ve been looking for the perfect bridal accessory pattern for months, and this cream lace barrel bag is exactly what I had in mind. The shell stitch texture gives it that delicate, romantic feel without being too fussy. This is my favourite kind of project: structured enough to look polished, but made entirely with stitches you probably already know.
Get the Ad-Free PDF Pattern
You can find the free pattern below, or you can purchase the ad-free printable PDF from my shop.
Get the Printable PDF →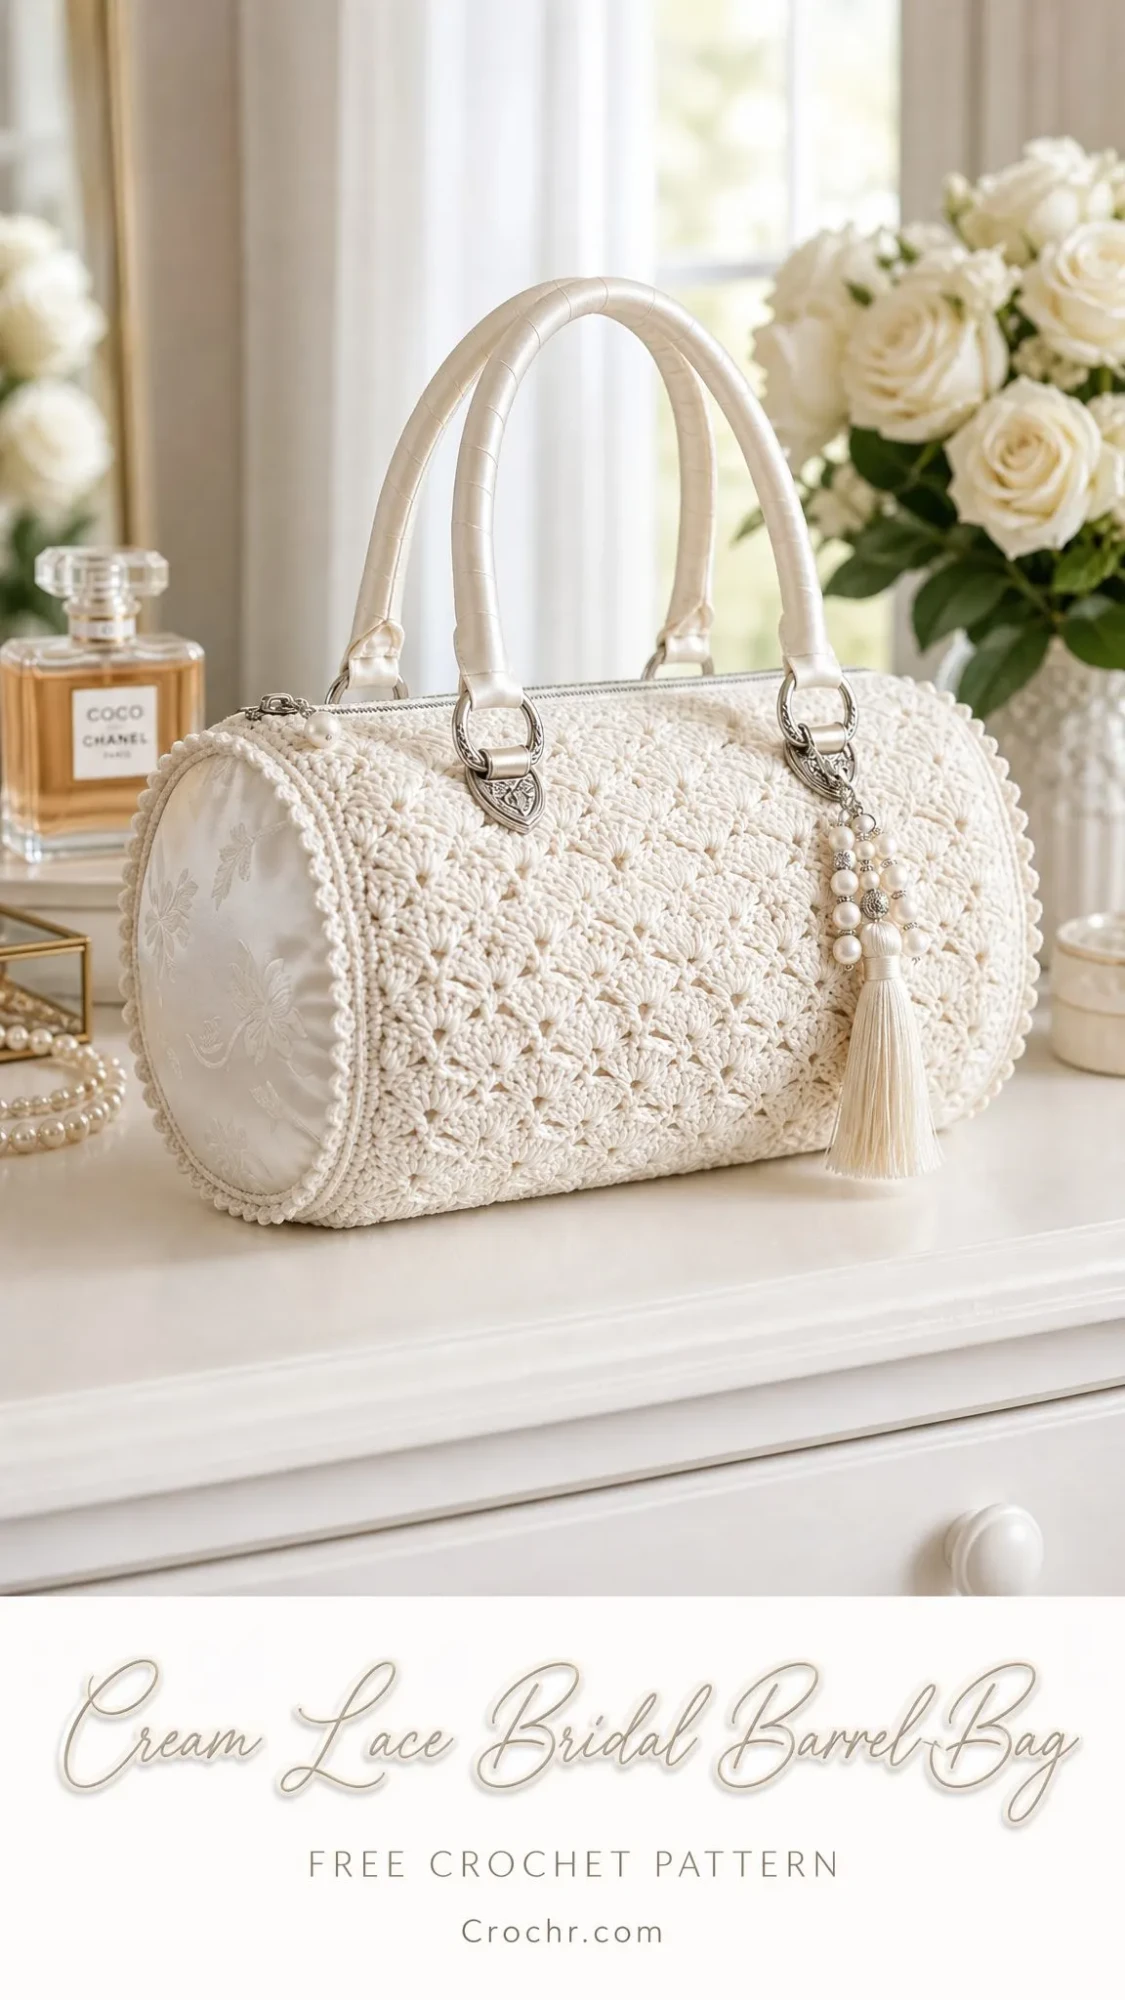
If you’re making something special for a wedding day, this bag hits all the right notes. The barrel shape is classic and practical. The pearl tassel charm adds just the right amount of sparkle. And the ivory satin end panels give it a finished, boutique quality that looks way more complicated than it actually is.
Whether you’re crocheting for yourself, a bride to be, or someone who just loves elegant accessories, this pattern delivers. Let me walk you through everything you need to know.
What Makes This Barrel Bag Special
This structured cream barrel handbag features a repeating shell lace body, two round end panels, a zipper installed along the top, faux leather wrapped handles, silver tone D rings, and a pearl tassel charm. The body is worked flat as a rectangle, then joined into a cylinder with the zipper. The circular ends are crocheted separately and sewn into the short sides of the body.
The finished size measures 11 inches wide by 5 inches in diameter (28 x 13 cm), excluding handles. Plan for about 10 to 14 hours of work time, depending on your pace.
Skill level: Advanced confident beginner to intermediate. You’ll need comfort with lace placement, zipper sewing, shaped panels, and hardware finishing.
Materials and Tools You’ll Need
Gather these supplies before you begin:
Yarn:
Hooks:
Hardware and Notions:
Yarn Suggestions:
| Yarn | Fiber/Weight | Why It Works |
|---|---|---|
| Paintbox Cotton DK | 100% cotton DK | Crisp shells and bridal matte finish |
| Knit Picks CotLin DK | Cotton/linen DK | Light structure with soft drape |
| Lion Brand 24/7 Cotton DK | Mercerized cotton DK | Smooth shine and firm stitch definition |
Choose a smooth DK cotton or cotton blend. Avoid very stretchy acrylic or fuzzy yarn because the zipper and round ends need firm edges.
Gauge
Shell lace: 24 stitches and 16 rows equals 4 inches (10 cm) after light blocking. Your body panel before assembly should measure 11 x 16 inches (28 x 40.5 cm).
End panel: The final round has 96 single crochet stitches and measures approximately 5.1 inches (13 cm) across.
Swatch before starting and adjust hook size to match both stitch and row gauge. Getting gauge right matters here because your zipper needs to fit properly and your end panels need to match up with your body edges.
Abbreviations and Stitch Guide
Here are all the abbreviations used in this pattern, with US crochet terms:
Special Stitches
Shell: Work 5 double crochet stitches in the indicated stitch. A shell counts as 5 stitches total. This creates that beautiful fan shape you see in the finished bag.
Shell row repeat: Each 6 stitch repeat uses 1 anchoring single crochet, 2 skipped stitches, 1 shell, and 2 skipped stitches. The repeat makes 6 stitches, so the body stitch count stays the same throughout.
sc2tog (single crochet 2 together): Insert hook in next stitch, yarn over and pull up a loop. Insert hook in next stitch, yarn over and pull up a loop. Yarn over and pull through all 3 loops on hook.
Invisible join: Cut yarn, pull tail through final stitch, thread needle under both loops of first stitch, then back down through the final stitch for a smooth round edge.
Pattern Notes
The chain 1 at the beginning of rows does not count as a stitch. Turn at the end of each body row. Keep your shell rows relaxed but even. Use locking markers every 16 rows along the short edges. These markers make the 96 stitch end edging easy to distribute later.
For a firmer handbag, add light stabilizer between the crochet shell and lining. Sew the lining after zipper installation but before the final handle tabs are secured.
Left handed note: Work the same instructions from your dominant side. Your fabric will mirror horizontally, but the cylinder, zipper placement, tabs, and handle spacing remain the same. Place markers at the same measured distances from each end.
Body Panel Instructions
You’ll make one body panel. The finished panel before seaming measures approximately 11 inches wide by 16 inches tall (28 x 40.5 cm).
| Step | Instruction | Count |
|---|---|---|
| Foundation | Ch 67. | – |
| Row 1 | Sc in 2nd ch from hook and in each ch across. Turn. | 66 sc |
| Row 2 (RS) | Ch 1. Sc in next st, sk 2 sts, shell in next st, sk 2 sts; rep from across. Turn. | 11 shells, 11 sc / 66 sts |
| Row 3 (WS) | Ch 1. Shell in next sc, sk 2 dc, sc in center dc of next shell, sk 2 dc; rep from across. Turn. | 11 shells, 11 sc / 66 sts |
| Rows 4-63 | Rep Rows 2-3 thirty times. | 66 sts each row |
| Row 64 | Ch 1. Sc in each st across. Do not fasten off. | 66 sc |
Body Edging
Long zipper edges: Work 66 single crochet stitches evenly across the Row 64 edge. Fasten off. Join yarn at the foundation edge and work 66 single crochet across. Fasten off.
Short end edges: Along each 64 row side edge, work 2 sc in the end of the next row, 1 sc in the end of the next row; rep from across. Each short edge has 96 sc. Fasten off.
Checkpoint: Your body panel should measure approximately 11 x 16 inches (28 x 40.5 cm), with 66 single crochet on each long zipper edge and 96 single crochet on each short end edge.
Round End Panels
Make 2 panels. Each panel is a flat circle that finishes with 96 single crochet to match the 96 stitch short edges of the body panel.
| Rnd | Instruction | Count |
|---|---|---|
| 1 | Magic ring, ch 1, 6 sc in ring. Do not turn. | 6 sc |
| 2 | 2 sc in each st around. | 12 sc |
| 3 | *Sc in next st, 2 sc in next st; rep around. | 18 sc |
| 4 | *Sc in next 2 sts, 2 sc in next st; rep around. | 24 sc |
| 5 | *Sc in next 3 sts, 2 sc in next st; rep around. | 30 sc |
| 6 | *Sc in next 4 sts, 2 sc in next st; rep around. | 36 sc |
| 7 | *Sc in next 5 sts, 2 sc in next st; rep around. | 42 sc |
| 8 | *Sc in next 6 sts, 2 sc in next st; rep around. | 48 sc |
| 9 | *Sc in next 7 sts, 2 sc in next st; rep around. | 54 sc |
| 10 | *Sc in next 8 sts, 2 sc in next st; rep around. | 60 sc |
| 11 | *Sc in next 9 sts, 2 sc in next st; rep around. | 66 sc |
| 12 | *Sc in next 10 sts, 2 sc in next st; rep around. | 72 sc |
| 13 | *Sc in next 11 sts, 2 sc in next st; rep around. | 78 sc |
| 14 | *Sc in next 12 sts, 2 sc in next st; rep around. | 84 sc |
| 15 | *Sc in next 13 sts, 2 sc in next st; rep around. | 90 sc |
| 16 | *Sc in next 14 sts, 2 sc in next st; rep around. Invisible join. | 96 sc |
Satin Look End Finish
Cut two fabric circles 5 inches (12.7 cm) across. Turn under a narrow hem or use fray check. Center one fabric circle on each crochet end panel and hand stitch around the edge, leaving the outer crochet round free for seaming.
Optional scallop after seaming: Join yarn at an outside edge and work *sl st in next st, ch 3, sl st in next st; rep around. Keep this loose enough that the end remains flat.
Handle Tabs
Make 4 tabs total.
Chain 7. Row 1: Sc in 2nd ch from hook and across. (6 sc) Rows 2 through 12: Ch 1, sc across. (6 sc)
Fold each tab over a D ring and stitch the short ends securely to the bag. For extra firmness, make tabs with a 2.75 mm hook.
Assembly Instructions
Follow these steps in order for the best results.
Step 1: Install the zipper. Lay the body panel right side up. Pin one zipper tape behind the foundation edge and the other behind the Row 64 edge, centered from end to end. Hand sew or machine sew through the edging stitches and zipper tape. Open zipper halfway before closing the bag shape.
Step 2: Form the cylinder. Bring the short ends into a barrel shape with the zipper along the top. The two 96 stitch short edges become the circular openings.
Step 3: Attach end panels. With right side facing out, match one end panel to one body opening. Use markers at quarters: 24 stitches per quarter on both pieces. Whipstitch or mattress stitch through corresponding stitches around. Repeat for the second end.
Step 4: Add lining. Sew a simple rectangular lining tube with round fabric ends. Slip inside the bag, turn the lining edge under, and hand stitch to the zipper tape.
Step 5: Add handle tabs. Position two tabs on each side of the zipper, approximately 2 inches (5 cm) from each end. Stitch tabs through the body and lining for strength.
Step 6: Add handles and charm. Attach D rings to the tabs, connect the handles, then add the pearl tassel charm to one front D ring.
Size Customization Tips
Want to make your bag longer or shorter? Here’s how to adjust.
To change bag length: Add or subtract foundation stitches in multiples of 6. At the stated gauge, 6 stitches changes the length by about 1 inch (2.5 cm).
To change diameter: Add or subtract body rows in pairs and keep the short edge stitch pickup compatible with the end circle. For every 2 body rows changed, adjust the short edge pickup by 3 single crochet and adjust the end circle final count to match.
For a longer handle drop: Use longer purchased handles or add crocheted connector tabs before attaching the D rings.
Troubleshooting Common Issues
| Issue | Fix |
|---|---|
| Panel curls or ruffles | Block lightly. If severe, go down a hook size for the shell body or keep skipped stitches looser. |
| End panel cups | Your sc rounds are too tight. Use a slightly larger hook or block the circles flat before sewing. |
| End panel waves | Your sc rounds are too loose. Use a smaller hook for the circles or steam block gently. |
| Zipper puckers | Baste first, sew from the center outward, and keep both zipper edges at exactly 66 sc. |
| Bag collapses | Add light stabilizer between crochet and lining, especially along the base and ends. |
Finishing and Blocking
Weave in all ends on the wrong side. Steam or wet block the body panel flat before zipper installation. Shape end panels over a flat surface and let dry completely.
After assembly, stuff the bag lightly with tissue while it dries so the barrel form sets evenly. This step really helps the bag hold its shape beautifully.
Care Instructions
Spot clean by hand with cool water and mild soap. Do not wring. Blot with a towel, reshape the barrel, and air dry away from direct heat. Remove detachable charms before cleaning. Store stuffed lightly to preserve the rounded shape.
Final Thoughts on This Bridal Barrel Bag Crochet Pattern
This cream lace bridal barrel bag makes such a stunning handmade gift or personal accessory. The shell stitch body looks intricate but uses a simple two row repeat. The structured shape comes together through careful assembly rather than complicated techniques.
Take your time with the zipper installation and end panel seaming. Those are the steps that really make this bag look professional. And don’t skip blocking. It makes a noticeable difference in how polished your finished piece looks.
I hope you love making this pattern as much as I do. Thank you so much for choosing this project! If you make one, I would absolutely love to see it. Tag me on Instagram or share a photo on Facebook. Seeing your finished makes is honestly the best part of sharing patterns.
Save this pattern to your Pinterest boards so you can find it easily when you’re ready to start. And please drop a comment below if you give it a try. I’d love to hear how it turns out for you!
Want a Quick & Easy Printable Version?
Get a clean, beautifully formatted PDF of this pattern — easy to follow step by step, ready to print or save on any device. No scrolling, no distractions, just the pattern.
Get the Printable PDF →