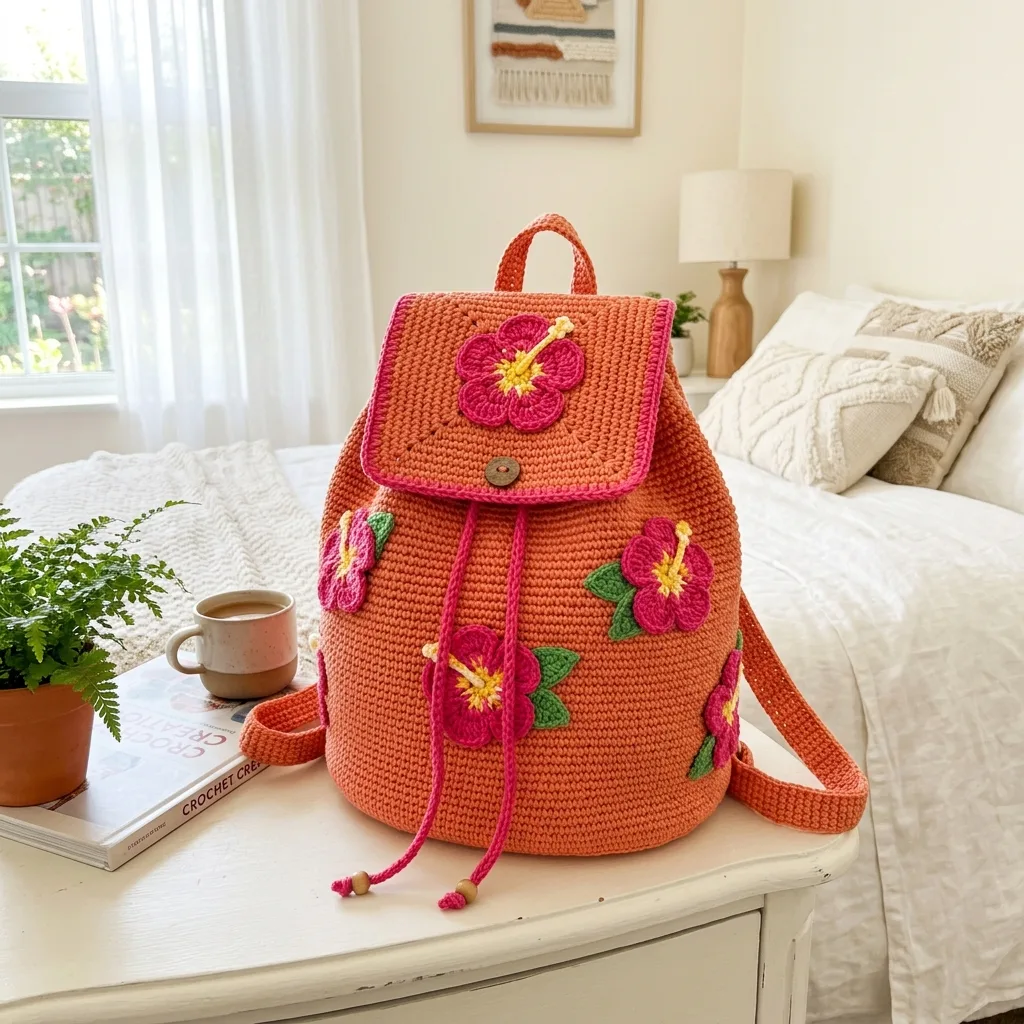
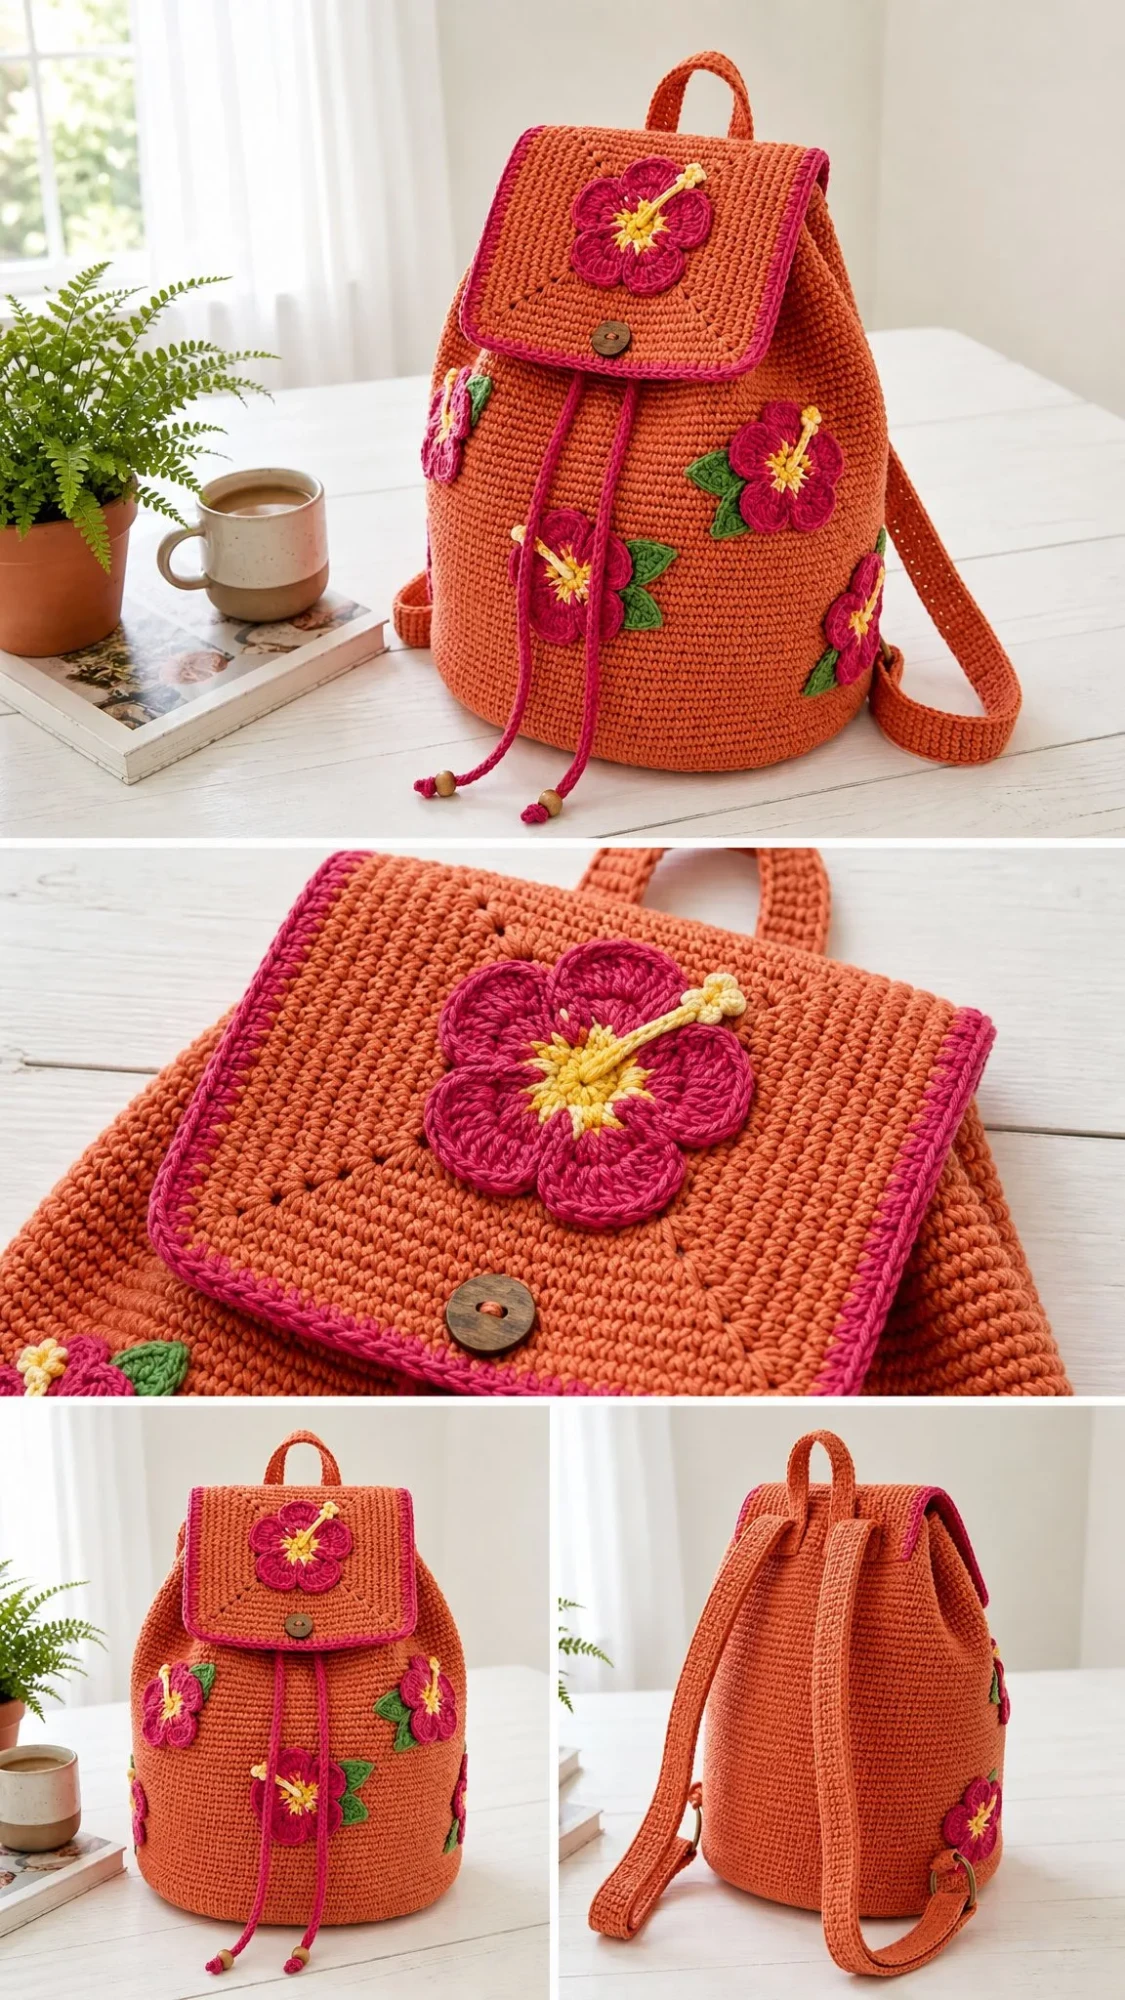
I call this one the Coral Hibiscus, and it started life as a tiny sketch in one of my old notebooks from a beach vacation years ago. I was sitting on a patio watching the hibiscus flowers sway in the wind, and I thought, "I need to carry that feeling with me everywhere." It took a while to get the shape just right, but this backpack finally captures that tropical energy I was chasing. The bright terracotta body, those bold fuchsia blooms, and the cheerful drawstring cords all come together into something that makes me smile every single time I pick it up.
Get the Ad-Free PDF Pattern
You can find the free pattern below, or you can purchase the ad-free printable PDF from my shop.
Get the Printable PDF →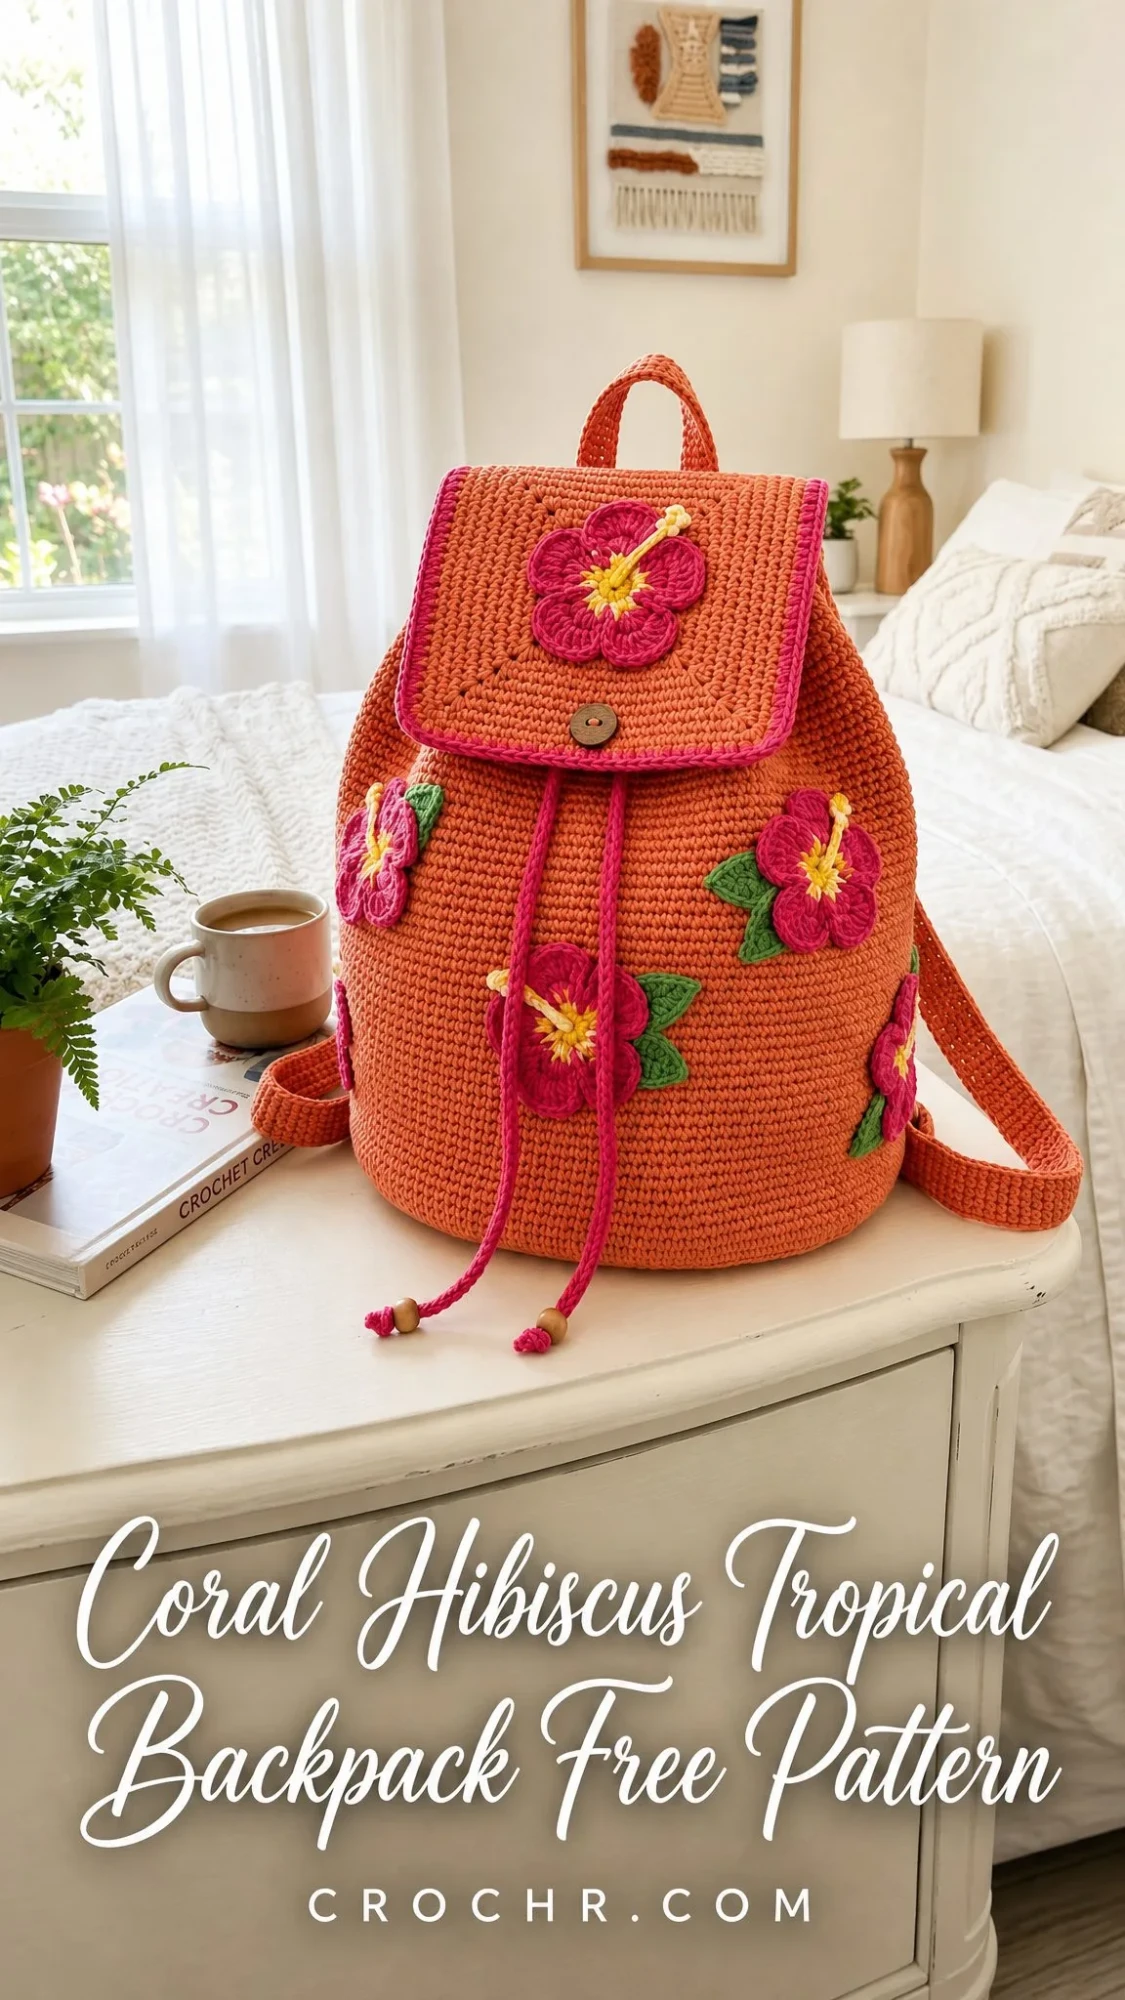
This is an intermediate project that combines continuous rounds, an oval base, flat pieces, and sewn appliques. If you have worked basic bags or amigurumi before, you will feel right at home. Confident beginners can absolutely tackle this too, as long as you mark your rounds carefully and check your stitch counts often.
About This Crochet Pattern
The Coral Hibiscus Tropical Backpack features a bottom-up oval base worked in continuous single crochet (sc) rounds. The body builds straight up from that sturdy foundation, creating a smooth cylindrical shape with just the right amount of structure to stand on its own. The flap adds classic backpack styling, while the hibiscus appliques bring all the tropical charm.
Finished Dimensions: Approximately 8.75 inches wide x 11 inches tall x 5.5 inches deep (22 x 28 x 14 cm)
Skill Level: Intermediate
Time Estimate: 10 to 14 relaxed hours, depending on your finishing speed and how long you spend arranging those beautiful flowers
Materials You Will Need
Gather these supplies before you begin. Having everything ready makes the whole process so much smoother.
Yarn:
Suggested Yarns:
Hook: 3.5 mm (US E) or size needed for gauge
Extras:
Substitution Note: Choose a smooth worsted or Aran yarn that creates a firm fabric at gauge. If using softer acrylic, add a lining or work one hook size smaller for structure. Match stitch gauge first, then check row gauge.
Gauge
Getting gauge right matters a lot for bags. You want that firm, sturdy fabric that holds its shape.
Swatch: 18 sc x 18 rows = 4 inches (10 cm), worked in single crochet and lightly blocked
Body Checkpoint: After Round 20, body should measure about 4.25 inches (11 cm) tall from base edge
Flat Pieces: Flap width after Row 1 should be about 8.5 inches (21.5 cm)
Abbreviations and Stitch Guide
Let me walk you through every stitch and abbreviation you will encounter. Even if you know these well, a quick refresher never hurts.
Special Stitches
Invisible Join: Cut yarn, pull tail through final stitch, thread needle under both loops of first stitch, then back down through final stitch. Tighten to mimic a stitch. This creates a seamless finish.
Standing sc: Place a slip knot on hook, insert hook in indicated stitch, yarn over, pull up a loop, yarn over and pull through both loops. Perfect for joining new yarn without a chain.
Picot Tip: Chain 3, slip stitch in first chain to make a small point for flower centers if desired.
Pattern Notes Before You Begin
A few important things to keep in mind as you work:
Backpack Base and Body Instructions
Start with yarn A. Work around both sides of the foundation chain to form an oval. Do not turn during base or body rounds.
Base Rounds
Round 1: Chain 25. Work 2 sc in 2nd chain from hook, sc in next 22 chains, 4 sc in last chain. Working along the opposite side of the foundation chain, sc in next 22 chains, 2 sc in first chain position. (52 sc)
Round 2: Inc in next 2 stitches, sc 22, inc in next 4 stitches, sc 22, inc in next 2 stitches. (60 sc)
Round 3: (Sc 1, inc) twice, sc 22, (sc 1, inc) 4 times, sc 22, (sc 1, inc) twice. (68 sc)
Round 4: (Sc 2, inc) twice, sc 22, (sc 2, inc) 4 times, sc 22, (sc 2, inc) twice. (76 sc)
Round 5: (Sc 3, inc) twice, sc 22, (sc 3, inc) 4 times, sc 22, (sc 3, inc) twice. (84 sc)
Round 6: (Sc 4, inc) twice, sc 22, (sc 4, inc) 4 times, sc 22, (sc 4, inc) twice. (92 sc)
Base Checkpoint: Your base should measure about 8.75 inches (22 cm) long and 5.5 inches (14 cm) wide after Round 6. A firm base helps the bag stand neatly. If yours is too loose or floppy, try going down a hook size.
Body Rounds
Round 7: Sc around in back loops only to turn the base upward. (92 sc)
This round creates that nice crisp edge where the base meets the sides. You will feel the fabric naturally want to turn upward.
Rounds 8 through 43: Sc around. Keep work smooth and cylindrical. (92 sc each round)
Just keep going round and round. This is the meditative part of the project. Put on a good podcast, settle in, and enjoy the rhythm.
Rounds 44 through 47: Sc around. (92 sc each round)
Round 48: Sc 4, ch 1, skip 1, sc 10; repeat from 8 times. (92 stitches including chain spaces)
This round creates the eyelet holes for your drawstring. Count carefully to make sure you have 8 evenly spaced eyelets.
Round 49: Sc in each sc and ch-1 space around. (92 sc)
Rounds 50 and 51: Sc around. Invisible join at end of Round 51. (92 sc each round)
Body Checkpoint: After Round 51, the bag body should measure about 10 to 10.5 inches (25.5 to 26.5 cm) tall from the base edge, before the flap. Top circumference is about 20.5 inches (52 cm).
Flap Instructions
Row 1: With right side facing, join yarn A 19 stitches to the right of back center. Chain 1, sc in same stitch and next 37 stitches. Turn. (38 sc)
Rows 2 through 18: Chain 1, sc in each stitch across. Turn after each row. (38 sc)
Row 19: Change to yarn E. Chain 1, sc 38 across top, 3 sc in corner, sc 17 down side, 3 sc in corner, sc 18, chain 8 for button loop, sc 20 across bottom. (122 stitches plus loop)
Flap Checkpoint: The flap should cover the front upper third of the bag, about 8.5 inches (21.5 cm) wide and 4 inches (10 cm) deep, with the loop centered over the button.
Top Handle
Row 1: With yarn A, chain 31, sc in 2nd chain from hook and each chain across. Turn. (30 sc)
Rows 2 through 6: Chain 1, sc across. Fasten off, leaving a long tail for sewing. (30 sc each row)
Shoulder Straps (Make 2)
Row 1: With yarn A, chain 91, sc in 2nd chain from hook and each chain across. Turn. (90 sc)
Rows 2 through 5: Chain 1, sc across. Fasten off, leaving a long sewing tail. (90 sc each row)
Drawstring Cords (Make 2)
With yarn E, chain 120. Slip stitch in 2nd chain from hook and each chain across. Alternatively, work an i-cord for a rounder finish.
Thread one cord through the eyelets from left to right and the second from right to left. Add wooden beads and knot the ends securely.
Hibiscus Appliques and Leaves
This is where the magic happens. Make 6 large flowers, 2 small flowers, and 8 leaves.
Large Hibiscus (Make 6)
Round 1: With yarn C, make a magic ring. Chain 1, 6 sc in ring, pull tight, join with slip stitch. (6 sc)
Round 2: Change to yarn B. In each stitch work: slip stitch, chain 2, 3 dc, chain 2, slip stitch. Repeat in all 6 stitches. (6 petals)
Center: With yarn C, embroider 5 to 7 long straight stitches from center outward. Add a picot tip or small French knots if desired.
Small Hibiscus (Make 2)
Work Round 1 as for large flower with 5 sc in the ring instead of 6.
Petal Round: In each stitch work: slip stitch, chain 2, 2 dc, chain 2, slip stitch. (5 petals)
Leaves (Make 8)
Step 1: With yarn D, chain 8. Sc in 2nd chain, hdc, dc 3, hdc, 3 sc in last chain. (9 stitches on first side)
Step 2: Working along opposite side: hdc, dc 3, hdc, sc, slip stitch to first sc. Fasten off. (17 edge stitches)
Assembly and Placement
Take your time with this step. The arrangement of your flowers really makes the backpack shine.
Assembly Order:
1. Sew handle to the top back, placing each end about 1.75 inches (4.5 cm) from center
2. Sew strap tops to the upper back, inside the top band. Sew lower strap ends to the lower back corners. Reinforce with a square and X of stitching
3. Sew button to the front center so the flap loop closes without pulling
4. Thread drawstrings, add beads, knot securely, and trim tails evenly
5. Optional lining: sew a simple oval-bottom fabric pouch slightly smaller than the bag and hand-stitch it just below the top edge
Flower Placement:
Blocking and Care
Blocking:
Care:
Troubleshooting Common Issues
Bag flares outward: Use a smaller hook on body rounds or tighten side tension. Steam-block around a box.
Base cups too much: Base rounds are too tight. Redo with looser tension or a 0.5 mm larger hook for base only.
Flap pulls at corners: Add 1 to 2 extra edge stitches at lower flap corners or block flap flat before sewing button.
Drawstring holes are uneven: Count the 8 eyelets on Round 48 and make sure each ch-1 space is worked into on Round 49.
Straps stretch: Add fabric or ribbon backing, or work straps with cotton and firm tension.
Size Customization Tips
Width and Depth: To make the bag wider, add chains to the foundation in multiples of 2. Every 2 added chains increases the long base by about 0.45 inches (1.1 cm) at gauge. Keep base increases at the curved ends only.
Height: Add or remove body rounds before Round 44. Each 4 to 5 rounds changes height by about 1 inch (2.5 cm).
Straps: For longer straps, add chains before Row 1. For shorter straps, remove chains. Keep both straps identical and reinforce the lower attachment points.
Final Thoughts on the Coral Hibiscus Tropical Backpack Crochet Pattern
This backpack is one of those projects that looks impressive but builds from simple, repetitive steps. The single crochet body is straightforward once you get into your rhythm. The flowers work up quickly and add so much personality. And the finished bag is genuinely useful, sturdy enough for daily adventures while still being soft and comfortable to wear.
I hope you love making this as much as I loved designing it. Thank you so much for choosing this pattern for your next project. It means the world to me when you bring these designs to life.
If you make your own Coral Hibiscus Tropical Backpack, I would absolutely love to see it. Save this pattern to your Pinterest boards so you can find it whenever you are ready to start, and please leave a comment below to let me know how yours turns out. Happy crocheting!
Want a Quick & Easy Printable Version?
Get a clean, beautifully formatted PDF of this pattern — easy to follow step by step, ready to print or save on any device. No scrolling, no distractions, just the pattern.
Get the Printable PDF →