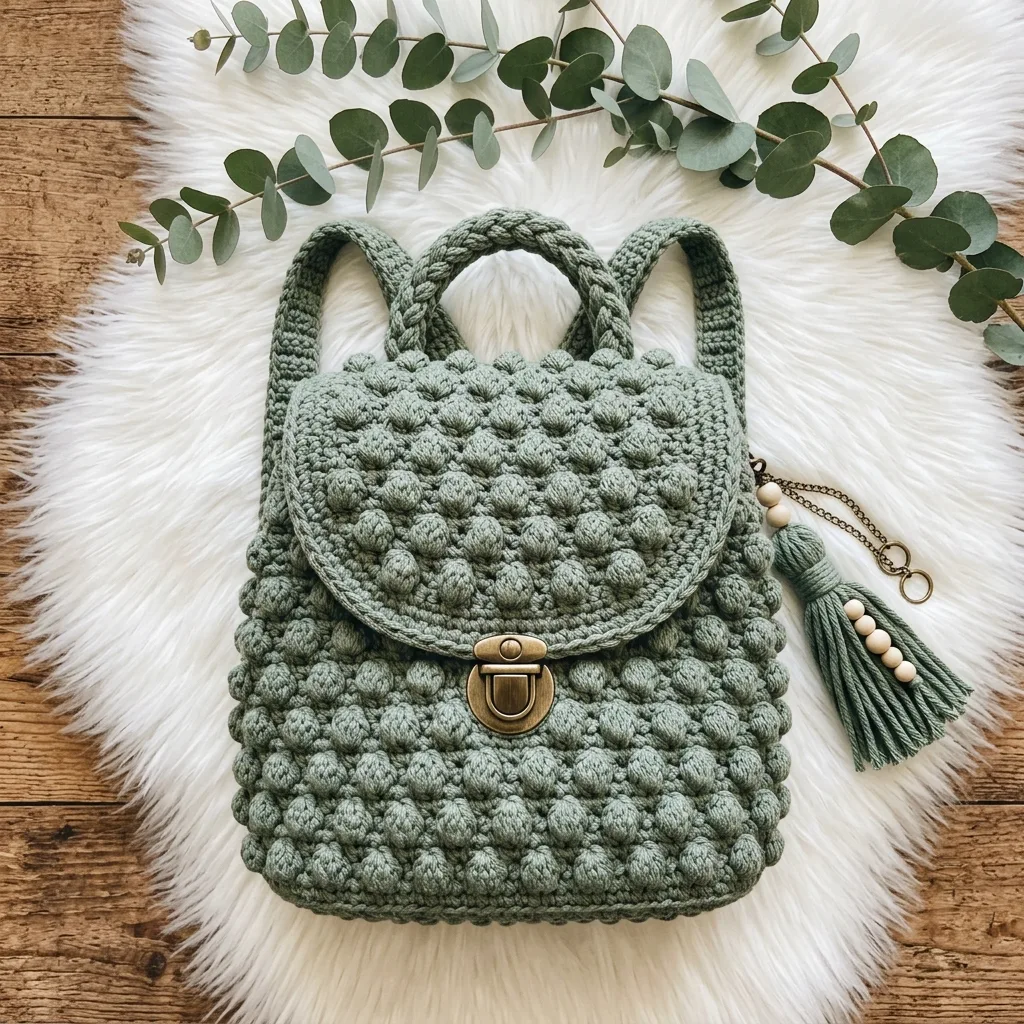
Last summer, I found myself standing in line at a farmer’s market, juggling a crossbody bag that kept sliding off my shoulder while I tried to balance fresh tomatoes and a jar of local honey. That frustrating moment got me thinking about what I really wanted in a bag. Something hands-free. Something cute enough for everyday outings. Something I could actually make myself. That’s when I started dreaming up a mini backpack design with texture, structure, and just enough boho charm to make me smile every time I reached for it. This Sage Green Boho Backpack crochet pattern is the result of that daydream turned reality.
Get the Ad-Free PDF Pattern
You can find the free pattern below, or you can purchase the ad-free printable PDF from my shop.
Get the Printable PDF →
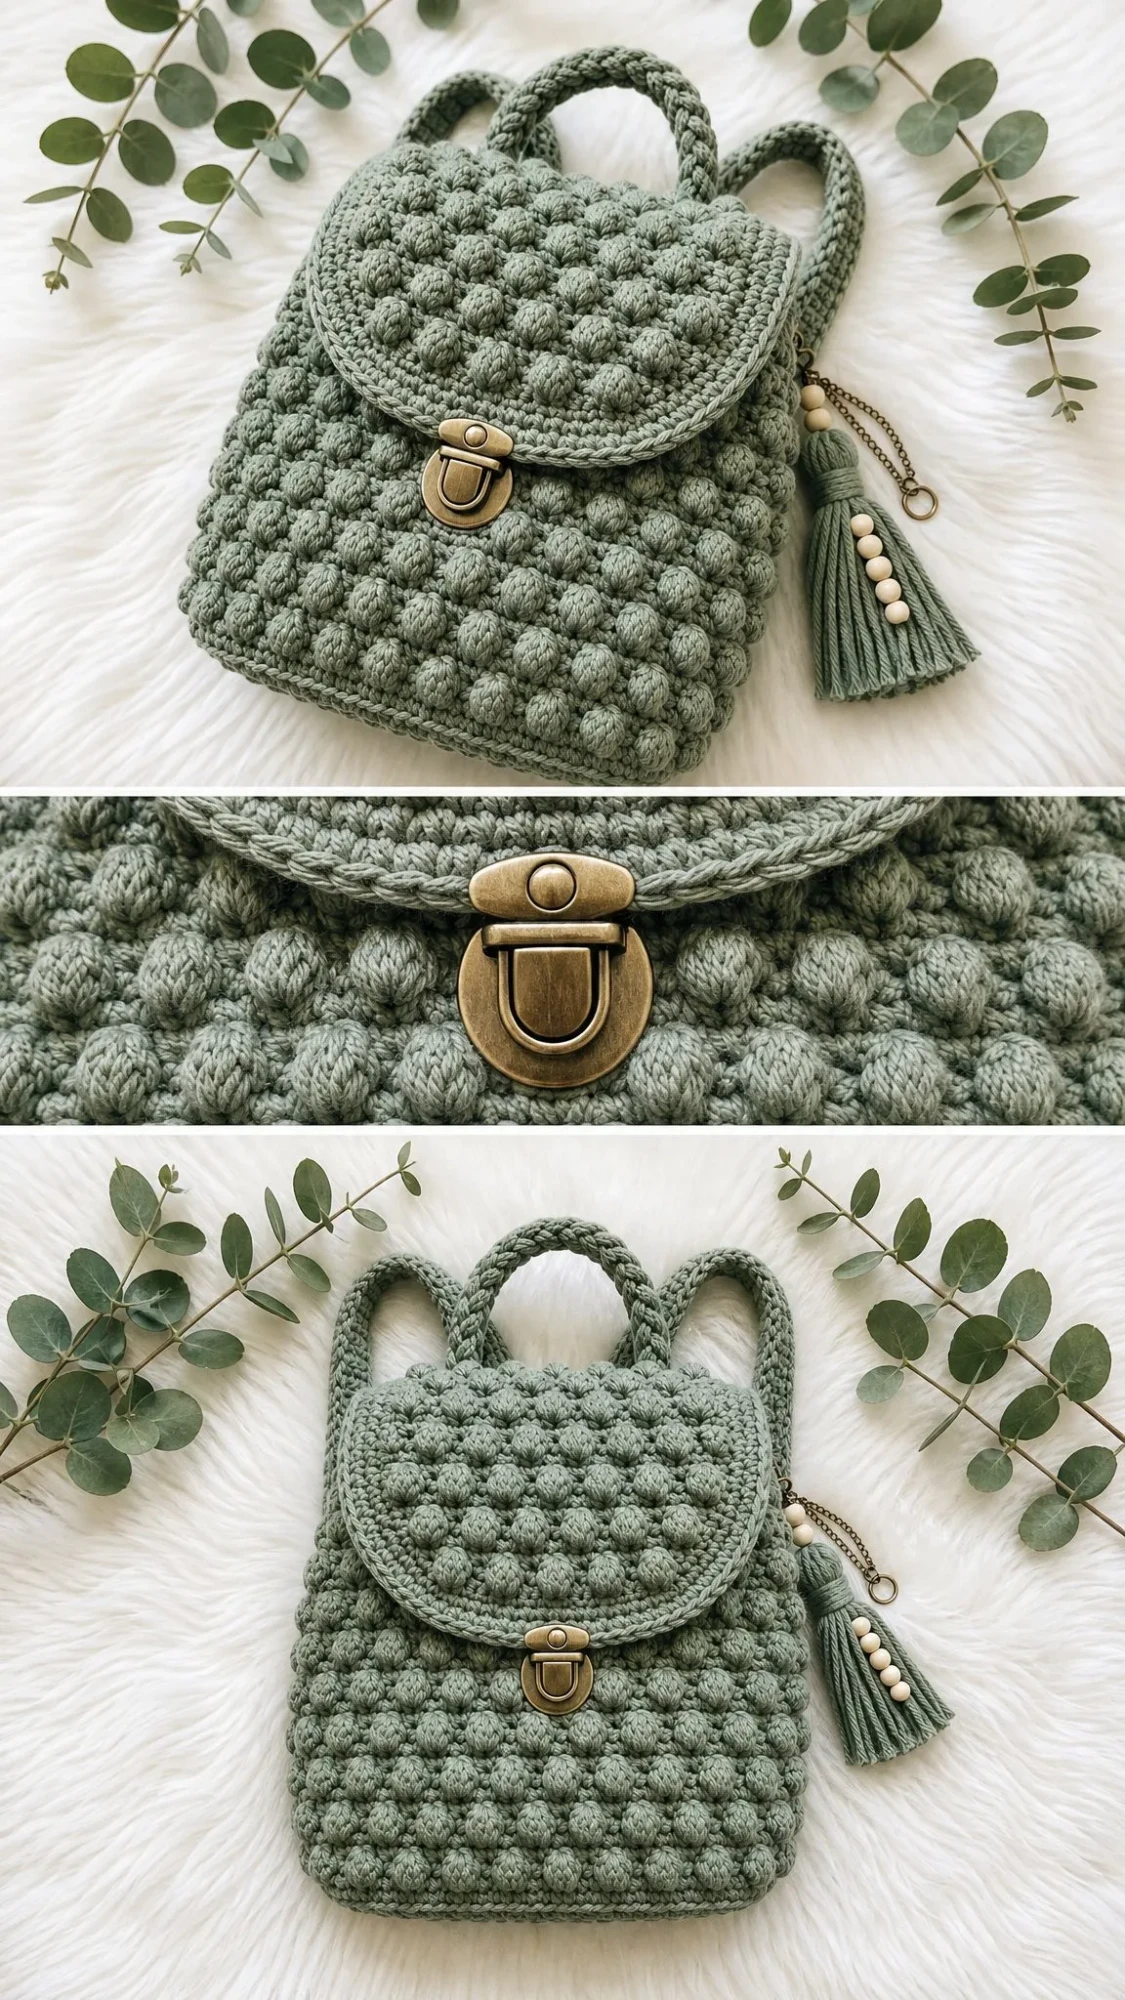
This textured mini backpack features a gorgeous puff stitch front panel that creates those satisfying raised bobbles you see in the photos. The back stays flat and firm for comfort against your body, while a long gusset strip gives the bag real depth and structure. Add in a rounded flap, braided top handle, adjustable straps, and a tassel charm with wooden beads, and you’ve got a showstopper that looks far more complicated than it actually is.
Pattern Overview and Finished Measurements
This crochet backpack pattern creates a compact bag perfect for carrying your essentials. Here are the finished dimensions:
| Measurement | Size |
|---|---|
| Width | 7.9 in / 20 cm |
| Height | 9.5 in / 24 cm |
| Depth | 3.5 in / 9 cm |
| Strap Length | 27.5 in / 70 cm |
| Handle Rise | 2 in / 5 cm |
The skill level is intermediate. You’ll use standard US crochet stitches throughout, but achieving that polished finish depends on keeping your puff texture even, seaming firmly, placing hardware correctly, and attaching straps neatly. Plan for about 8 to 12 hours of crochet time, plus additional time if you add a fabric lining.
Materials You’ll Need
Gather these supplies before you start:
Yarn: Worsted weight cotton or cotton-blend, approximately 430 yards / 393 meters total
Hook: US G/6 / 4.0 mm crochet hook, or size needed to achieve gauge
Hardware:
Extras:
Yarn Suggestions
I recommend choosing a firm cotton yarn that holds its shape well. Here are some excellent options:
Lion Brand 24/7 Cotton gives you crisp stitch definition and a sturdy body that’s perfect for bags.
Paintbox Yarns Cotton Aran offers smooth texture with a wide color range if you want to customize.
WeCrochet Dishie is a durable cotton that works beautifully for bags and accessories.
When substituting yarn, avoid very stretchy acrylic if you want your backpack to hold its shape. Match gauge before starting your panels.
Gauge Information
Getting gauge right matters for this project. Your bag pieces need to match up when you join them together.
Single crochet (sc) gauge: 18 sc x 20 rows = 4 inches / 10 cm after light blocking
Puff stitch gauge: 6 puff clusters x 8 puff rows = approximately 4 inches / 10 cm across the textured field
Here’s a helpful checkpoint: measure your front panel after Row 12. It should be about 7.9 inches / 20 cm wide. If it’s too big, go down a hook size. Too small? Go up a size.
Abbreviations and Stitch Definitions
Let me walk you through every abbreviation you’ll encounter in this pattern:
ch = chain: wrap yarn over hook and pull through the loop on your hook
st(s) = stitch(es): the individual loops you work into
sl st = slip stitch: insert hook, yarn over, pull through both the stitch and the loop on your hook in one motion
sc = single crochet: insert hook, yarn over, pull up a loop (2 loops on hook), yarn over, pull through both loops
dc = double crochet: yarn over, insert hook, yarn over, pull up a loop, (yarn over, pull through 2 loops) twice
hdc = half double crochet: yarn over, insert hook, yarn over, pull up a loop (3 loops on hook), yarn over, pull through all 3 loops
RS/WS = right side/wrong side: the front and back of your work
sc2tog = single crochet 2 stitches together: a decrease that turns 2 stitches into 1
rep = repeat: do the instructions again
blo = back loop only: work into only the back loop of the stitch instead of both loops
The 5-dc Puff Stitch
This special stitch creates the beautiful textured bobbles on your front panel and flap. Don’t let it intimidate you. It’s just a series of incomplete double crochets pulled together.
Step 1: Yarn over, insert hook in the indicated stitch, yarn over and pull up a loop to the height of your working row.
Step 2: Repeat step 1 four more times in the same stitch. You will have 11 loops on your hook.
Step 3: Yarn over and pull through all loops on hook.
Step 4: Chain 1 to close the puff. This closing chain is not counted as a stitch.
The key to uniform puffs is pulling each loop up to the same height. Take your time on the first few rows until you find your rhythm.
Pattern Notes Before You Begin
Keep these tips in mind as you work:
Front Panel with Puff Texture
This panel showcases all those gorgeous puff stitches. Your target size after Row 42 is approximately 7.9 inches / 20 cm wide x 8.4 inches / 21.3 cm tall before edging.
Row 1 (WS foundation): Ch 37. Sc in 2nd ch from hook and in each ch across. Turn. (36 sc)
Row 2: Ch 1, sc in each st across. Turn. (36 sc)
Row 3: Ch 1, [puff in next st, sc in next 2 sts] 12 times. Turn. (12 puffs, 24 sc; 36 sts)
Row 4: Ch 1, sc in each st across, working 1 sc into each puff and each sc. Turn. (36 sc)
Row 5: Ch 1, sc in first st, [puff in next st, sc in next 2 sts] 11 times, puff in next st, sc in last st. Turn. (12 puffs, 24 sc; 36 sts)
Row 6: Ch 1, sc in each st across. Turn. (36 sc)
Rows 7-40: Repeat Rows 3-6 eight more times, then repeat Rows 3-4 once more. Keep 36 sts each row.
Rows 41-42: Ch 1, sc in each st across. Turn at end of Row 41 only. (36 sc)
Panel edging: Ch 1. Work 1 round of sc evenly around the panel, placing 3 sc in each corner. Join with sl st. Fasten off, leaving a long tail for seaming. (Approximately 160 sc around)
Back Panel with Firm Flat Fabric
The back panel uses simple single crochet throughout. This creates a smooth, comfortable surface that sits against your back.
Rows 1-42: Ch 37. Work as for a plain sc rectangle: Row 1 gives 36 sc; Rows 2-42 each remain 36 sc.
Back edging: Work the same edging as the front panel. (Approximately 160 sc around)
Checkpoint: Your front and back panels should match in width and height before joining.
Side and Bottom Gusset Strip
This long strip wraps around the sides and bottom of your bag, giving it that boxy structure.
Row 1: Ch 17. Sc in 2nd ch from hook and in each ch across. Turn. (16 sc)
Rows 2-124: Ch 1, sc in each st across. Turn. (16 sc)
Optional texture edge: Work 1 sl st or crab stitch along each long edge for a corded outline.
Gusset checkpoint: Your strip should measure approximately 3.5 inches / 9 cm wide x 24.8 inches / 63 cm long. It wraps one side, the bottom, and the opposite side. The top remains open.
Joining Your Panels to the Gusset
Single Crochet Join Seam Technique
Hold two pieces with wrong sides together. Insert your hook through both layers, yarn over, pull up a loop, yarn over and pull through both loops. Work evenly, keeping seam tension firm but not tight.
Join Front to Gusset
Mark the center bottom of the front panel and the center of the gusset strip. With wrong sides together, pin or clip the gusset around one side, the bottom, and the opposite side of the front panel. Join with sc seam through both layers. Work 3 sc in bottom corners if needed to turn cleanly. Keep the top edge open.
Join Back to Gusset
Repeat the same joining process with the back panel. Check that the front and back top edges are level before fastening off. Weave in seaming tails securely, especially at lower corners.
Joining checkpoint: Your bag body should stand at approximately 7.9 inches / 20 cm wide x 9.5 inches / 24 cm tall including edging, with 3.5 inches / 9 cm depth.
Rounded Flap
Make 1. The flap is worked flat from the top edge downward. The first 10 rows build the puff field, and Rows 11-20 round the lower edge.
Row 1: Ch 31. Sc in 2nd ch from hook and across. Turn. (30 sc)
Row 2: Ch 1, sc across. Turn. (30 sc)
Row 3: Ch 1, [puff in next st, sc in next 2 sts] 10 times. Turn. (30 sts)
Row 4: Ch 1, sc across. Turn. (30 sc)
Row 5: Ch 1, sc in first st, [puff in next st, sc in next 2 sts] 9 times, puff in next st, sc in last st. Turn. (30 sts)
Rows 6-10: Repeat Rows 2-5 once, then repeat Row 2 once. (30 sc)
Row 11: Ch 1, sc2tog, sc across to last 2 sts, sc2tog. Turn. (28 sc)
Row 12: Repeat Row 11. Turn. (26 sc)
Row 13: Repeat Row 11. Turn. (24 sc)
Row 14: Repeat Row 11. Turn. (22 sc)
Row 15: Repeat Row 11. Turn. (20 sc)
Row 16: Repeat Row 11. Turn. (18 sc)
Row 17: Repeat Row 11. Turn. (16 sc)
Row 18: Repeat Row 11. Turn. (14 sc)
Row 19: Repeat Row 11. Turn. (12 sc)
Row 20: Repeat Row 11. Do not turn. (10 sc)
Flap edging: Ch 1, sc evenly around the flap, placing 3 sc at each upper corner and working 2 sc into the end of every other row along the curved sides. Join and fasten off. Sew the straight top edge to the back top edge, centered.
Flap checkpoint: Before sewing, your flap should be about 6.7 inches / 17 cm wide at top and 4.1 inches / 10.5 cm deep.
Backpack Straps
Make 2 straps.
Row 1: Ch 126. Sc in 2nd ch from hook and across. Turn. (125 sc)
Rows 2-5: Ch 1, sc across. Turn after Rows 2-4 only. (125 sc)
Edging: Sl st evenly around each strap. Fasten off, leaving long tails. Finished strap length: approximately 27.5 inches / 70 cm.
Braided Top Handle
Make 3 cords: Ch 32 for each cord, fasten off. Braid the three cords together, knot each end, and sew ends firmly to the top back edge. Add a row of sc over the braid if you prefer a thicker handle.
Top Rim Edging
Join yarn at a side seam. Work 1 round of sc evenly around the entire open top rim, skipping the area where the flap is sewn if it feels too bulky. Join with sl st. Work 1 additional round of sl st for a firm edge. (Approximately 104-112 sts, depending on seam thickness)
Attaching the Straps
Position upper strap ends 1.2 inches / 3 cm in from each top back corner. Sew through multiple rows for strength. Attach lower ends near the bottom back corners using D-rings or direct stitching. Try on before final knotting or sewing. You can shorten or lengthen by moving the lower attachment point.
Checkpoint: Straps should sit symmetrically and lie flat without twisting. Reinforce each attachment with several passes of yarn.
Turn-Lock Closure Installation
Close the flap over the front panel and mark the center. Sew or install the turn-lock plate on the flap first, then align the receiving plate on the front. Use matching yarn to cover hardware stitches on the inside.
If using a magnetic snap instead, add a small felt or fabric patch behind each snap half before securing.
Tassel Charm
Wrap yarn around a 6 inch / 15 cm card 28-32 times. Tie the top loop, cut the lower loops, wrap a neck 0.5 inch / 1.3 cm below the top, and trim evenly. Add 4 wooden beads and attach to the side ring with a chain or split ring.
Blocking and Lining
Steam lightly or wet block gently. Do not flatten the puff texture.
For a crisp retail finish, sew a simple box lining: front and back rectangles plus a gusset strip, then hand-stitch lining just below the top rim. Weave in all ends inside seams or behind the lining.
Care Instructions
| Wash | Dry | Heat | Storage |
|---|---|---|---|
| Spot clean or hand wash cold | Lay flat to dry | Steam lightly if needed | Store stuffed to hold shape |
Troubleshooting Common Issues
Puffs lean or vary in size: Pull loops to one consistent height and keep your closing chain relaxed.
Panel grows wider: Do not count the puff closing chain. Count 36 stitches after each row.
Bag body twists: Clip lower corners and match gusset center to panel center before joining.
Flap curls: Block lightly or add one extra sc edging round if needed.
Straps stretch: Use cotton yarn, tighter tension, and reinforce strap ends.
Customization Tips
Want to adjust the size? Here’s how:
Width: Add or subtract 3 foundation chains on front and back panels to preserve the puff repeat.
Height: Add or remove full 4-row puff repeats before the final two sc rows.
Depth: Add or subtract 2 gusset stitches for approximately 0.45 inch / 1.1 cm depth change.
Straps: Add or subtract chains before Row 1. Every 5 chains changes length by approximately 1.1 inches / 2.8 cm.
Final Thoughts on This Boho Backpack Crochet Pattern
I hope you love making this Sage Green Boho Backpack as much as I enjoyed designing it. The combination of textured puff stitches and practical construction creates something truly special. Whether you’re heading to the farmer’s market, a concert, or just running errands around town, this little backpack keeps your hands free and your essentials secure.
Thank you so much for choosing this pattern for your next crochet project. I’d absolutely love to see your finished backpack. If you make one, please share your photos on Instagram or Facebook and tag me. Seeing your color choices and styling ideas always makes my day.
If you found this crochet backpack tutorial helpful, go ahead and save it to your Pinterest boards so you can find it easily when you’re ready to start. And please drop a comment below if you make this pattern. I read every single one and love hearing about your crochet adventures!
Want a Quick & Easy Printable Version?
Get a clean, beautifully formatted PDF of this pattern — easy to follow step by step, ready to print or save on any device. No scrolling, no distractions, just the pattern.
Get the Printable PDF →