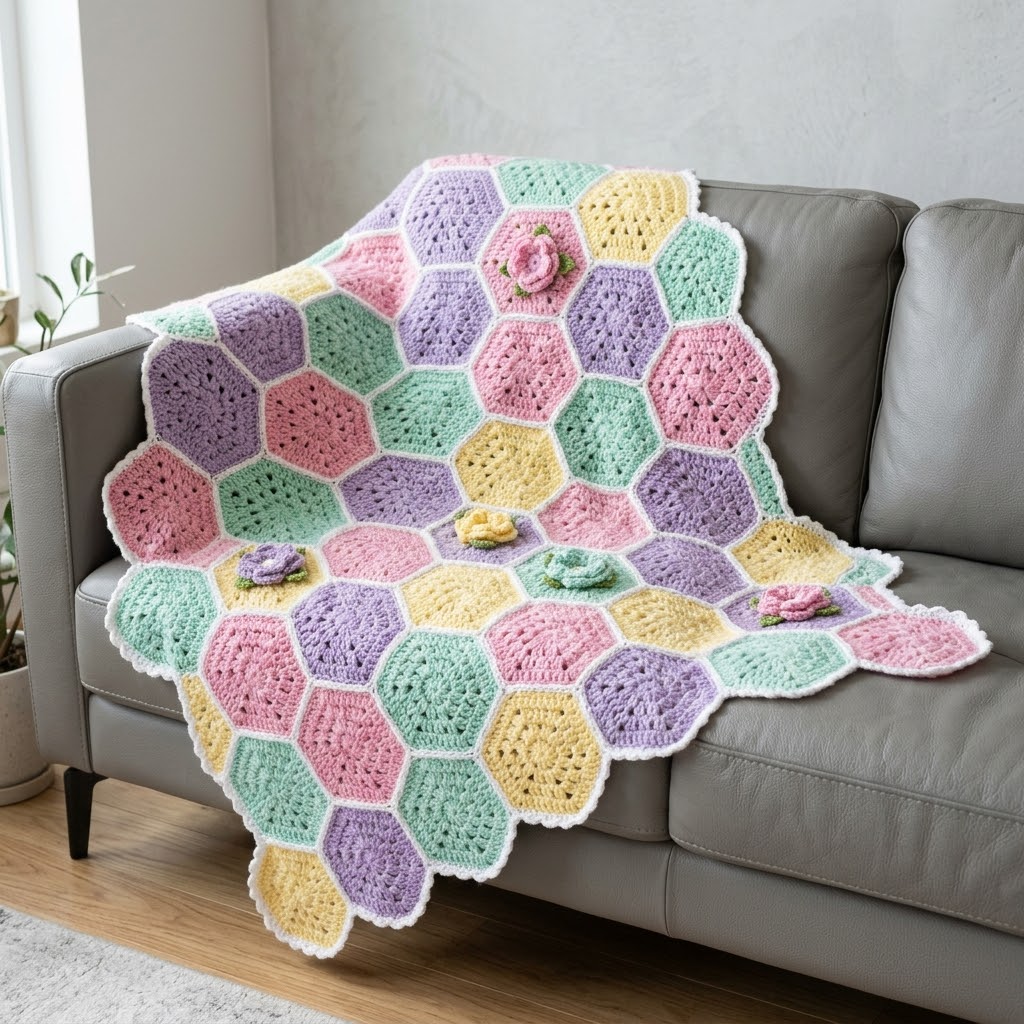
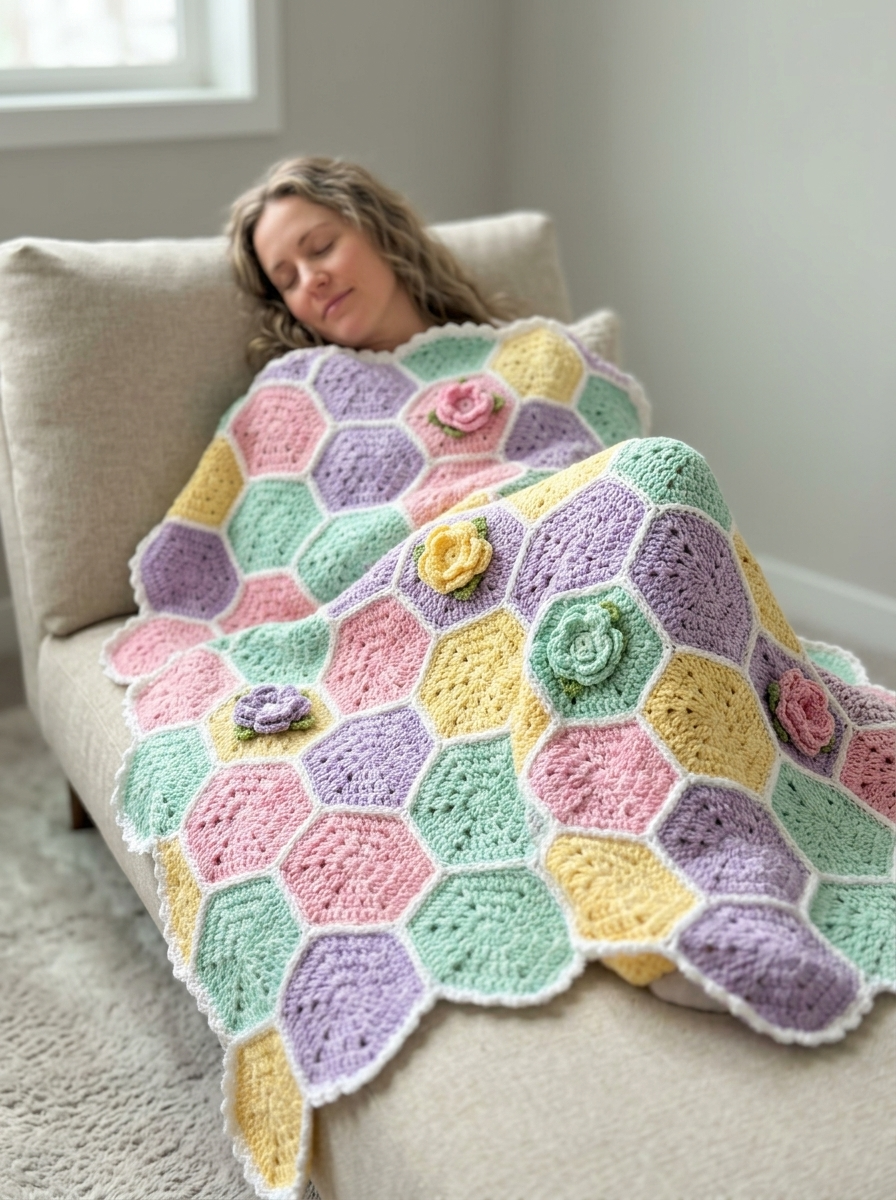
This gorgeous hexagon blanket is calling your name if you love pastel colors and springtime vibes. I designed this Spring Garden Hexagon Blanket to capture that soft, romantic feeling of a flower garden in full bloom. The best part? If you can crochet a basic hexagon, you can absolutely make this blanket.
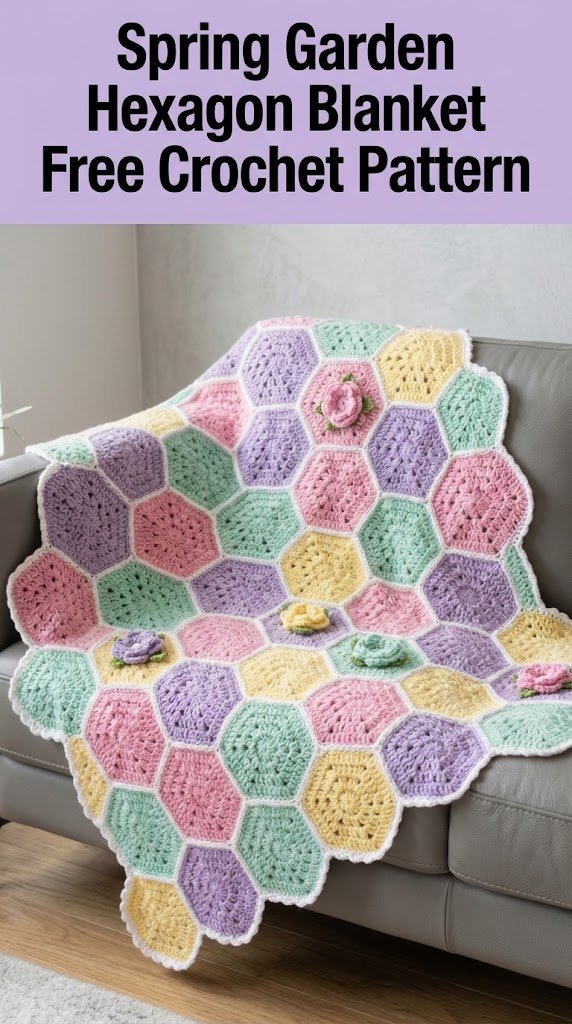
The construction is simple. You make individual hexagon motifs, join them together, and add a scalloped border. Scattered across the blanket are sweet little three-dimensional roses that give it that extra special garden touch. This crochet pattern walks you through every single step.
Let me show you exactly how to recreate this beauty for yourself or someone you love.
Why You Will Love This Crochet Tutorial
This blanket hits all the right notes. The hexagon shape creates visual interest without complicated colorwork. Each motif works up quickly, making this a perfect portable project. Take a few hexagons with you anywhere.
The pastel color palette works beautifully for baby gifts, spring decor, or anyone who loves soft romantic colors. Pink, lavender, mint green, and butter yellow play together perfectly here.
And those roses? They look impressive but are actually beginner friendly once you understand the technique. I will walk you through it step by step.
Skill Level
Intermediate beginner. If you have made granny squares or any basic motif before, you have the skills for this project. The hexagons use familiar stitches in a straightforward pattern. The roses require a bit more attention but nothing scary.
Finished Dimensions
Approximately 45 inches wide by 50 inches long based on the arrangement shown. You can easily adjust the size by making more or fewer hexagons.
Each hexagon measures approximately 5 inches point to point when blocked.
Materials Needed for Your Spring Garden Hexagon Blanket
Yarn
Worsted weight yarn (weight 4) in the following colors:
I recommend a soft acrylic or acrylic blend for easy care. Look for something with good stitch definition so your hexagons look crisp and clean.
Hook
Size H/8 (5.0 mm) crochet hook or size needed to obtain gauge.
Notions
Gauge
One completed hexagon = 5 inches point to point after blocking.
Gauge matters here because it affects your final blanket size and how well your hexagons fit together. Make one hexagon first and measure it. Adjust your hook size up if your hexagon is too small, down if too large.
Abbreviations and Stitch Definitions
Let me define every stitch before we begin. No surprises.
ch = chain: Yarn over, pull through loop on hook. This creates the foundation for most crochet work.
sl st = slip stitch: Insert hook, yarn over, pull through stitch AND loop on hook in one motion. Used for joining and moving across stitches without adding height.
sc = single crochet: Insert hook, yarn over, pull up a loop (2 loops on hook), yarn over, pull through both loops. The shortest basic stitch.
dc = double crochet: Yarn over, insert hook, yarn over, pull up a loop (3 loops on hook), yarn over, pull through 2 loops, yarn over, pull through remaining 2 loops. A taller stitch that creates nice drape.
2dc cl = 2 double crochet cluster: Work 2 dc in the same stitch but stop before the final yarn over on each one (leaving 3 loops on hook), then yarn over and pull through all 3 loops. Creates a joined pair.
3dc cl = 3 double crochet cluster: Same concept but with 3 partially completed dc stitches joined at the top.
ch-sp = chain space: The gap created by chain stitches in the previous round. You work into this space, not into individual chains.
sk = skip: Pass over the indicated stitch without working into it.
How to Crochet the Basic Hexagon Motif
You will need approximately 55 to 60 hexagons for the blanket size shown. The exact number depends on your final arrangement. Make them in a mix of all four pastel colors.
Round 1 (Center)
With your chosen color, ch 4. Join with a sl st to first ch to form a ring.
Ch 3 (counts as first dc throughout), work 11 dc into the ring. Join with sl st to top of beginning ch-3.
Stitch count: 12 dc
The ring might feel tight at first. That is normal. Just push your stitches close together around the ring.
Round 2 (First Expansion)
Ch 3, dc in same st as join (this creates the first corner). Ch 1.
(2 dc in next st, ch 1) around. Join with sl st to top of beginning ch-3.
Stitch count: 24 dc with 12 ch-1 spaces
Round 3 (Creating the Hexagon Shape)
Here is where the magic happens. We create six distinct corners.
Ch 3, dc in same st. Dc in next dc. (2 dc, ch 2, 2 dc) in next ch-1 sp (this is your corner). Dc in next 2 dc.
Repeat from * around, working a corner cluster in every other ch-1 space (6 corners total). Join with sl st.
Stitch count: 48 dc with 6 corner ch-2 spaces
Round 4 (Final Round)
Ch 3, dc in each dc to corner. (2 dc, ch 2, 2 dc) in corner ch-2 sp. Continue dc in each dc around, working corner clusters in each corner ch-2 sp. Join with sl st.
Stitch count: 72 dc with 6 corner ch-2 spaces
Fasten off. Weave in ends.
Color Distribution
For a balanced look like the blanket shown, make roughly equal numbers in each color:
Lay them out before joining to make sure no two same-colored hexagons touch. Rearrange until you love the distribution.
How to Crochet the 3D Rose Embellishments
These little roses scattered across the blanket add so much charm. Make 5 to 7 roses in assorted colors.
Rose Base
Ch 40.
Row 1: Sc in 2nd ch from hook and each ch across. (39 sc)
Row 2: Ch 3, turn. Work 4 dc in first sc. 5 dc in each sc across.
This creates a long ruffled strip. Do not panic if it curls wildly. That is exactly what you want.
Shaping the Rose
Starting at one end, roll the strip tightly to form the center bud. Continue rolling more loosely as you go outward. The ruffles naturally create petal shapes.
Use your yarn needle and a length of matching yarn to stitch through the base as you roll, securing each layer. Stitch through all layers at the bottom several times to lock the shape.
Rose Leaves (Make 2 per rose)
With light green yarn, ch 8.
Sc in 2nd ch from hook, hdc in next ch, dc in next 2 ch, hdc in next ch, sc in next ch, sl st in last ch.
Ch 1, do not turn. Working down the other side of the chain, sl st in first st, sc in next, hdc in next, dc in next 2, hdc in next, sc in last.
Fasten off, leaving a tail for attaching.
Joining the Hexagons
I recommend the flat slip stitch join for this blanket. It creates that pretty white outline between each hexagon that you see in the photos.
Step by Step Joining Method
1. Hold two hexagons with wrong sides together (right sides facing out).
2. Join white yarn with sl st through both corner ch-2 spaces.
3. Working through both layers, sl st in each stitch across the edge until you reach the next corner.
4. Continue joining hexagons in rows first, then join the rows together.
Assembly Layout
Arrange your hexagons in offset rows like a honeycomb. The blanket shown uses approximately 8 hexagons across and 7 to 8 rows, with half hexagons filling the edges.
For a cleaner edge without making half hexagons, simply leave the natural scalloped edge that forms from the hexagon points.
Attaching the Roses
Before adding the border, decide where you want your roses. Space them randomly across the blanket surface for a natural garden feel.
Using your yarn needle and matching thread, stitch each rose securely to the center of a hexagon. Attach the leaves beside each rose, tucking the base under the rose slightly.
Take your time here. These roses are the focal point of your Spring Garden Hexagon Blanket, so make sure they feel secure and look just right.
Scalloped Border
The border finishes everything beautifully with that soft scalloped edge.
Round 1 (Foundation)
Join white yarn at any corner point.
Ch 1, work sc evenly around entire blanket, placing 3 sc in each corner point and working sc into join seams as needed. Join with sl st.
Round 2 (Scallop Round)
Ch 1, sc in first st.
Sk 2 sts, 5 dc in next st, sk 2 sts, sc in next st.
Repeat from * around entire blanket. At corners, you may need to adjust spacing. The goal is a smooth scalloped edge all around.
Join with sl st to first sc. Fasten off.
Finishing Your Blanket
Weave in all remaining ends. You will have quite a few from all those hexagons. Take your time and weave each tail through at least 2 inches of stitches before trimming.
Blocking is optional but makes a noticeable difference. Wet block by soaking the blanket in lukewarm water, gently squeezing out excess moisture (no wringing), and laying flat to dry. Pin if needed to shape the edges.
Tips for Success
Work loosely on the roses. Tight stitches make the strip hard to roll into a nice shape.
Count your stitches on each hexagon round. One missed stitch throws off the whole shape.
Use stitch markers at each corner ch-2 space while you learn the pattern. Remove them once the hexagon shape clicks for you.
Make all hexagons before joining. This lets you play with the color arrangement until it looks perfect.
Customization Ideas
Want to make this your own? Here are some ideas.
Change the color palette to match any nursery, bedroom, or season. Deep jewel tones would look stunning. So would all neutrals with cream and tan.
Add more roses for an ultra-romantic look, or skip them entirely for a simpler modern vibe.
Resize easily by making more hexagons for a larger throw or fewer for a baby blanket.
Use different yarn weights. Bulky yarn creates a cozy chunky blanket. Sport weight makes a lighter warmer-weather version.
Wrapping Up Your Spring Garden Hexagon Blanket Crochet Pattern
You now have everything you need to create this beautiful blanket from scratch. The hexagon construction keeps things interesting without overwhelming you. The roses add that special handmade touch that makes people say wow.
I really hope you enjoy making this project as much as I enjoyed designing it. There is something so satisfying about watching a pile of hexagons transform into a stunning finished blanket.
Thank you so much for choosing this pattern. Your support means the world to me.
When you finish your blanket, I would absolutely love to see it. Tag me on Instagram or share it in my Facebook group. Seeing your creations is genuinely the best part of my day.
Happy crocheting, friend. You have got this.
