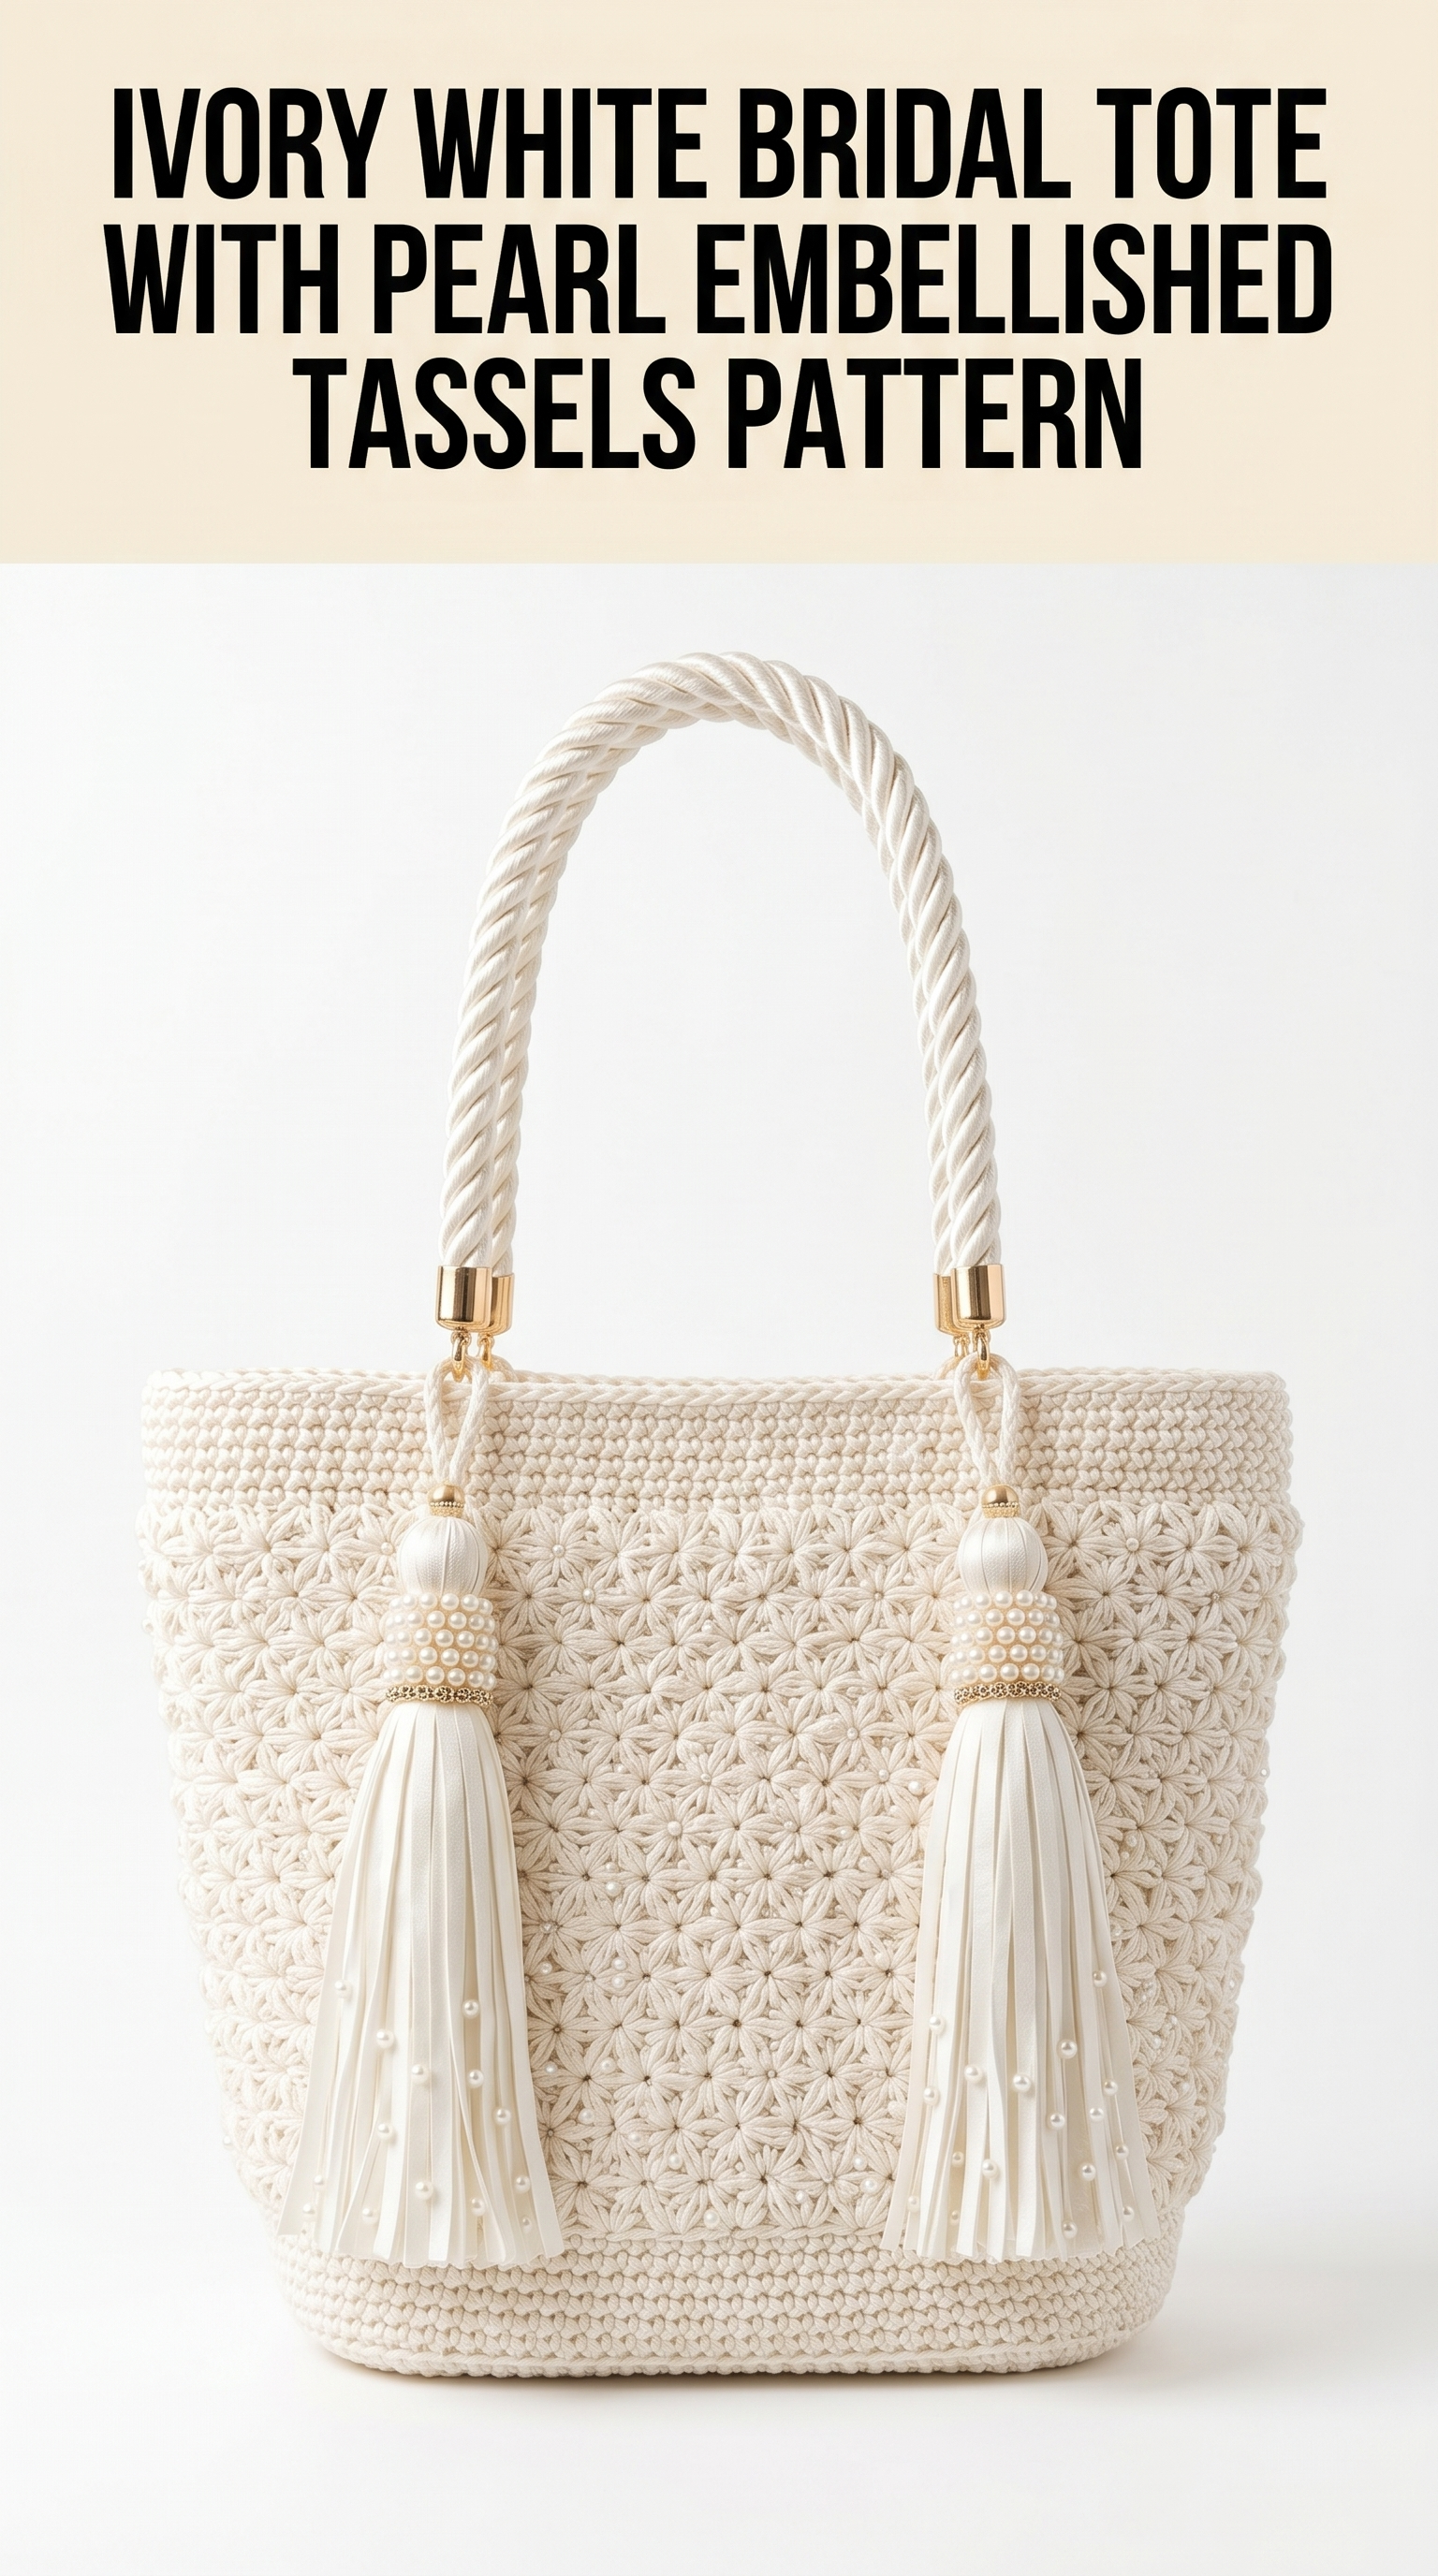
This stunning crochet tote bag is the kind of project that makes you feel like a true artisan when you finish it. The jasmine stitch creates those gorgeous textured flower-like clusters across the body, while the pearl-adorned tassels and twisted rope handle elevate this bag from handmade to high-end bridal accessory.
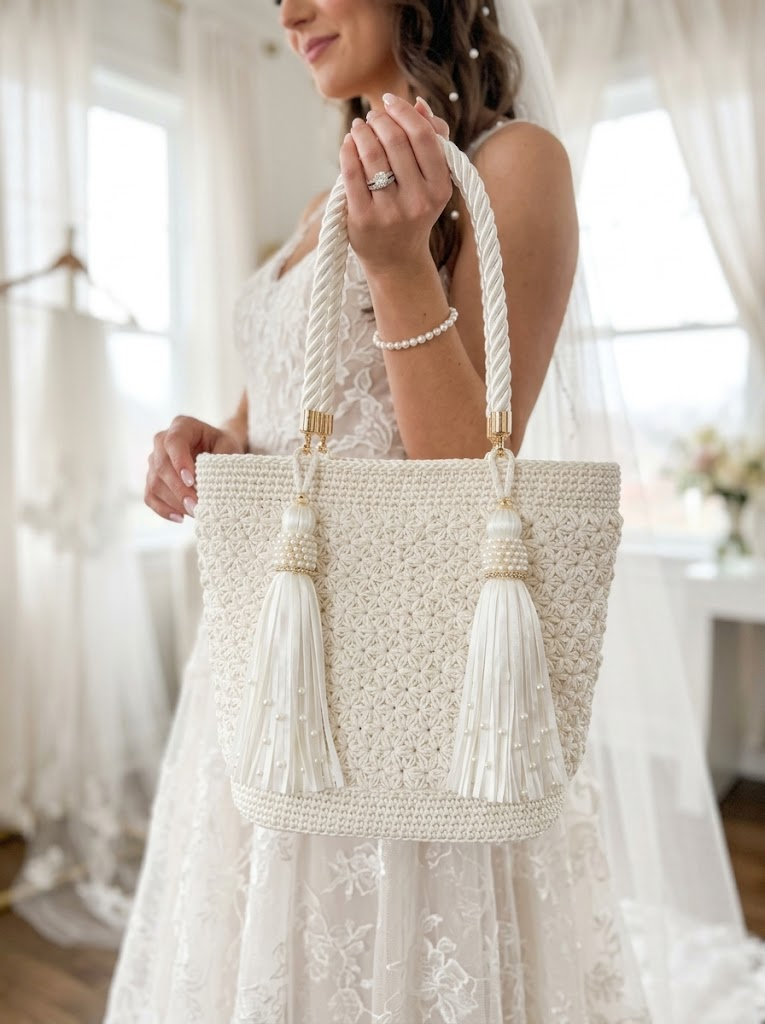
I designed this ivory white bridal tote with special occasions in mind. Think wedding day essentials, honeymoon travel, or even an elegant everyday carryall. The construction is more approachable than it looks. If you can work double crochets and follow a simple repeat, you can absolutely make this crochet pattern your own.
Let me walk you through every single step.
Why This Crochet Tote Pattern Works So Well
The magic here is the jasmine stitch, sometimes called the star stitch or flower stitch. It creates those beautiful six-pointed flower motifs you see covering the main body of the bag. Each “flower” forms naturally as you work clusters of stitches that pull together at a center point.
The bottom section uses tight single crochet rows for stability. This gives the bag a solid base that holds its shape even when filled. The contrast between the dense bottom and the decorative jasmine body adds visual interest and practical structure.
What I love most is how the hardware and embellishments transform the finished piece. The gold end caps, twisted rope handle, and pearl-wrapped tassels make this look like something from a boutique window. But you made it with your own hands.
Skill Level
Intermediate. You should be comfortable with basic stitches and reading pattern instructions. The jasmine stitch has a learning curve, but I break it down completely below. If you have made a few projects and feel confident working in the round, you are ready.
Finished Dimensions
Materials Needed

Yarn
Mercerized cotton gives that subtle sheen visible in the finished bag. It also holds stitch definition beautifully for textured patterns like the jasmine stitch.
Hook
Adjust if needed to achieve gauge. A tighter gauge helps the bag hold its shape.
Notions and Hardware
Gauge
18 stitches and 14 rows in single crochet equals 4 inches square.
For the jasmine stitch section, 2 full jasmine repeats should measure approximately 2.5 inches wide.
Always swatch before starting. This bag needs to hold its shape, so erring toward a tighter gauge is better than looser.
Abbreviations and Stitch Definitions
Let me define every stitch before we begin. Read through this section even if you feel experienced. The jasmine stitch definition is essential.
Understanding the Jasmine Stitch
Before you start the bag, let me break down the jasmine stitch so it makes sense.
The jasmine stitch creates flower-like clusters. Here is how one repeat works:
1. Work 3 dc into one stitch
2. Skip 2 stitches
3. Work 3 dc into the next stitch
4. Chain 1
5. Work 1 dc inserting your hook through the top of both 3-dc clusters you just made, connecting them at the center
This creates one “flower” motif. The center dc pulls everything together and forms that star-shaped appearance.
Practice this on a swatch chain of 20 stitches before starting the bag. Once you feel the rhythm, it becomes almost meditative.
Step by Step Crochet Pattern
Part 1: The Base
The base is worked flat in rows using single crochet for maximum density.
Foundation: Ch 37.
Row 1: Sc in 2nd ch from hook and in each ch across. (36 sts)
Rows 2 through 14: Ch 1, turn. Sc in each st across. (36 sts)
You should have a rectangle approximately 10 inches long by 4 inches wide. This forms the entire bottom of the tote.
Fasten off but do not cut yarn. We continue directly into the body.
Part 2: Building Up the Sides (Single Crochet Border)
Now we work around the entire base to build up the sides. This creates a seamless transition from flat base to bag body.
Round 1: Ch 1. Work sc evenly around the entire rectangle. Work 36 sc across the long sides and 14 sc across the short sides. Place a stitch marker at each corner. Sl st to first sc to join. (100 sts)
Rounds 2 through 4: Ch 1. Sc in each st around. Sl st to join. (100 sts per round)
These three rounds create a stable lower border before the decorative jasmine section begins.
Part 3: Jasmine Stitch Body
This is where the bag transforms. Work the jasmine stitch pattern around the entire bag.
Setup Round (Round 5): Ch 3 (counts as dc). Dc in same st. *Skip 2 sts, work 3 dc in next st, ch 1, dc through tops of previous and current cluster to join them.* Repeat from * around, adjusting final repeat to join smoothly. Sl st to top of ch-3.
Tip: You may need to adjust your starting stitch count slightly to make the jasmine repeat work evenly. Having a multiple of 4 plus 2 works best. If needed, work a few invisible increases or decreases in Round 4 to reach 98 or 102 stitches.
Rounds 6 through 18: Continue jasmine stitch pattern. Each round, work your first cluster into the center dc of the flower below, which staggers the flowers and creates that beautiful offset floral effect.
At the end of Round 18, the jasmine section should measure approximately 6 inches tall.
Part 4: Top Border
We finish with a clean single crochet border for structure.
Round 19: Ch 1. Sc in each stitch and chain space around, working approximately 100 sc total. Sl st to join.
Rounds 20 through 22: Ch 1. Sc in each st around. Sl st to join. (100 sts)
Fasten off. Weave in all ends securely.
Part 5: Adding Pearl Embellishments
This step is optional but adds significant elegance.
Using thin beading wire or strong thread, attach small faux pearls scattered across the jasmine stitch body. I recommend placing pearls at the center of every third or fourth flower motif. Secure each pearl with several passes of thread through the bead and through the crochet fabric.
Space them randomly for an organic look, or create a deliberate pattern. Both approaches work beautifully.
Part 6: Handle Attachment
The twisted rope handle attaches using gold barrel-style end caps with loops.
1. Thread each end of your rope handle through a gold end cap. Secure with strong glue or by crimping if your end caps allow.
2. Position the end caps at the side edges of the tote, approximately 2 inches in from each corner.
3. Use matching yarn to whip stitch the end cap loops securely to the inside top edge of the bag. Reinforce with multiple passes.
The handle should arc gracefully above the bag opening.
Part 7: Creating and Attaching Tassels
The pearl-embellished tassels are the finishing touch.
Option 1: Purchase pre-made white leather or faux leather tassels. Add pearl bead wraps around the tassel cap by stringing small pearls onto thin wire and wrapping around the top section.
Option 2: Create tassels from scratch using white faux leather strips. Cut strips approximately 4 inches long, bundle them, and wrap the top with a separate strip to secure. Add pearl wraps as above.
Attach finished tassels to the rope handle just below the gold end caps. They should hang approximately 4 to 5 inches down the front of the bag.
Part 8: Lining (Optional)
For a polished interior, add a fabric lining.
1. Cut two rectangles of cotton fabric slightly smaller than the bag interior.
2. Sew side and bottom seams with right sides together.
3. Fold top edge under and press.
4. Insert lining into bag and hand stitch the folded top edge to the inside of the crochet top border.
This protects the crochet from wear and gives the bag a professional finish.
Tips for Success
Styling Your Bridal Tote
This ivory white bridal tote with pearl embellished tassels works for so many occasions. Brides love it for carrying touch-up makeup, phones, and tissues on the wedding day. It also makes an elegant gift for bridesmaids or mothers of the bride.
Beyond weddings, this bag is stunning for garden parties, summer brunches, or vacation travel. The neutral ivory pairs with everything.
Thank You for Making This With Me
I truly appreciate you choosing this crochet pattern for your next project. There is something deeply satisfying about creating an accessory this elegant with just a hook and some yarn.
If you make this tote, I would absolutely love to see it. Share your finished bag on Instagram or Facebook and tag me. Seeing your versions genuinely makes my day.
Happy crocheting, and enjoy every stitch of this beautiful bridal tote.
