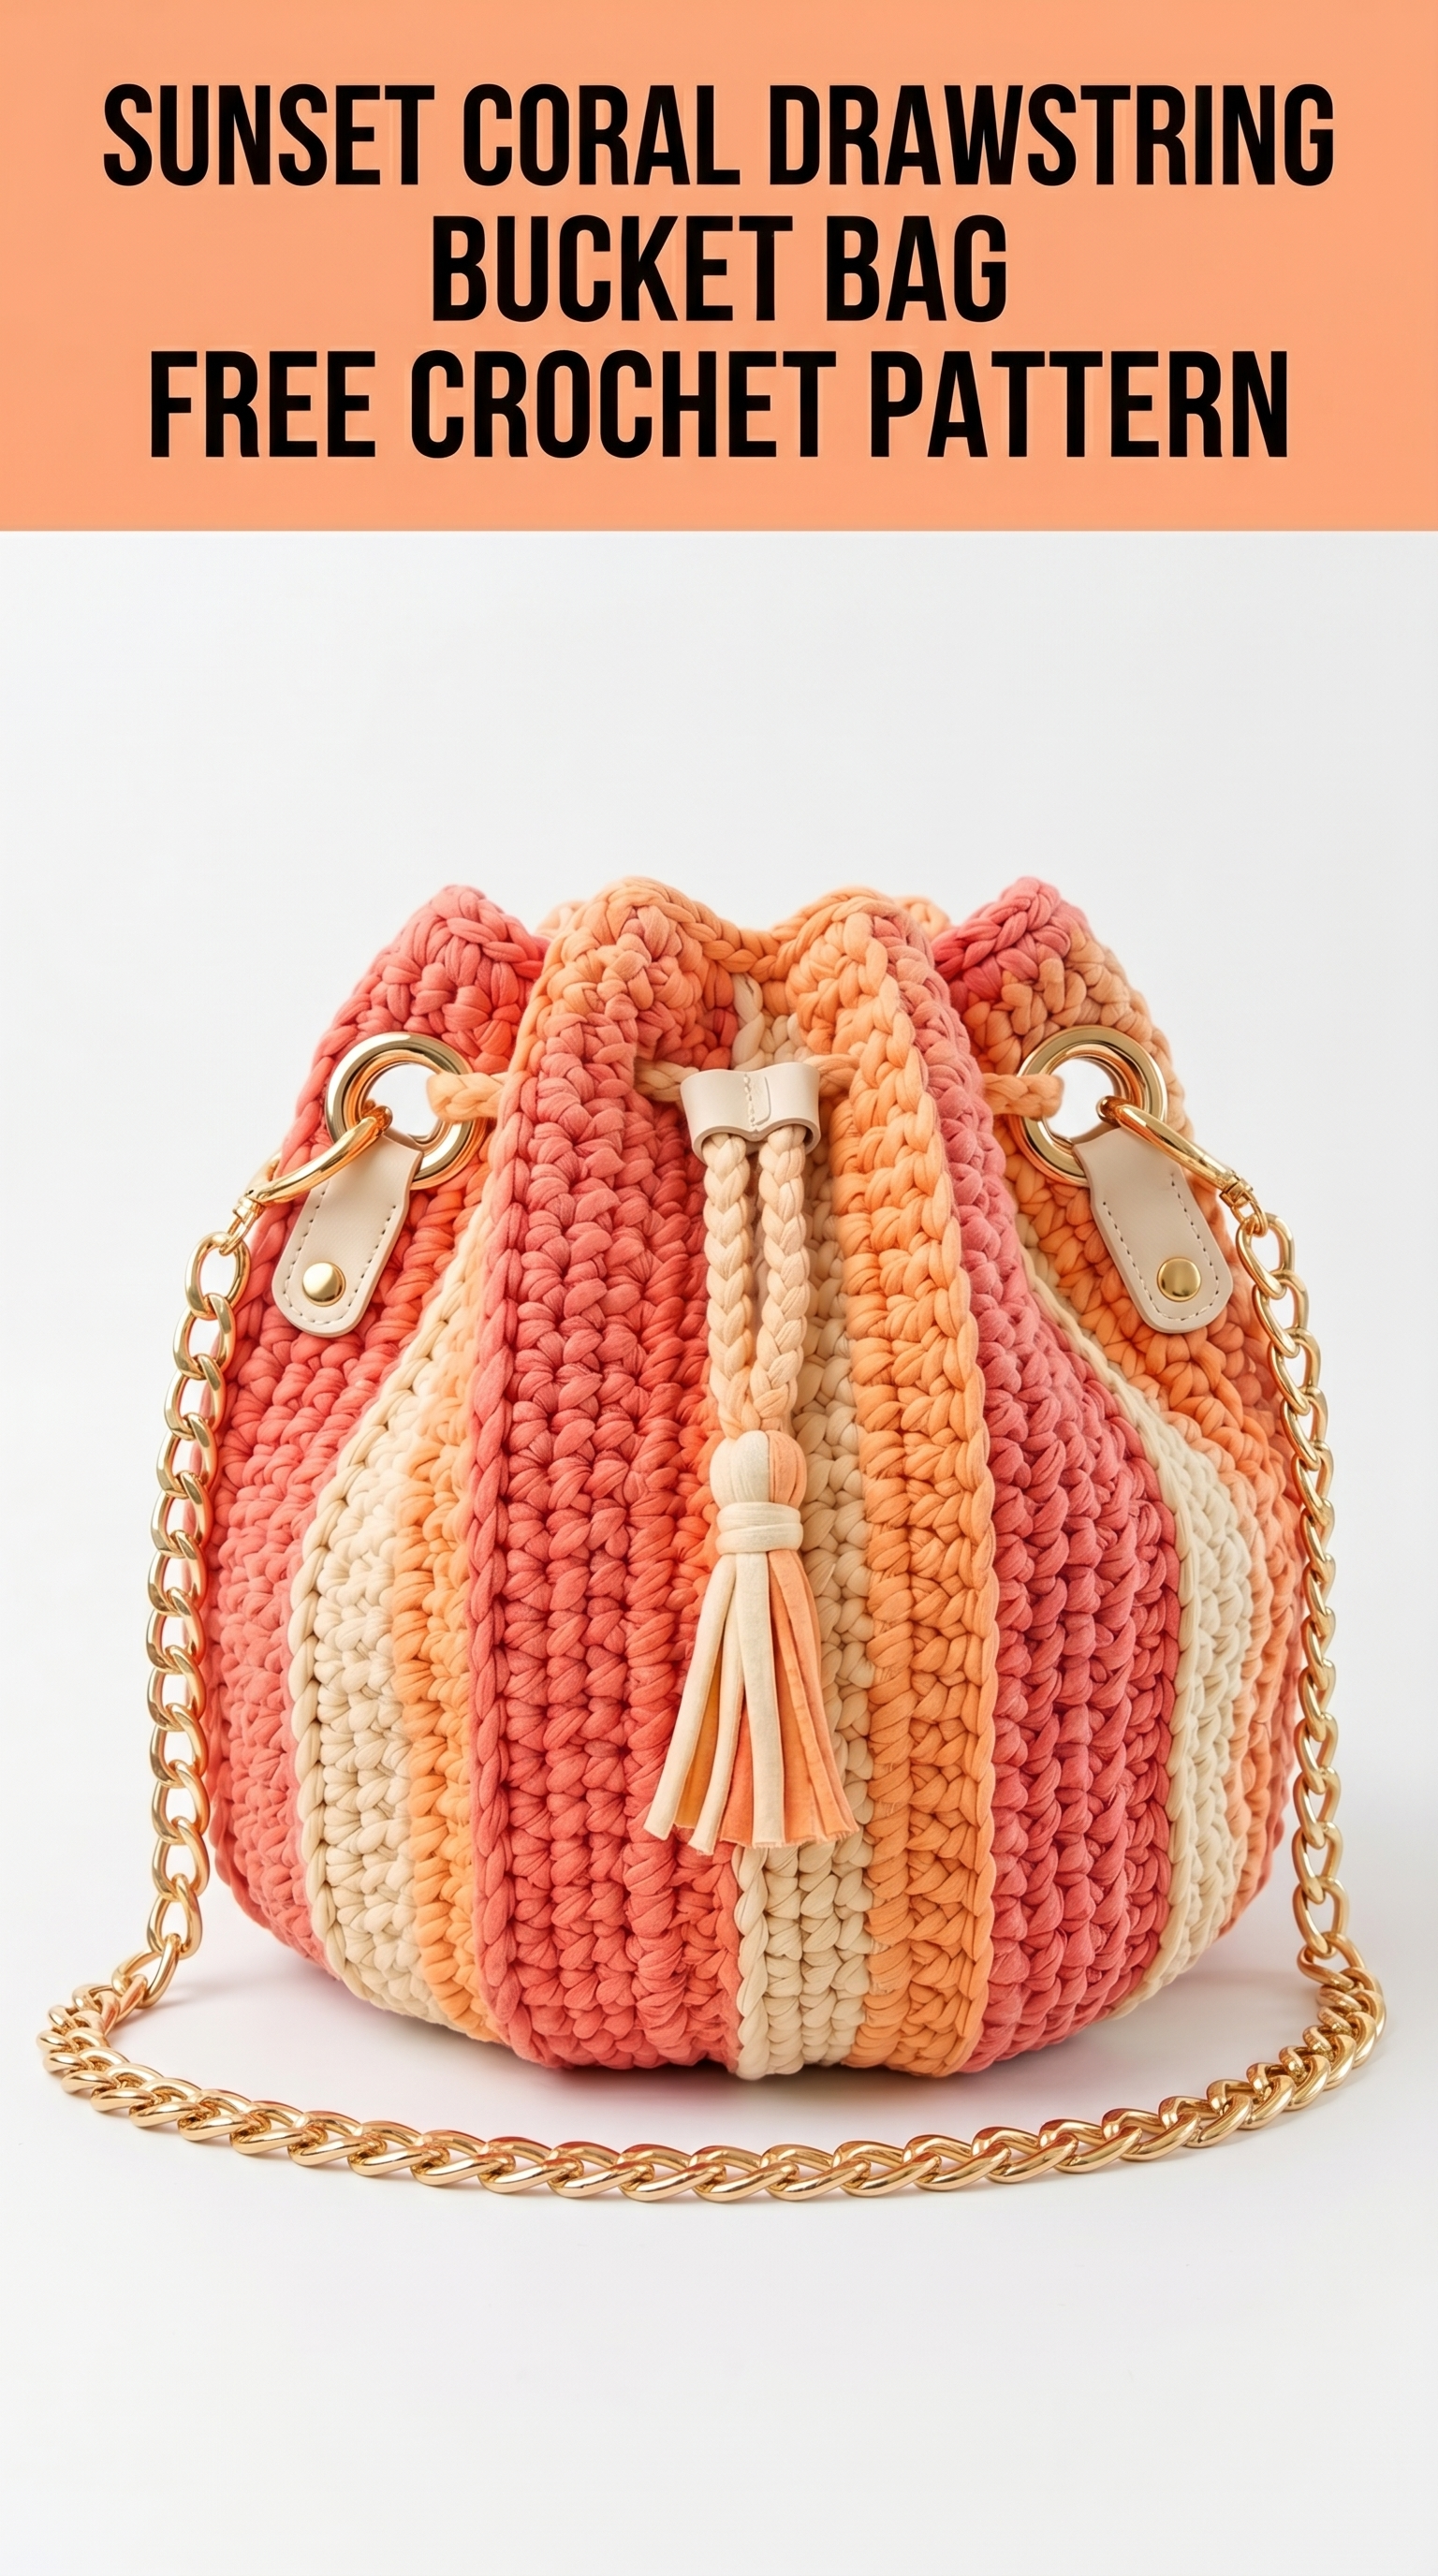
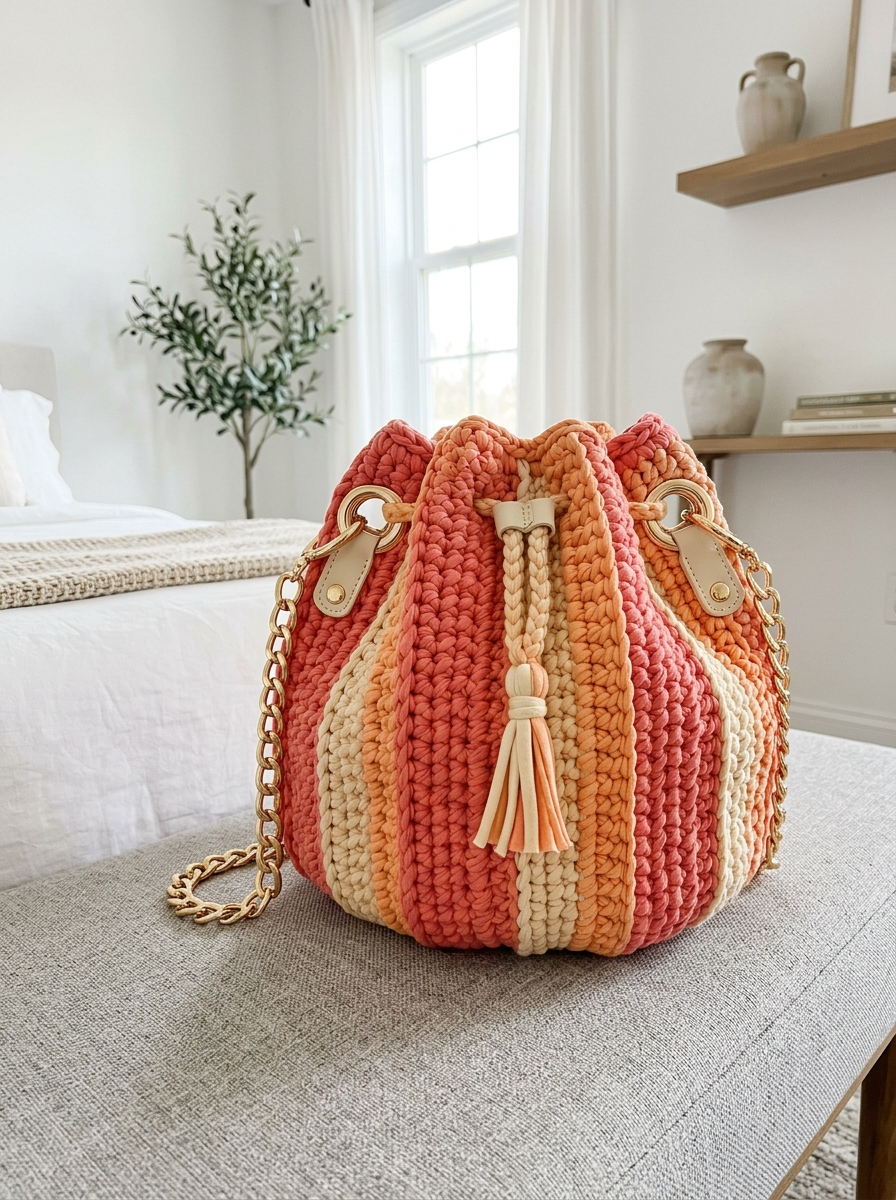
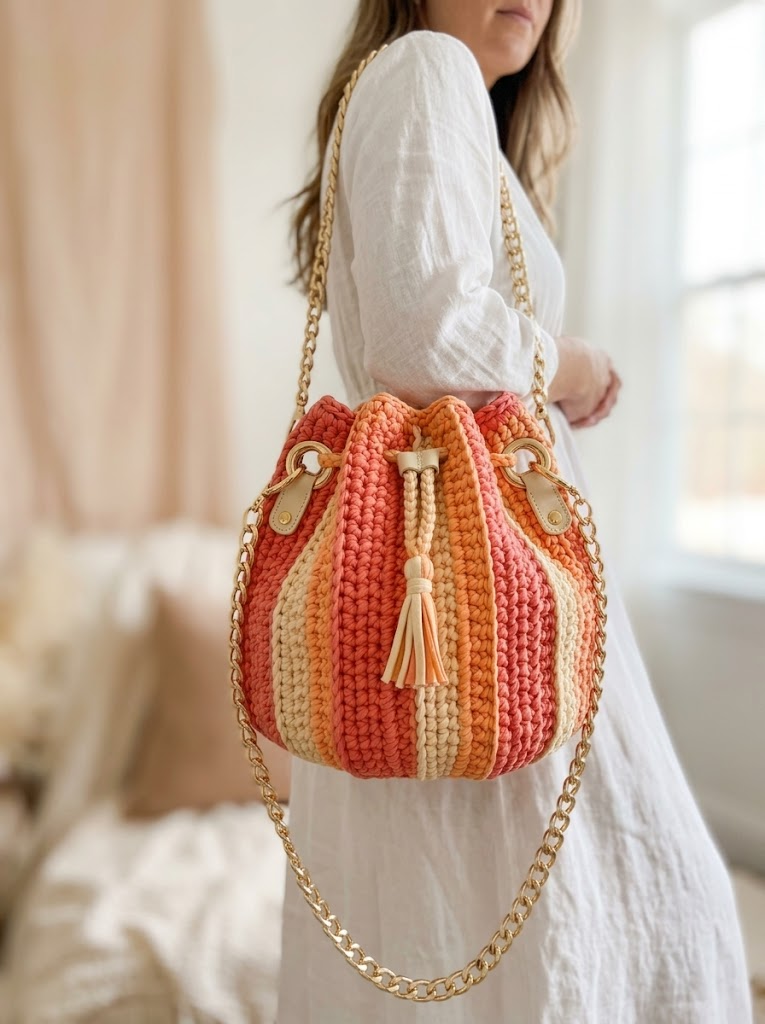
This gorgeous bucket bag is about to become your new favorite summer accessory. The Sunset Coral Drawstring Bucket Bag features stunning vertical stripes in warm coral, peach, orange, and cream tones that catch the light beautifully. I designed this crochet pattern to look high end while being totally achievable for confident beginners.
The best part? You probably already know all the stitches. If you can single crochet and work in the round, you can absolutely make this bag.
I used chunky t-shirt yarn (also called tube yarn or spaghetti yarn) to get that plush, structured look. The thick yarn works up quickly and gives the bag enough body to hold its shape without any lining. Add some pretty hardware and a chain strap, and you have got yourself a designer-looking piece for a fraction of the cost.
Let me walk you through everything you need to recreate this crochet bucket bag pattern from scratch.
Why This Crochet Bucket Bag Pattern Works So Well
The construction is simpler than it looks. You start with a flat circle for the base, then work straight up the sides in continuous rounds. The vertical stripes happen naturally because you are carrying multiple colors at once and switching between them as you go around.
I know color work can feel intimidating. But this technique is forgiving. The carried yarn hides inside those chunky stitches, so your inside looks almost as neat as your outside.
The drawstring closure cinches everything together at the top, and those gold hardware pieces elevate the whole thing. Trust me, people will ask where you bought it.
Materials You Will Need
Yarn:
I recommend brands like Hoooked Zpagetti, Bobilon, or Yarn Art Maccheroni. Any cotton-blend t-shirt yarn in similar weights will work beautifully.
Hook:
Notions:
Optional:
Skill Level
Confident Beginner to Intermediate
You should be comfortable with:
Gauge
With 10mm hook and t-shirt yarn:
8 stitches and 8 rows = 4 inches in single crochet
Gauge matters for bags because it affects the final size. Too loose and your bag will be floppy. Too tight and it will be stiff as cardboard. Swatch a small circle first if you are unsure.
Finished Dimensions
Abbreviations and Stitch Definitions
Let me break down every stitch you will use in this crochet tutorial.
ch = chain: Wrap yarn over hook, pull through loop on hook. This creates the foundation for most projects.
sl st = slip stitch: Insert hook, yarn over, pull through stitch AND loop on hook in one motion. Used for joining and moving across stitches invisibly.
sc = single crochet: Insert hook into stitch, yarn over and pull up a loop (2 loops on hook), yarn over and pull through both loops. This is your main stitch for the entire bag.
inc = increase: Work 2 single crochets into the same stitch. This adds one stitch to your count.
st(s) = stitch(es)
BLO = back loop only: Instead of inserting your hook under both loops of the stitch, go under only the back loop (the one farther from you). Creates a ridge effect.
Special Technique: Carrying Yarn for Vertical Stripes
Here is how to crochet those clean vertical stripes without cutting yarn every few stitches.
You will hold multiple strands at once. When you are not using a color, it travels along the inside of your work, hidden by the stitches. Every time you switch colors, you simply drop the current yarn and pick up the next one.
The key: Always bring the new color up from UNDER the old color. This twists them slightly and prevents holes at the color changes.
Do not pull the carried yarn too tight or your fabric will pucker. Do not leave it too loose or you will see it peeking through. It takes a round or two to find your rhythm. That is completely normal.
Step by Step Crochet Pattern
Part 1: The Base
You will work the base in Color A (coral) using the magic ring method.
Round 1: Create a magic ring. Ch 1 (does not count as stitch), work 6 sc into ring. Pull ring closed. Place stitch marker in first sc. (6 sts)
Round 2: Inc in each st around. (12 sts)
Round 3: *Sc 1, inc* repeat around. (18 sts)
Round 4: *Sc 2, inc* repeat around. (24 sts)
Round 5: *Sc 3, inc* repeat around. (30 sts)
Round 6: *Sc 4, inc* repeat around. (36 sts)
Round 7: *Sc 5, inc* repeat around. (42 sts)
Round 8: *Sc 6, inc* repeat around. (48 sts)
Your base should measure approximately 6 inches across. If it is significantly smaller or larger, adjust your hook size.
Part 2: Transition Round
This round creates the sharp angle between the base and sides.
Round 9: Working in BLO only, sc in each st around. (48 sts)
You will notice a ridge forming. That ridge becomes the bottom edge of your bag. Pretty satisfying, right?
Part 3: The Sides with Vertical Stripes
Now for the fun part. You are going to divide your 48 stitches into 8 sections of 6 stitches each. Each section gets one color, and you will rotate through the color sequence.
Color sequence: A (coral), B (orange), C (peach), D (cream), A, B, C, D
Setting up: Join all four colors at the beginning of Round 10. You can tie them together loosely or just hold them.
Round 10:
(48 sts)
Move your stitch marker up as you complete each round.
Rounds 11 through 28: Repeat Round 10, maintaining the same color in each section. (48 sts each round)
You will work 18 rounds for the sides total (Rounds 10 through 28). The bag should measure approximately 8 inches tall from the base at this point.
Tip: If your colors start drifting out of alignment, you are probably picking up the yarn from the wrong direction. Always bring new color up from underneath.
Part 4: Eyelet Round for Drawstring
Round 29: With Color A only (fasten off other colors, weave in ends), *sc 4, ch 2, skip 2* repeat around. (32 sc + 8 ch-2 spaces)
These gaps are where your drawstring will weave through.
Part 5: Top Edge
Round 30: Sc in each sc and 2 sc in each ch-2 space around. (48 sts)
Round 31: Sc in each st around. (48 sts)
Sl st to next st. Fasten off. Weave in end.
Part 6: Drawstring Cord
Using Color A and Color D held together, ch 80. Sl st in second ch from hook and each ch across. Fasten off.
Alternatively, you can braid three strands together for a chunkier drawstring like shown in the photo. Cut 6 strands approximately 50 inches long. Group into three pairs and braid tightly. Knot both ends.
Part 7: Tassel
To make the tassel:
1. Wrap Color A, C, and D around a 5-inch piece of cardboard about 15 times total
2. Slide a 10-inch strand under the top and tie tightly
3. Cut the bottom loops
4. Wrap another strand around the tassel about 1 inch from the top to create the head
5. Trim ends evenly
Attach tassel to center of drawstring.
Assembly and Finishing
Attaching the hardware:
Position your D-rings or O-rings on opposite sides of the bag, about 1 inch below the eyelet round. The leather strap connectors typically have holes for sewing or rivets for punching through.
If sewing: Use a sharp needle and strong thread to stitch through the leather and around several stitches of the bag body.
If using rivets: You may need to reinforce the inside with a small piece of leather or felt.
Adding the chain strap:
Clip or thread your chain through the D-rings. Most chains come with lobster clasps that make this easy.
Threading the drawstring:
Weave your braided cord in and out of the ch-2 spaces around Round 29. Both ends should exit at the front center of the bag.
Customization Ideas
Want to make this crochet bucket bag your own? Here are some options:
Troubleshooting Common Issues
My stripes are not straight: Make sure you are working in continuous rounds without joining. Mark the first stitch of each round religiously.
The carried yarn shows through: You might be using a hook that is too large, creating loose stitches. Try going down a hook size.
My base is curling: This usually means your tension is too tight. Relax your grip and let the stitches breathe.
The bag is too floppy: T-shirt yarn varies a lot by brand. Try a smaller hook or consider adding a fabric lining with interfacing.
You Did It
And there you have it. Your very own Sunset Coral Drawstring Bucket Bag. This step by step crochet pattern takes you from a simple magic ring all the way to a stunning accessory you will reach for again and again.
I hope you enjoyed working through this beginner friendly crochet pattern as much as I enjoyed designing it. There is something so satisfying about carrying a bag you made with your own hands.
Thank you for trusting me with your time and your yarn stash. It genuinely means the world.
If you make this bag, I would absolutely love to see it. Tag me on Instagram or share in our Facebook group. Seeing your finished projects is the best part of my day, honestly.
Happy hooking, and I will see you in the next pattern.
