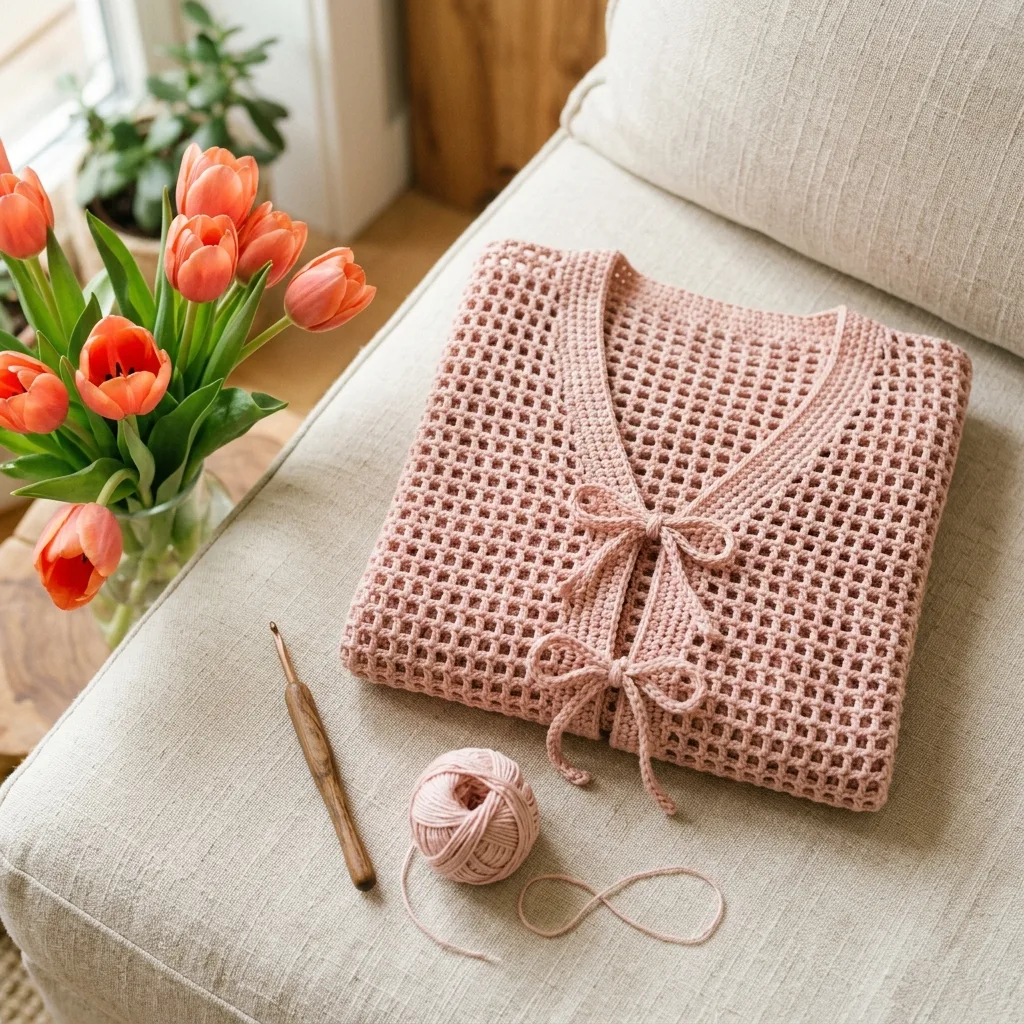
Cardigans can feel intimidating. I get it. The shaping, the sleeves, making sure both sides match. But here’s the truth: this blush pink bow front cardigan is far more approachable than it looks. The open mesh stitch creates that gorgeous lacy effect with nothing more than chains and double crochets. If you can make a granny square, you can absolutely make this cardigan. Whether you’re a confident beginner ready to level up or an experienced crocheter looking for a relaxing spring project, this pattern breaks everything down into manageable pieces. No magic ring wizardry required. No complicated decreases. Just simple stitches, clear instructions, and a stunning finished piece you’ll actually want to wear.

Why This Crochet Cardigan Pattern Works
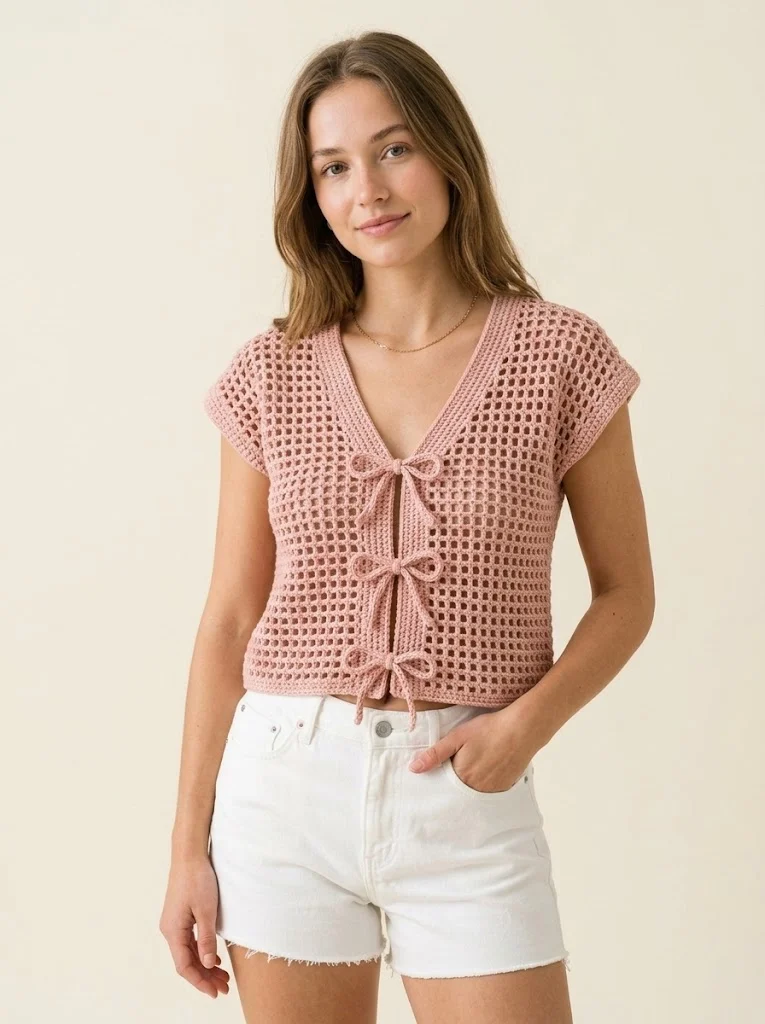
This bow front cardigan hits that sweet spot between elegant and effortless. The V-neckline creates a flattering silhouette on every body type, while the tie front closure adds a romantic, feminine touch without requiring buttons or zippers. The open mesh construction makes it lightweight and breathable, perfect for those transitional seasons when you need just a little something extra.
The blush pink color shown here is absolutely dreamy, but this design works beautifully in any solid or tonal yarn. Think soft sage, creamy ivory, or even a bold terracotta for fall.
Materials You’ll Need
Yarn:
Hook:
Notions:
Gauge:
Skill Level
Easy to Intermediate
This pattern uses basic stitches throughout. The construction involves making separate panels and seaming them together, which is much simpler than working in one piece with complicated shaping.
Finished Measurements
This pattern is written for size Medium with a finished bust of approximately 40 inches and length of 22 inches. Notes for adjusting size are included throughout.
Abbreviations and Stitch Definitions
Before we dive into the pattern, let’s get familiar with every stitch you’ll use:
Ch = Chain. Wrap yarn over hook, pull through loop on hook. This creates the foundation for your work.
Sl st = Slip stitch. Insert hook, yarn over, pull through both loops at once. Used for joining and moving across stitches without adding height.
Sc = Single crochet. Insert hook, yarn over, pull up a loop (2 loops on hook), yarn over, pull through both loops. Creates a short, tight stitch.
Hdc = Half double crochet. Yarn over, insert hook, yarn over, pull up a loop (3 loops on hook), yarn over, pull through all 3 loops. Slightly taller than single crochet.
Dc = Double crochet. Yarn over, insert hook, yarn over, pull up a loop (3 loops on hook), yarn over, pull through 2 loops, yarn over, pull through remaining 2 loops. The main stitch used in this pattern.
Sk = Skip. Pass over the indicated stitch without working into it.
Sp = Space. The gap created by chain stitches in the previous row.
Rep = Repeat.
Understanding the Mesh Stitch Pattern
The beautiful open grid texture of this cardigan comes from a simple filet mesh pattern. Don’t let the fancy name scare you. It’s just double crochets separated by chain stitches.
Mesh Pattern:
(Dc, ch 1, sk 1) repeated across the row
That’s it. You work a double crochet, chain one, skip the next stitch, and repeat. On the following row, you work your double crochets into the chain spaces from the row below. This creates those perfect little squares you see in the finished piece.
Practice Swatch:
Ch 22.
Row 1: Dc in 4th ch from hook, *ch 1, sk 1 ch, dc in next ch*, rep from * to * across. (10 mesh squares)
Row 2: Ch 3 (counts as dc), turn, *dc in next ch-1 sp, ch 1*, rep from * to * across, dc in top of turning chain. (10 mesh squares)
Repeat Row 2 until you feel comfortable with the rhythm.
Blush Pink Bow Front Crochet Cardigan Pattern
Back Panel
The back is worked flat in one rectangular piece.
Foundation:
Ch 82.
Row 1: Dc in 4th ch from hook (skipped chains count as first dc), *ch 1, sk 1 ch, dc in next ch*, rep from * to * across. Turn. (40 mesh squares)
Row 2: Ch 3 (counts as dc here and throughout), *dc in next ch-1 sp, ch 1*, rep from * to * across, ending with dc in top of turning chain. Turn. (40 mesh squares)
Rows 3 through 44: Rep Row 2.
Your back panel should measure approximately 20 inches wide and 22 inches long. Fasten off and weave in ends.
Left Front Panel
The front panels are narrower than the back and include shaping for the V-neckline.
Foundation:
Ch 42.
Row 1: Dc in 4th ch from hook, *ch 1, sk 1 ch, dc in next ch*, rep from * to * across. Turn. (20 mesh squares)
Rows 2 through 30: Work even in mesh pattern as established. (20 mesh squares per row)
Begin V-Neck Shaping:
Row 31: Ch 3, work in mesh pattern across to last 2 mesh squares, dc in next ch-1 sp. Turn, leaving remaining stitches unworked. (18 mesh squares)
Row 32: Ch 3, sk first ch-1 sp, dc in next ch-1 sp, work in pattern to end. Turn. (17 mesh squares)
Rows 33 through 40: Continue decreasing 1 mesh square at neck edge every row. (9 mesh squares remain after Row 40)
Rows 41 through 44: Work even on remaining 9 mesh squares.
Fasten off and weave in ends.
Right Front Panel
Work same as Left Front Panel through Row 30.
Begin V-Neck Shaping:
Row 31: Ch 3, sk first ch-1 sp, dc in next ch-1 sp, work in pattern to end. Turn. (18 mesh squares)
Row 32: Ch 3, work in pattern across to last 2 mesh squares, dc in next ch-1 sp. Turn. (17 mesh squares)
Rows 33 through 40: Continue decreasing 1 mesh square at neck edge every row, keeping decreases on the opposite edge from Left Front. (9 mesh squares remain after Row 40)
Rows 41 through 44: Work even on remaining 9 mesh squares.
Fasten off and weave in ends.
Sleeves (Make 2)
The sleeves are worked flat and seamed.
Foundation:
Ch 62.
Row 1: Dc in 4th ch from hook, *ch 1, sk 1 ch, dc in next ch*, rep from * to * across. Turn. (30 mesh squares)
Rows 2 through 32: Work even in mesh pattern. (30 mesh squares)
Your sleeve should measure approximately 15 inches wide and 16 inches long. Fasten off.
Assembly
Now comes the satisfying part. Putting it all together.
1. Shoulder Seams: Place right sides of Back and Left Front together. Using a tapestry needle and yarn, whip stitch or mattress stitch the shoulder seam, joining approximately 4 inches (9 mesh squares) at the outer shoulder edge. Repeat for Right Front.
2. Attach Sleeves: Find the center of one sleeve’s top edge. Match this to the shoulder seam. Pin in place. Sew the sleeve to the body, attaching it to both front and back panels. The sleeve should sit smoothly without puckering. Repeat for second sleeve.
3. Side and Sleeve Seams: Starting at the bottom hem of the body, sew the side seam up to the underarm. Continue sewing down the sleeve seam to the cuff. Repeat on other side.
Neckline and Front Edging
This creates the clean finished edge you see around the V-neck and front opening.
Round 1: Join yarn at bottom right front corner with a sl st. Ch 1, sc evenly up the right front edge, working approximately 2 sc for every mesh row. Continue around the neckline, working 3 sc in the point of the V for a smooth curve. Sc down the left front edge. Sl st to join. Turn.
Round 2: Ch 1, sc in each sc around, working 3 sc in corner at bottom of V. Sl st to join. Turn.
Rounds 3 and 4: Rep Round 2.
Fasten off and weave in ends.
Bow Ties (Make 2)
The bow ties are simple chains that thread through the mesh openings.
For each tie:
Ch 120 (or desired length, approximately 24 inches).
Row 1: Sc in 2nd ch from hook, sc in each ch across. (119 sc)
Fasten off and weave in ends.
Attaching the Ties:
Locate a mesh opening approximately 2 inches below where the V-neck shaping begins on each front panel. Thread one tie through the right front panel, pulling it halfway through so equal lengths hang on each side. Repeat with second tie on left front panel, placing it at the same height.
When worn, tie both sets in bows at the front center.
Bottom Ribbing (Optional)
For a more polished hem, add a ribbed border to the bottom edge.
Row 1: Join yarn at one side seam at bottom of body. Ch 1, sc evenly across entire bottom edge. Turn.
Rows 2 through 6: Ch 1, working in back loops only (BLO), sc in each sc across. Turn.
Fasten off and sew short ends of ribbing together.
Helpful Tips for Success
Blocking matters. After seaming, wet block your cardigan by soaking it in cool water, gently squeezing out excess moisture, and laying flat to dry on blocking mats. This evens out your stitches and gives the mesh pattern that crisp, professional look.
Count your stitches. The mesh pattern makes it easy to lose track. Count your mesh squares at the end of every few rows, especially in the beginning.
Use stitch markers generously. Mark the first and last stitch of each row, the center of your sleeves, and the beginning of your neckline shaping.
Try it on as you go. Once you have the back panel done, hold it up to yourself. This helps catch sizing issues before you’ve committed hours to all the pieces.
Customization Ideas
Add length: Simply work more rows on the body panels before beginning neckline shaping.
Adjust sleeve length: Add or subtract rows from the sleeve pattern.
Change the neckline depth: Begin your V-shaping earlier for a deeper V, or later for a higher neckline.
Skip the ties: If you prefer a cleaner look, omit the bow ties entirely and wear the cardigan open.
Caring for Your Finished Cardigan
Hand wash in cool water with a gentle detergent. Lay flat to dry, reshaping while damp. Store folded rather than hung to prevent stretching.
Cotton and cotton blend yarns may relax slightly with wear. This is normal and actually makes the drape even more beautiful over time.
Thank you so much for choosing this cardigan crochet pattern for your next project. I genuinely hope you love making it as much as I loved designing it. If you give it a try, I would absolutely love to see your finished piece. Tag me on Instagram or share a photo in my Facebook group. Your creations make my whole day brighter.
If this blush pink bow front crochet cardigan is calling your name but life is busy right now, go ahead and pin this pattern to your favorite Pinterest board so you can find it when you’re ready. And if you do make one, please pop back and leave a comment below. I read every single one and love hearing which colors you chose.
