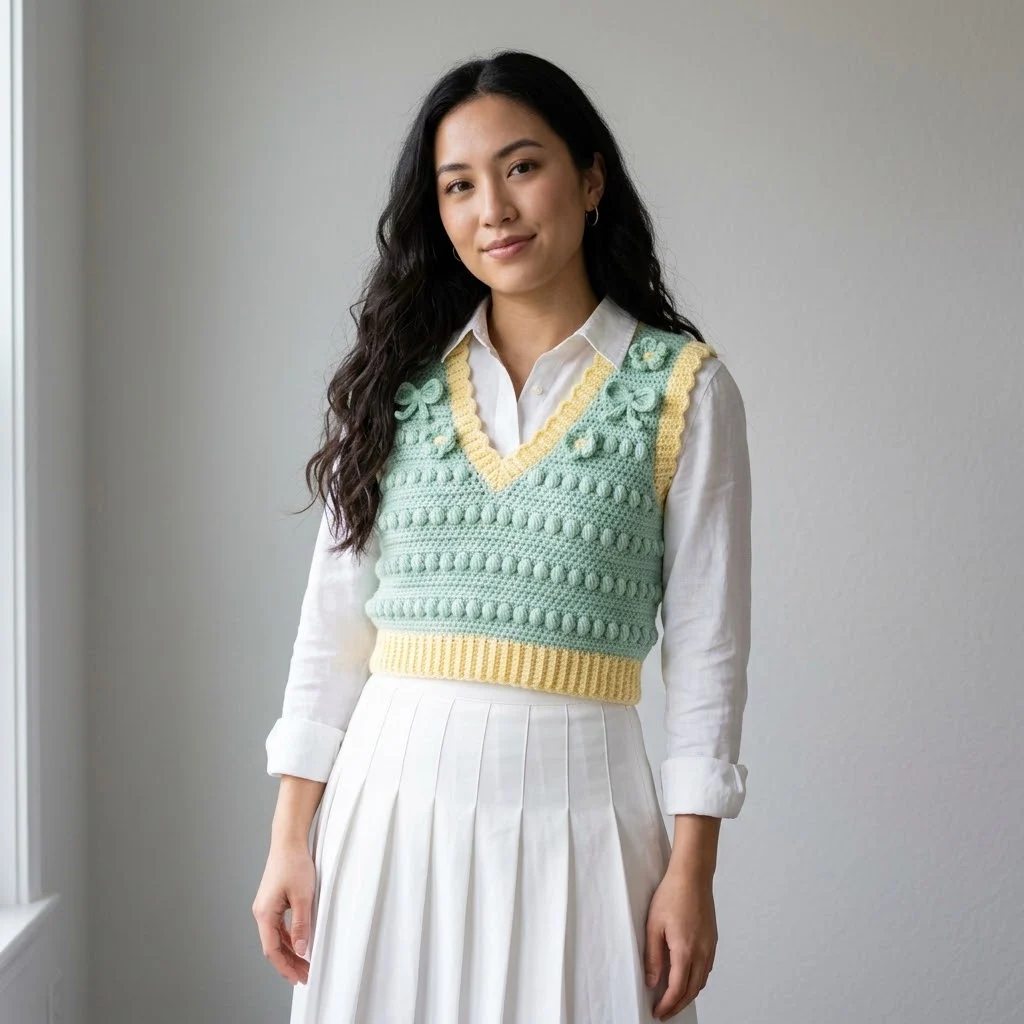
I pulled this design out of an old notebook last spring, and I knew it was finally time to bring it to life. I originally sketched the idea after spotting a vintage sweater vest at a thrift store years ago. The woman wearing it had paired it with a crisp white button-down, and I couldn’t stop thinking about how charming it looked. I named this pattern the Mint Garden Bow Vest because it reminds me of those sweet bows you’d see on garden party dresses from another era. The soft mint and butter yellow combination feels fresh but nostalgic, like something your favorite grandmother would have worn in her twenties.
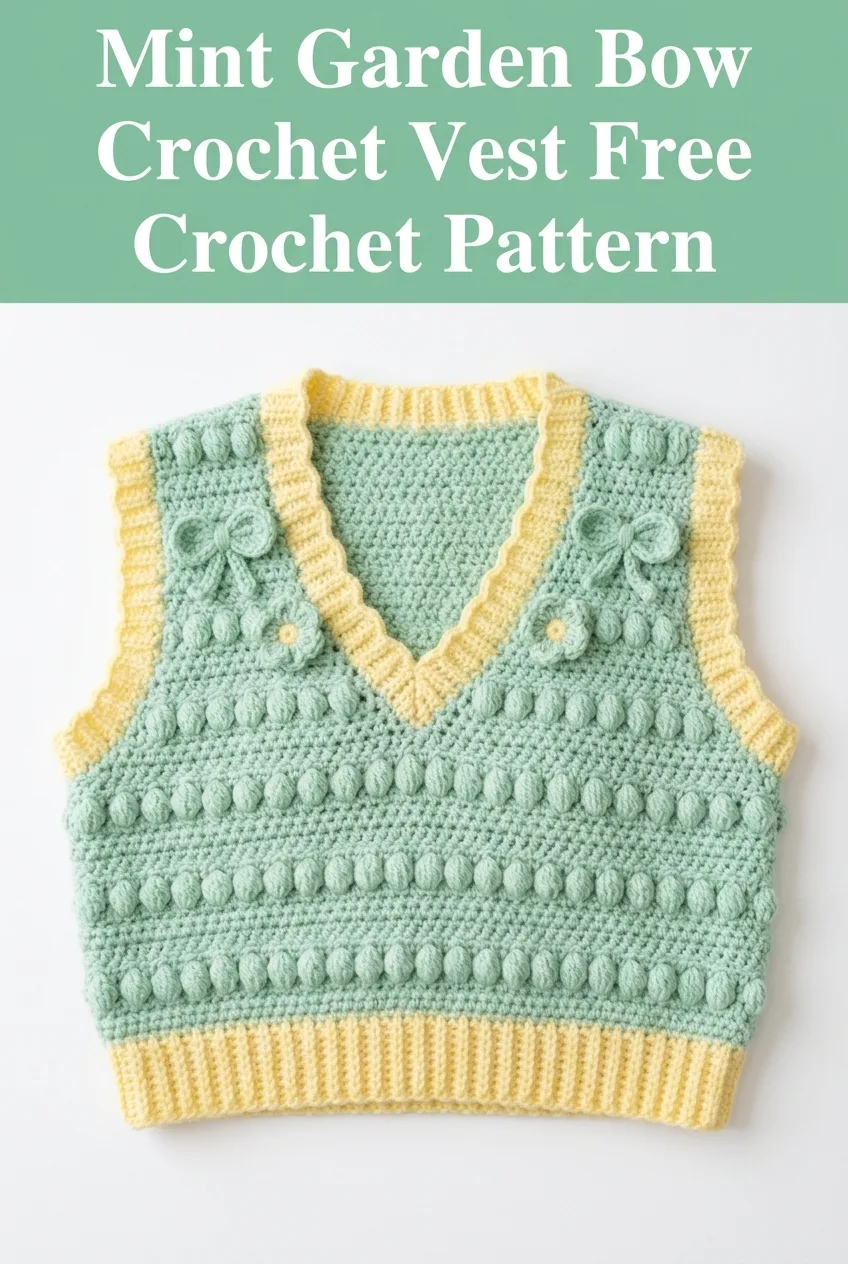
This crochet vest pattern combines classic construction techniques with playful texture elements that make it truly special. You’ll work bobble stitches for dimensional interest, create adorable crocheted bow appliqués, and finish with a scalloped neckline that frames the face beautifully. If you’ve been wanting to try a wearable crochet project but felt intimidated, this is a wonderful place to start.
Why You’ll Love This Crochet Vest Pattern
This mint garden bow crochet vest hits that perfect sweet spot between interesting enough to keep you engaged and repetitive enough to feel relaxing. The body uses straightforward stitches you likely already know, while the decorative elements add personality without overwhelming complexity.
The bobble stitch rows create those beautiful raised dots you see running horizontally across the body. They look intricate, but once you get the rhythm, your hands will know what to do without much thought.
The crocheted bow appliqués are made separately and stitched on at the end. This means no complicated colorwork or carrying multiple strands. You can make as many or as few bows as you like.
The ribbed bottom band in sunny yellow gives the vest structure and helps it hug at the waist without riding up. It also adds that preppy, polished look that makes the whole piece feel intentional.
This crochet tutorial walks you through every single step. Whether you’re newer to garment construction or you’ve made dozens of wearables, you’ll find clear guidance here.
Skill Level
Intermediate beginner to intermediate. You should feel comfortable with basic stitches and be willing to learn the bobble stitch if you haven’t tried it before. I’ll explain everything clearly, so don’t let that scare you off.
Finished Measurements
This pattern is written for size Small with a finished bust measurement of approximately 34 inches and a length of 18 inches from shoulder to hem. The vest has a slightly cropped fit designed to sit at the natural waist.
To adjust sizing: Add or subtract stitches in multiples of 4 for the bobble pattern to remain consistent. Add approximately 4 stitches per inch of additional width needed.
Materials Needed
Yarn:
I recommend a soft acrylic or cotton blend for easy care and comfortable wear. Look for yarn labeled as worsted weight or medium (4) on the label.
Hook:
Notions:
Gauge
16 stitches and 14 rows = 4 inches in single crochet using size H/8 hook.
Please, please check your gauge. I know it feels tedious, but garments that don’t fit properly usually come down to skipped gauge swatches. Make a 5-inch square, measure the center 4 inches, and adjust your hook size if needed.
Abbreviations and Stitch Definitions
Let me walk you through every stitch and term you’ll encounter in this pattern.
ch = chain: Yarn over, pull through loop on hook. This creates your foundation.
sl st = slip stitch: Insert hook, yarn over, pull through both loops at once. Used for joining and moving yarn position.
sc = single crochet: Insert hook into stitch, yarn over and pull up a loop (2 loops on hook), yarn over and pull through both loops. This is your main stitch for this project.
hdc = half double crochet: Yarn over, insert hook into stitch, yarn over and pull up a loop (3 loops on hook), yarn over and pull through all 3 loops. Creates a slightly taller stitch than single crochet.
dc = double crochet: Yarn over, insert hook into stitch, yarn over and pull up a loop (3 loops on hook), yarn over and pull through 2 loops, yarn over and pull through remaining 2 loops.
bob = bobble stitch: Work 5 half-finished double crochets into the same stitch (yarn over, insert hook, yarn over, pull up loop, yarn over, pull through 2 loops), then yarn over and pull through all 6 loops on hook. This creates that lovely raised bump.
sk = skip: Pass over the indicated stitch without working into it.
st(s) = stitch(es)
RS = right side (the pretty side facing out when worn)
WS = wrong side
BLO = back loop only: Insert hook through only the back loop of the stitch instead of both loops. This creates the ribbed texture in the waistband.
Crochet Vest Pattern Instructions
Back Panel
With MC and larger hook, ch 69.
Row 1 (RS): Sc in 2nd ch from hook and in each ch across, turn. (68 sts)
Row 2: Ch 1, sc in each st across, turn. (68 sts)
Row 3: Ch 1, sc in first 3 sts, *bob in next st, sc in next 3 sts*, repeat from * to last st, sc in last st, turn. (68 sts, 16 bobbles)
Row 4: Ch 1, sc in each st across, turn. (68 sts)
Rows 5-6: Ch 1, sc in each st across, turn. (68 sts)
Rows 7-42: Repeat Rows 3-6 nine more times. You should have 10 total bobble rows.
Rows 43-44: Ch 1, sc in each st across, turn. (68 sts)
Back Armhole Shaping
Row 45: Ch 1, sl st in first 6 sts, ch 1, sc in next 56 sts, leave remaining 6 sts unworked, turn. (56 sts)
Row 46: Ch 1, sc2tog over first 2 sts, sc across to last 2 sts, sc2tog, turn. (54 sts)
Rows 47-48: Repeat Row 46. (50 sts after Row 48)
Rows 49-58: Ch 1, sc in each st across, turn. (50 sts)
Back Neck and Shoulder Shaping
Row 59: Ch 1, sc in first 15 sts, leave remaining sts unworked, turn. (15 sts) This is your first shoulder.
Row 60: Ch 1, sc2tog, sc to end, turn. (14 sts)
Row 61: Ch 1, sc in each st across. Fasten off. (14 sts)
Skip center 20 sts for back neck. Rejoin yarn in next st.
Row 59 (second shoulder): Ch 1, sc in each remaining st across, turn. (15 sts)
Row 60: Ch 1, sc to last 2 sts, sc2tog, turn. (14 sts)
Row 61: Ch 1, sc in each st across. Fasten off. (14 sts)
Front Panel (Make 2)
With MC and larger hook, ch 35.
Row 1 (RS): Sc in 2nd ch from hook and in each ch across, turn. (34 sts)
Row 2: Ch 1, sc in each st across, turn. (34 sts)
Row 3: Ch 1, sc in first 3 sts, *bob in next st, sc in next 3 sts*, repeat from * across, turn. (34 sts, 8 bobbles)
Row 4: Ch 1, sc in each st across, turn. (34 sts)
Rows 5-6: Ch 1, sc in each st across, turn. (34 sts)
Rows 7-42: Repeat Rows 3-6 nine more times.
Front V-Neck Shaping (Right Front)
Row 43: Ch 1, sc in each st to last 2 sts, sc2tog, turn. (33 sts)
Row 44: Ch 1, sc in each st across, turn. (33 sts)
Row 45 (armhole): Ch 1, sl st in first 6 sts, ch 1, sc to last 2 sts, sc2tog, turn. (26 sts)
Rows 46-58: Continue decreasing 1 st at neck edge every RS row while keeping armhole edge straight. (14 sts remaining)
Rows 59-61: Ch 1, sc in each st across. Fasten off. (14 sts)
For the Left Front, reverse the shaping by working decreases at the beginning of RS rows instead of the end.
Ribbed Waistband
With CC and smaller hook (optional), ch 11.
Row 1: Sc in 2nd ch from hook and each ch across, turn. (10 sts)
Row 2: Ch 1, sc BLO in each st across, turn. (10 sts)
Repeat Row 2 until ribbing measures approximately 34 inches (or matches the width of your joined front and back panels at the bottom edge).
Sl st the short ends together to form a loop. Whip stitch or slip stitch the ribbing to the bottom of the joined vest body.
V-Neck Edging
With CC and larger hook, join yarn at right shoulder seam.
Round 1: Ch 1, work sc evenly around entire neckline, placing 3 sc in the point of the V at center front. Join with sl st to first sc.
Round 2: Ch 1, *sc in next 2 sts, sk 1 st, 5 dc in next st (shell made), sk 1 st*, repeat from * around neckline, adjusting as needed at the V point. Join with sl st. Fasten off.
This creates that lovely scalloped edge you see in the finished piece.
Armhole Edging
Join CC at underarm seam.
Round 1: Ch 1, sc evenly around armhole opening. Join with sl st.
Round 2: Ch 1, sc in each st around. Join, fasten off.
Crocheted Bow Appliqués (Make 5)
The bows are what give this vest its garden party charm. They’re surprisingly quick to make.
Bow Loop (Make 2 per bow):
With MC, ch 15.
Row 1: Sc in 2nd ch from hook and each ch across. (14 sts)
Fasten off, leaving a long tail. Fold into a loop and stitch the short ends together.
Bow Center:
Ch 6.
Row 1: Sc in 2nd ch from hook and each ch across. (5 sts)
Rows 2-4: Ch 1, sc in each st across, turn.
Fasten off.
Assembly: Stack two loops on top of each other, slightly offset. Wrap the center piece around the middle and stitch in place on the wrong side. This creates that classic bow shape.
Sew bows along the V-neckline as shown, spacing them evenly on each side.
Assembly Instructions
1. Block all pieces before seaming. Wet blocking works wonderfully for this project. Pin to measurements and allow to dry completely.
2. Seam shoulders using mattress stitch or whip stitch. Take your time here for invisible seams.
3. Seam sides from bottom of armhole to waistband attachment.
4. Attach waistband to the joined body, easing any fullness evenly.
5. Add neckline and armhole edging as instructed above.
6. Attach bow appliqués along the V-neckline, using the photograph as placement guide.
7. Weave in all ends carefully on the wrong side.
Styling Tips for Your Crochet Vest
This vest looks absolutely darling over a crisp white button-down shirt, as shown. The preppy aesthetic works beautifully for spring brunches, garden parties, or just making a regular Tuesday feel a little more special.
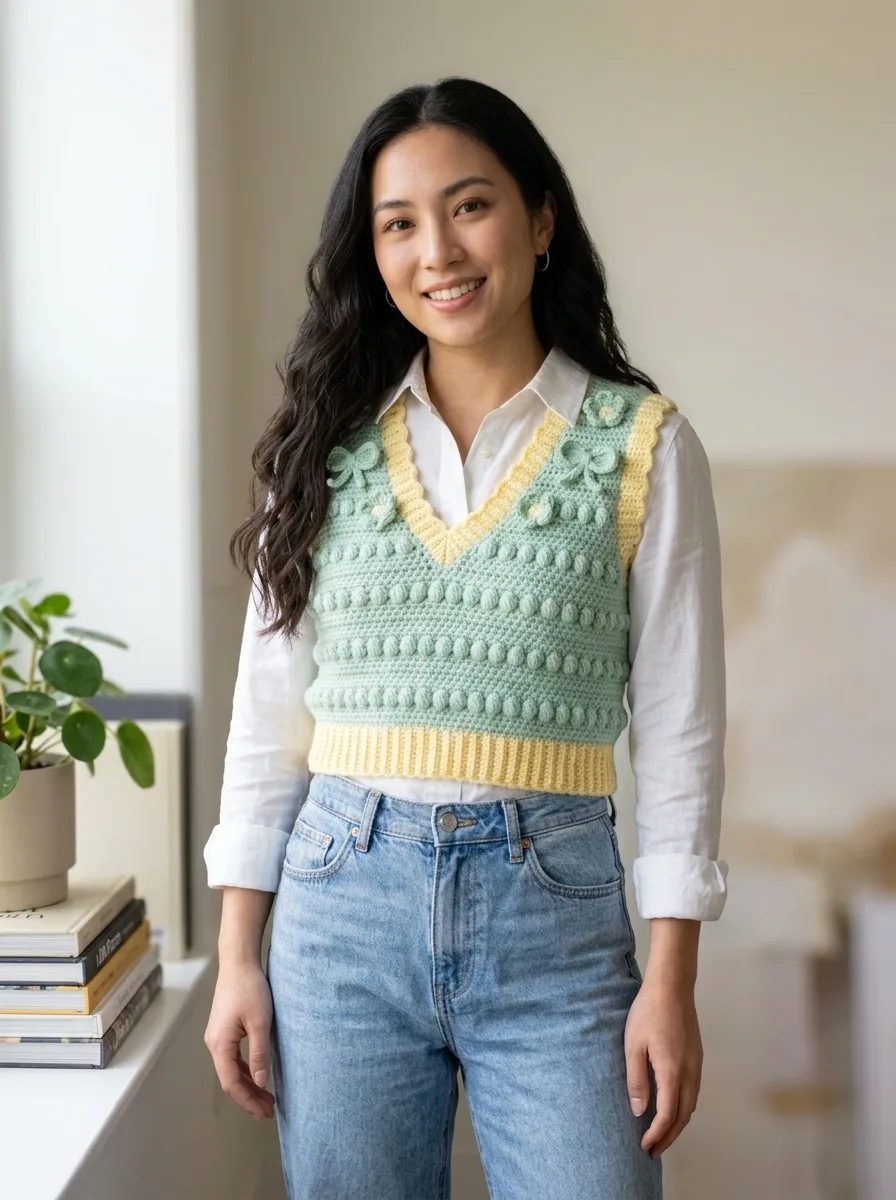
Try it over a fitted turtleneck for cooler weather, or wear it directly over a camisole when temperatures rise. The cropped length pairs perfectly with high-waisted trousers, midi skirts, or your favorite jeans.
Troubleshooting Common Issues
Bobbles not popping? Make sure you’re pushing them to the right side as you work. Some crocheters find it helpful to push each bobble through to the front with a finger before completing the stitch.
V-neck looking wonky? Consistent decreases are key. Use stitch markers to remind yourself where decreases should fall.
Ribbing too loose? Drop down a hook size, or work your stitches more tightly. The ribbing should have good stretch and recovery.
Bows looking flat? Stuff a tiny bit of yarn scrap behind them before stitching down, or use slightly bulkier yarn for the bows only.
Final Thoughts on the Mint Garden Bow Crochet Vest
I hope this crochet pattern brings you as much joy to make as it brought me to design. The combination of bobble texture, sweet bow details, and that cheerful mint and yellow color palette creates something truly special. This is the kind of piece that sparks conversations and makes people ask, "Did you really make that yourself?"
Yes. Yes, you did.
Thank you so much for choosing this pattern for your next project. I genuinely appreciate you being here and trusting me with your crafting time.
If you make this vest, I would absolutely love to see it. Tag me on Instagram or share in my Facebook group. Your makes are my favorite part of this whole creative journey.
I hope you’ll save this pattern to your Pinterest boards so you can find it easily when you’re ready to cast on. And if you do make the Mint Garden Bow Vest, please drop a comment below. I read every single one, and nothing makes my day quite like seeing your finished projects come to life.
