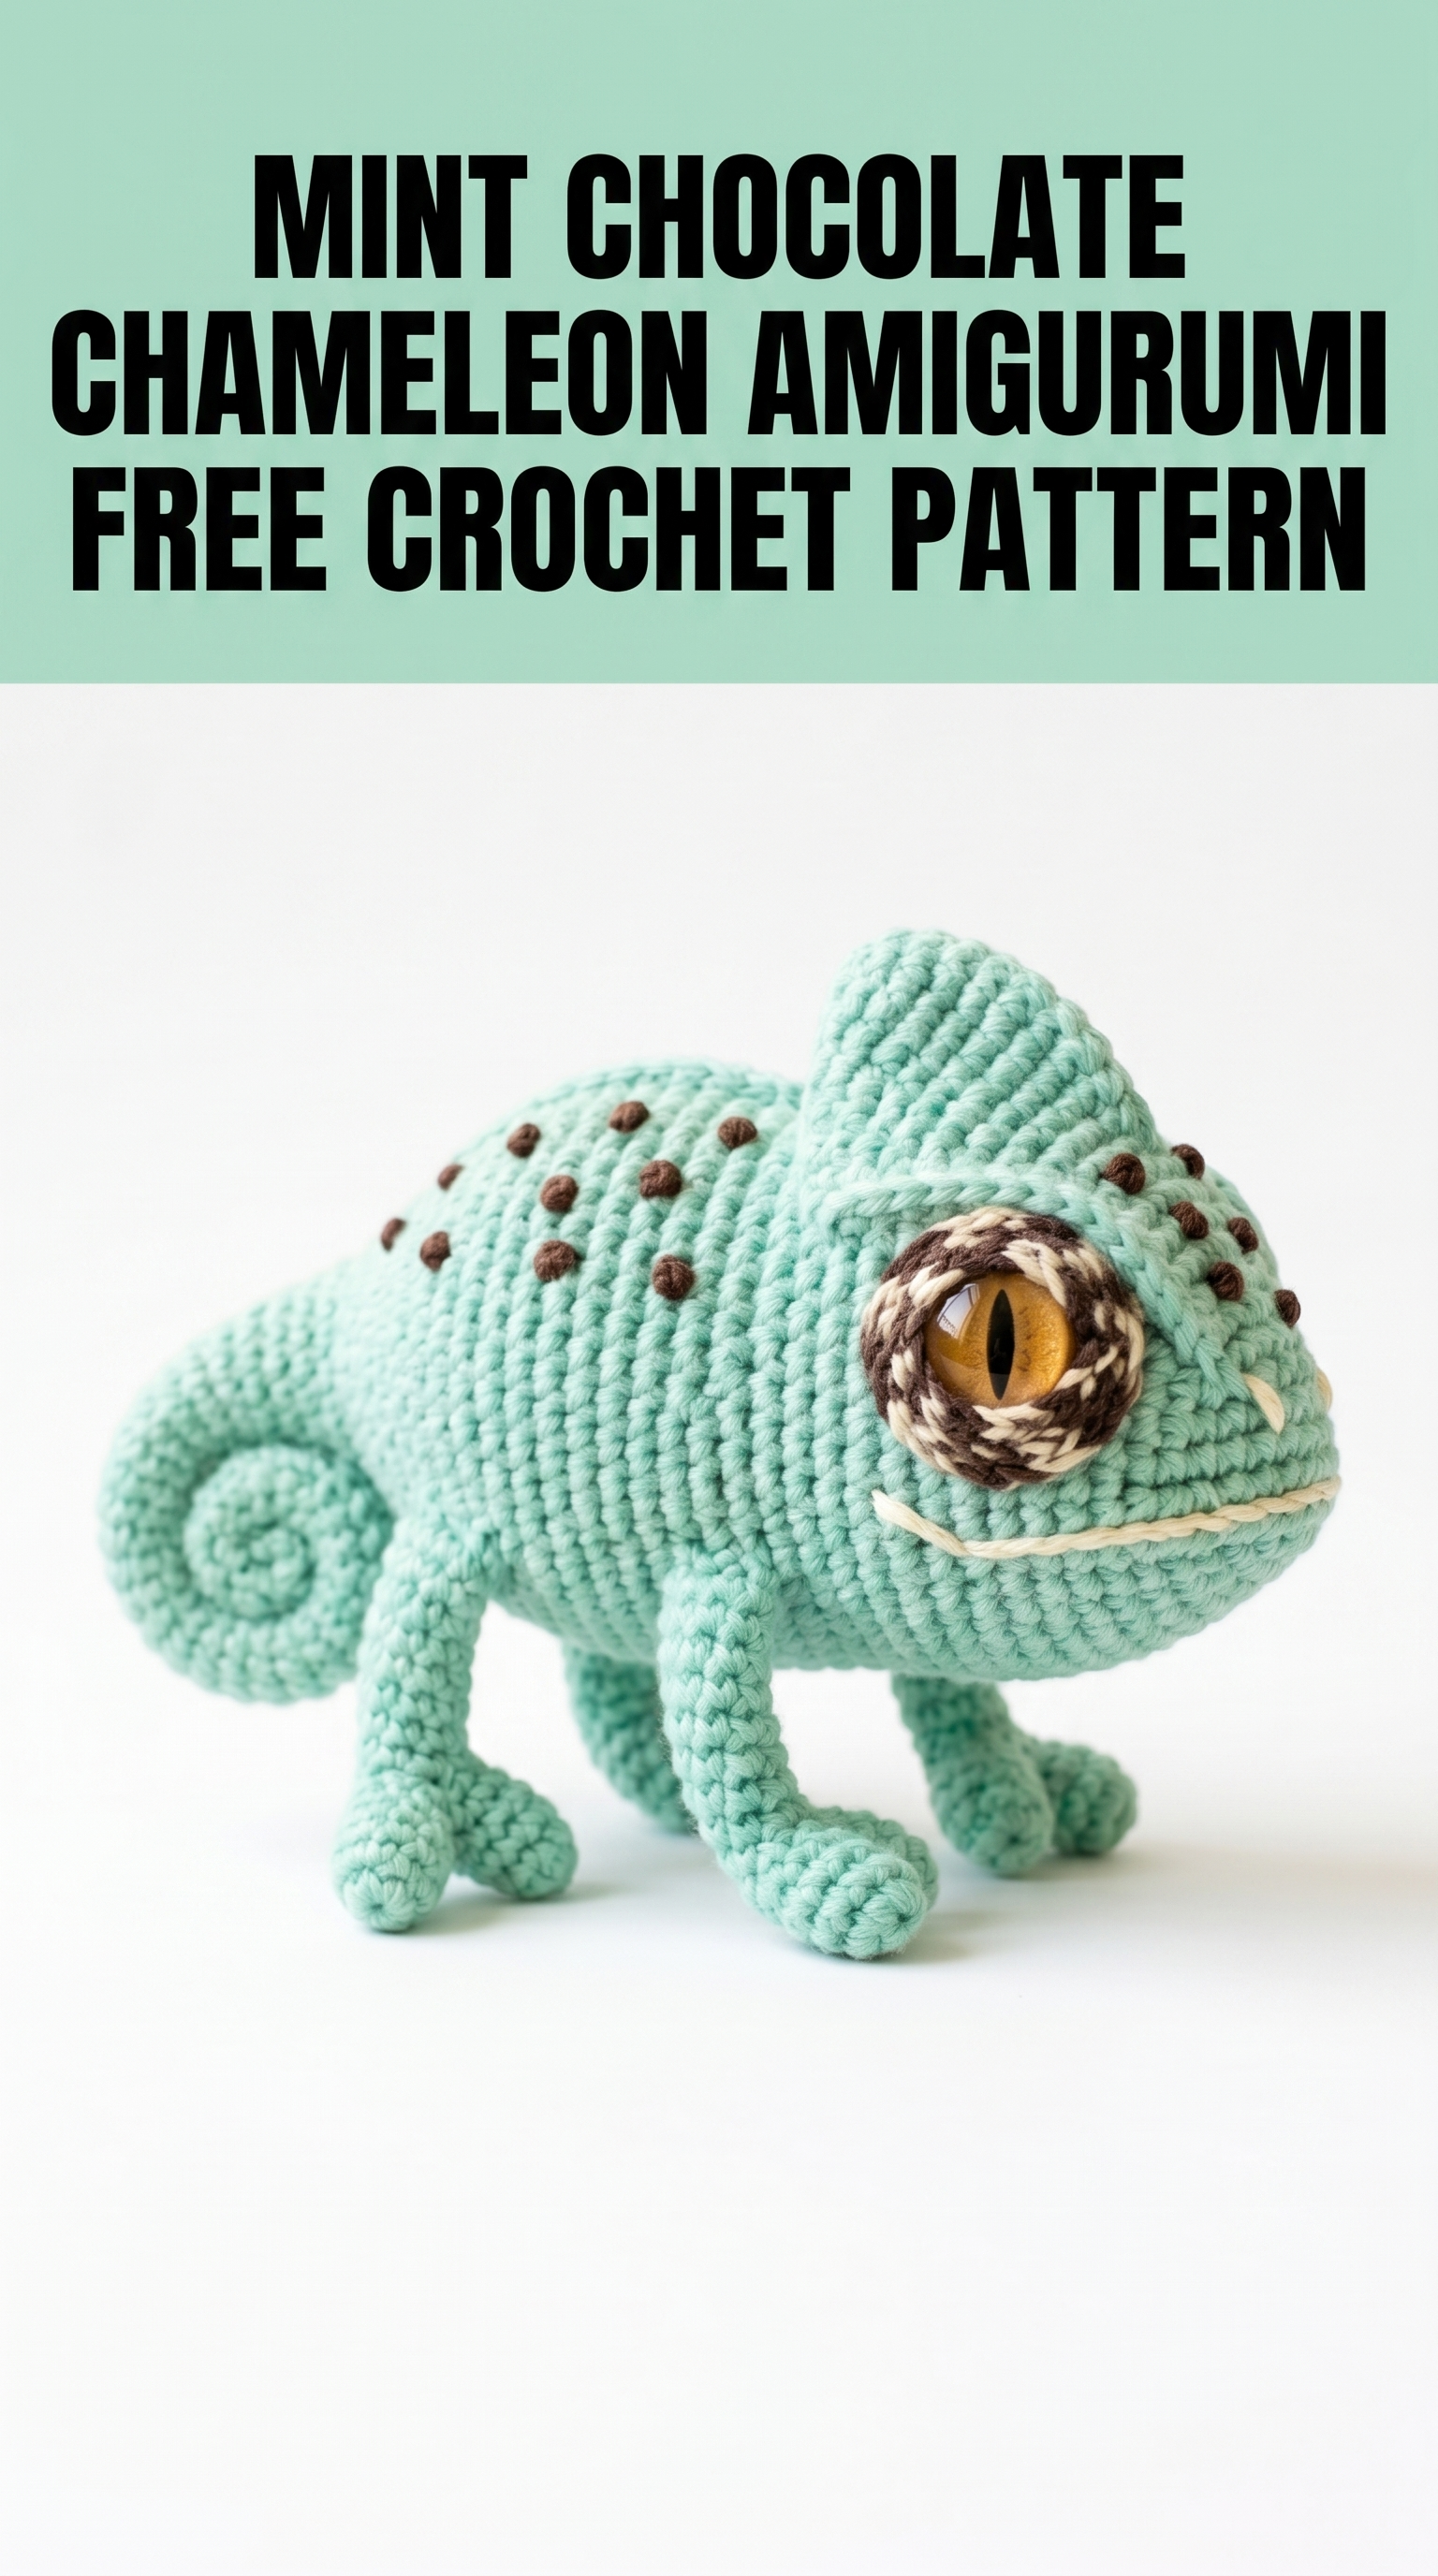
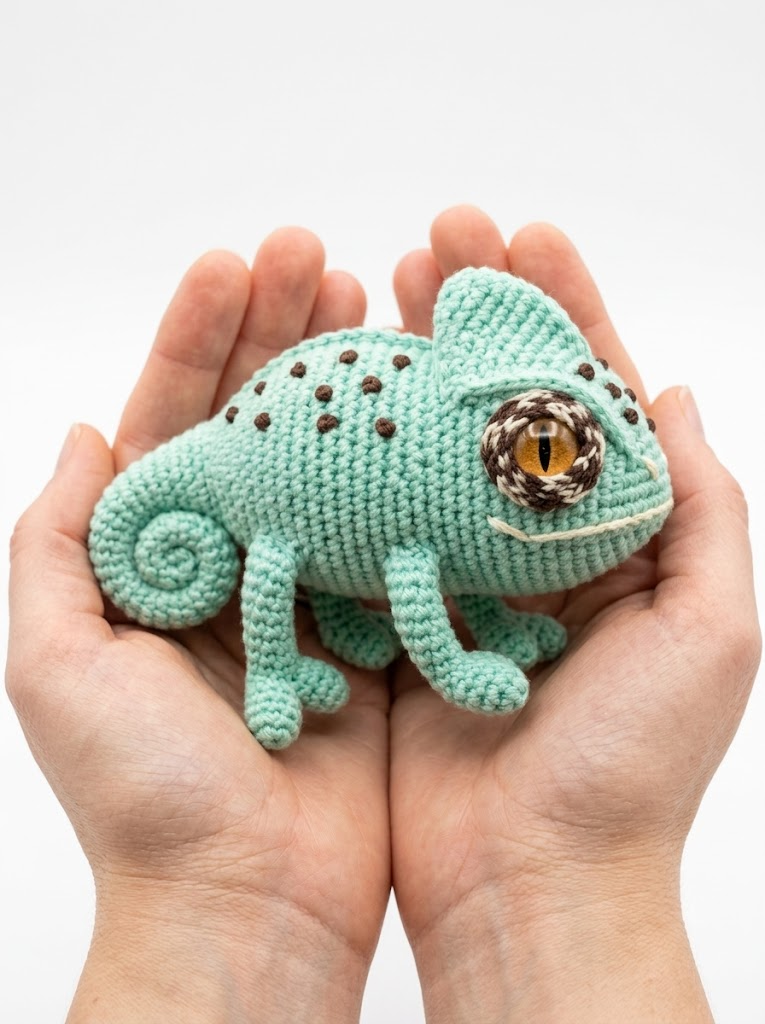
You’re looking at one of the most charming amigurumi projects I’ve ever designed. This adorable chameleon features soft mint green yarn with chocolate brown speckle details, expressive golden eyes, and that signature curled tail that makes chameleons so lovable. If you can crochet in the round and know your basic stitches, you can absolutely make this little guy.
This crochet chameleon pattern looks advanced but breaks down into manageable pieces. The body, head crest, legs, tail, and eyes all come together through simple assembly. I’ll walk you through every single step.
Let me show you how to crochet this mint chocolate chameleon from start to finish.
What Makes This Amigurumi Chameleon Special
This design captures realistic chameleon features while staying cute and approachable. The tall head crest gives him personality. Those big round eyes with the slit pupils look almost alive. The curled tail and splayed feet add authentic character.
The brown French knot details scattered across the body and crest mimic natural chameleon markings. They’re completely optional but add so much charm.
Finished size is approximately 5 inches long and 3.5 inches tall when using the recommended yarn weight. Perfect for display, gifting, or little hands to play with.
Materials You’ll Need
Gather these supplies before starting your chameleon amigurumi crochet tutorial.
Yarn:
I used a cotton blend yarn for nice stitch definition. Acrylic works beautifully too and is easier to find.
Hook:
Going down a hook size from yarn label recommendations creates tighter stitches. This prevents stuffing from showing through.
Notions:
Abbreviations and Stitch Definitions
Let me define every stitch term before we begin. Reference this section anytime you need a refresher.
MR – Magic Ring: An adjustable loop that creates a tight center. Wrap yarn around finger, pull loop through, chain one, then work stitches into the ring. Pull tail to close.
ch – Chain: Yarn over, pull through loop on hook. Creates foundation or adds height.
sc – Single Crochet: Insert hook, yarn over, pull up loop (two loops on hook), yarn over, pull through both loops.
inc – Increase: Work two single crochet stitches into the same stitch. This adds one stitch to your count.
dec – Decrease (Invisible Decrease): Insert hook through front loops only of next two stitches, yarn over, pull through both front loops, yarn over, pull through both loops on hook. Creates a neater decrease than standard method.
sl st – Slip Stitch: Insert hook, yarn over, pull through stitch and loop on hook in one motion. Used for joining or invisible finishing.
FO – Fasten Off: Cut yarn, pull tail through final loop, tighten.
BLO – Back Loop Only: Work into only the back loop of the stitch instead of both loops.
All rounds are worked in continuous spirals unless noted. Use your stitch marker to track round beginnings.
Chameleon Body Pattern
The body forms the main structure. You’ll work from the nose toward the back end.
With mint green yarn:
Round 1: 6 sc in MR (6 sts)
Round 2: Inc in each st around (12 sts)
Round 3: [Sc 1, inc] repeat 6 times (18 sts)
Round 4: [Sc 2, inc] repeat 6 times (24 sts)
Round 5: [Sc 3, inc] repeat 6 times (30 sts)
Round 6: [Sc 4, inc] repeat 6 times (36 sts)
Rounds 7-9: Sc in each st around (36 sts) – 3 rounds even
This creates the widest part of the body where the head meets.
Round 10: [Sc 4, dec] repeat 6 times (30 sts)
Rounds 11-13: Sc in each st around (30 sts) – 3 rounds even
Round 14: [Sc 3, dec] repeat 6 times (24 sts)
Rounds 15-17: Sc in each st around (24 sts) – 3 rounds even
Begin stuffing firmly now. Continue adding stuffing as you work.
Round 18: [Sc 2, dec] repeat 6 times (18 sts)
Rounds 19-20: Sc in each st around (18 sts) – 2 rounds even
Round 21: [Sc 1, dec] repeat 6 times (12 sts)
Round 22: Dec 6 times (6 sts)
Stuff remaining space firmly. Close hole by weaving yarn through front loops of final 6 stitches. Pull tight and secure. FO, weave in end.
Head Crest Pattern
This distinctive crest sits on top of the head. It’s worked flat, then curved during attachment.
With mint green yarn:
Row 1: Ch 16, sc in 2nd ch from hook, sc in next 13 ch, 3 sc in last ch. Working along opposite side of chain: sc in next 14 ch (32 sts total around)
Row 2: Ch 1, turn. Sc 14, inc, sc 2, inc, sc 14 (34 sts)
Row 3: Ch 1, turn. Sc 15, inc, sc 2, inc, sc 15 (36 sts)
Row 4: Ch 1, turn. Sc across (36 sts)
Row 5: Ch 1, turn. Sc2tog, sc 14, sc2tog, sc2tog, sc 14, sc2tog (32 sts)
Row 6: Ch 1, turn. Sc2tog, sc 12, sc2tog, sc2tog, sc 12, sc2tog (28 sts)
FO with long tail for sewing.
The crest should curve naturally. Pin along the center top of the head from between the eyes to the back before sewing.
Eye Pieces Pattern (Make 2)
The eyes give this chameleon so much personality. They’re constructed in layers.
Eye Socket (make 2):
With mint green yarn:
Round 1: 6 sc in MR (6 sts)
Round 2: Inc in each st around (12 sts)
Round 3: [Sc 1, inc] repeat 6 times (18 sts)
Round 4: [Sc 2, inc] repeat 6 times (24 sts)
Rounds 5-7: Sc in each st around (24 sts) – 3 rounds even
Round 8: [Sc 2, dec] repeat 6 times (18 sts)
Sl st to next st. FO with long tail.
Eye Ring Detail:
Using brown and cream yarn held together (or alternating), chain 18. Join to first chain with sl st to form ring. FO with tail for sewing.
Assembly:
Insert 12mm safety eye through center of eye socket before closing. The crocheted ring sits around the safety eye, secured with a few stitches. Stuff eye sockets lightly to create that bulging chameleon look.
Leg Pattern (Make 4)
These stubby legs have the characteristic chameleon feet shape.
With mint green yarn:
Round 1: 5 sc in MR (5 sts)
Round 2: Inc in each st around (10 sts)
Rounds 3-5: Sc in each st around (10 sts) – 3 rounds even
Round 6: [Sc 3, dec] repeat 2 times (8 sts)
Rounds 7-10: Sc in each st around (8 sts) – 4 rounds even
Sl st to next st. FO with long tail for sewing.
Stuff feet portion lightly. Leave upper leg portion unstuffed for flexibility.
Curled Tail Pattern
The signature chameleon tail curls beautifully. A pipe cleaner inside helps it hold shape.
With mint green yarn:
Round 1: 6 sc in MR (6 sts)
Rounds 2-4: Sc in each st around (6 sts) – 3 rounds even
Round 5: [Sc 1, dec] repeat 2 times (4 sts)
Rounds 6-18: Sc in each st around (4 sts) – 13 rounds even
Insert pipe cleaner cut to tail length. Bend end to prevent poking through.
Sl st to next st. FO with long tail. Do not stuff. The pipe cleaner provides structure.
Curl tail into spiral shape before attaching.
Step by Step Assembly Instructions
Assembly transforms separate pieces into one cohesive amigurumi. Take your time here.
Step 1: Position Eyes
Place eye sockets on either side of the head area (rounded end of body). They should bulge outward and sit fairly close together near the front. Pin in place. The eyes face slightly forward and outward, typical chameleon style.
Sew securely using the yarn tail, going around the opening edge multiple times.
Step 2: Attach Head Crest
Curve the crest piece so it arches from between the eyes to the back of the head. Pin along the center line of the body top. The crest should stand upright, not flop over.
Sew along the bottom edge, securing to the body. The front edge can remain slightly open near the eyes for a natural look.
Step 3: Sew Legs
Position front legs on sides of body, roughly below and slightly behind the eyes. Back legs attach further back, leaving room for the belly.
Angle feet slightly outward for stability. Sew openings flat against body.
Step 4: Attach Tail
The tail joins at the back end of the body. Position the spiral curling to one side or downward. Sew securely, adding extra stitches at the base for strength.
Step 5: Add Spots
Using chocolate brown yarn, create French knots scattered across the body and crest. To make a French knot: bring needle up through fabric, wrap yarn around needle 2-3 times, insert needle back down very close to where it came up while holding wraps. Pull through to create a small raised dot.
Add 8-12 spots randomly. Reference the photo for placement ideas.
Step 6: Embroider Mouth
Using cream yarn, stitch a simple curved line from below the eye, across the face area. This creates that subtle chameleon smile. A few straight stitches work perfectly.
Step 7: Final Touches
Weave in all remaining yarn tails. Adjust tail curl. Fluff stuffing by gently manipulating the body.
Helpful Tips for Success
Tension matters. Keep your stitches tight and consistent throughout. Loose stitches show stuffing and create an uneven surface.
Stitch markers save sanity. Working continuous rounds means no clear round endings. Move your marker up every round without fail.
Stuff as you go. Don’t wait until the end. Getting stuffing into narrow areas becomes impossible once openings shrink.
Safety eyes must be secured early. Once the backing goes on, it doesn’t come off without damage. Check placement before committing.
The pipe cleaner trick works wonders. That tail holds its curl permanently with internal support. You can also reshape it anytime.
Customization Ideas
Change the color palette entirely. Purple with teal spots. Rainbow gradient. Natural brown and green. This amigurumi chameleon crochet pattern adapts beautifully.
Skip the spots for a simpler look. Or add more for extra texture.
Use larger safety eyes for a more cartoonish appearance. Smaller eyes create a subtle, realistic vibe.
Make a family in graduated sizes by changing hook and yarn weight. Sport weight with a 2.75mm hook creates a mini version. Bulky yarn with a 5mm hook makes a huggable larger chameleon.
Skill Level and Time Estimate
I’d call this an intermediate amigurumi pattern. You need comfort with working in the round, increasing, decreasing, and basic sewing assembly.
Beginners who have made a few simple amigurumi projects can absolutely tackle this. The pieces aren’t complicated individually. Assembly requires patience and spatial thinking.
Expect 4-6 hours total crochet time depending on your speed. Assembly adds another hour or so.
Wrapping Up Your Mint Chocolate Chameleon
You now have everything needed to crochet this darling chameleon from the first magic ring to the final woven end. Every round, every stitch count, every assembly step is right here in this step by step crochet tutorial.
I genuinely love how this design turned out. Those golden eyes really bring him to life, and that curled tail gets me every time. He sits perfectly on a desk, bookshelf, or in the hands of someone who loves unique handmade gifts.
Thank you so much for choosing this pattern for your next project. It means everything when someone takes time to create something I designed.
I’d absolutely love to see your finished chameleon. Tag me on Instagram or share in my Facebook group. Seeing your color choices and personal touches brings me so much joy.
Happy crocheting, friend. You’ve got this.
