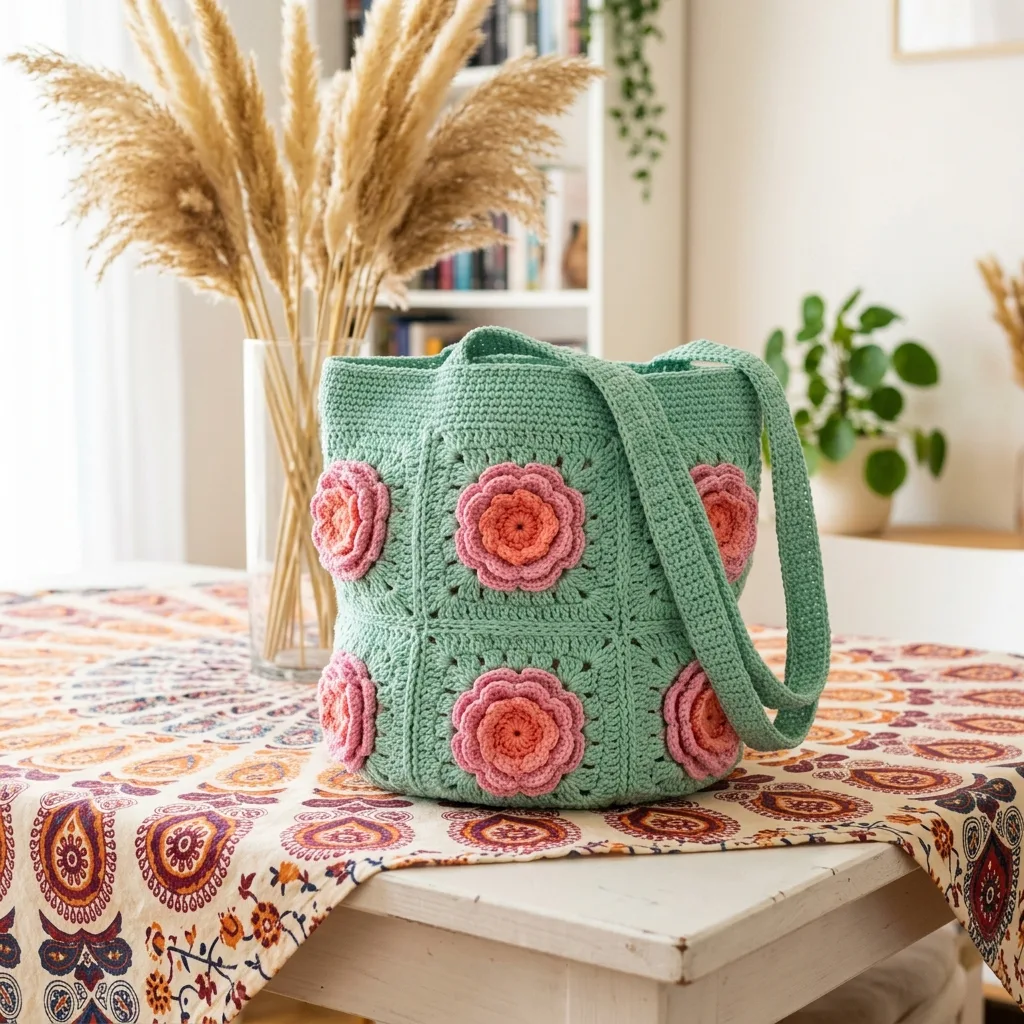
A sturdy shoulder bag that holds your essentials, looks beautiful, and works up in a weekend. That is exactly what this Mint Green Rose Granny Square Bag delivers. The construction uses solid granny squares joined into a rectangular bucket shape, topped with dimensional layered roses in coral and pink. This pattern works well for confident beginners ready to try something new, and it makes an excellent handmade gift for anyone who appreciates functional beauty. The whole project takes roughly 10 to 14 hours, so you can start on Friday evening and carry your new bag by Sunday.
Get the Ad-Free PDF Pattern
You can find the free pattern below, or you can purchase the ad-free printable PDF from my shop.
Get the Printable PDF →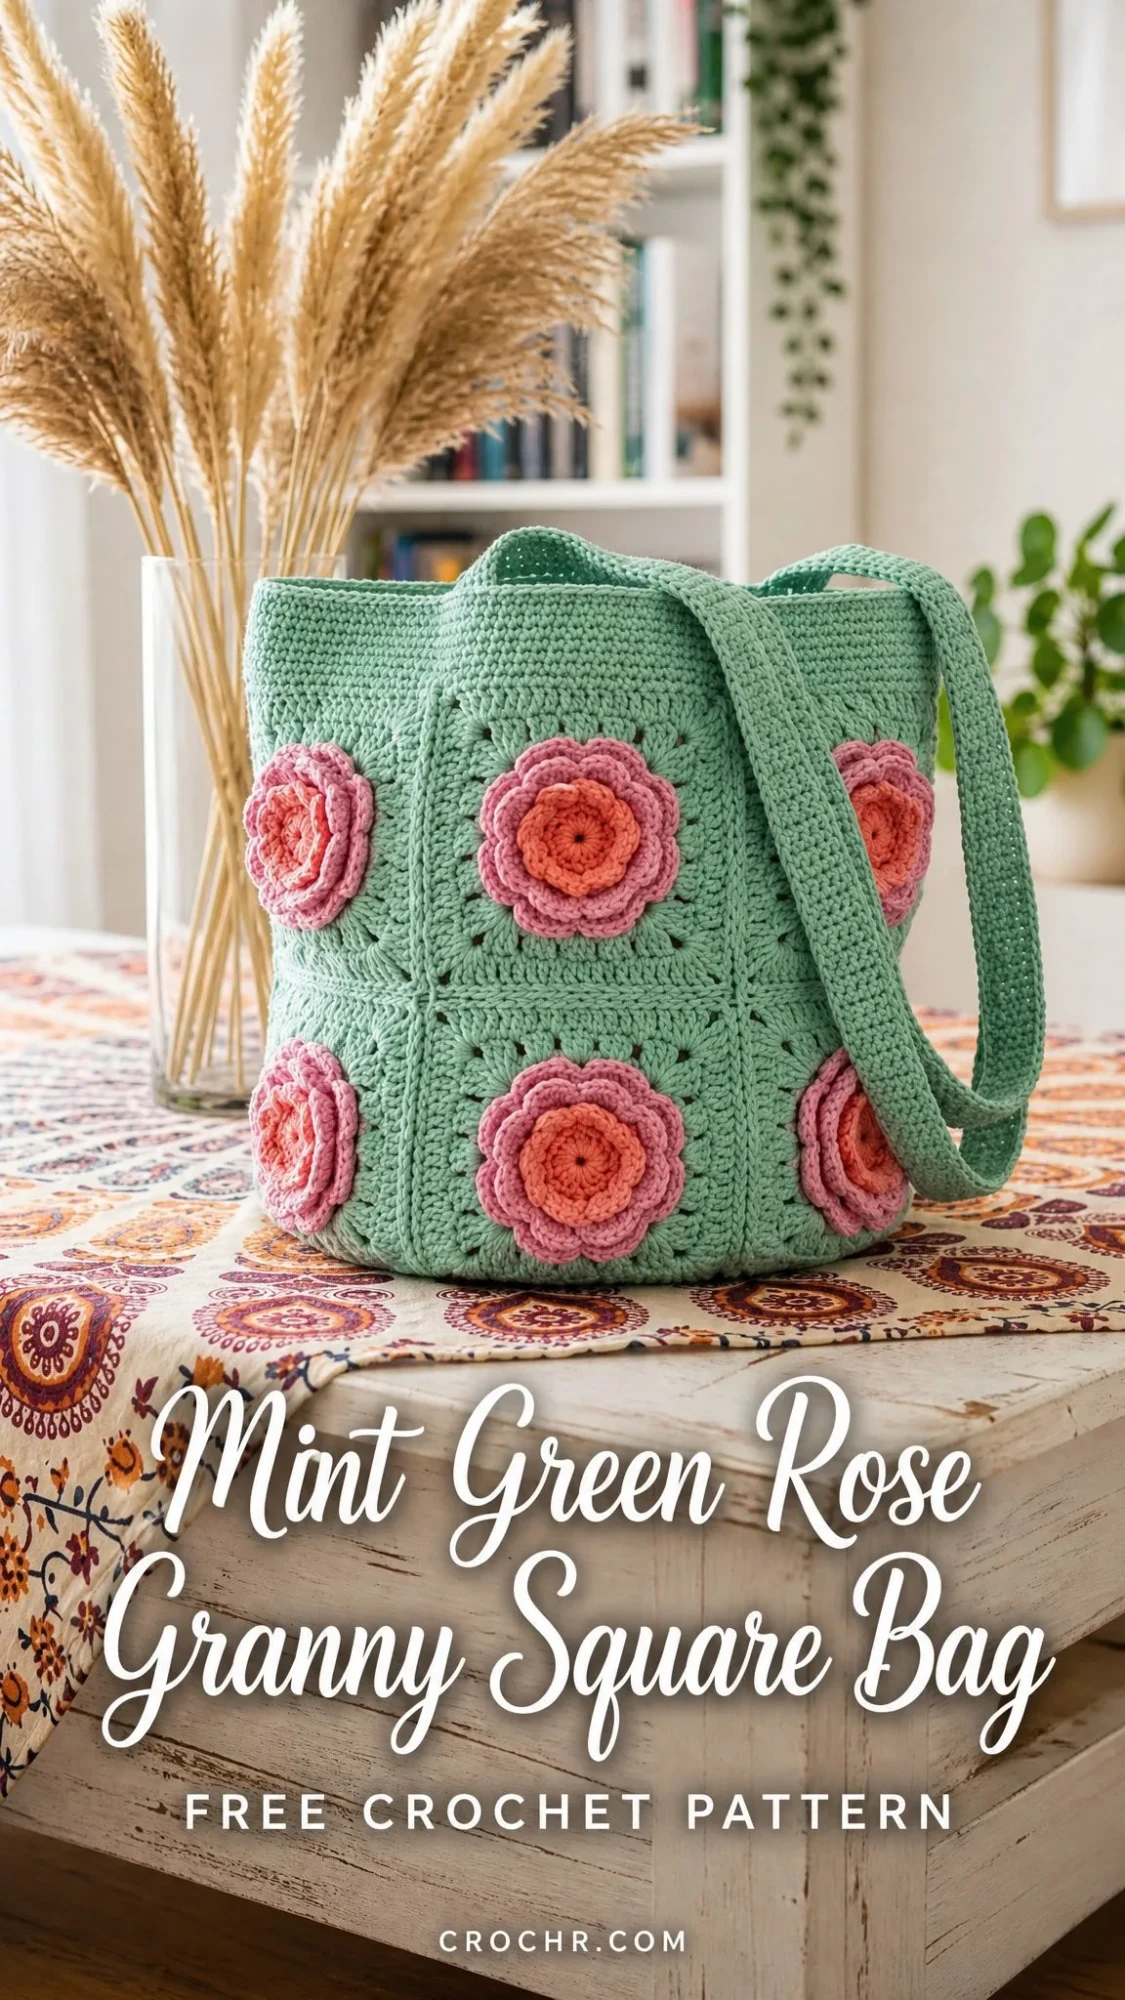
Why You Will Love This Granny Square Bag Pattern
This crochet bag pattern combines classic granny square construction with modern floral embellishments. The mint green base keeps things fresh and springy, while the coral and pink roses add dimension and visual interest without overwhelming the design.
What makes this project special is the structure. Unlike floppy tote bags that lose their shape, this one stands upright on its own. The worsted weight cotton yarn creates a firm fabric that holds up to daily use. You can toss in your wallet, phone, keys, and a paperback without worrying about stretch or sag.
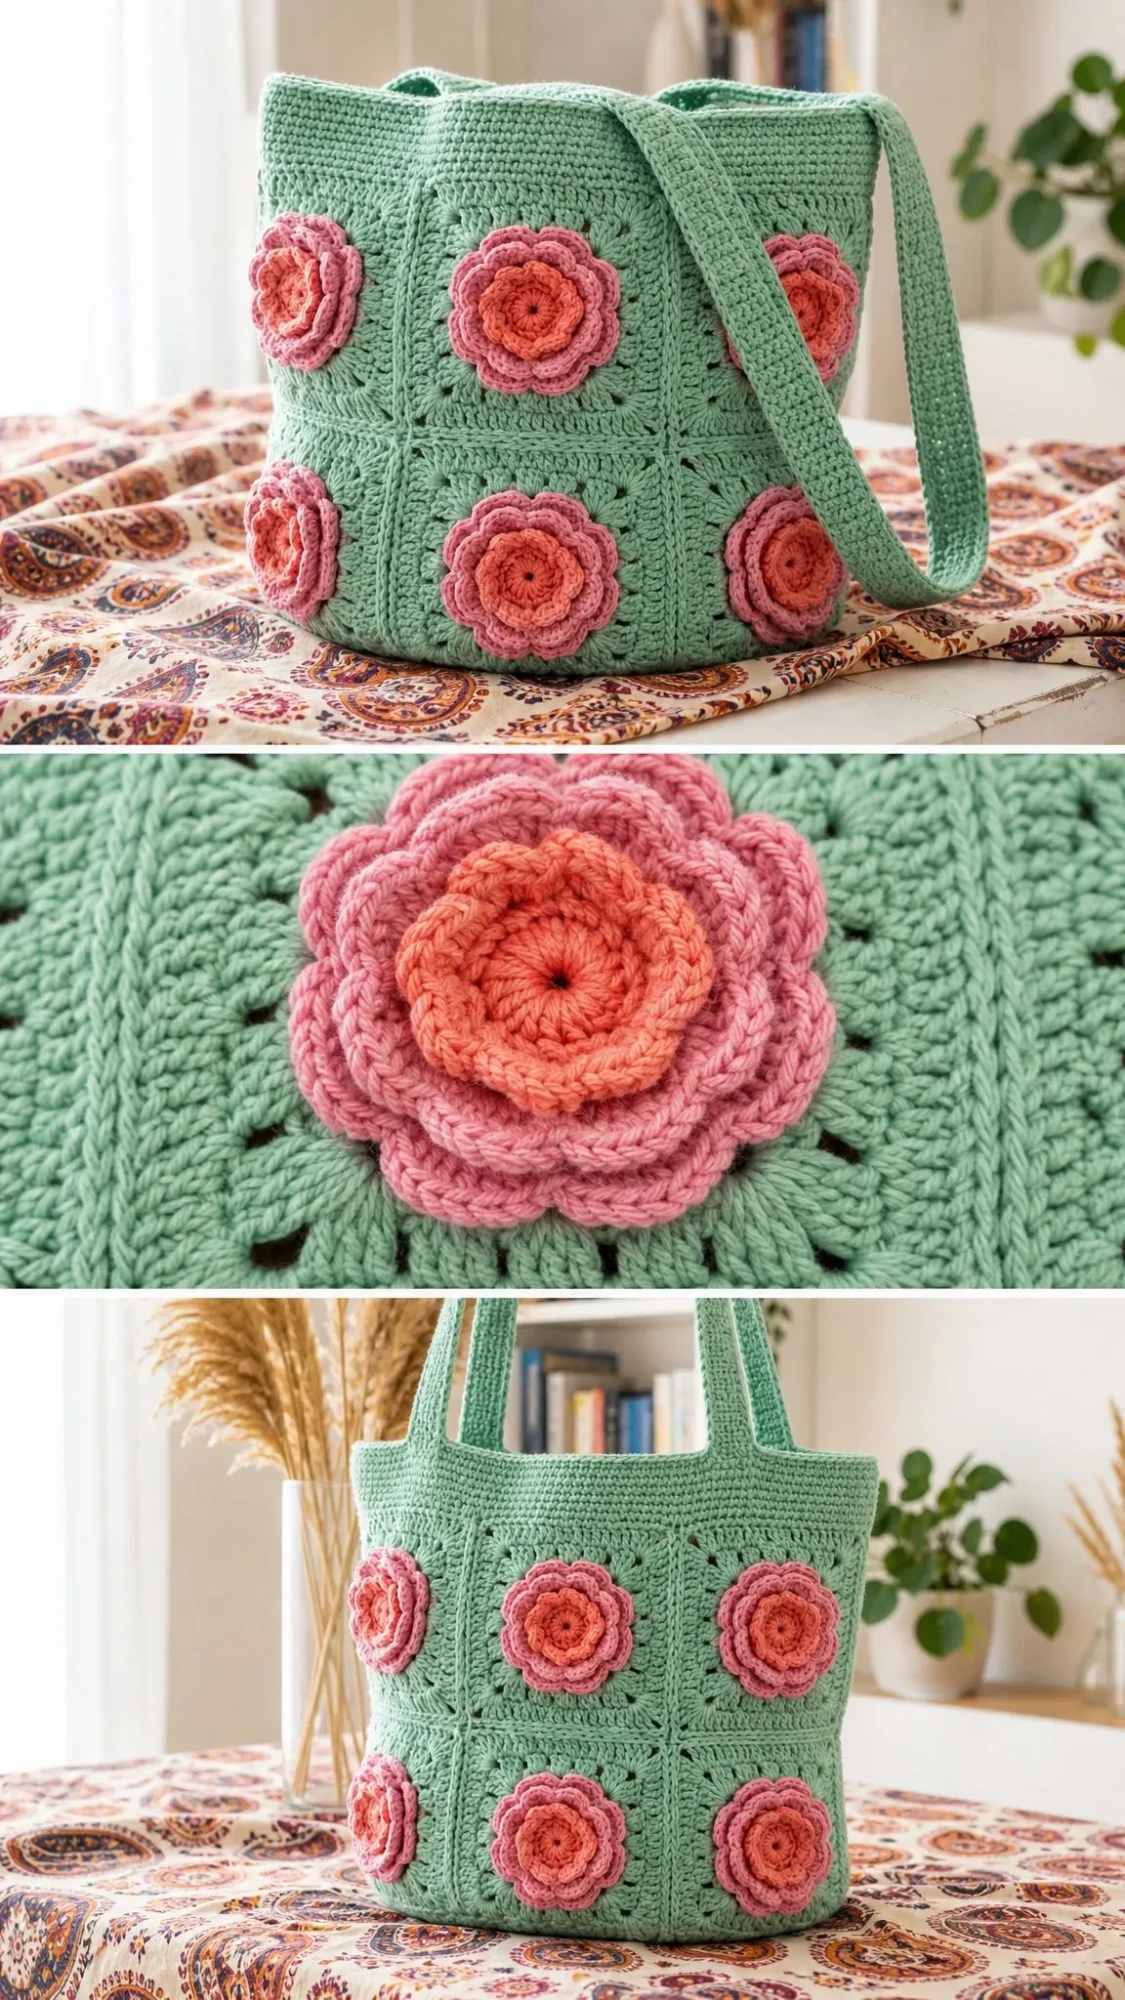
The granny squares are solid rather than lacy, which means no holes for small items to escape through. Each square measures 4.25 inches after blocking, and you will make 14 of them total. Twelve squares form the walls of the bag, and two squares create the bottom.
The roses get sewn on after the squares are complete. This approach lets you position each flower exactly where you want it before committing to permanent placement. If you have never tried applique work before, this is a gentle introduction.
Materials You Will Need
Gather these supplies before you begin:
Yarn:
Hook: 4.0 mm (G-6), or whatever size gives you the correct gauge
Notions: Yarn needle, stitch markers, pins, tape measure, scissors, and optional lining fabric
Yarn Suggestions
The pattern recommends smooth worsted or aran weight cotton that creates a firm fabric. Here are three excellent options:
Avoid very soft drapey yarns unless you plan to line the bag. Cotton holds its shape better than acrylic for structured projects like this one.
Gauge Information
Getting your gauge right matters for this crochet pattern. The finished bag dimensions depend entirely on your square size.
Make one test square first. If it measures larger than 4.25 inches by more than a quarter inch, try a smaller hook. If it measures smaller, go up a hook size. Match the square size first, and everything else will fall into place.
Finished Dimensions
Abbreviations and Special Stitches
This pattern uses US crochet terms throughout. If you usually work from UK patterns, remember that US single crochet (sc) equals UK double crochet (dc), US half double crochet (hdc) equals UK half treble (htr), and US double crochet (dc) equals UK treble (tr).
Standard Abbreviations:
Special Stitches Explained
Standing dc join: Make a slip knot on your hook, yarn over, insert hook in the indicated stitch or space, yarn over and pull up a loop, yarn over and pull through two loops twice. This counts as one double crochet and lets you start a new color without a chain.
Invisible seam: Hold pieces with wrong sides together or lay them flat with right sides up. Using matching yarn, sew through the inner loops only, catching one inner loop from each edge. Pull snug but not tight. This creates a nearly invisible join.
Crab stitch: Work single crochet from left to right if you are right-handed, or right to left if you are left-handed. Insert your hook in the next stitch behind your hook, pull up a loop, yarn over and pull through both loops. It feels backward at first, but creates a beautiful braided edge.
Motif 1: Solid Granny Square Instructions
You will make 14 mint green squares total. Twelve become wall squares, and two form the bottom of the bag.
Pattern Notes:
Square Instructions (Make 14)
Round 1: With mint, make a magic ring. Ch 3, 2 dc in ring, ch 2, [3 dc in ring, ch 2] 3 times. Join with sl st to top of ch-3. Tighten ring. (12 dc, 4 corner ch-2 spaces)
Round 2: Sl st into next corner sp. Ch 3, dc in same sp, ch 2, 2 dc in same sp, dc in each of next 3 dc, [(2 dc, ch 2, 2 dc) in next corner sp, dc in each of next 3 dc] 3 times. Join. (28 dc, 4 corner ch-2 spaces; 7 dc per side)
Round 3: Sl st into next corner sp. Ch 3, dc in same sp, ch 2, 2 dc in same sp, dc in each of next 7 dc, [(2 dc, ch 2, 2 dc) in next corner sp, dc in each of next 7 dc] 3 times. Join. (44 dc; 11 dc per side)
Round 4: Repeat Round 3 logic, working corners as (2 dc, ch 2, 2 dc) and dc in each of 11 dc across each side. Join. (60 dc; 15 dc per side)
Round 5: Repeat Round 3 logic, working corners as (2 dc, ch 2, 2 dc) and dc in each of 15 dc across each side. Join and fasten off. (76 dc; 19 dc per side)
Checkpoint: Each square should measure 4.25 inches (10.8 cm) across after blocking. If it measures larger or smaller by more than 0.25 inches (6 mm), change your hook size before making the remaining squares.
Motif 2: Layered Rose Applique Instructions
Make 12 flowers, one for each visible wall square. Leave a 16 inch (40 cm) tail for sewing when you fasten off.
Round 1 (center): With coral, make a magic ring. Ch 1, 8 sc in ring. Join with sl st to first sc. (8 sc)
Round 2 (center growth): Ch 1, 2 sc in each st around. Join. (16 sc)
Round 3 (inner petals): Change to light pink. Working in front loops only: [sl st in next st, 5 dc in next st] 8 times. Join to first sl st. (8 petals)
Round 4 (outer petal base): Working behind Round 3 into unworked back loops of Round 2: [sl st in next back loop, ch 4, skip next back loop] 8 times. Join. (8 ch-4 spaces)
Round 5 (outer petals): Change to pink. In each ch-4 sp work (sl st, hdc, 5 dc, hdc, sl st). Join and fasten off, leaving tail. (8 outer petals)
Applique Placement Tips
Center one flower on each of the 12 wall squares. Pin all flowers first before sewing anything down. The outer petals should sit inside the square border without covering the seam line.
Sew around the back of the flower through the final round and a few center stitches so the applique remains secure. Take your time with this step. A well-attached flower will stay put through years of use.
Checkpoint: A finished flower should measure about 2.5 to 2.75 inches (6.5 to 7 cm) across and sit flat against the square.
Bag Layout and Joining
Arrange the 12 wall squares into one long band, two squares tall:
| Left side | Front | Front | Right side | Back | Back |
|---|---|---|---|---|---|
| Left side | Front | Front | Right side | Back | Back |
Join the remaining 2 squares into a strip for the bottom. This creates an 8.5 inch x 4.25 inch (21.5 x 11 cm) base.
Joining the Wall Band
With right sides facing up, join squares edge to edge using the invisible seam through inner loops only.
1. Join vertical seams first to form the long wall band. Each joined edge uses 19 seam stitches.
2. Fold the band into a tube and join the final side seam. Keep front and back panels two squares wide.
3. Join the bottom strip to the lower edge of the tube. Ease one bottom square under the two front columns and one under the two back columns. Match corners and seams before sewing.
Seam Count Checkpoint: Every square edge has 19 dc along the side. When two edges are joined, you should make 19 sewing bites across the dc stitches, then secure at the corner.
Shape Checkpoint: After joining, the bag should stand as a soft rectangular bucket measuring 8.5 inches wide, 8.5 inches tall, and 4.25 inches deep.
Top Edging Instructions
Round 1: Join mint at a side seam on the top opening. Ch 1, sc evenly around: 19 sc across each of the 6 top square edges and 1 sc in each of the 6 seam or corner joins. Join. (120 sc)
Rounds 2-3: Ch 1, sc in each st around. Join. (120 sc)
Round 4: Crab stitch in each st around. Join and fasten off. (120 crab sts)
Strap Instructions
Row 1: With mint, ch 111. Sc in 2nd ch from hook and in each ch across. Turn. (110 sc)
Rows 2-5: Ch 1, sc in each st across. Turn. (110 sc)
Edging: Ch 1, rotate and sc evenly around all four edges, placing 2 sc in each corner. Join and fasten off. Aim for a flat edge, not a ruffle.
Attaching the Strap
Mark the center of each side panel at the top edge. Overlap each strap end by 1.25 inches (3 cm) on the inside of the bag. Sew a box with an X through it using mint yarn or strong matching thread. Repeat several passes for strength.
The finished strap drop will be about 11 to 12 inches (28 to 30.5 cm) depending on how tightly you sew the ends.
Finishing Your Granny Square Bag
Weave in all ends on the wrong side, splitting yarn tails in different directions so the cotton does not work loose over time.
Steam or wet block the finished bag lightly. Shape the corners and allow to dry completely before use.
For extra structure, consider sewing in a simple fabric lining or adding a removable plastic canvas base cut slightly smaller than the bottom.
Size Customization Options
Want a different size? Here are some easy modifications:
Keep every square the same blocked size before joining for best results.
Troubleshooting Common Issues
| Issue | Fix |
|---|---|
| Square cups | Loosen corner tension or block more firmly |
| Square ruffles | Use a smaller hook or reduce steam blocking |
| Flowers curl | Block flowers face down, then sew more anchor points |
| Top edge waves | Work fewer pick-up stitches at seams |
| Strap stretches | Add a lining strip or work one row of surface slip stitches down the center |
Care Instructions
Spot clean when possible. For a deeper clean, hand wash in cool water, press out moisture in a towel, reshape, and dry flat. Avoid hanging while wet because cotton can stretch.
I hope you enjoy making this Mint Green Rose Granny Square Bag as much as I enjoyed putting this pattern together. It really is the perfect blend of practical and pretty.
If you found this crochet pattern helpful, please save it to your Pinterest boards so you can find it again when you are ready to start. And I would absolutely love to see your finished bags, so drop a comment below or tag me on social media when you complete yours. Happy crocheting!
Want a Quick & Easy Printable Version?
Get a clean, beautifully formatted PDF of this pattern — easy to follow step by step, ready to print or save on any device. No scrolling, no distractions, just the pattern.
Get the Printable PDF →