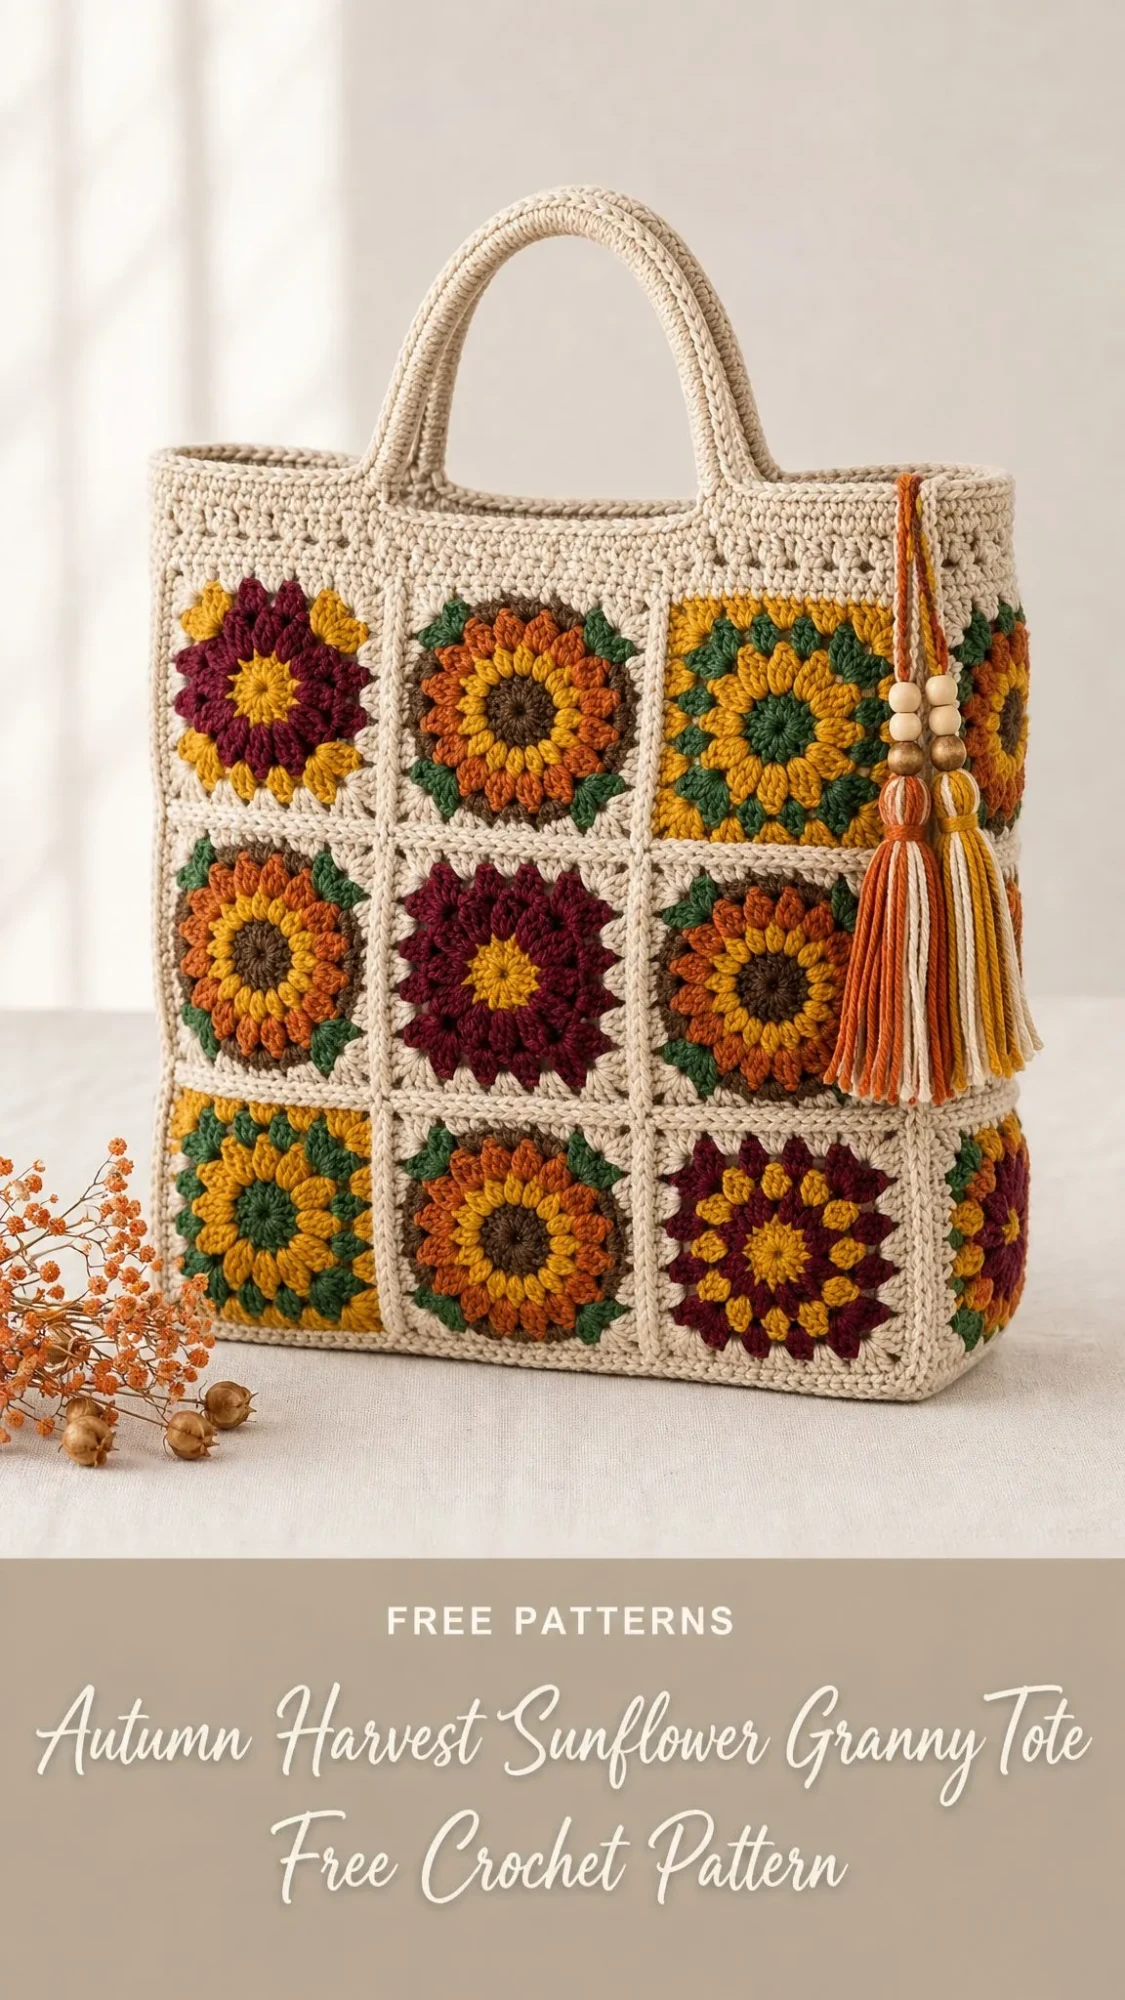
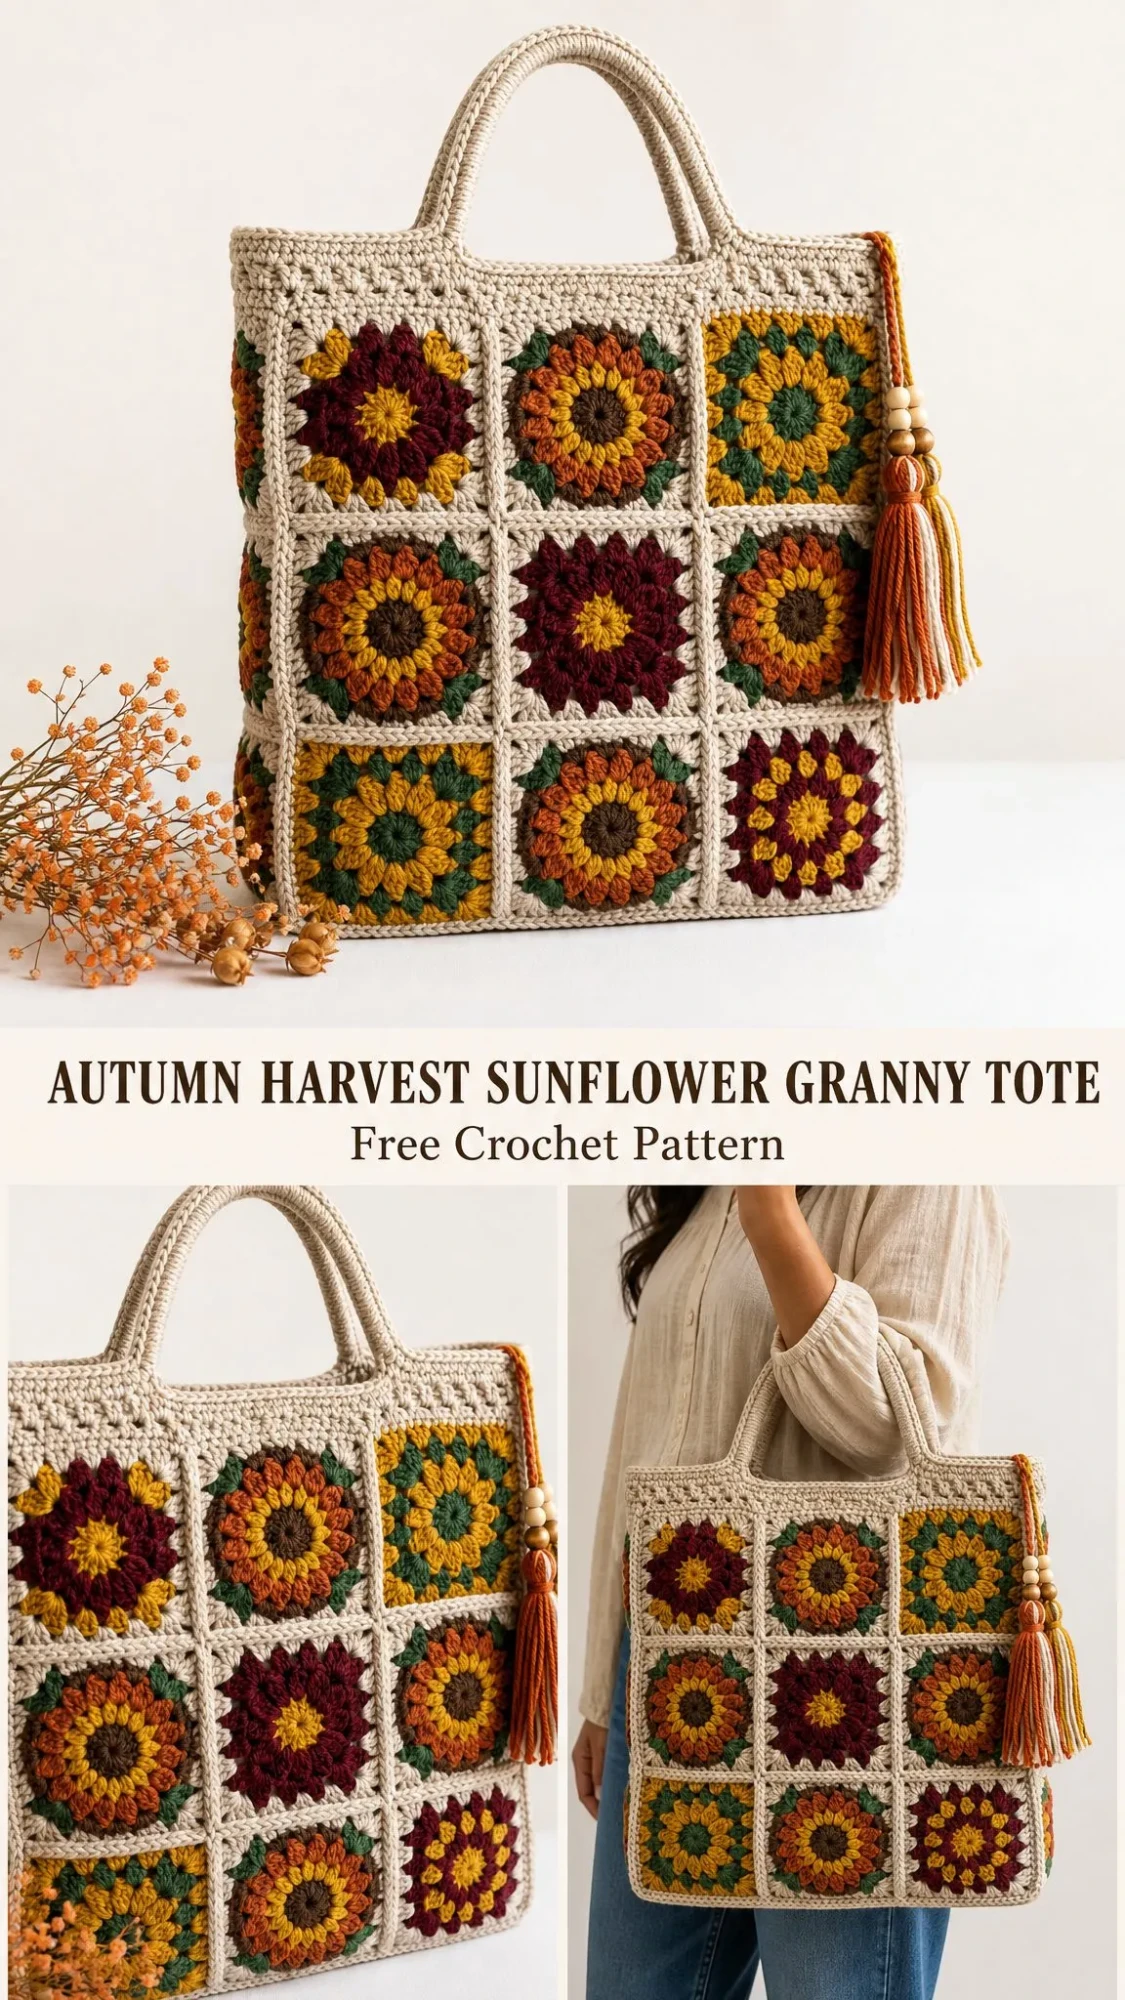
This is a granny square tote bag with sunflower motifs in warm autumn colors. You will work 18 squares using puff stitches for the petals, join them into two panels, add a textured band, and finish with sturdy handles and a beaded tassel. The pattern uses worsted weight cotton yarn and a 5.0 mm hook.
Each square takes about 30 to 40 minutes once you find your rhythm. The whole bag comes together in roughly 15 to 20 hours. If you can work double crochet (dc), change colors, and make a basic puff stitch, you have all the skills you need.
The finished tote measures 15 inches wide by 16.75 inches tall, with a boxed base that gives it structure. It is roomy enough for farmers market finds, library books, or a small project bag. The beaded tassel adds a boho touch that makes this bag look far more complicated than it actually is.
Materials You Will Need
Gather these supplies before you begin.
Yarn: Worsted weight or Aran weight cotton yarn, category 4. A firm cotton or cotton blend gives the best body for a tote. You will need:
Suggested Yarns:
Hook: 5.0 mm (US H-8) crochet hook for motifs and band
Notions:
Gauge
One finished sunflower square should measure 5 inches by 5 inches (12.5 cm by 12.5 cm) using worsted yarn and a 5.0 mm hook.
Make one square first and measure it. If your square is larger than 5 inches, drop down a hook size. If it is smaller, go up a hook size. Getting the square size right is the most important step because it determines the final bag dimensions.
Abbreviations and Special Stitches
Standard Abbreviations:
UK Note: US dc equals UK treble (tr). US sc equals UK double (dc). This pattern uses US terms throughout.
Special Stitches:
Magic ring: An adjustable loop that creates a tight center. Make a loop with your yarn, insert your hook, pull up a loop, and work your stitches into the ring. Pull the tail to close the center tight.
Puff stitch (puff): This creates the fluffy petals. Yarn over, insert hook in stitch or space, yarn over, pull up a loop to double crochet height. Repeat this sequence 3 times total so you have 7 loops on your hook. Yarn over and pull through all 7 loops, then chain 1 to close the puff.
Pattern Notes
Before you start crocheting, read through these helpful tips.
The Sunflower Square Pattern
Make 18 squares in total. Each square uses a brown center, two petal shades of your choice, green corner leaves, and cream to square it off.
Round 1 (Brown):
With brown and a magic ring, chain 2 (this does not count as a stitch). Work 12 dc in the ring. Pull the ring tight to close the center. Join with a slip stitch to the first dc. (12 dc)
Round 2 (Petal A):
Join your first petal color in any stitch. Work a puff stitch in each dc around, chaining 1 after each puff. Join with a slip stitch to the top of the first puff. (12 puffs, 12 ch-1 spaces)
Round 3 (Petal B):
Join your second petal color in any ch-1 space. Work a puff stitch in each ch-1 space around, chaining 1 after each puff. Join with a slip stitch. These offset petals sit between Round 2’s petals, creating a full flower effect. (12 puffs, 12 ch-1 spaces)
Round 4 (Square it):
Working into the 12 ch-1 spaces of Round 3, you will set 4 corners at every 3rd space. In each corner space, work green (3 dc, ch 2, 3 dc). In each of the other 8 spaces, work cream 3 dc. Join with a slip stitch. (48 dc, 4 corner spaces)
Round 5 (Cream frame):
Join cream in any corner ch-2 space. Work (3 dc, ch 2, 3 dc) in each corner space. Work 3 dc in each gap along the sides. You will have 3 gaps per side. Join with a slip stitch. (60 dc, 4 corner spaces)
Fasten off and weave in your ends.
Blocking Tip: Block each finished square to a true 5 inches by 12.5 cm before joining. Flat, even squares make assembly quick and the grid crisp.
Colorways and Layout
The harvest look comes from mixing petal pairs from square to square. Keep brown centers, green corners, and cream frames constant while rotating these petal combinations.
Ember: Burgundy for Petal A, Gold for Petal B
Harvest: Rust for Petal A, Brown-edged for Petal B
Marigold: Gold for Petal A, Green-kissed for Petal B
Make 18 squares total, balancing the three colorways. Arrange a front panel and a back panel, each 3 squares across by 3 squares down. Scatter the shades so no two identical squares touch each other.
Take a photo of your layout before joining so you remember the arrangement.
Assembly Instructions
Step 1: Join Each Panel
With cream yarn and right sides facing up, whip stitch or single crochet the squares into two 3 by 3 grids. You will have one front panel and one back panel. Match stitch to stitch for tidy seams.
Step 2: Seam the Body
Hold both panels with wrong sides together. Join cream yarn and seam down both sides and across the bottom, leaving the top open. You will have 3 seamed edges total.
Step 3: Box the Base
Flatten each bottom corner into a small triangle. Seam across about 2 to 3 inches (5 to 7.5 cm) to create a boxed base that helps the tote stand upright. You will have 2 boxed corners.
Step 4: Top Band
Join cream at the top opening.
Round 1: Single crochet evenly around the entire opening. Join with a slip stitch.
Rounds 2 through 4: Single crochet in each stitch around. On Round 3, work a row of front-post single crochet to echo a woven band texture. Finish with one plain single crochet round. Maintain an even stitch count each round.
Handles (Make 2)
Chain 8.
Row 1: Single crochet in the 2nd chain from hook and in each chain across. Turn. (7 sc)
Rows 2 through 60: Single crochet in each stitch across. Turn. (7 sc)
After completing all 60 rows, fold the handle lengthwise and single crochet the long edge closed to create a firm, rounded strap.
Placement: Pin each handle to the band so the two handles sit about 5 inches (12.5 cm) apart. Make sure they are aligned front to back. Stitch each end down securely through the band, going over it several times for strength.
The Beaded Tassel
Step 1: Wrap the Skirt
Wind cream, rust, and gold yarn together around a 6 inch (15 cm) piece of cardboard about 30 times. Slip a long tie under the top and knot firmly.
Step 2: Cut and Form
Snip the bottom loops open. About 1 inch (2.5 cm) from the top, wrap a strand several times around the bundle to form the neck. Secure and bury the ends inside the tassel.
Step 3: Add Beads
Thread the top ties through 5 to 6 wooden beads, stacking them above the neck for that boho finish.
Step 4: Attach
Tie the tassel to the top-right corner of the band where the handle meets it. Knot securely and weave the ends in.
Step 5: Final Press
Lightly steam block the whole bag. Shape the base and weave in any remaining ends.
Optional Lining
A simple cotton lining slipped inside and hand-stitched to the band adds structure and keeps small items from poking through the granny square openings. Cut two rectangles slightly smaller than your finished panels, sew them together on three sides, and whip stitch the top edge to the inside of the band.
Care Instructions
Customizing the Size
Bigger: Add a column or row of squares (4 by 3 or 4 by 4)
Smaller: Work a 2 by 3 grid for a sweet mini tote
Deeper: Box the base corners wider, up to 4 inches (10 cm)
Longer handles: Add rows in pairs to keep them even
Square-Count Math:
Width equals squares across times 5 inches. Height equals squares down times 5 inches plus approximately 1.75 inches for the band. So a 3 by 3 front gives 15 inches wide and about 16.75 inches tall. Scale either direction by full squares to keep the grid even.
Troubleshooting Tips
Puff stitches look uneven: Make sure you are pulling up loops to the same height each time. The ch-1 that closes the puff helps secure it.
Squares are different sizes: Check your tension. You might crochet tighter when tired. Block aggressively to even things out.
Corners are rounding: Make sure you are working (3 dc, ch 2, 3 dc) in each corner space, not just 3 dc.
Seams look bumpy: Try mattress stitch instead of whip stitch for nearly invisible joins.
Final Thoughts on the Autumn Harvest Sunflower Granny Tote Pattern
This tote is one of those projects that looks impressive on someone’s arm but is actually just the same square repeated 18 times. The puff stitch petals give it personality. The autumn palette makes it feel special. And the boxed base means it actually functions as a real bag, not just a pretty craft project.
Once you make your first sunflower square and see those petals puff up, you will understand why granny square bags have made such a comeback. They are satisfying to make, portable to work on, and end up as genuine heirloom pieces.
The tassel is optional but highly recommended. It takes maybe 15 minutes and adds so much character to the finished bag.
Thank you so much for choosing this pattern. I hope you love making your Autumn Harvest Sunflower Granny Tote as much as I loved designing it.
If you make this bag, I would absolutely love to see it. Share your photos on Instagram or Facebook and tag me so I can admire your work. Save this pattern to your Pinterest boards so you can find it when you are ready to start, and leave a comment below if you have any questions or just want to share your finished project. Happy crocheting!
