Last summer, I was sitting on my back porch watching the sky turn every shade of pink and gold you can imagine. You know that perfect twenty minutes when the sun is low and everything glows? I grabbed my phone to take a photo, but honestly, it never looks the same on a screen. So I did what any yarn-obsessed person would do. I started pulling skeins from my stash, lining them up until I had that same warm gradient sitting on my coffee table.
That’s how this bag was born. I wanted to carry a little piece of that sunset feeling with me everywhere I went. Not in a cheesy way, but in that quiet, beautiful way that only handmade things can capture.
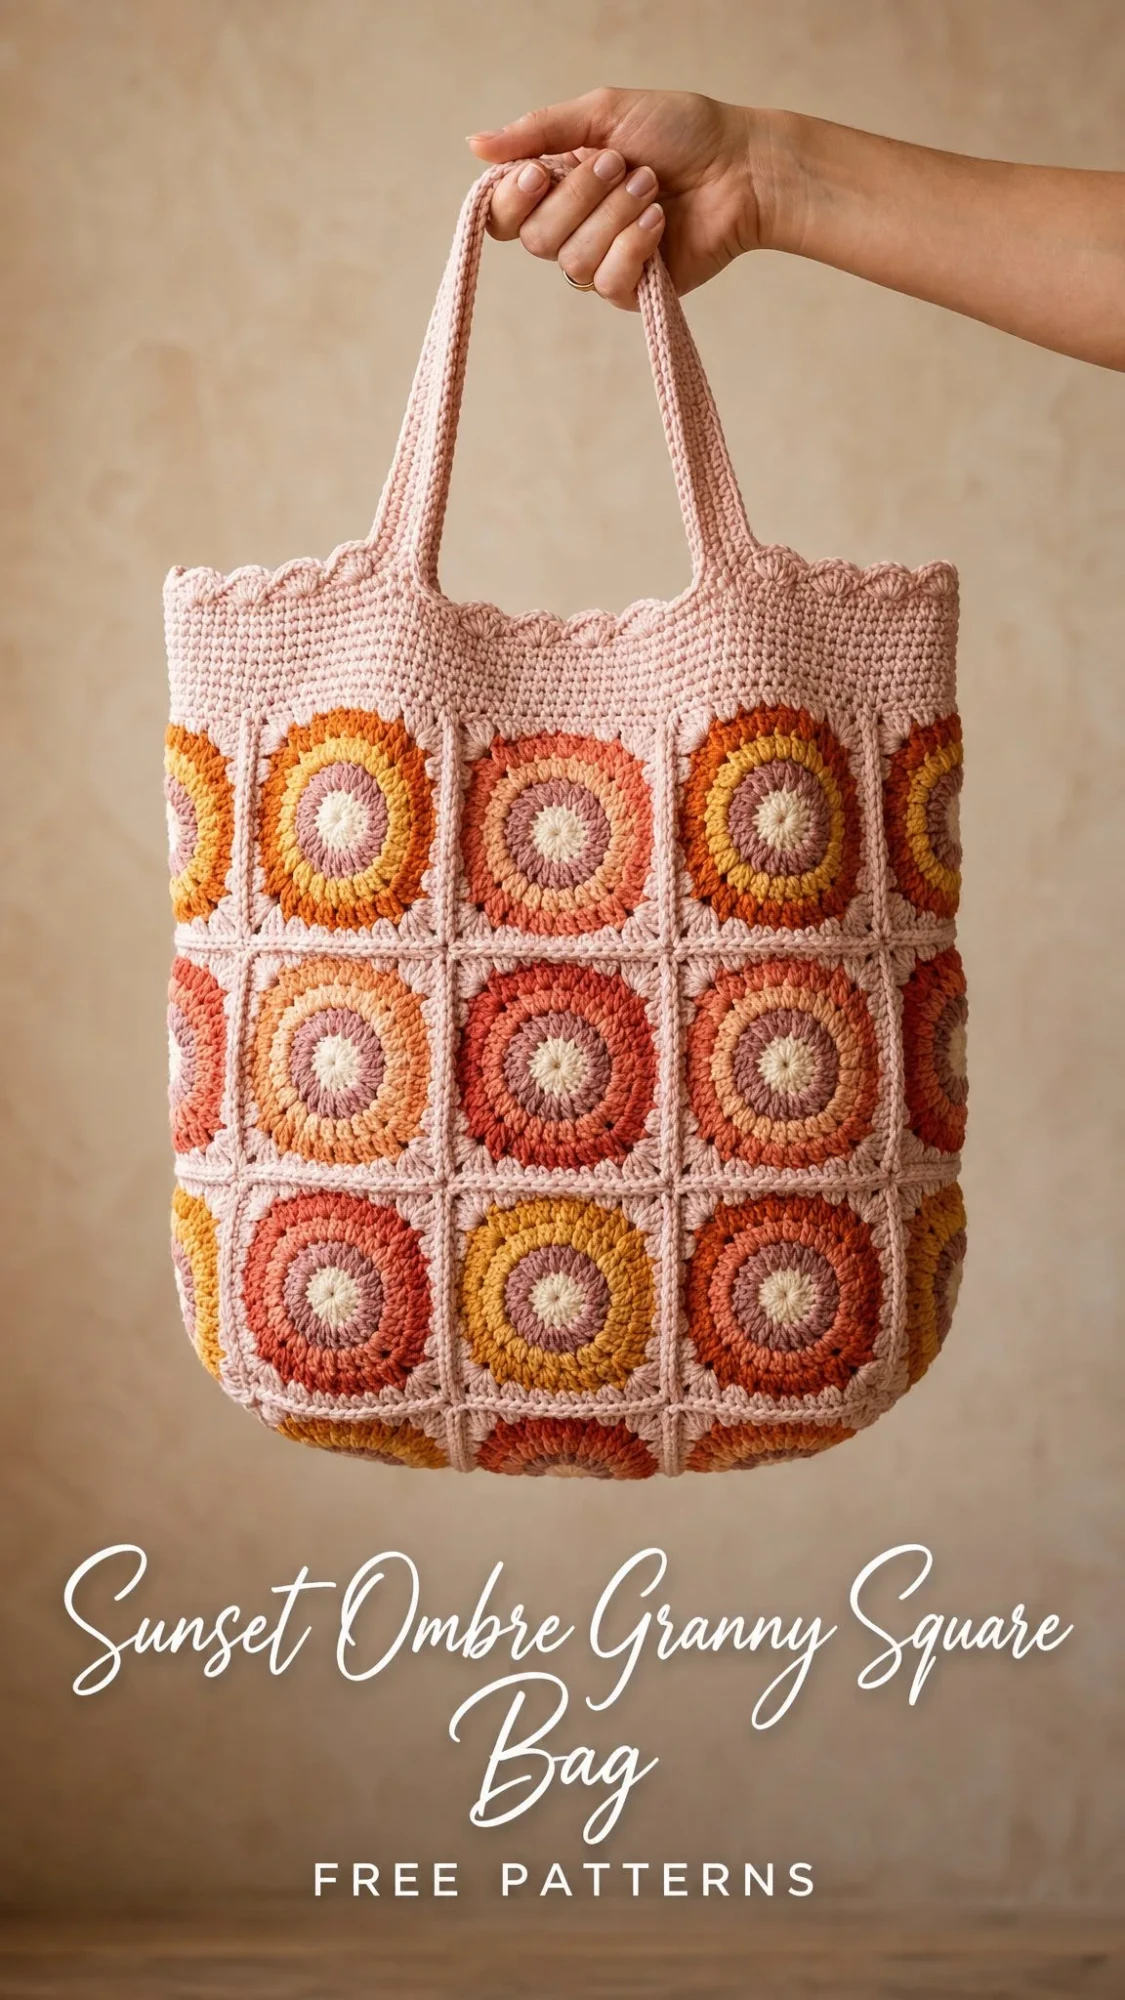
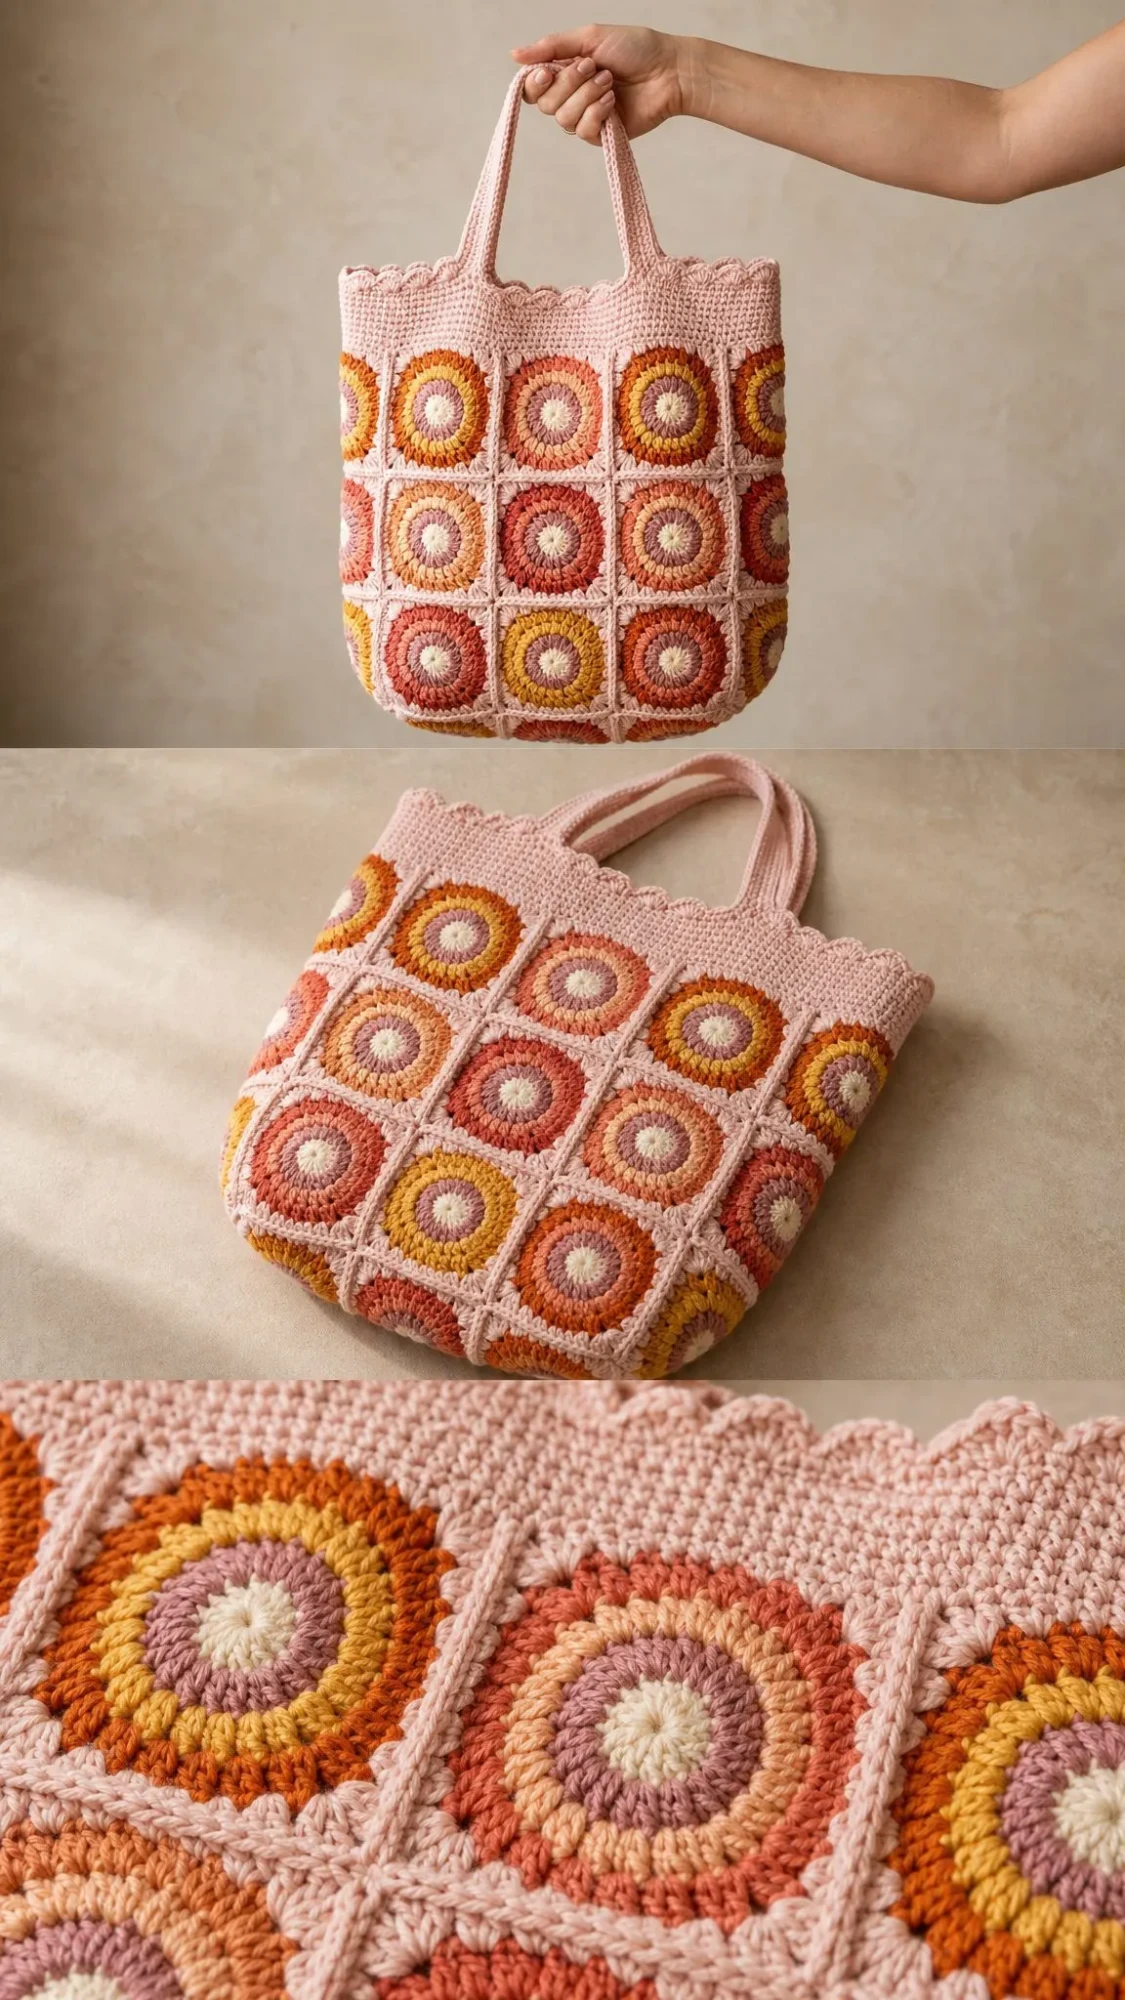
The result is this roomy circle-in-square tote worked in warm ombre shades. It’s the kind of project that looks impressive but breaks down into simple, repeatable steps. If you’ve made a granny square before, you can absolutely make this bag.
Why You’ll Love This Crochet Bag Pattern
This tote combines two of my favorite things in crochet: satisfying repetition and creative freedom. You’ll make 24 individual motifs, which sounds like a lot until you realize each one works up quickly and you get to play with color placement as you go. The sunset effect comes from varying your accent colors across the motifs, not from following a strict sequence. That means no two bags will look exactly alike, and yours will have its own unique glow.
The finished bag measures approximately 16 inches wide by 14.5 inches tall (40.5 x 37 cm), not counting the handles. The handle drop is about 9 inches (23 cm), which makes it comfortable for shoulder carrying. The base is seamed flat across the bottom, giving the bag a soft, rounded shape that holds its form beautifully whether it’s stuffed full of farmers market finds or sitting empty on a hook by your door.
The skill level is intermediate, but don’t let that intimidate you. If you’re comfortable with basic crochet stitches and have joined a few motifs together before, you have all the skills you need. I’ll walk you through everything step by step.
Materials You’ll Need
Gather these supplies before you start:
Yarn: Worsted weight cotton (medium / #4) in seven shades. Here’s the breakdown:
| Color | Yardage | Use |
|---|---|---|
| Blush (MC) | ~350 yards | Joining, band, and handles |
| Cream | ~60 yards | Motif centers |
| Dusty Rose | ~90-110 yards | Accent ring |
| Peach | ~90-110 yards | Accent ring |
| Orange | ~90-110 yards | Accent ring |
| Golden Yellow | ~90-110 yards | Accent ring |
| Terracotta | ~90-110 yards | Accent ring |
Total yardage needed is approximately 950 to 1000 yards.
Any of these yarns substitute well:
Hook: G/6 (4.0 mm)
Notions: Yarn needle, stitch markers, scissors
Gauge
Getting gauge right matters for this project because it determines the final size of your bag. One finished motif should measure 4 x 4 inches (10 x 10 cm) after blocking. For the band section, 14 half double crochet stitches by 10 rows should equal 4 inches (10 cm).
Take time to make a test motif before diving into all 24. If yours is too big, try a smaller hook. Too small? Go up a hook size.
Abbreviations and Stitch Definitions
This pattern uses US crochet terms. UK equivalents are noted in brackets.
Special Stitches
Scallop Shell: Work 5 double crochet stitches into one stitch. This creates a fan-shaped shell.
Corner: Work (tr, ch 2, tr) all in one stitch. This creates the corner turn on your square motifs.
Pattern Notes Before You Begin
Read through these notes first. They’ll save you confusion later.
The Circle-in-Square Motif
Make 24 motifs.
Begin each motif with a cream magic ring. Fasten off and join the next color at the start of every round.
Round 1 (Cream)
Make a magic ring (MR). Chain 3 (this counts as your first double crochet). Work 11 double crochet stitches into the ring. Join to the top of the starting chain-3 with a slip stitch. Fasten off and pull the magic ring closed.
(12 dc)
Round 2 (Dusty Rose)
Join your accent color to any stitch. Chain 3 (counts as dc), then work 1 dc in the same stitch. Work 2 dc in each stitch around. Join to the top of the chain-3. Fasten off.
(24 dc)
Round 3 (Peach)
Join color. Chain 3 (counts as dc), dc in same stitch, dc in next stitch. Work 2 dc in next stitch, dc in next stitch. Repeat from * around. Join. Fasten off.
(36 dc)
Round 4 (Gold)
Join color. Chain 3 (counts as dc), dc in same stitch, dc in next 2 stitches. Work 2 dc in next stitch, dc in next 2 stitches. Repeat from * around. Join. Fasten off.
(48 dc)
Round 5 (Blush)
This round squares off the circle. The treble stitches pull the corners out while the shorter stitches flatten each side. You’ll work four matching repeats, one corner per repeat.
Join blush in any stitch. Chain 1. Single crochet in next stitch, half double crochet in next stitch, double crochet in next 2 stitches, treble crochet in next 2 stitches, work corner (tr, ch 2, tr) in next stitch, treble crochet in next 2 stitches, double crochet in next 2 stitches, half double crochet in next stitch. Repeat from * three more times (4 times total). Join to first sc. Fasten off.
(52 stitches + 4 corner spaces)
Building the Ombre Effect
Here’s where the magic happens. The sunset effect comes from where you place each accent color, not from following one fixed sequence. Keep cream centers and blush squares on every motif, then vary Rounds 2 through 4.
Top row motifs: Lean into golden yellow, peach, and soft orange for a sunlit look.
Middle row motifs: Mix rose, peach, and orange evenly.
Bottom row motifs: Bring in terracotta and deep orange so the color settles warmest at the base.
Pro tip: Aim for gentle variation rather than perfect matching. Neighboring motifs reading slightly differently is what gives the bag its hand-dyed, sunset glow. Lay your motifs out before joining and shuffle them around until the gradient feels right to you. Trust your eye.
Joining the Motifs and Creating the Base
Layout
Arrange your 24 completed motifs into a panel that is 8 motifs across and 3 motifs down. The 8-wide direction will wrap around the bag.
Joining
With blush yarn and a yarn needle, whipstitch motifs together through the back loops only. Join all columns first, then join all rows.
(8 x 3 panel)
Tip: Block the flat panel before seaming. Crisp, square motifs join far more neatly and keep the grid lines straight.
Forming the Tube
Bring the two short side edges together and whipstitch them to form a tube. You now have a cylinder that is 8 motifs around.
Closing the Base
Flatten the tube so the side seam sits at one edge. Whipstitch the bottom edge closed straight across. This seam gives the bag its soft, rounded base.
The Top Band
The band is worked in continuous joined rounds in blush around the top opening of the tube.
Round 1
Join blush yarn at the top edge. Work half double crochet stitches evenly around the entire opening, decreasing 8 stitches evenly spaced as you go.
(96 hdc)
Rounds 2 through 5
Chain 1. Half double crochet in each stitch around. Join with a slip stitch.
(96 hdc)
Scallop Edge
Chain 1. Skip 2 stitches, work 5 dc in next stitch (this is your scallop shell), skip 2 stitches, single crochet in next stitch. Repeat from * around. Join. Fasten off.
(16 scallops)
Why it divides evenly: Each scallop uses 6 stitches, so 96 divided by 6 gives a clean run of 16 shells around the brim. That’s eight across the front and eight across the back.
The Handles
Make 2 handles.
Foundation
With blush yarn, chain 7.
Row 1
Half double crochet in the 2nd chain from hook and in each chain across.
(6 hdc)
Rows 2 through 40
Chain 1, turn. Half double crochet in each stitch across.
(6 hdc)
Finishing the Handles
Fasten off, leaving a long tail for sewing.
Attaching the Handles
Sew each handle to the inside of the band. Anchor the ends about 5 inches (13 cm) apart, making sure the front handle placement matches the back handle placement. Stitch through both the handle ends and the band several times for strength.
Tip: For a sturdier carry, work the handles a stitch or two wider, or hold the yarn double. Cotton softens with use, so a firm tension here keeps them from stretching over time.
Finishing Your Sunset Ombre Bag
Weaving in Ends
Weave in all ends on the wrong side of the work, threading tails into matching colors so they disappear completely.
Final Blocking
Give the whole bag a final light steam or wet block. Ease it into shape over a towel-stuffed form to help it hold its silhouette.
Checking Seams
Examine the base seam and handle joins. Reinforce any loose spots with extra stitches now so you don’t have to fix them later.
Care Instructions
Cotton yarn blooms and softens beautifully after its first wash. The stitches even out and the motifs settle into crisp squares, so don’t worry if the fabric feels firm straight off the hook.
Customizing Your Bag
Want to make this pattern your own? Here are some ideas:
Smaller bag: Work Rounds 1 through 3 only (skip Round 4) for approximately 3-inch motifs. You can also drop to a 3.5 mm hook throughout for a denser, smaller fabric.
Deeper tote: Add a fourth row of motifs (32 motifs total) before seaming for extra capacity.
Longer handles: Add rows to each handle in pairs to keep the front and back handles even.
Calmer palette: Limit your accents to just three close shades for a subtler, more tonal gradient.
You Did It!
Thank you so much for choosing this pattern. I hope you love making this bag as much as I loved designing it. There’s something really special about carrying something you made with your own hands, especially when it reminds you of warm summer evenings and the last light of day.
If you make this bag, I would absolutely love to see it! Share your finished project on Instagram or Facebook and tag me so I can admire your work. Every maker puts their own spin on a pattern, and I’m always amazed by the color combinations people choose.
If this pattern made your project list, go ahead and save it to your Pinterest boards so you can find it easily when you’re ready to start. And if you do make one, drop a comment below. I read every single one and love hearing how your projects turn out!
