This bag is GORGEOUS and works up SO much faster than you’d think! Seriously, those flower squares look intricate, but once you get the rhythm down, you’ll be churning them out while binge-watching your favorite show.

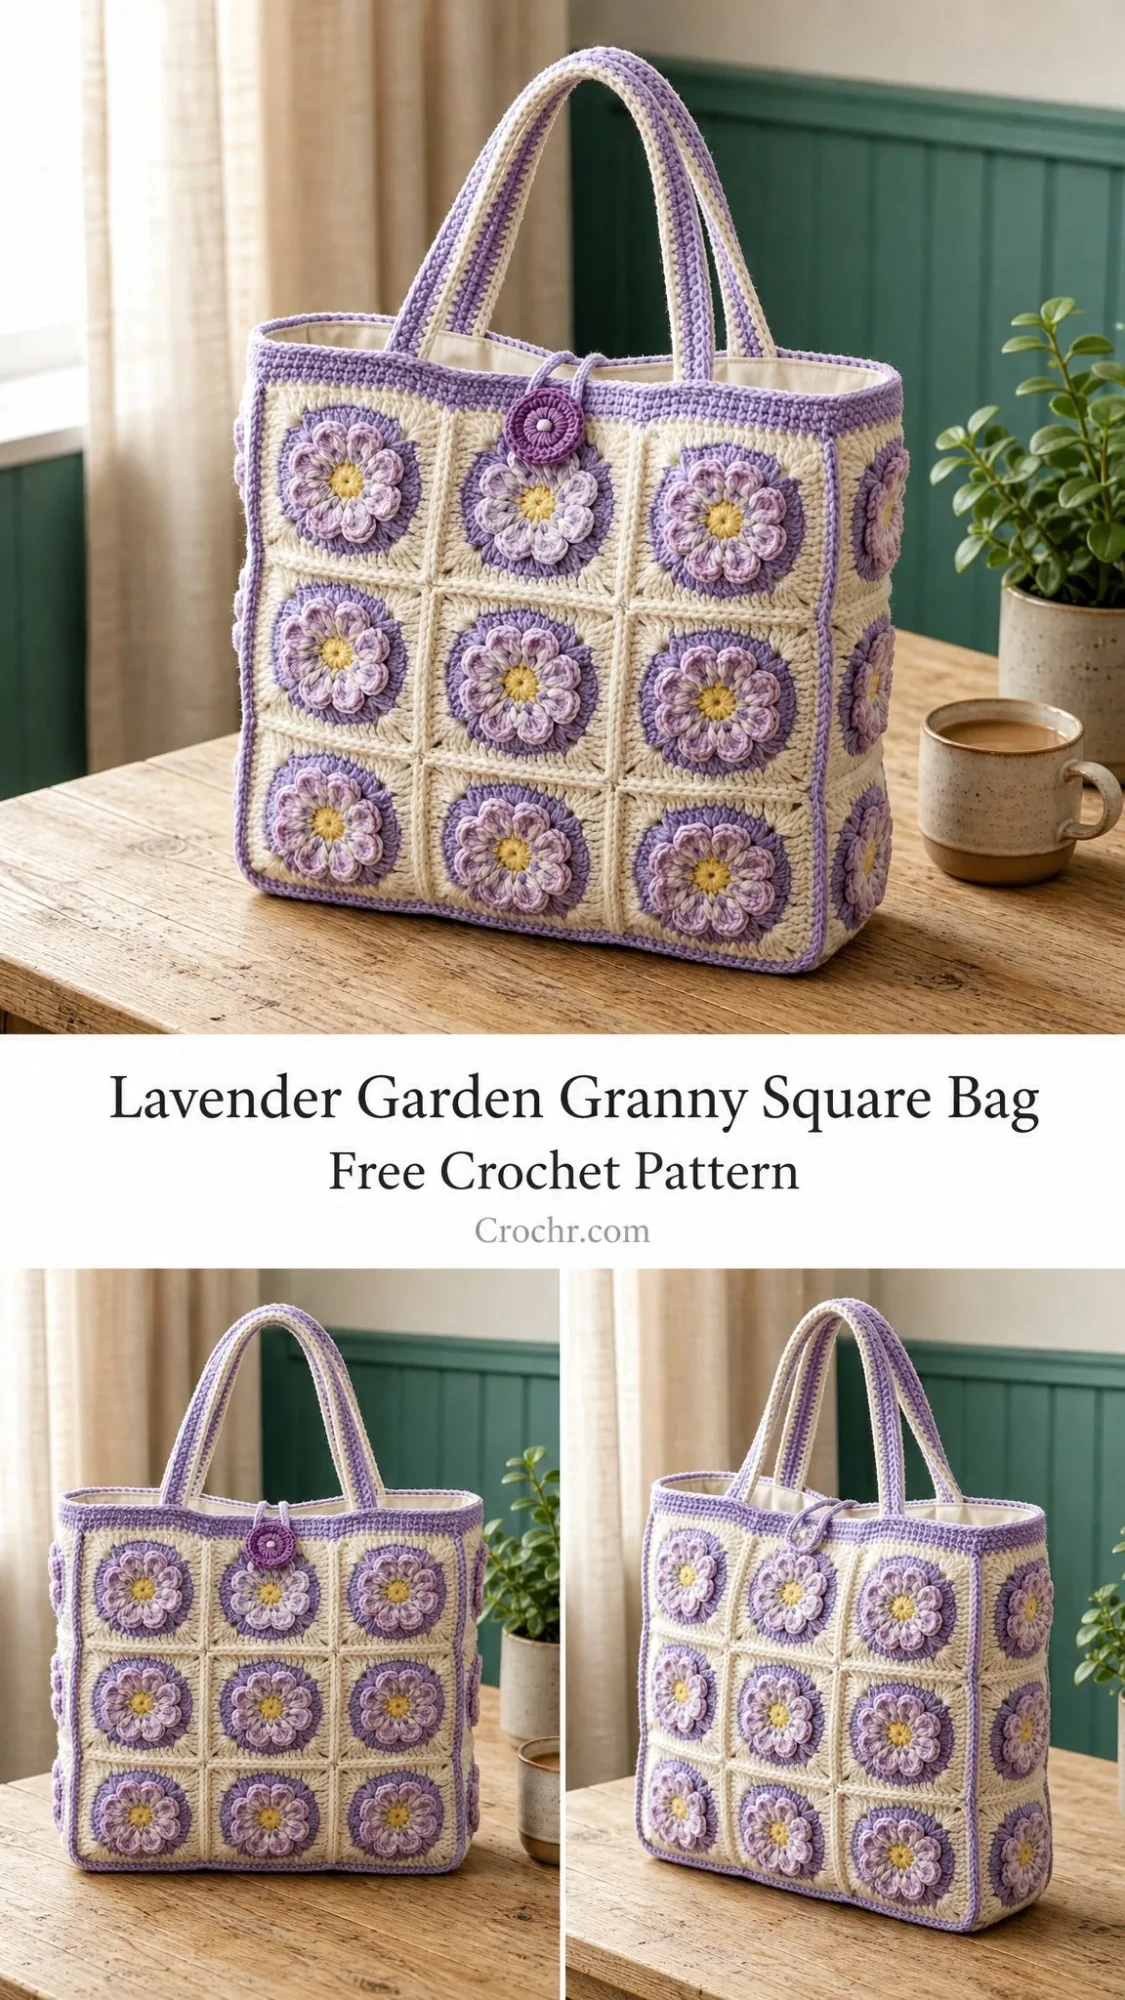
I’ve been obsessed with granny square bags lately, and this Lavender Garden tote might be my new favorite project. The combination of that golden center, soft lilac petals, and deep plum outer bloom creates the prettiest layered flower effect. And that cream frame? Chef’s kiss.
If you’ve been wanting to make a statement bag that actually holds its shape and fits all your stuff, this is the one. It takes about 18 to 24 hours total, which sounds like a lot until you realize that’s just a few evenings of relaxed crocheting. Plus, it makes an incredible gift!
About This Lavender Garden Granny Square Bag Pattern
This structured tote features eighteen lavender flower squares arranged in a 3×3 grid on both the front and back panels. Two neat side panels and a sturdy base join everything together to create a roomy bag that holds its shape beautifully. The finished size is 12 x 12 x 4 inches (30 x 30 x 10 cm) with a comfortable 9 inch (23 cm) handle drop.
The construction method uses motif squares that are joined together, which makes this project perfect for on-the-go crocheting. You can work on individual squares anywhere, then assemble everything at the end. The skill level is intermediate, mainly because you’ll be working with multiple colors and joining techniques. But don’t let that scare you off if you’re a confident beginner!
Each flower square measures 4 inches (10 cm) when blocked, and the color progression goes from a gold center outward through lilac inner petals, plum outer bloom, and finally a cream frame. It’s like watching a flower open up as you work each round.
Materials You’ll Need
Yarn: Worsted weight (#4 / Aran / 10-ply) cotton or cotton blend
| Color | Name | Amount |
|---|---|---|
| A | Cream (main) | ~400 g / 800 yd |
| B | Plum | ~120 g / 240 yd |
| C | Lilac | ~80 g / 160 yd |
| D | Gold | ~30 g / 60 yd |
Suggested Yarns:
Cotton yarn gives this bag crisp stitch definition and helps it stand up on its own. I highly recommend sticking with cotton or a cotton blend rather than acrylic for this project.
Hook & Notions:
Gauge
One finished flower square should measure 4 inches (10 cm) square with a 5.0 mm hook. In double crochet (dc), you should get 14 stitches x 8 rows = 4 inches (10 cm).
Gauge matters here! The square size determines your finished bag size. If your squares are too big or too small, adjust your hook size accordingly. Go up a hook size if your squares are too small, or down if they’re too large.
Abbreviations and Special Stitches
Let me walk you through all the abbreviations you’ll encounter. I’ve included plain-English definitions so nothing catches you off guard.
Standard Abbreviations:
Special Stitches:
Petal cluster: Work (hdc, dc, hdc) all in the same stitch. This creates the small inner petals in Round 2.
Large petal: Work (sc, hdc, 3 dc, hdc, sc) all in one chain space. This creates the bigger outer petals in Round 4.
Corner: Work (2 dc, ch 2, 2 dc) in the corner space. This squares off your motif in the final rounds.
Pattern Notes Before You Start
Each color round is fastened off and re-joined with the new color. This means you’ll have more ends to weave in, but it gives you those crisp color changes that make the flowers pop.
Work all rounds with the right side facing you. The flower should look pretty from the front the whole time!
How to Crochet the Flower Square (Make 18)
This is the star of the show. You’ll make 18 of these beauties total: 9 for the front panel and 9 for the back panel.
Round 1 (Gold, Color D)
Into a magic ring: ch 2 (this does not count as a stitch), work 16 dc in the ring. Join with a sl st to the first dc. Pull the ring tight, then fasten off. (16 dc)
The magic ring lets you close up that center hole completely. If you’re not comfortable with magic rings, you can chain 4 and join with a slip stitch to form a ring instead.
Round 2 (Lilac, Color C)
Join lilac yarn in any dc from Round 1. Ch 1.
Sc in the next dc, then work a petal cluster (hdc, dc, hdc) in the next dc. Repeat from to around 7 more times for 8 petals total. Join to the first sc with a sl st. Fasten off. (8 petals)
You’re essentially alternating between a single crochet and a little petal bump all the way around.
Round 3 (Plum, Color B)
Join plum yarn in any sc (the sc sits behind a petal from Round 2).
Ch 3, sc in the next sc (this will be between the next two petals). Repeat from to around to create 8 chain-3 loops behind the petals. Join and fasten off. (8 ch-3 loops)
These loops create the foundation for your larger outer petals. You’re working behind the lilac petals, so don’t worry if it feels a bit awkward at first.
Round 4 (Plum, Color B)
Join plum in any ch-3 loop. Work a large petal (sc, hdc, 3 dc, hdc, sc) in each ch-3 loop around. Join and fasten off. (8 large petals)
Now you can really see the flower taking shape! Those plum petals should frame the lilac ones beautifully.
Round 5 (Cream, Color A)
Join cream in the center top of any large petal (right at the middle dc of the 3-dc group).
Ch 3 (counts as dc), then work (2 dc, ch 2, 3 dc) in the same petal. This is your first corner made!
3 dc in the top of the next petal, then (3 dc, ch 2, 3 dc) in the top of the following petal. Repeat from to twice more. 3 dc in the last petal. Join to the top of the beginning ch-3. (36 dc, 4 corner spaces)
This round starts squaring off your circle into a granny square shape.
Round 6 (Cream, Color A)
Sl st into the nearest corner space. Ch 3 (counts as dc), then work (1 dc, ch 2, 2 dc) in the same corner.
Dc in each of the next 9 dc, then (2 dc, ch 2, 2 dc) in the next corner space. Repeat from to around, ending with dc in each of the last 9 dc. Join to the top of the beginning ch-3. Fasten off. (52 dc, 4 corner spaces, with 13 dc per side)
Your finished flower square should show the progression: gold center, lilac inner petals, plum outer bloom, cream frame. Make 18 of these total!
Side Squares (Make 6)
Work the Flower Square exactly as written in Rounds 1 through 6. These six squares form the two narrow side panels, with three squares stacked on each side of the bag.
Plain Base Squares (Make 3)
These solid cream squares form the bottom of your bag.
Round 1 (Cream, Color A)
Into a magic ring: ch 3 (counts as dc), 15 dc in ring, join. (16 dc)
Round 2 (Cream, Color A)
Ch 3, then work (2 dc, ch 2, 3 dc) in the same stitch for the first corner.
3 dc, then (3 dc, ch 2, 3 dc) for the next corner. Repeat around for 4 corners total. Join. (36 dc, 4 corner spaces)
Round 3 (Cream, Color A)
Work the same as Flower Square Round 6: dc around with (2 dc, ch 2, 2 dc) in each corner space. Join and fasten off. (52 dc, 4 corner spaces)
Square Count Summary
| Location | Square Type | Quantity |
|---|---|---|
| Front panel | Flower (3×3) | 9 |
| Back panel | Flower (3×3) | 9 |
| Side panels | Flower (1×3 each) | 6 |
| Base | Plain cream (3×1) | 3 |
| Total | 27 |
Joining the Bag
Now comes the fun part: turning all those squares into an actual bag! Join with cream yarn using a flat whip stitch through the outer loops only, with the right side facing out.
Work in this order so the box shape forms naturally:
Step 1: Lay out your front panel (3×3 flower squares), back panel (3×3 flower squares), two side strips (1×3 each), and the base strip (3×1). Whip stitch each panel’s own squares together first before connecting the panels to each other.
Step 2: Join the base strip to the bottom edge of the front panel, then join the base strip to the bottom edge of the back panel.
Step 3: Attach a side strip into each of the four vertical gaps. You’re connecting front-to-side and side-to-back up both edges. This creates 4 vertical seams.
Step 4: Sew the short ends of each side strip to the base ends to close the box shape. Weave in all ends.
Picture the flat layout like a cross or plus sign: the front and back panels are the top and bottom of the cross, with the side panels on the left and right, and the base in the center. Fold the sides up to form your box-shaped bag.
Top Border
Round 1 (Cream, Color A): Join cream at a side seam and sc evenly around the entire opening. Join with a sl st. (approximately 96 sc)
Round 2 (Plum, Color B): With plum, sc in each stitch around. Join and fasten off. This creates that pretty lilac trim line at the rim. (approximately 96 sc)
Handles (Make 2)
Row 1 (Cream, Color A): Ch 61, sc in the 2nd ch from hook and across. (60 sc)
Rows 2 through 5: Ch 1, turn, sc in each stitch across. (60 sc)
Edging (Plum, Color B): With plum, sc along both long edges of each handle. Fasten off. (60 sc per edge)
The plum edging gives the handles that polished, finished look that matches the top border.
Attaching Handles
Pin each handle to the inside of the top border. The ends should be roughly aligned with the gaps between squares 1 and 2, and between squares 2 and 3 on the front panel. Repeat the same placement on the back panel.
Sew down firmly through several stitches for strength. These handles will be carrying the weight of your bag, so don’t skimp on the stitching!
Button Loop (Plum, Color B)
Join plum at the center top of the front border. Ch 12, sl st back into the join to form a loop. Sc around the loop until it’s completely covered with single crochets. Fasten off. (1 loop)
Covered Button (Plum, Color B)
Round 1: Into a magic ring, work 6 sc, join. (6 sc)
Round 2: 2 sc in each stitch around. (12 sc)
Rounds 3 and 4: Sc around. Insert your 1 inch button, then sc 2 together (sc2tog) around to close over the button. Fasten off.
Sew the completed covered button to the center top of the back border, directly opposite the loop on the front.
Finishing and Care
Blocking and Lining Tips
Wet-block each square to a true 4 inches (10 cm) before joining. This makes your seams so much easier and gives you a more professional-looking finished bag.
For extra structure, cut a fabric lining 1 inch larger than each panel and hand-stitch it inside the bag. A piece of plastic canvas in the base keeps the bag flat-bottomed and prevents sagging when you load it up.
Care Instructions
Hand wash cool with mild detergent and do not wring. Reshape while damp and dry flat, away from direct heat. If you added a lining that isn’t pre-shrunk, remove it before washing.
Size Customization Ideas
Want a larger tote? Add a column to make your front and back panels 4×3 (24 squares total) and lengthen the base and handles to match.
Want a taller bag? Add a row to make your panels 3×4 and widen the side strips to 1×4.
Want a mini version? Drop down to 2×2 panels with a 2×1 base for an adorable pouch.
Different yarn weights: Use DK yarn with a 4.0 mm hook for approximately 3.25 inch (8 cm) squares and a daintier bag. Or hold cotton double with a 6.0 mm hook for a chunky, slouchy market tote.
Color variations: Keep the cream frame and swap the bloom colors! Try dusty rose with blush, teal with sage, or make a rainbow bag where every square has different petal colors over the same gold center.
Remember that any change to square size or count will change your yarn amounts. Buy a little extra of the main cream color to be safe.
You Did It!
Slip the loop over the button to close your bag. Give everything a final press, and your Lavender Garden Bag is ready to carry!
I hope you love making this Lavender Garden Granny Square Bag crochet pattern as much as I enjoyed putting it together for you. Those layered flowers are so satisfying to watch come together, and the finished bag is sturdy enough to actually use every day. Thank you so much for choosing this project!
If you’re planning to make this bag, save this pattern to your Pinterest boards so you can find it easily when you’re ready to start. And please leave a comment below if you make one! I’d absolutely love to see your color combinations and finished bags.
