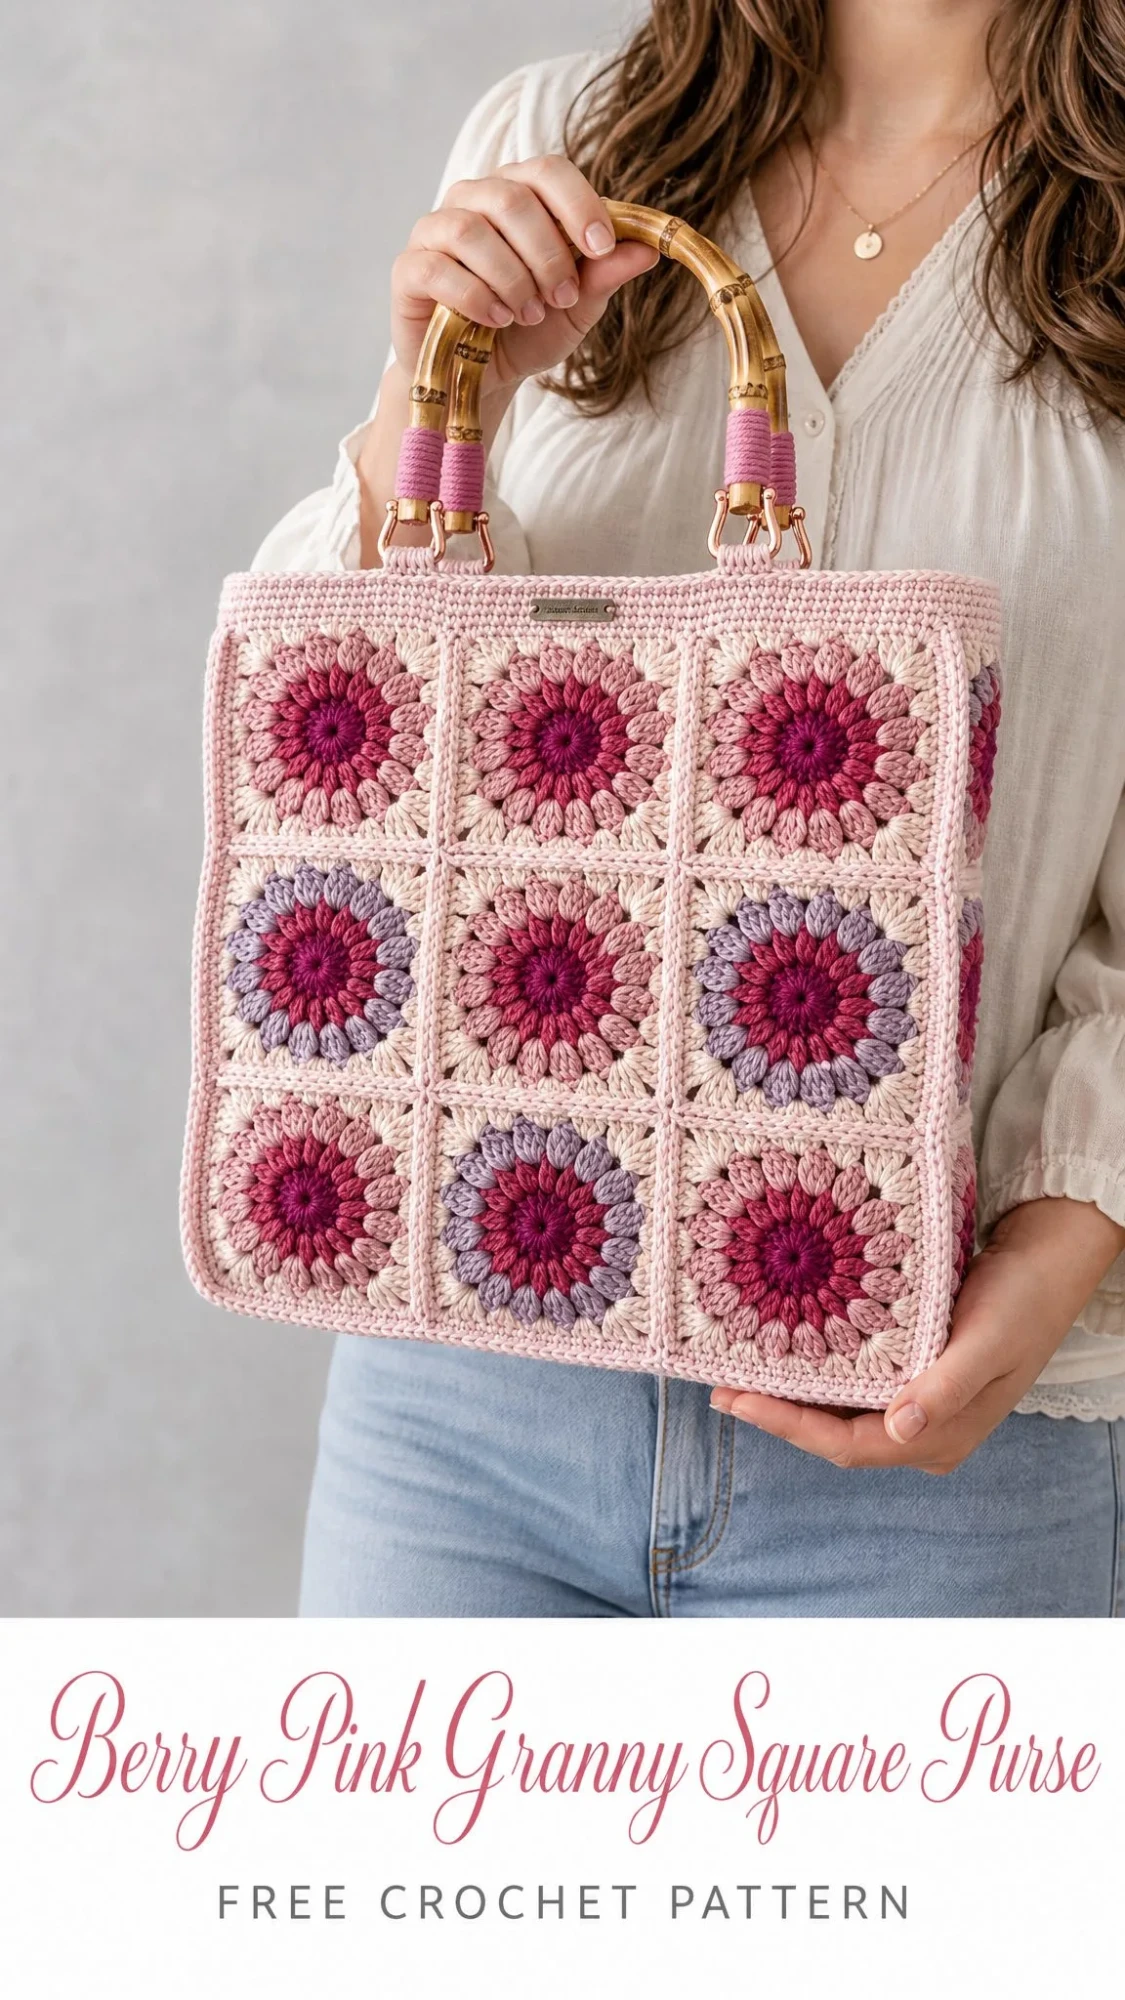
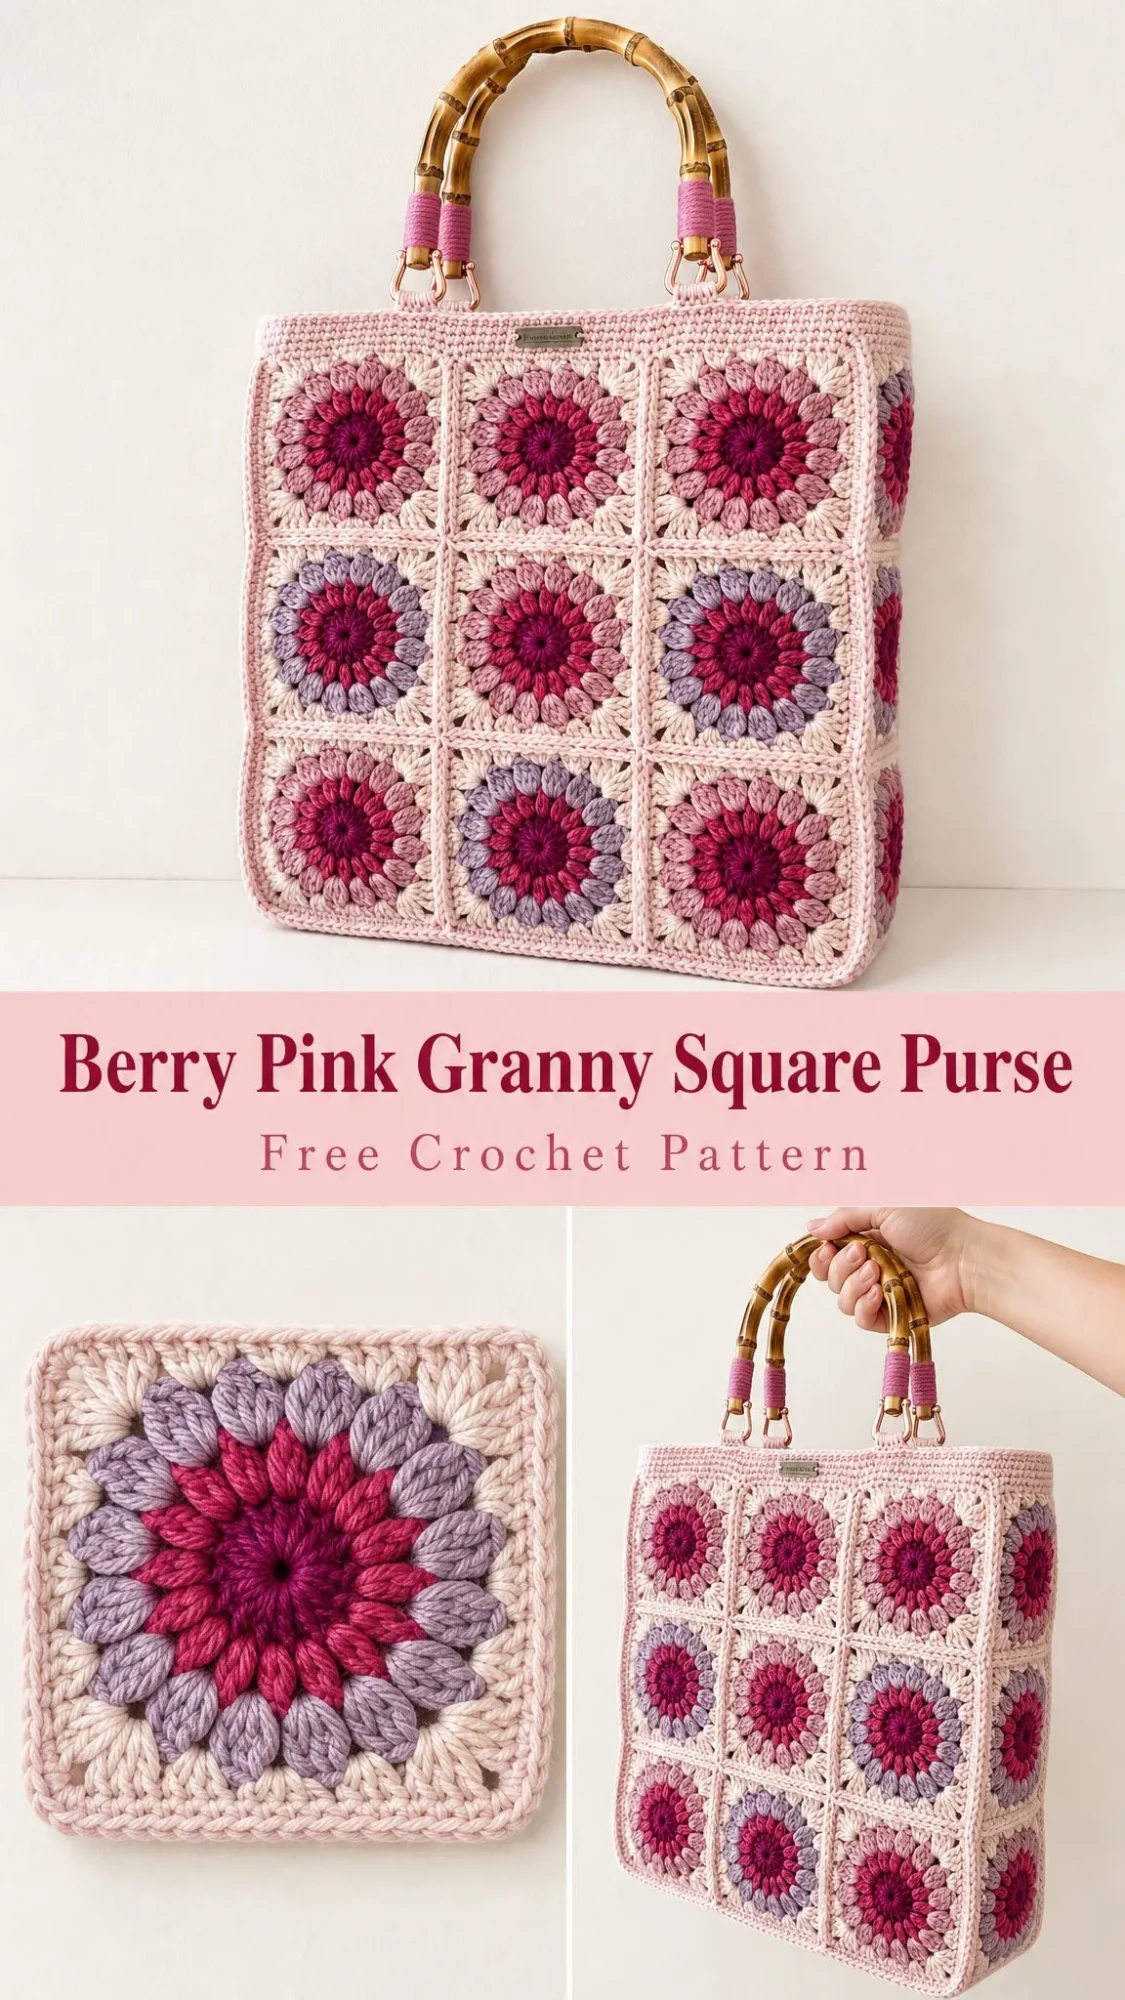
This structured tote is made from 27 sunburst granny squares in worsted cotton. It uses puff stitches, double crochet clusters, and simple seaming. The whole bag comes together in about 20 to 30 hours of relaxed stitching.
If you can work in the round and you are comfortable with basic color changes, you can absolutely make this purse. The sunburst squares look intricate, but they are really just puff stitches surrounded by granny clusters. Once you get the rhythm down on your first square, the rest fly by.
The finished bag measures 12 inches wide by 14 inches tall by 4 inches deep, not counting the bamboo handles. Those handles add another 5 inches of height and give the whole piece a polished, boutique look. Let me walk you through everything you need to make your own.
Why You Will Love This Berry Pink Granny Square Purse Pattern
This is not your grandmother’s granny square bag, though she would probably love it too. The sunburst design creates a flower-like center that blooms outward through berry, rose, and lavender petals before settling into a soft cream frame. The blush pink sashing between the squares reads like piping along every seam, giving the whole piece a structured, intentional look.
The box construction means this bag actually stands up on its own. You can set it down at a coffee shop or farmers market and it holds its shape. The bamboo handles clip on through crocheted loops, so you can remove them for washing or swap them out for a crossbody strap when you want a different look.
What makes this pattern special:
Materials You Will Need
Before you start crocheting, gather all your supplies. Having everything ready makes the project much more enjoyable.
Yarn: Worsted weight cotton, also called aran weight cotton, Category 4. The pattern calls for five colors with generous estimates for 27 squares plus all the joining and border work.
| Color | Amount | Purpose |
|---|---|---|
| Berry or Magenta | ~150 g | Centers and inner petals |
| Rose Pink | ~90 g | Outer petals on warm squares |
| Lavender | ~90 g | Outer petals on cool squares |
| Cream or Ecru | ~220 g | Square frames, most used color |
| Blush Pink | ~150 g | Sashing, border, loops, handle wrap |
Recommended yarns that work beautifully for this project:
Hook and Notions:
Gauge
Getting your gauge right is important for this project because the square size determines the entire bag dimensions.
One completed sunburst square should measure 4 inches by 4 inches (10 cm by 10 cm) when worked in worsted cotton on a 4.0 mm hook.
If your squares are coming out larger, try going down a hook size. If they are smaller, go up a hook size. Take the time to make a test square before committing to all 27. It is much easier to adjust now than to discover your bag is the wrong size after hours of work.
Abbreviations and Special Stitches
This pattern uses US crochet terminology throughout. If you normally work from UK patterns, remember that US single crochet (sc) equals UK double crochet (dc), US half double crochet (hdc) equals UK half treble (htr), and US double crochet (dc) equals UK treble (tr).
Standard abbreviations:
Special stitches you will use:
Puff stitch (puff): This creates the beautiful petal effect in Round 3. Here is how to work it: yarn over, insert hook in stitch, yarn over and pull up a loop to about half an inch. Repeat this sequence two more times in the same stitch. You now have 7 loops on your hook. Yarn over and pull through all 7 loops, then chain 1 to close the puff. The chain 1 is important because it locks the puff in place.
Corner: Work (3 dc, ch 2, 3 dc) all in the same space unless the pattern notes otherwise. This creates the corner turn on your granny squares.
Magic ring: An adjustable loop that gives you a tight, closeable center. If you have never made one, there are many video tutorials available. You can also substitute ch 4, sl st to first ch to form a ring, though the magic ring gives a cleaner center.
Pattern Notes and Construction Overview
Read through this section before you begin. Understanding how the bag comes together will make every step easier.
Key things to remember:
How the bag comes together:
| Panel | Configuration | Number of Squares |
|---|---|---|
| Front panel | 3 x 3 grid | 9 squares |
| Back panel | 3 x 3 grid | 9 squares |
| Side panels | 3 x 1 strip each | 3 squares x 2 sides = 6 squares |
| Base panel | 3 x 1 strip | 3 squares |
| Total | 27 squares |
The side depth is just one square wide, which gives the bag a nice slim profile while still providing enough room for everyday essentials.
The Sunburst Square Pattern
This is the heart of the project. Each square has five rounds and uses three colors: berry for the center, rose or lavender for the petals, and cream for the frame.
Round 1 (Berry): Into a magic ring: ch 3 (counts as dc), 15 dc in ring. Join to top of beg ch-3. Pull ring closed. 16 dc
Round 2 (Berry): Ch 2 (counts as hdc), hdc in same st, 2 hdc in each st around. Join to top of beg ch-2. 32 hdc
Round 3 (Rose OR Lavender): Ch 1, puff in first st, ch 2, skip 1 st; puff in next st, ch 2, skip 1 st; rep from around. Join to top of first puff. 16 puffs, 16 ch-2 sps
This is where you choose between rose pink for warm squares or lavender for cool squares. The pattern suggests making 14 squares with rose petals and 13 squares with lavender petals, but you can adjust this ratio to your preference.
Round 4 (Cream): Sl st into any ch-2 sp. (ch 3, 2 dc, ch 2, 3 dc) in same sp, this is your first corner; 3 dc in each of next 3 sps; (3 dc, ch 2, 3 dc) in next sp, 3 dc in each of next 3 sps; rep from twice. Join to top of beg ch-3. 60 dc, 4 corner sps
Round 5 (Cream): Sl st to any corner ch-2 sp. (ch 3, 2 dc, ch 2, 3 dc) in corner; 3 dc in each of next 4 sps along the side, (3 dc, ch 2, 3 dc) in next corner sp; rep from around, ending the last side with 4 sps. Join. 72 dc, 4 corner sps
Fasten off and weave in ends. If you plan to whip-stitch your seams, leave a long tail on the cream yarn.
Pro tip: Keep your puffs plump and even. They are the petals of your sunburst flower, and consistent puffs make a huge difference in the finished look.
Color Placement Guide
Every square shares the same berry center (Rounds 1 and 2) and cream frame (Rounds 4 and 5). Only Round 3 changes between rose and lavender.
For the front panel, arrange your squares roughly like this, where R means rose petals and L means lavender petals:
“`
R R R
L R L
R L R
“`
Mirror this layout on the back panel for a cohesive look.
The base squares face downward and will not be visible during normal use, so place any squares you are less happy with there. This is a great spot for your first practice squares or any that came out slightly different.
Building the Panels
Join your squares using blush pink yarn so a soft pink line frames every square. This creates that beautiful piping effect visible in the finished bag.
You can use either whip stitch through the back loops or single crochet seams worked on the wrong side. Pick one method and stick with it throughout for consistency.
Assembly order:
1. Front: Join 9 squares into a 3 x 3 grid
2. Back: Join 9 squares into a 3 x 3 grid
3. Sides (make 2): Join 3 squares into a 3 x 1 strip
4. Base: Join 3 squares into a 3 x 1 strip
Seam order to assemble the box:
1. Attach the base strip’s two long edges to the bottom of the front and back panels
2. Attach the base strip’s two short ends to the bottom of each side strip
3. Join each side strip’s long edges to the vertical edges of the front and back
You now have an open-topped box. Weave in seam ends as you go to avoid a mountain of finishing work at the end.
Top Border
With the box assembled, work the border in blush pink around the opening to firm up the rim. This gives the bag structure and creates a clean edge for attaching the handles. Begin at a back corner.
Round 1 (Blush): Join at the top edge. Sc evenly around the whole opening. Aim for about 12 sc across each square’s top edge. Join. 96 sc
Rounds 2 through 4 (Blush): Ch 1, sc in each st around. Join. 96 sc each round
Final round (Blush): Ch 1, sc in each st around for a clean edge. Join and fasten off. 96 sc
Important note: If your square tops give a slightly different stitch count, just keep the same count on every round. The exact total matters less than having a smooth, non-rippling rim.
Handles and Finishing
The bamboo handles clip on through four small blush loops, two on the front rim and two on the back.
Loops (Blush, make 4): Ch 16, sl st in first ch to form a ring; sc 20 around the ring. Fasten off, leaving a long tail. 20 sc per loop
Placement: Fold each loop in half and sew both ends to the inside of the top border. Position them above the seams between squares 1 and 2 and between squares 2 and 3 on the front, then mirror on the back. 4 loops total
Attach: Clip each handle’s swivel clasp through a loop. 2 handles
Optional finishing touches:
Handle wrap: Wind blush yarn around the bamboo ends near the clasps and secure the ends. This adds a nice color accent and protects the wood.
Lining: Cut fabric to the box dimensions plus seam allowance, stitch into a pouch, and hand-sew it just below the border. A lining adds structure, protects the inside of the bag, and keeps small items from poking through the stitches.
Weave in all remaining ends and give the finished bag a light steam block to even out the stitches.
Care Instructions
Your handmade bag deserves gentle care to keep it looking beautiful for years.
Customization Ideas
This pattern is wonderfully adaptable. Here are some ways to make it your own:
Bigger tote: Use a 4 x 4 grid for the front and back panels, and lengthen the base and sides to match. This creates a roomy market bag.
Taller bag: Add a fourth row of squares to every wall while keeping the width the same.
Larger squares: Add one more cream granny round to each square to grow it past 4 inches. Just remember to recheck your handle spacing afterward.
Crossbody option: Swap the bamboo handles for a long clip-on strap attached to the same loops.
Different color story: Keep the berry center and cream frame, but swap rose and lavender for any two-tone petal pair you love. Teal and coral would be gorgeous for summer, or try burgundy and gold for fall.
Wrapping Up Your Berry Pink Granny Square Purse
You now have everything you need to create this beautiful structured tote. The sunburst squares look impressive but are really quite manageable once you get the puff stitch rhythm down. Take your time with the first few squares, block them carefully, and the rest will come together smoothly.
This bag makes a stunning gift for someone special, or treat yourself to a handmade accessory you will reach for again and again. The roomy interior holds all your daily essentials, and the bamboo handles add a touch of elegance that takes this beyond a typical crochet bag.
Thank you so much for choosing this pattern for your next project. I would absolutely love to see your finished purse! If you make one, please share a photo on Instagram or in our Facebook group. Seeing your color choices and personal touches is one of the best parts of sharing patterns.
If you enjoyed this Berry Pink Granny Square Purse pattern, save it to your Pinterest boards so you can find it easily when you are ready to start. And please drop a comment below if you make one. I love hearing which color combinations you choose and seeing how these bags turn out in your hands!
