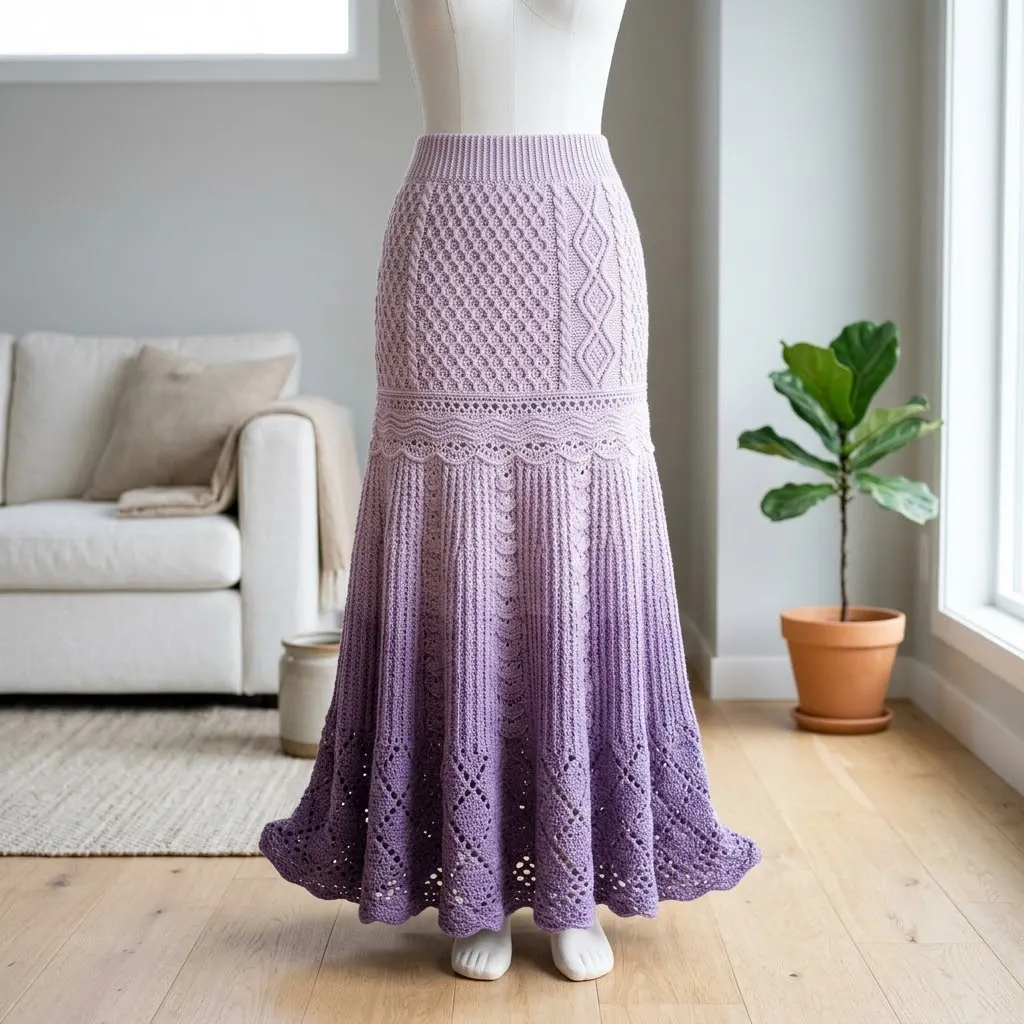
I have been dreaming about designing a showstopper maxi skirt for months now. Something romantic, flowy, and absolutely stunning. I wanted intricate texture at the hip, a gorgeous ombre color transition, and that dramatic sweep at the hem that makes you feel like twirling the moment you put it on. This skirt checks every single box. The fitted waistband and hip section create a flattering silhouette, while the flared lower portion moves like a dream. I am SO pleased with how it turned out!
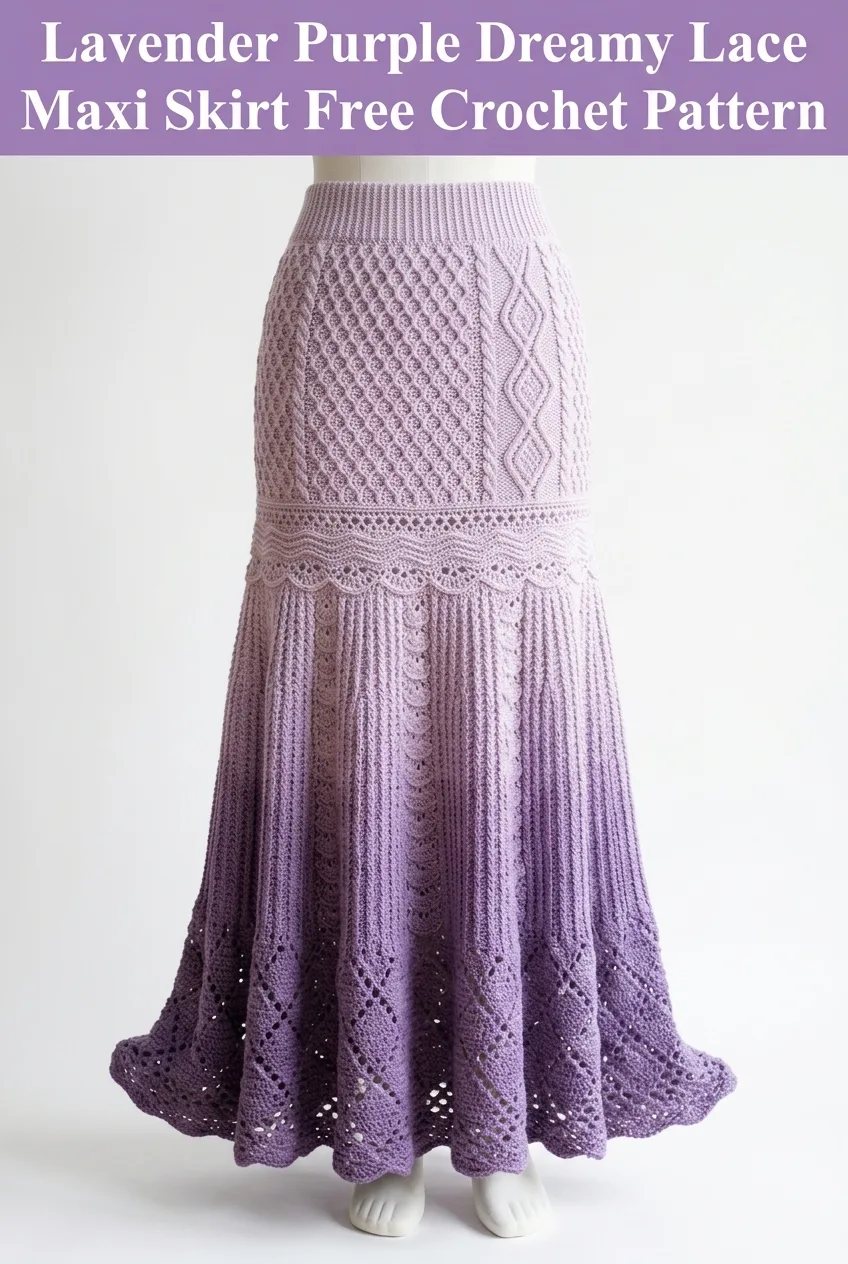
This crochet maxi skirt pattern combines cable-inspired diamond motifs, delicate lace borders, and a stunning gradient from pale lavender to deep purple. It looks incredibly advanced, but I promise you can absolutely make this. We will work through it section by section, and I will walk you through every stitch.
About This Lavender Lace Maxi Skirt Crochet Pattern
This elegant maxi skirt features three distinct sections that create visual interest and a flattering fit. The hip section uses textured diamond and lattice stitches that provide structure and slight compression. A decorative wavy lace border separates the fitted top from the flowing skirt below. The lower portion flares dramatically with vertical lace panels and an ornate scalloped hem.
The ombre effect moves from pale champagne lavender at the waist through dusty mauve in the middle and down to a rich purple at the hem. This color transition adds dimension and makes the skirt feel extra special.
Skill Level: Intermediate to Advanced
This pattern involves working in the round, texture stitches, lace patterns, and shaping. If you have made a crochet garment before and feel comfortable reading stitch patterns, you can absolutely tackle this project.
Materials Needed
Yarn:
Suggested breakdown:
Hook:
Notions:
Gauge
22 stitches and 12 rows = 4 inches in double crochet
Gauge matters for fit. Please take time to swatch before beginning.
Finished Measurements
This pattern is written for size Small with adjustments noted for Medium, Large, and XL in parentheses.
Abbreviations and Stitch Definitions
Let me walk you through every stitch abbreviation before we begin. Understanding these will make the pattern much easier to follow.
Ch = Chain. Wrap yarn over hook, pull through loop on hook. This creates your foundation and is used for turning and spacing.
Sl st = Slip stitch. Insert hook, yarn over, pull through both loops at once. Used for joining rounds.
Sc = Single crochet. Insert hook, yarn over, pull up a loop (2 loops on hook), yarn over, pull through both loops. Creates a short, tight stitch.
Dc = Double crochet. Yarn over, insert hook, yarn over, pull up loop (3 loops on hook), yarn over, pull through 2 loops, yarn over, pull through remaining 2 loops. This is your workhorse stitch for the body.
Hdc = Half double crochet. Yarn over, insert hook, yarn over, pull up loop (3 loops on hook), yarn over, pull through all 3 loops at once. Slightly shorter than dc.
Tr = Treble crochet. Yarn over twice, insert hook, yarn over, pull up loop, (yarn over, pull through 2 loops) three times. Creates a tall stitch for lace sections.
FPdc = Front post double crochet. Yarn over, insert hook from front to back to front around the post (vertical part) of the stitch below, complete as regular dc. Creates raised texture.
BPdc = Back post double crochet. Yarn over, insert hook from back to front to back around post of stitch below, complete as dc. Creates recessed texture.
Dc2tog = Double crochet 2 together (decrease). Yarn over, insert hook, pull up loop, yarn over, pull through 2 loops, yarn over, insert hook in next stitch, pull up loop, yarn over, pull through 2 loops, yarn over, pull through all 3 remaining loops. You have just turned 2 stitches into 1.
Ch-sp = Chain space. The gap created by chains in the previous row.
Special Stitches
Shell: Work 5 dc in the same stitch. Creates a fan-like shape.
V-stitch: Work (dc, ch 1, dc) in the same stitch. Creates a small V shape.
Diamond Cable Panel (worked over 11 stitches):
Row 1: FPdc around next st, dc in next 3 sts, FPdc around next st, dc in next st, FPdc around next st, dc in next 3 sts, FPdc around next st.
Row 2: Work established pattern, crossing center cable stitches.
Don’t worry if this looks complex. I will guide you through each section step by step.
Pattern Instructions
Section 1: Ribbed Waistband
The waistband is worked flat first, then joined. This creates stretch and a polished look.
With Color A, ch 13.
Row 1: Sc in 2nd ch from hook and in each ch across. (12 sc)
Row 2: Ch 1, turn. Working in back loops only (BLO), sc in each st across. (12 sc)
Rows 3-144 (166, 188, 210): Repeat Row 2.
Your ribbed piece should measure approximately 26 (30, 34, 38) inches when slightly stretched. Adjust rows if needed to match your waist measurement minus 2 inches for negative ease.
Joining: Fold strip with short ends together. Sl st or whip stitch ends together to form a tube.
Transition Round: Working along the long edge of your waistband tube, join Color A with sl st. Ch 1, work 144 (166, 188, 210) sc evenly around the edge. Sl st to first sc to join. (144/166/188/210 sts)
Place a marker at the join. This is your center back.
Section 2: Textured Hip Section
This section creates the beautiful diamond and lattice pattern you see in the image. We work in rounds, building texture with front and back post stitches.
Round 1: Ch 3 (counts as dc here and throughout), dc in each st around. Sl st to top of ch-3 to join. (144/166/188/210 dc)
Round 2: Ch 3, *FPdc around next st, dc in next 3 sts, repeat from * around, adjusting final stitches to complete round evenly. Sl st to join.
Round 3: Ch 3, *dc in next st, FPdc around next FPdc, dc in next 2 sts, repeat from * around. Sl st to join.
Rounds 4-6: Continue established pattern, moving the FPdc stitches one position to the right each round to create diagonal lines.
Rounds 7-12: Reverse direction of diagonal movement to create diamond shapes.
Rounds 13-24: Repeat Rounds 1-12 once more.
You should now have approximately 8 inches of textured fabric from the waistband down.
Small note for beginners: If you lose track of your post stitches, look at your work from the side. The raised stitches will pop out toward you. Work your FPdc around those raised stitches.
Section 3: Decorative Lace Border
This wavy border creates the visual separation between the fitted hip and the flared skirt.
Round 1: With Color B, ch 1, sc in each st around. Sl st to join. (144/166/188/210 sc)
Round 2: Ch 5 (counts as dc plus ch-2), skip 2 sts, *dc in next st, ch 2, skip 2 sts, repeat from * around. Sl st to 3rd ch of beginning ch-5.
Round 3: Ch 1, *3 sc in ch-2 sp, sc in dc, repeat from * around. Sl st to join.
Round 4: Ch 4 (counts as tr), tr in next 2 sts, *3 tr in next st (this creates the scallop peak), tr in next 3 sts, skip 2 sts, tr in next 3 sts, repeat from * around, adjusting as needed. Sl st to join.
Round 5: Ch 1, sc in each st around, working 3 sc in each scallop peak. Sl st to join.
Your border should show gentle waves now. Beautiful work!
Section 4: Flared Lower Skirt
Now comes the magic. We increase gradually to create that gorgeous flare while adding vertical lace panels.
Increase Setup Round: Ch 3, dc in next 7 sts, *2 dc in next st (increase made), dc in next 8 sts, repeat from * around. Sl st to join.
Your stitch count increases by approximately 10-15%. Mark 8 evenly spaced points around the skirt for panel placement.
Panel Pattern (worked between markers):
Round 1: Ch 3, dc to 2 sts before marker, ch 2, skip 2 sts, dc to next marker, repeat around. Sl st to join.
Round 2: Ch 3, dc to ch-sp, (dc, ch 2, dc) in ch-sp (V-stitch increase), dc to next ch-sp, repeat around. Sl st to join.
Rounds 3-8: Continue working V-stitches in each ch-sp, adding 1 dc on each side of the V-stitch every other round. This creates the vertical lace lines you see in the photo.
Change to Color C when your skirt measures approximately 18 inches from waist.
Rounds 9-16: Continue established pattern, maintaining vertical panels. Add 1 increase in each panel every 4th round to gradually widen the flare.
Change to Color D when your skirt measures approximately 28 inches from waist.
Rounds 17-24: Continue pattern. Your skirt should be flaring beautifully now.
Section 5: Diamond Lace Hem
The hem features open diamond shapes that echo the textured diamonds at the hip.
Round 1: Ch 5, skip 2 sts, dc in next st, *ch 2, skip 2 sts, dc in next st, repeat from * around. Sl st to 3rd ch of beginning ch-5.
Round 2: Sl st to ch-sp, ch 5, dc in next ch-sp, *ch 2, dc in next ch-sp, repeat from * around. Sl st to join.
Round 3: Ch 3, 2 dc in same ch-sp, ch 3, 3 dc in next ch-sp, *skip next ch-sp, 3 dc in next ch-sp, ch 3, 3 dc in next ch-sp, repeat from * around. Sl st to join.
This creates the open diamond lattice visible in the photo.
Rounds 4-6: Continue diamond pattern, working 3 dc clusters on each side of ch-3 spaces.
Section 6: Scalloped Edge
Final Round: Ch 1, sc in first st, *skip 2 sts, 5 dc in next st (shell made), skip 2 sts, sc in next st, repeat from * around. Sl st to join. Fasten off.
Finishing
Elastic Casing:
Fold the ribbed waistband in half to the inside, encasing your elastic. Using a tapestry needle and matching yarn, whip stitch the folded edge to the inside of the waistband, leaving a 2 inch gap.
Thread your elastic through the casing. Overlap ends by 1 inch and sew securely. Stitch the gap closed.
Weaving Ends:
You will have several ends from color changes. Weave each end through several stitches on the wrong side, then back in the opposite direction. Trim closely.
Blocking:
Wet block your finished skirt by soaking in cool water for 15 minutes. Gently squeeze out excess water (never wring). Lay flat on blocking mats, shaping the scallops at the hem. Allow to dry completely.
Customization Tips
Shorter length: Stop the flared section earlier. Work the hem pattern when you reach your desired length.
Solid color: This pattern looks stunning in a single color too. You will need approximately 1,600 yards total.
Different gradient: Try ocean blues, sunset oranges, or forest greens for completely different vibes.
Adding a lining: For extra coverage, sew a slip lining from matching fabric and attach at the waistband.
Common Questions
How do I keep track of increases?
Place stitch markers every 18 stitches. Count each section after every round until you feel confident.
My skirt is curling. What do I do?
This often resolves with blocking. If curling persists, try going up half a hook size on your next project.
Can I make this shorter?
Absolutely! Work fewer rounds in Section 4 and proceed to the hem whenever you reach your preferred length.

Care Instructions
Hand wash in cool water with mild detergent. Lay flat to dry. Store folded, not hung, to prevent stretching.
I hope you love making this lavender lace maxi skirt crochet pattern as much as I loved designing it. The moment you slip it on and see that gorgeous drape, all those hours will feel completely worth it.
Thank you so much for choosing to make this with me. If you create your own version, I would absolutely love to see it! Tag me on Instagram or share a photo in our Facebook group. Seeing your makes truly lights up my day.
If you want to save this maxi skirt crochet pattern for later, go ahead and pin it to your favorite Pinterest board. That way you will have it ready whenever the mood strikes. And please drop a comment below if you have questions or when you finish yours. I read every single one and love cheering you on!
