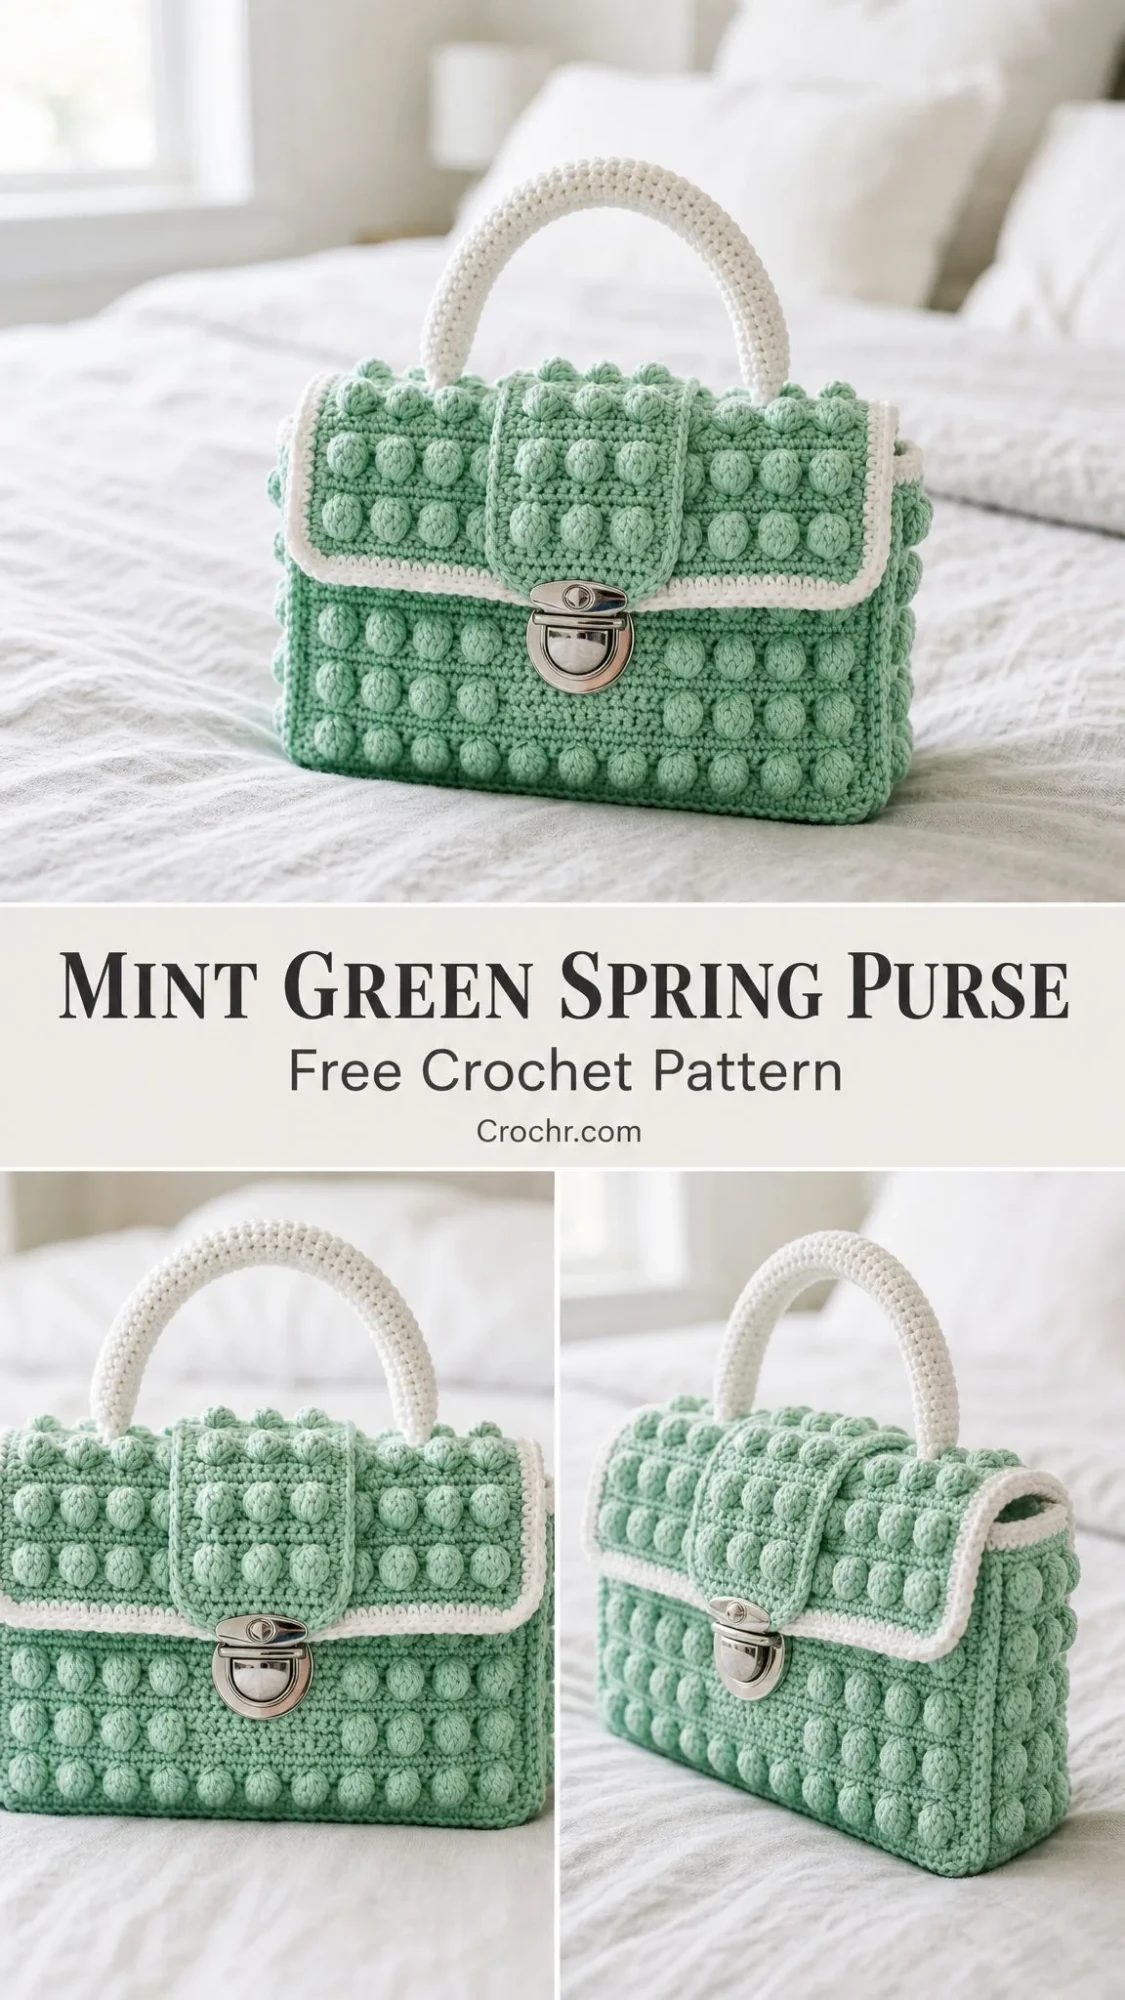
I pulled this design out of my project notebook last spring and called her "Minty." She started as a quick sketch after I spotted a vintage handbag at a flea market. The original had this gorgeous structured shape with textured bumps all over, and I knew I had to recreate it in crochet.
Get the Ad-Free PDF Pattern
You can find the free pattern below, or you can purchase the ad-free printable PDF from my shop.
Get the Printable PDF →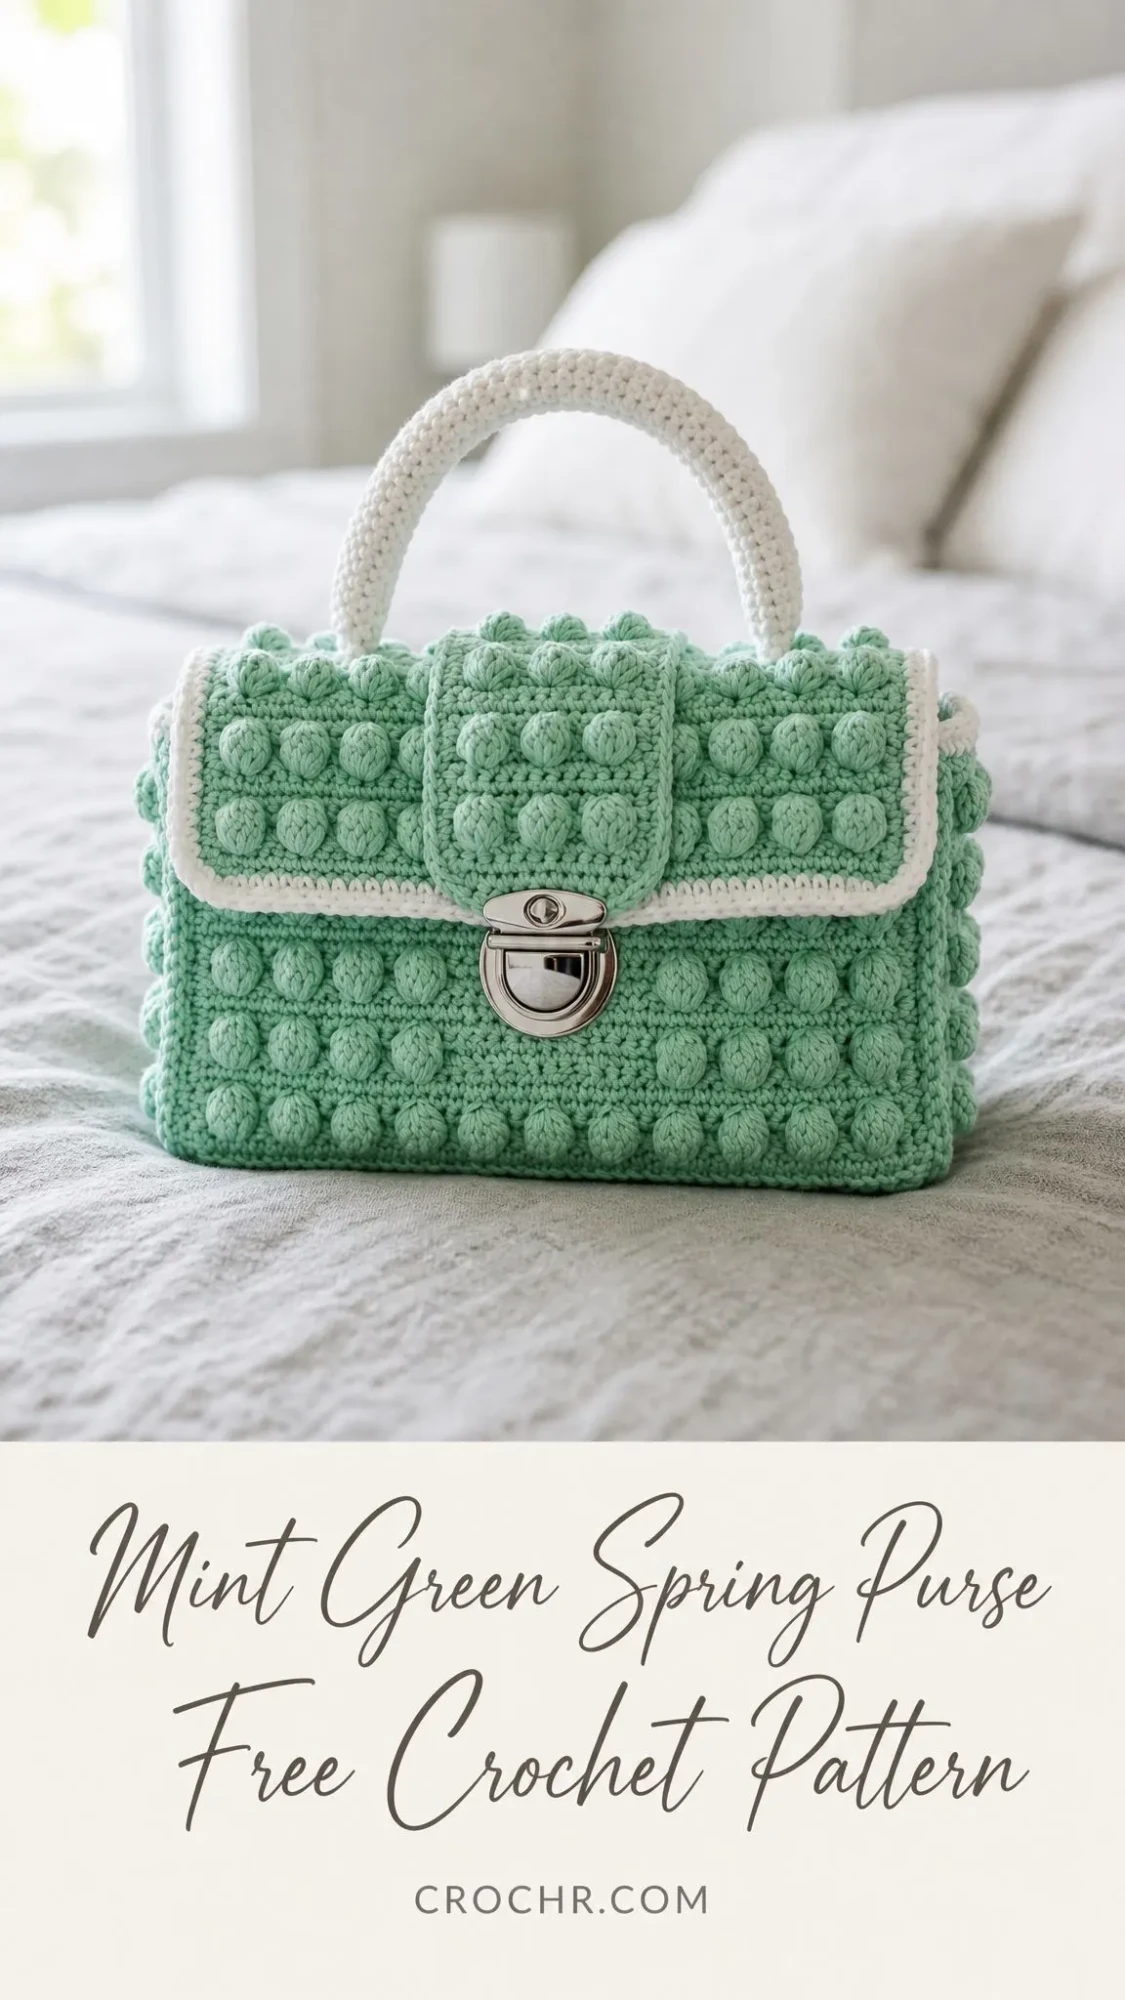
After months of tweaking the bobble placement and testing different yarn weights, Minty finally came together exactly how I pictured her. That crisp mint green with cream trim just screams springtime to me.
If you have been wanting to try your hand at a structured crochet bag with real hardware, this is your project. The bobble stitch pattern looks impressive but follows a simple repeat you will memorize in no time.
Why You Will Love This Pattern
This compact structured purse features raised bobble rows that create beautiful texture across every panel. The cream contrast edging adds a polished finish, while the firm arched handle and decorative push-lock clasp give it that designer handbag feel.
Skill Level: Intermediate
Time Estimate: 7 to 10 hours
Finished Size: 7.75 inches wide x 5.9 inches tall x 3.15 inches deep (20 x 15 x 8 cm)
The construction breaks down into manageable pieces. You will make two body panels, one long gusset that wraps around the sides and bottom, a flap, a tab for the clasp, and the handle. Everything comes together with simple seaming at the end.
Materials You Will Need
Gather these supplies before you start:
Yarn:
Hook:
Notions:
Optional:
Yarn Suggestions
The pattern works best with a firm cotton or cotton blend yarn. Here are some options I recommend:
Lion Brand 24/7 Cotton gives crisp stitch definition and creates a firm fabric that holds its shape beautifully.
Paintbox Yarns Cotton Aran is smooth and durable with plenty of mint shades to choose from.
WeCrochet Dishie offers sturdy cotton with a lovely handmade texture.
If you want to substitute with soft acrylic, go for it. Just know you will need more stabilizer to keep the bag from collapsing.
Gauge and Checkpoints
Getting gauge right matters for this project since you want all your pieces to fit together properly.
Gauge: 13 single crochet (sc) and 15 rows = 4 inches / 10 cm in single crochet, blocked lightly
Bobble repeat: 4 stitches x 4 rows
Before you start seaming, check these measurements:
Panel checkpoint: Each body panel should measure about 7.75 inches / 20 cm wide x 5.9 inches / 15 cm tall before edging.
Gusset checkpoint: 3.15 inches / 8 cm wide x 19.7 inches / 50 cm long before seaming.
Stitch Guide and Abbreviations
Let me walk you through every stitch you will use:
ch = chain: Yarn over, pull through loop on hook.
sl st = slip stitch: Insert hook, yarn over, pull through stitch and loop on hook in one motion.
sc = single crochet: Insert hook in stitch, yarn over and pull up a loop (2 loops on hook), yarn over and pull through both loops.
hdc = half double crochet: Yarn over, insert hook in stitch, yarn over and pull up a loop (3 loops on hook), yarn over and pull through all 3 loops.
dc = double crochet: Yarn over, insert hook in stitch, yarn over and pull up a loop (3 loops on hook), yarn over and pull through 2 loops, yarn over and pull through remaining 2 loops.
st(s) = stitch(es)
RS/WS = right side / wrong side
MC/CC = main color / contrast color
5-dc Bobble Stitch
This is the star of the show. Here is how to make it:
Yarn over, insert hook in the indicated stitch, pull up a loop, yarn over and pull through 2 loops. You now have 2 loops on your hook.
Repeat this 4 more times in the same stitch. After 5 partial double crochets, you will have 6 loops remaining on your hook.
Yarn over and pull through all 6 loops at once. Chain 1 to close the bobble. This closing chain does not count as a stitch.
The bobble pops out naturally. Just make sure you keep pushing them to the right side as you work.
Cream Reverse Single Crochet Edge
This creates that beautiful corded finish around the edges:
Join contrast color with right side facing. Working left to right (backwards from normal), insert hook into next stitch, yarn over, pull up a loop, yarn over and pull through both loops.
Repeat around the edge for that raised rope-like trim.
Left-handed makers: Work in the opposite direction for the same effect.
Pattern Notes
A few things to keep in mind as you work:
For left-handed crocheters: Follow the same stitch counts. Your working direction mirrors the sample. Place the clasp and tab by measuring from the center rather than counting from one side.
Body Panels
Make 2 in main color. Each panel uses 26 stitches so the 4-stitch bobble repeat fits perfectly: 2 edge sc + six 4-stitch repeats. Turn after every row.
Row 1: Ch 27. Sc in 2nd ch from hook and each ch across. (26 sc)
Row 2: Ch 1, sc in each st across. (26 sc)
Row 3: Ch 1, sc in first 2 sts, [bobble in next st, sc in next 3 sts] 6 times. (26 sts; 6 bobbles)
Rows 4-6: Ch 1, sc in each st across. (26 sc)
Row 7: Ch 1, sc in first 2 sts, [bobble in next st, sc in next 3 sts] 6 times. (26 sts; 6 bobbles)
Rows 8-10: Ch 1, sc in each st across. (26 sc)
Row 11: Ch 1, sc in first 2 sts, [bobble in next st, sc in next 3 sts] 6 times. (26 sts; 6 bobbles)
Rows 12-14: Ch 1, sc in each st across. (26 sc)
Row 15: Ch 1, sc in first 2 sts, [bobble in next st, sc in next 3 sts] 6 times. (26 sts; 6 bobbles)
Rows 16-18: Ch 1, sc in each st across. (26 sc)
Row 19: Ch 1, sc in first 2 sts, [bobble in next st, sc in next 3 sts] 6 times. (26 sts; 6 bobbles)
Rows 20-22: Ch 1, sc in each st across. (26 sc)
Fasten off after Row 22.
Panel Edging
With contrast color and right side facing, work 1 round sc evenly around each panel: 26 sc across top, 22 sc down side, 26 sc across bottom, 22 sc up side, placing 3 sc in each corner. Join with slip stitch. (104 sc including corner stitches)
Fasten off.
Gusset
The gusset wraps around both sides and the bottom of your purse. Work in main color.
Row 1: Ch 11. Sc in 2nd ch from hook and each ch across. (10 sc)
Row 2: Ch 1, sc in each st across. (10 sc)
Row 3: Ch 1, sc in first st, [bobble in next st, sc in next 3 sts] 2 times, sc in last st. (10 sts; 2 bobbles)
Rows 4-6: Ch 1, sc in each st across. (10 sc)
Row 7: Ch 1, sc in first st, [bobble in next st, sc in next 3 sts] 2 times, sc in last st. (10 sts; 2 bobbles)
Row 8: Ch 1, sc in each st across. (10 sc)
Continue in this established sequence. Work bobble rows on rows 3, 7, 11, 15, 19, 23, 27, 31, 35, 39, 43, 47, 51, 55, 59, 63, 67, 71, and 75.
All other rows are plain sc rows with 10 stitches.
Work until you have completed 75 rows total.
Fasten off.
Flap
Work in main color.
Row 1: Ch 27. Sc in 2nd ch from hook and each ch across. (26 sc)
Row 2: Ch 1, sc in each st across. (26 sc)
Row 3: Ch 1, sc in first 2 sts, [bobble in next st, sc in next 3 sts] 6 times. (26 sts; 6 bobbles)
Rows 4-6: Ch 1, sc in each st across. (26 sc)
Row 7: Ch 1, sc in first 2 sts, [bobble in next st, sc in next 3 sts] 6 times. (26 sts; 6 bobbles)
Rows 8-10: Ch 1, sc in each st across. (26 sc)
Fasten off.
Flap Edge
With contrast color, sc evenly around flap, placing 3 sc in each corner. For a raised cream lip like the sample, work one optional round of reverse sc. Fasten off.
Tab
Work in main color.
Row 1: Ch 9. Sc in 2nd ch from hook and each ch across. (8 sc)
Row 2: Ch 1, sc in each st across. (8 sc)
Row 3: Ch 1, sc in first 2 sts, bobble in next st, sc in next st, bobble in next st, sc in last 3 sts. (8 sts; 2 bobbles)
Rows 4-6: Ch 1, sc in each st across. (8 sc)
Row 7: Ch 1, sc in first 2 sts, bobble in next st, sc in next st, bobble in next st, sc in last 3 sts. (8 sts; 2 bobbles)
Rows 8-10: Ch 1, sc in each st across. (8 sc)
Fasten off.
Handle
Work in contrast color.
Row 1: Ch 36. Sc in 2nd ch from hook and each ch across. (35 sc)
Rows 2-5: Ch 1, sc across. (35 sc)
Fasten off, leaving a long tail for seaming.
Fold the handle piece lengthwise around a firm cord or doubled yarn strand. Whipstitch the long edges closed to create a tube.
Curve the handle into an arch shape. Sew ends securely to the inside top edge, positioning them 2 inches / 5 cm in from each side.
Assembly
Now for the fun part. Here is the order I recommend:
Step 1: Mark 22 rows down each side of the front and back panels. The remaining gusset length forms the bottom.
Step 2: With wrong sides together, seam the gusset to the front panel using whipstitch through inner loops only. This creates a clean seam on the outside. Repeat for the back panel.
Step 3: Sew the flap to the back top edge, centering it across the 26-stitch width.
Step 4: Sew the tab to the front center of the flap. Attach clasp parts to tab and front body. Reinforce with lining or stabilizer for extra security.
Step 5: Sew handle ends to the inside top. Add optional lining.
Finishing and Shaping
Blocking: Pin panels flat to final measurements. Steam lightly through a cloth if your yarn allows, but do not flatten the bobbles.
Structure: Insert plastic canvas or firm bag stabilizer cut slightly smaller than front, back, bottom, and side areas if you want that crisp handbag silhouette.
Size Customization
Want to make your purse bigger or smaller? Here is how to adjust:
Width changes: Add or subtract 4 stitches to maintain the bobble repeat. Every 4 stitches changes width by about 1.25 inches / 3 cm at gauge.
Height changes: Add or subtract rows in groups of 4 to keep bobble rows evenly spaced.
Depth changes: Make the gusset 4, 6, 8, 10, or 12 stitches wide. Keep an even width for easy seaming.
Handle length: Add or subtract chains before Row 1.
Troubleshooting Tips
Bobbles lean inward: Tighten the sc after each bobble and push bobbles firmly to the right side as you work.
Panels curl: Use a larger hook for the foundation chain or block before seaming.
Bag collapses: Add lining and stabilizer, especially if using soft yarn.
Clasp pulls fabric: Sandwich the crochet between clasp hardware and a small fabric or felt reinforcement.
Care Instructions
Hand wash your finished purse in cold water. Reshape and lay flat to dry. Do not bleach, iron the bobbles, dry clean, or tumble dry. Remove detachable hardware before washing when possible.
Final Thoughts on This Mint Green Spring Purse Crochet Pattern
This structured bobble stitch purse makes such a statement piece. Whether you carry it to brunch, a spring wedding, or just around town running errands, you will get compliments.
The bobble stitch pattern is rhythmic and almost meditative once you get going. And there is something so satisfying about adding that push-lock clasp at the end and watching your handmade bag transform into something that looks store-bought.
I hope this mint green spring purse crochet pattern brings you as much joy to make as it did for me to design. Take your time with the assembly, trust the process, and do not forget to block those panels before seaming.
If you loved making this bag, save it to your Pinterest boards so you can find it again later or share it with your crafty friends. And please drop a comment below if you make one. I would absolutely love to see your finished Minty purse and hear which color combination you chose!
Want a Quick & Easy Printable Version?
Get a clean, beautifully formatted PDF of this pattern — easy to follow step by step, ready to print or save on any device. No scrolling, no distractions, just the pattern.
Get the Printable PDF →