
THIS is the project you’ve been waiting for. Seriously. If you want a showstopper piece that will have everyone asking "did you MAKE that?!" then grab your hook and let’s do this.
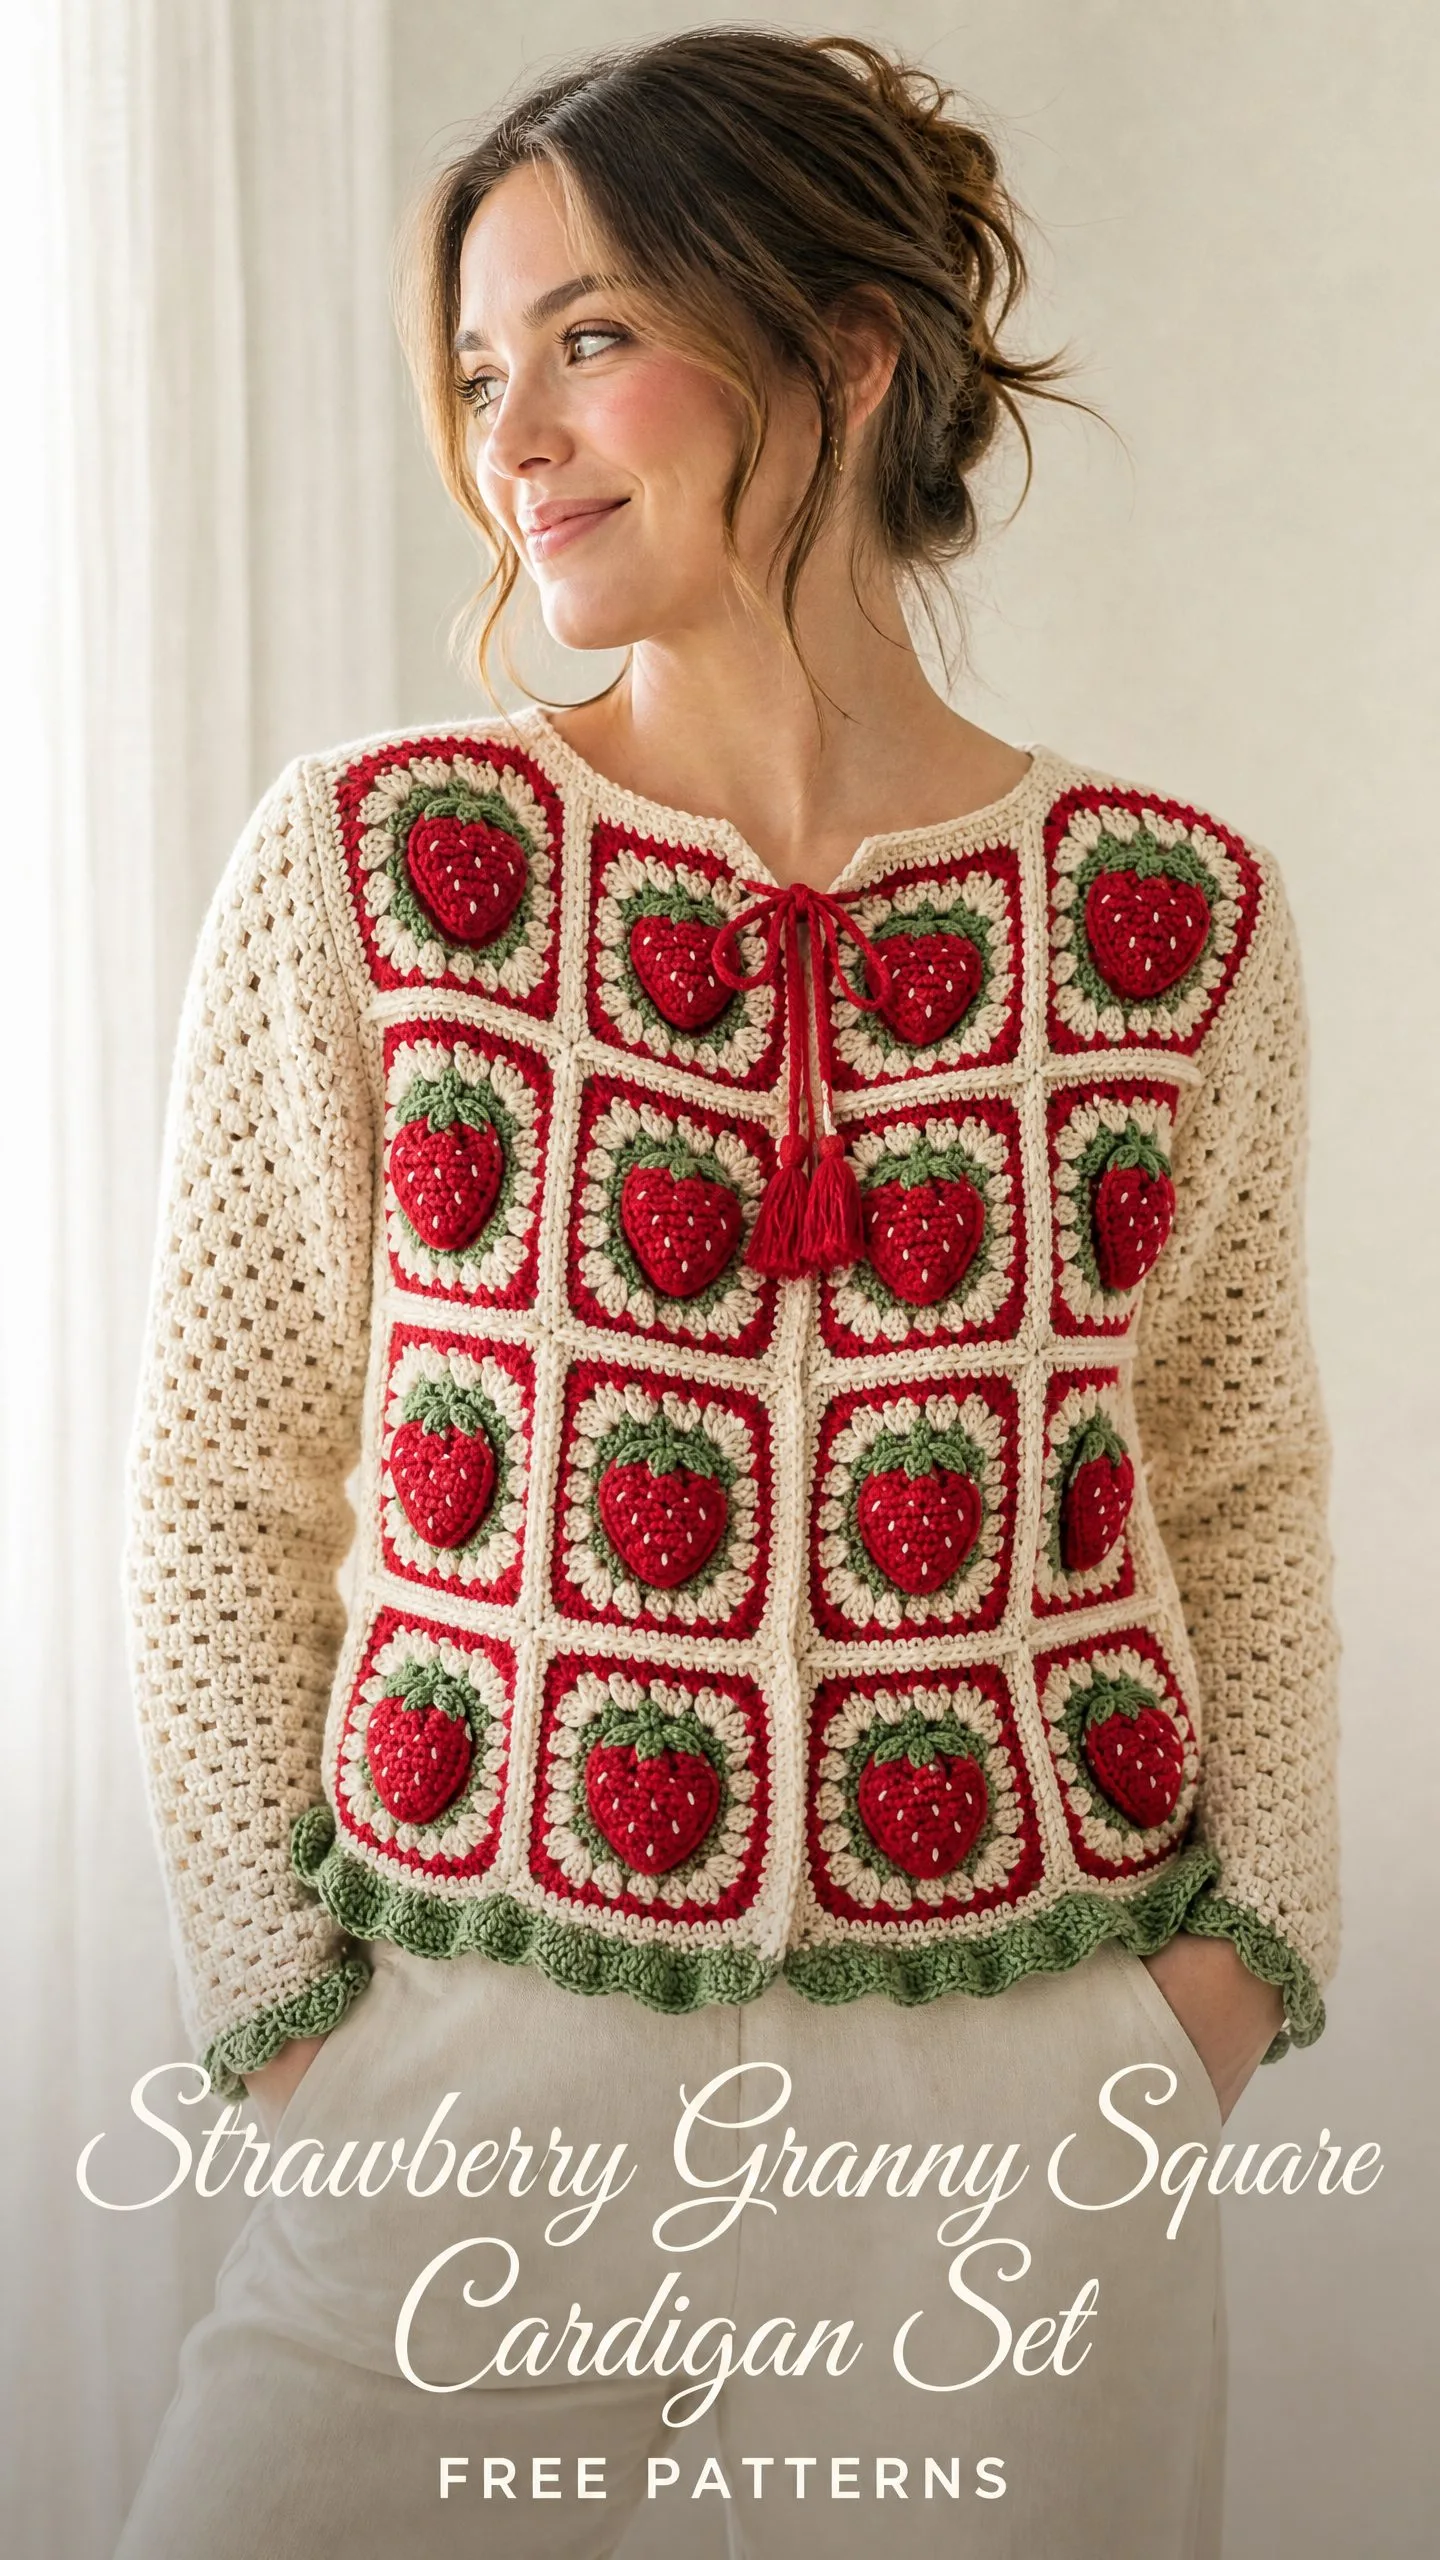
This strawberry granny square cardigan set is one of those rare patterns that looks incredibly complex but breaks down into totally manageable steps. You’re making squares. You’re making cute little 3D strawberries. You’re joining everything together. That’s it.
Fair warning though. This is an intermediate to advanced project that takes 60 to 90 hours to complete. But every single one of those hours is worth it when you see the finished set laid out on your bed looking like a vintage dream.
What You’re Making
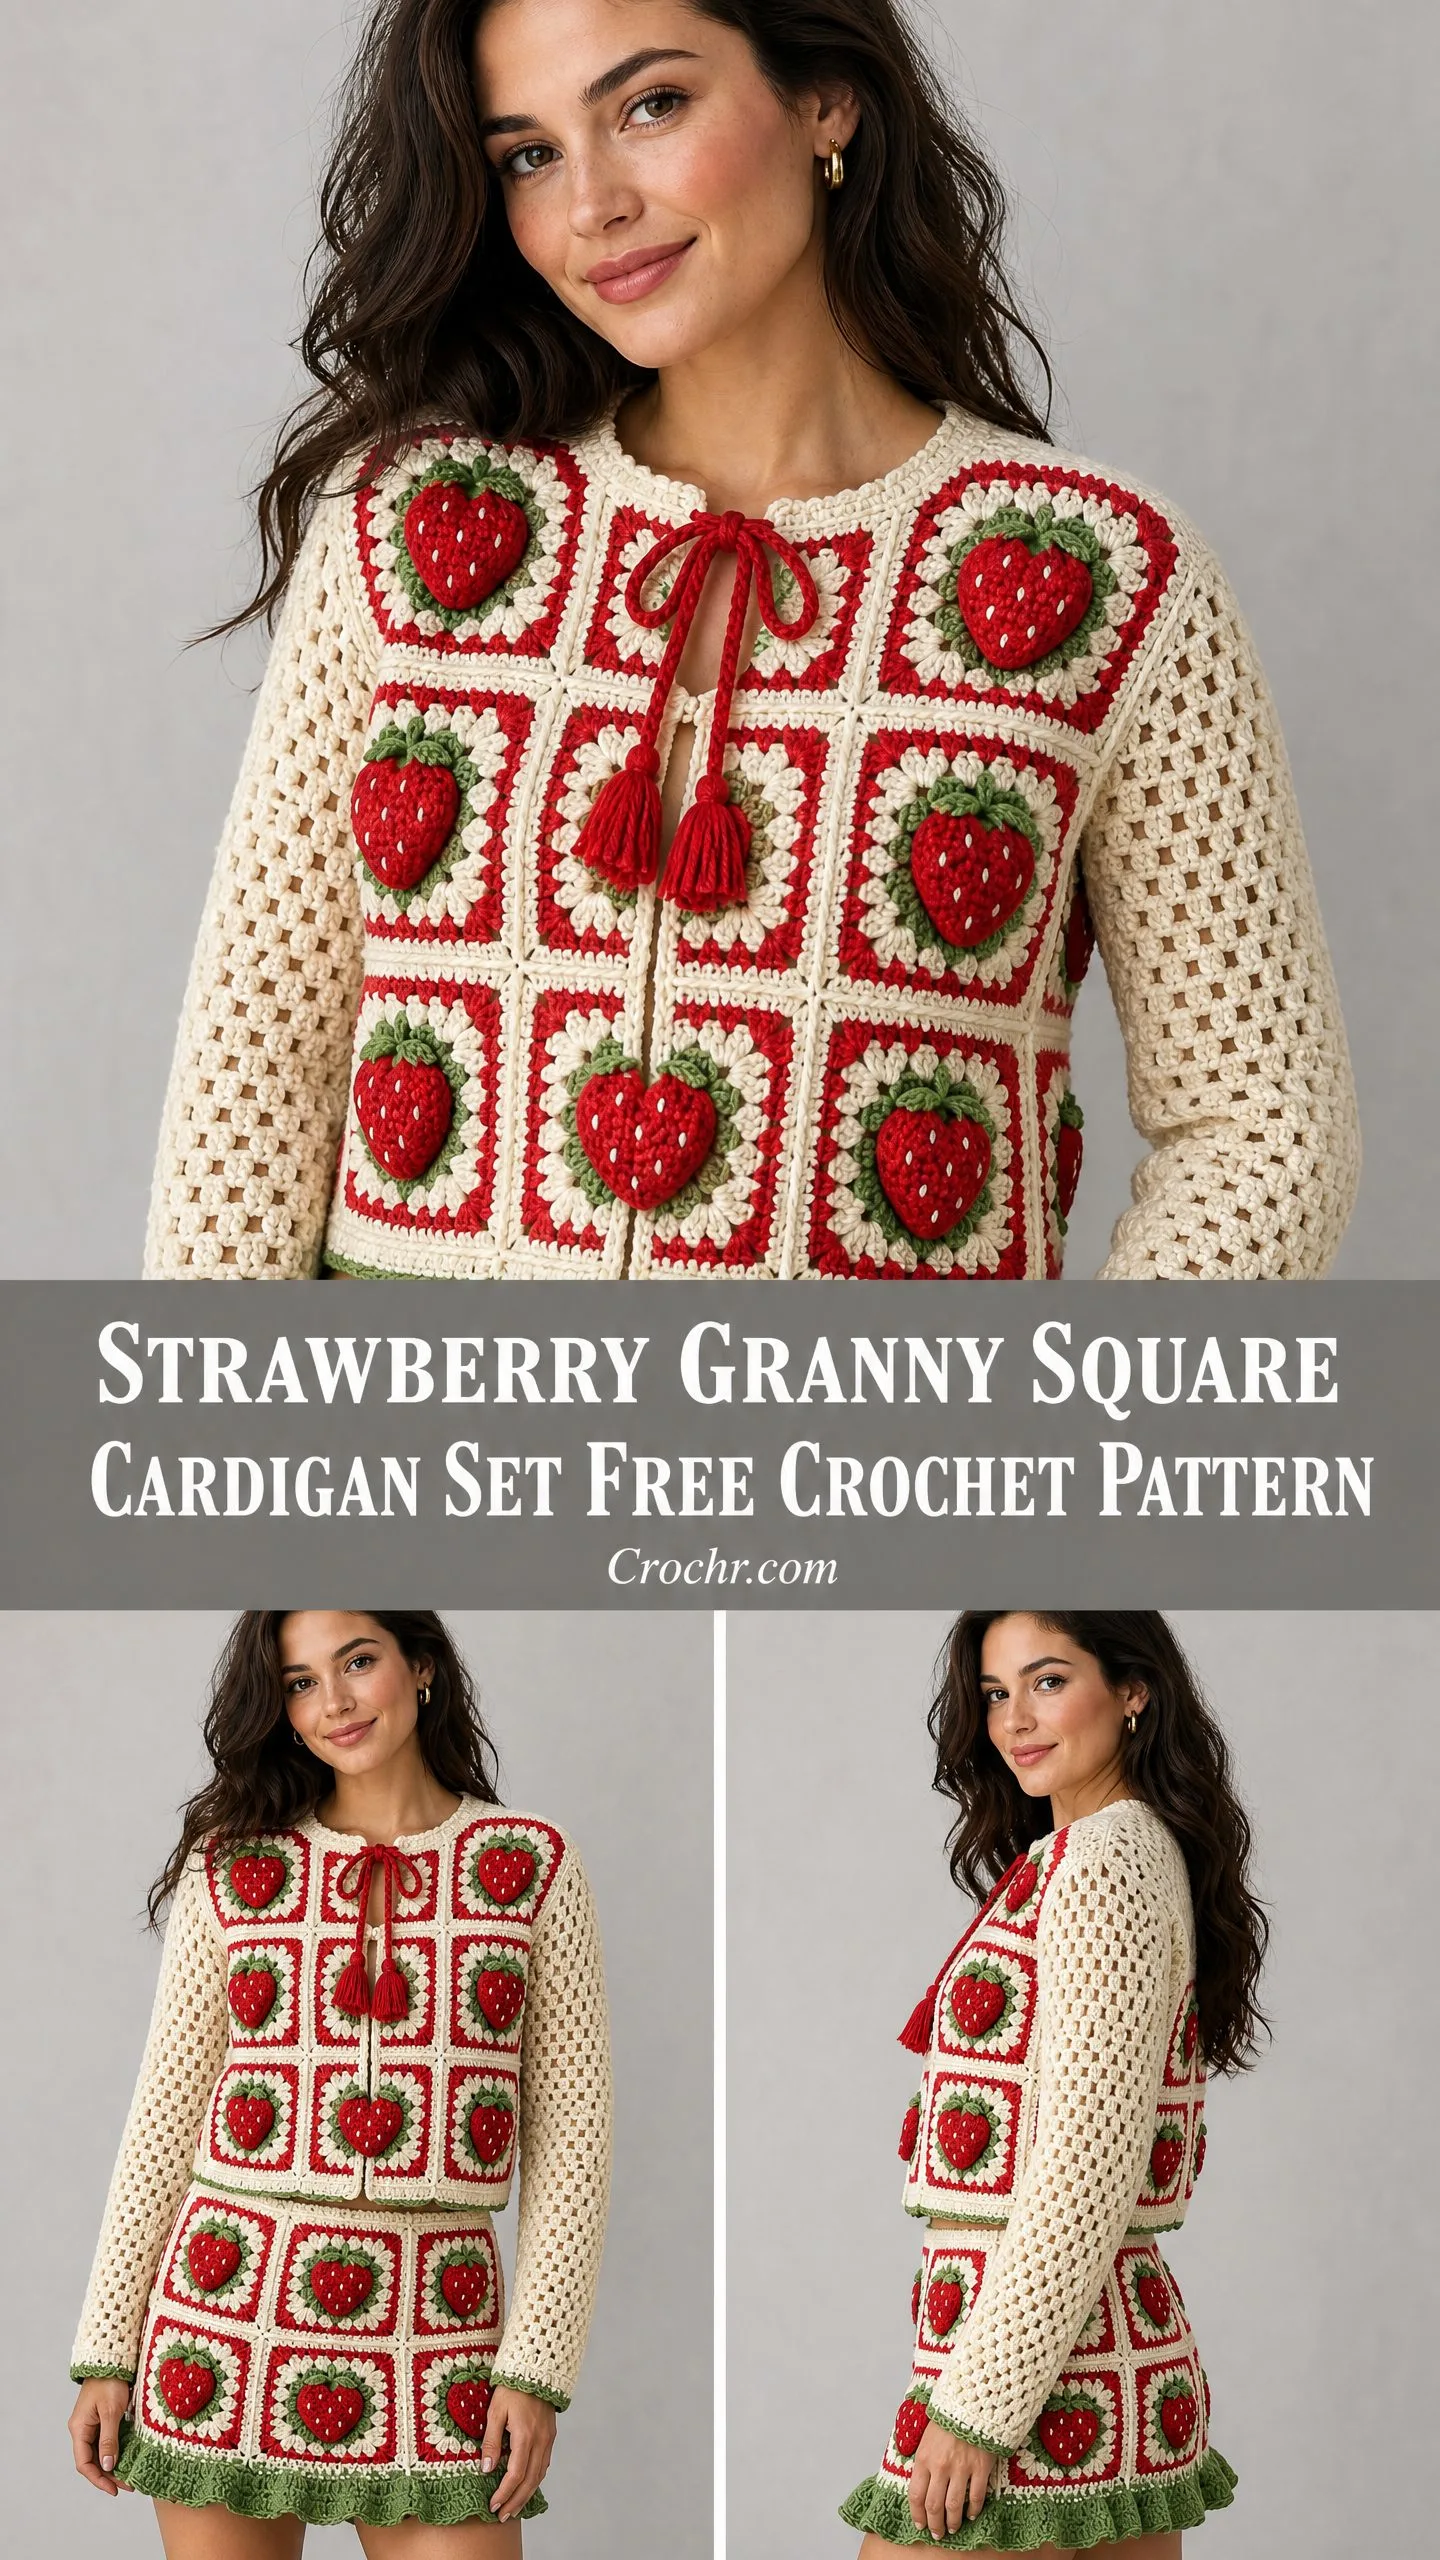
This pattern creates a complete coordinating set. You get a cropped open front cardigan with gorgeous strawberry motif granny squares covering the body, solid cream mesh sleeves, and a sweet ruffled green scallop edge along the hem and cuffs. The matching bucket hat ties the whole look together with its own strawberry squares and ruffled brim.
The cardigan closes with a red ribbon tie at the neckline, finished with adorable tassels. No buttons to fuss with. Just slip it on, tie it up, and look absolutely adorable.
The real magic here is in those 3D strawberry appliques. Each one gets worked separately and sewn onto the squares with a tiny bit of stuffing to make them pop right off the surface. The little white seed stitches are the perfect finishing touch.
Finished Measurements
This pattern is written for size Small/Medium, which fits US sizes 6 through 10.
Cardigan:
Bucket Hat:
Materials You’ll Need
Yarn (all worsted weight, Category 4):
Hooks:
Notions:
Great Yarn Options:
Lion Brand Wool-Ease works beautifully in Fisherman, Scarlet, and Sage. Paintbox Yarns Simply DK at a slightly looser tension also creates lovely results in Champagne White, Pillar Box Red, and Grass Green.
Choose yarn with good stitch definition so your 3D strawberries really pop. Avoid fuzzy or heavily textured yarns for the red and green colors.
Gauge (Please Check This)
Granny Square Gauge:
Each completed strawberry granny square through Round 4 should measure 4.5 inches x 4.5 inches (11.5 cm x 11.5 cm) after light blocking, using your J-10 / 6.0 mm hook.
Sleeve Mesh Gauge:
14 stitches x 16 rows equals 4 inches (10 cm) in single crochet mesh pattern using your I-9 / 5.5 mm hook.
Take time to check your gauge. The square size controls ALL your garment dimensions. If your square is larger than 4.5 inches, go down a hook size. If it’s smaller, go up a hook size.
Abbreviations
Let me walk you through every abbreviation before we start. If you’re newer to reading patterns, bookmark this section.
How Many Squares Do You Need?
Here’s the full breakdown. Make all your squares before you start joining. Trust me on this.
Cardigan Body:
Hat:
Complete Set Total: 38 squares and 38 strawberry appliques
Special Stitch Instructions
The Strawberry Granny Square
Each square uses Colors B (red), C (green), and A (cream). Work in rounds.
Round 1 (Color B, Red): Make a magic ring or chain 4 and join to first chain to form ring. Chain 3 (this counts as your first double crochet, or dc). Work 2 dc into ring, chain 2. Then work (3 dc into ring, chain 2) three more times. Join to top of beginning chain 3. You now have 4 clusters of 3 dc and 4 chain 2 corner spaces. Fasten off Color B.
Round 2 (Color C, Green): Join to any chain 2 corner space. Chain 1. Work (sc, chain 1, sc) into corner space, chain 1, skip cluster, (sc, chain 1, sc) into next corner space. Repeat around all 4 corners. Join to first sc. (8 sc total, 4 chain 1 spaces between corners, 4 chain 1 corner pivot points) Fasten off Color C.
This round creates those cute leaf like points at each corner. They’ll peek out behind your strawberry applique like little green caps.
Round 3 (Color A, Cream): Join to any chain 1 corner space. Chain 3 (counts as dc), work (2 dc, chain 2, 3 dc) into same corner space, chain 1, skip to next corner space, (3 dc, chain 2, 3 dc) into corner space, chain 1. Repeat around all 4 corners. Join to top of beginning chain 3. (24 dc, 4 chain 2 corner spaces, 4 chain 1 side spaces) Fasten off Color A.
Round 4 (Color B, Red): Join to any chain 2 corner space. Chain 3 (counts as dc), work (2 dc, chain 2, 3 dc) into same corner space, chain 1, 3 dc into chain 1 side space, chain 1, (3 dc, chain 2, 3 dc) into corner space, chain 1, 3 dc into side space, chain 1. Repeat around remaining 2 corners. Join to top of beginning chain 3. (48 dc, 4 chain 2 corner spaces, 8 chain 1 spaces) Fasten off Color B.
Weave in all ends. Block your square to exactly 4.5 inches x 4.5 inches. The strawberry applique gets sewn on after blocking.
The 3D Strawberry Applique
This creates that adorable puffy berry you’ll sew onto each square.
Foundation: With Color B and your J-10 hook, chain 10.
Row 1: Sc in 2nd chain from hook and in each chain across. (9 sc) Turn.
Row 2: Chain 1, inc in first st, sc in next 3 sts, inc in next st (center), sc in next 3 sts, inc in last st. (12 sc) Turn.
Row 3: Chain 1, inc in first st, sc in next 4 sts, inc in next st, inc in next st, sc in next 4 sts, inc in last st. (16 sc) Turn.
Row 4: Chain 1, sc in each st across. (16 sc) Turn.
Row 5: Chain 1, sc in each st across. (16 sc) Turn.
Row 6: Chain 1, dec over first 2 sts, sc in next 12 sts, dec over last 2 sts. (14 sc) Turn.
Row 7: Chain 1, dec, sc in next 10 sts, dec. (12 sc) Turn.
Row 8: Chain 1, dec, sc in next 8 sts, dec. (10 sc) Turn.
Row 9: Chain 1, dec, sc in next 6 sts, dec. (8 sc) Turn.
Row 10: Chain 1, dec, sc in next 4 sts, dec. (6 sc) Turn.
Row 11: Chain 1, dec, sc in next 2 sts, dec. (4 sc) Turn.
Row 12: Chain 1, (dec) twice. (2 sc) Turn.
Row 13: Chain 1, dec. (1 sc) Fasten off, leaving a 12 inch tail for seaming.
Edging: Rejoin Color B to the bottom left corner of your foundation chain. Work sc evenly around the entire outer edge of the berry shape. Work approximately 1 sc per row end on the sides and 1 sc per stitch on top and bottom. You can place 3 sc in each bottom corner point to help it curve nicely. Join and fasten off.
Shaping the Berry: Using your yarn needle and that long tail, weave a running stitch along the very bottom straight edge (your foundation chain edge). Pull gently to cinch and create the rounded point at the base. This becomes the tip of your strawberry. Knot securely.
Adding the Leaf Cap: With Color C, use your yarn needle to embroider or surface slip stitch a small leaf cap of 3 or 5 small loops at the top (wide end) of the berry. This mimics the stem cap. Fasten off.
Adding Seeds: Thread Color D (white) on your yarn needle. Using small straight stitches, place 8 to 10 tiny seed marks across the face of the berry in a scattered pattern. Angle them very slightly for a natural look. Knot on the wrong side.
Attaching to Your Square: Center the applique with the wide top toward the top of the square and the pointed tip toward the bottom. Pin in place. Using Color B threaded on your yarn needle, whip stitch around the outer edge. Leave a small opening at the top and stuff very lightly with a tiny amount of scrap yarn or polyfill. This creates that gorgeous 3D raised effect. Close the opening and fasten off invisibly.
The Scallop Ruffle Edging
This creates the beautiful green ruffled edge on the hem, cuffs, and hat brim.
Foundation Row: With Color C, join to any stitch of the edge. Sc evenly across the full edge, placing sc in each dc, chain space, and join seam point. Your count must be a multiple of 6. Adjust by adding or removing 1 to 3 sc as needed. Do not turn.
Ruffle Row 1: Chain 1, turn so RS faces you. Sc in first sc, skip 2 sts, 5 dc in next st (this makes one shell), skip 2 sts, sc in next st. Repeat (skip 2, 5 dc in next, skip 2, sc in next) across to the end. Fasten off Color C.
The Sleeve Mesh Stitch
Row 1: Chain your desired number of stitches (must be a multiple of 2 plus 1). Sc in 2nd chain from hook, then work (chain 1, skip 1, sc in next) across. Turn.
Row 2: Chain 1, sc in first sc, (chain 1, skip chain 1 space, sc in next sc) across. Turn.
Repeat Row 2 for pattern. This creates a lovely offset mesh with small holes.
The Flat Join
Hold two squares with wrong sides facing together (right sides facing outward). Working through both outer loops of corresponding stitches simultaneously, slip stitch across the joining edge. This creates a visible raised seam on the right side that looks like a decorative grid line between your squares.
Cardigan Instructions
Section 1: Make All Your Granny Squares
Work all 30 squares following the Strawberry Granny Square instructions above. After completing Round 4, each square should measure 4.5 inches before blocking.
Block all 30 squares to exactly 4.5 inches each. Pin and allow to dry fully.
Work all 30 strawberry appliques and sew one to each square. Make sure each applique sits properly centered on the square face.
Checkpoint: You should now have 30 blocked squares with attached 3D appliques, each measuring 4.5 x 4.5 inches.
Section 2: Joining Squares Into Panels
Right Front Panel (3 squares wide x 3 squares tall = 9 squares):
Lay your squares in a 3×3 grid with all appliques facing upward. Arrange so all strawberry points face the same direction (tips pointing down).
Hold Square 1 and Square 2 with wrong sides together, right sides facing outward. Using Color A and your J-10 hook, work flat join (slip stitch) along one 4.5 inch edge. Work slip stitch into each corresponding pair of stitches across. You’ll work through approximately 16 to 18 stitch pairs across each joining edge. Fasten off.
Join Square 3 to Square 2 in the same manner to complete your first row of 3 squares.
Make two more rows of 3 squares the same way.
Join all three rows together by seaming the long horizontal edges in the same flat join manner. You now have one 3×3 panel measuring approximately 13.5 inches wide x 13.5 inches tall.
Left Front Panel: Repeat identically for another 9 squares in a 3×3 grid.
Back Panel (3 squares wide x 4 squares tall = 12 squares): Join in the same manner to create a 3×4 panel measuring approximately 13.5 inches wide x 18 inches tall.
Section 3: Shoulder Joining
Place your Right Front Panel and Back Panel with wrong sides together. Align the top edges (the 13.5 inch edge). Using Color A and the flat join method, seam across the top 3 square width.
Repeat with the Left Front Panel and the remaining side of the Back Panel top edge for the left shoulder.
Your joined body piece is now one connected unit. The cardigan opens at the center front where the two front panels do not meet each other.
Section 4: Making the Sleeves (Make 2)
The sleeves are worked flat in Color A using the Sleeve Mesh Stitch pattern.
Cuff: With Color A and your J-10 hook, chain 47.
Row 1: Sc in 2nd chain from hook, (chain 1, skip 1, sc in next) across. (23 sc, 22 chain 1 spaces) Turn.
Rows 2 through 30: Chain 1, sc in first sc, (chain 1, skip chain 1 space, sc in next sc) across. (23 sc, 22 chain 1 spaces per row) Turn.
Increase Rows (begin increasing 1 stitch at each side every 4th row):
To increase: At start of increase row, chain 1, sc in first sc, chain 1, sc in same sc (increase at start), continue in pattern to last sc, sc in last sc, chain 1, sc in same last sc again (increase at end).
Continue in pattern without further increase through Row 72. (39 sc, 38 chain 1 spaces)
Sleeve Cap:
Sleeve Seam: Fold sleeve in half lengthwise with right sides together. Using your yarn needle and Color A, mattress stitch or whip stitch the long side edge from cuff to the beginning of the cap (Row 72 to Row 1). Leave cap unsewn. Turn sleeve right side out.
Make second sleeve identically.
Section 5: Setting In Sleeves
Pin each sleeve cap into an armhole opening with right side of sleeve facing right side of cardigan body at the seam. The center top of the cap (Row 72) aligns with the shoulder seam point. Match the underarm points of the sleeve to the bottom corners of the armhole opening.
Using Color A and your yarn needle, whip stitch or back stitch through both layers around the entire armhole circumference. Ease in any fullness at the cap top by gathering very slightly.
Repeat for second sleeve.
Section 6: Hem and Cuff Edging
Cardigan Hem: Join Color C to the lower right corner of the right front panel.
Edging Setup Row: With Color C and your J-10 hook, sc evenly across the entire bottom hem edge. Work 1 sc per each stitch or space across each square’s bottom edge. Each square bottom has approximately 16 usable edge positions. Total hem edge equals 9 squares (3 across front right plus 3 across back bottom plus 3 across front left) which equals 9 x 16 = 144 sc. (144 sc) Do not turn.
Ruffle Row: With RS facing, chain 1, turn. Work (sc in first sc, skip 2 sc, 5 dc in next sc, skip 2 sc) across to end, sc in last sc. You’ll have 24 complete scallops. Fasten off Color C.
Cuff Edging: For each sleeve, join Color C to the bottom edge of the sleeve (foundation chain edge).
Cuff Setup Row: Sc evenly around the cuff edge. The cuff has 46 foundation chain positions. Add 2 more at the join point to reach 48. (48 sc) Join to first sc to work in the round.
Cuff Ruffle Round: Chain 1, (sc in next sc, skip 2 sc, 5 dc in next sc, skip 2 sc) around, join. (8 scallops) Fasten off.
Repeat for second cuff.
Section 7: Front Edge, Neckline Trim, and Closure
With Color A and your J-10 hook, join to the bottom right corner of the right front panel at the outer (open front) edge. Sc evenly up the entire right front outer edge, across the back neckline, and down the entire left front outer edge. Work approximately 2 sc per row end on the granny square edges and 1 sc per stitch across the neckline top.
Adding the Tie: Thread your red ribbon or a length of Color B yarn through the top corners of both front panels, creating a tie closure. Add a tassel to each end if desired.
Making Tassels (optional): Wrap Color B around a small piece of cardboard (about 2 inches wide) approximately 15 times. Slide a short length of yarn through the top and tie tightly. Cut the bottom loops. Wrap another piece of yarn around the tassel about half an inch from the top to create the head. Trim ends evenly.
Size Customization Tips
To adjust the size of your cardigan, you have a few options:
For a larger size: Add one more row of squares to each panel (making front panels 3×4 and back panel 3×5). You can also use a slightly larger hook to increase individual square size.
For a smaller size: Use a smaller hook to decrease individual square size, or work fewer rows on the sleeves.
For longer sleeves: Add more rows before beginning the cap shaping.
For a longer body: Add one more row of squares to the bottom of each panel.
Care Instructions
Block your finished cardigan lightly before first wear. If using a superwash wool or acrylic blend, you can machine wash on gentle cycle and lay flat to dry. The 3D strawberry appliques may flatten slightly in the wash but can be reshaped while damp.
Store folded rather than hanging to prevent stretching at the shoulders.
I really hope you love making this strawberry granny square cardigan set as much as I loved writing this pattern. It’s a labor of love for sure, but the finished result is absolutely stunning.
If you make this pattern, please save it to your Pinterest boards so you can find it easily later. And I would absolutely love to see your finished projects! Drop a comment below or tag me on Instagram with your strawberry creations. Happy crocheting!
You Might Also Like
- Sunset Ombre Rose Bracelet Free Crochet Pattern
- Mint Green Dragon Amigurumi Plush Free Crochet Pattern
- Sage Green Botanical Lace Collar Free Crochet Pattern
- Sage Green Cottagecore Heart Crochet Cardigan Pattern
