
Last summer, my best friend called me in a panic. Her sister’s baby shower was three weeks away, and she wanted to give something handmade. Something special. Something that would make everyone at the party ask "where did you get that?" I pulled out my hook that night and started sketching out these overalls.
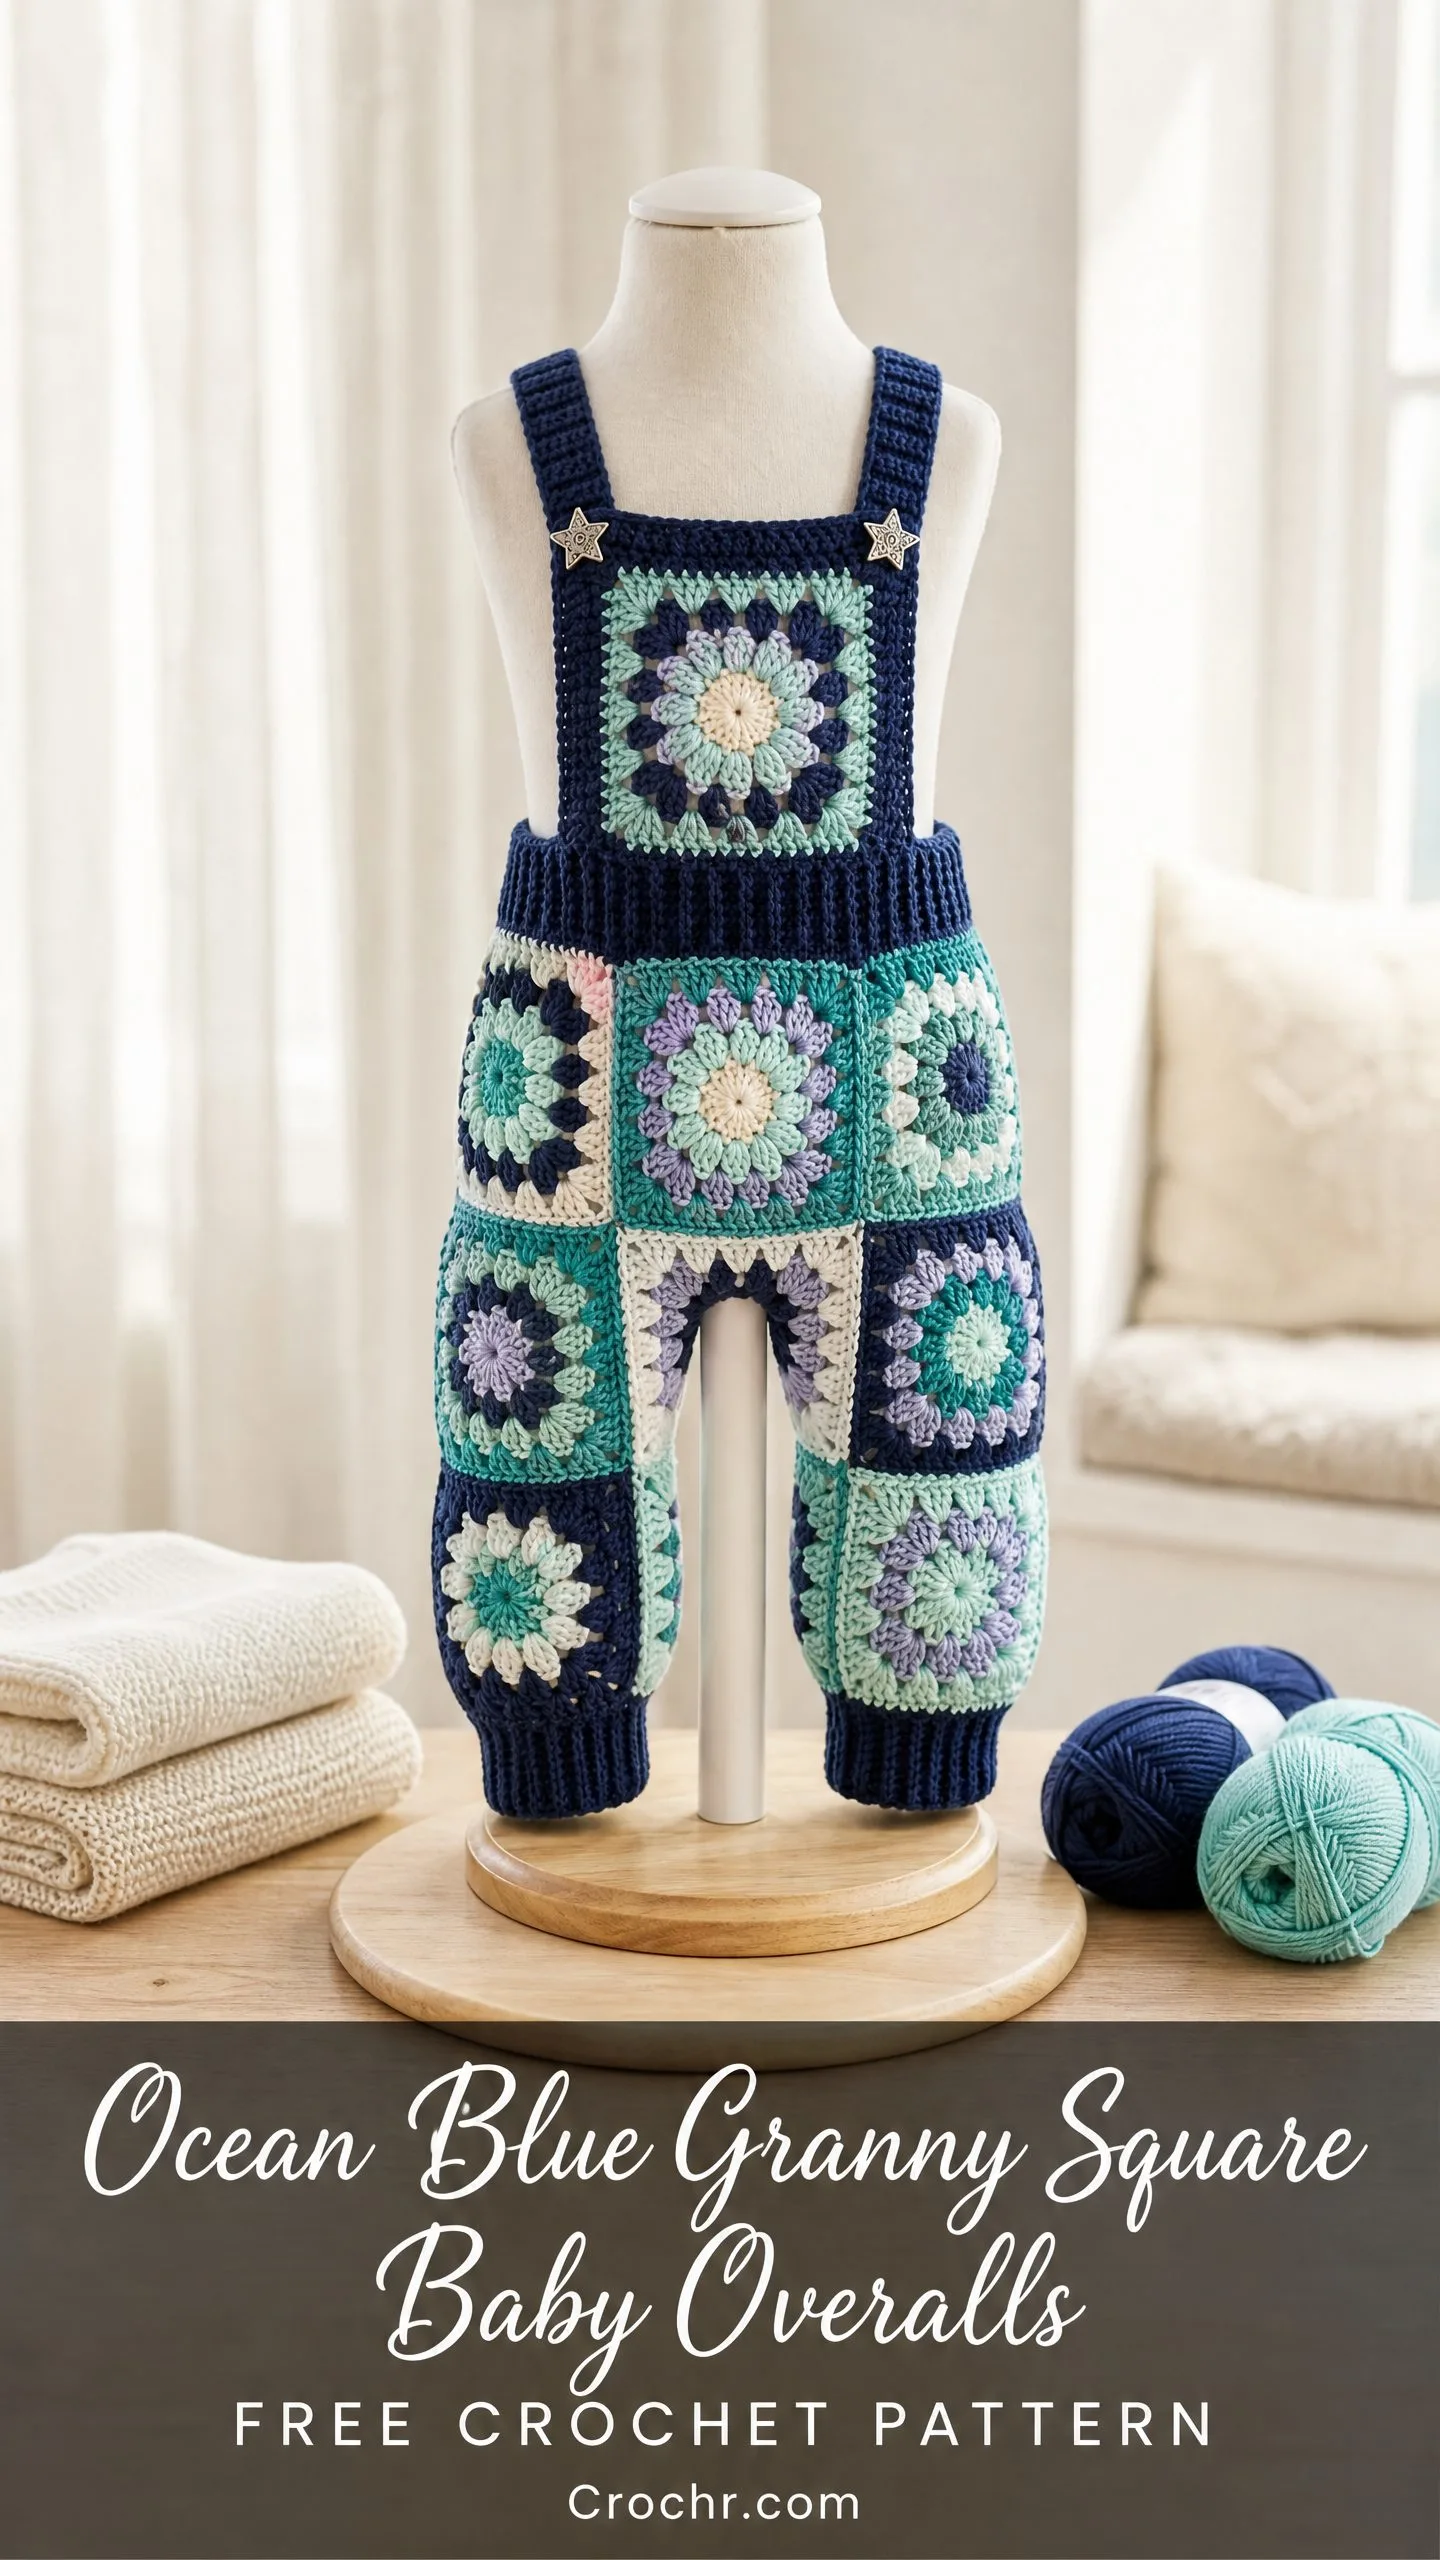
The result? A show-stopping pair of baby overalls that had every guest passing them around and cooing. My friend cried. The mom-to-be cried. I may have teared up a little too. These overalls became my go-to baby gift pattern, and now I’m sharing it with you.
Fair warning: this is not a quick weekend project. It takes real time and attention. But if you want to create a true heirloom piece that will be photographed at every holiday and passed down to the next baby in the family, keep reading.
About This Crochet Pattern
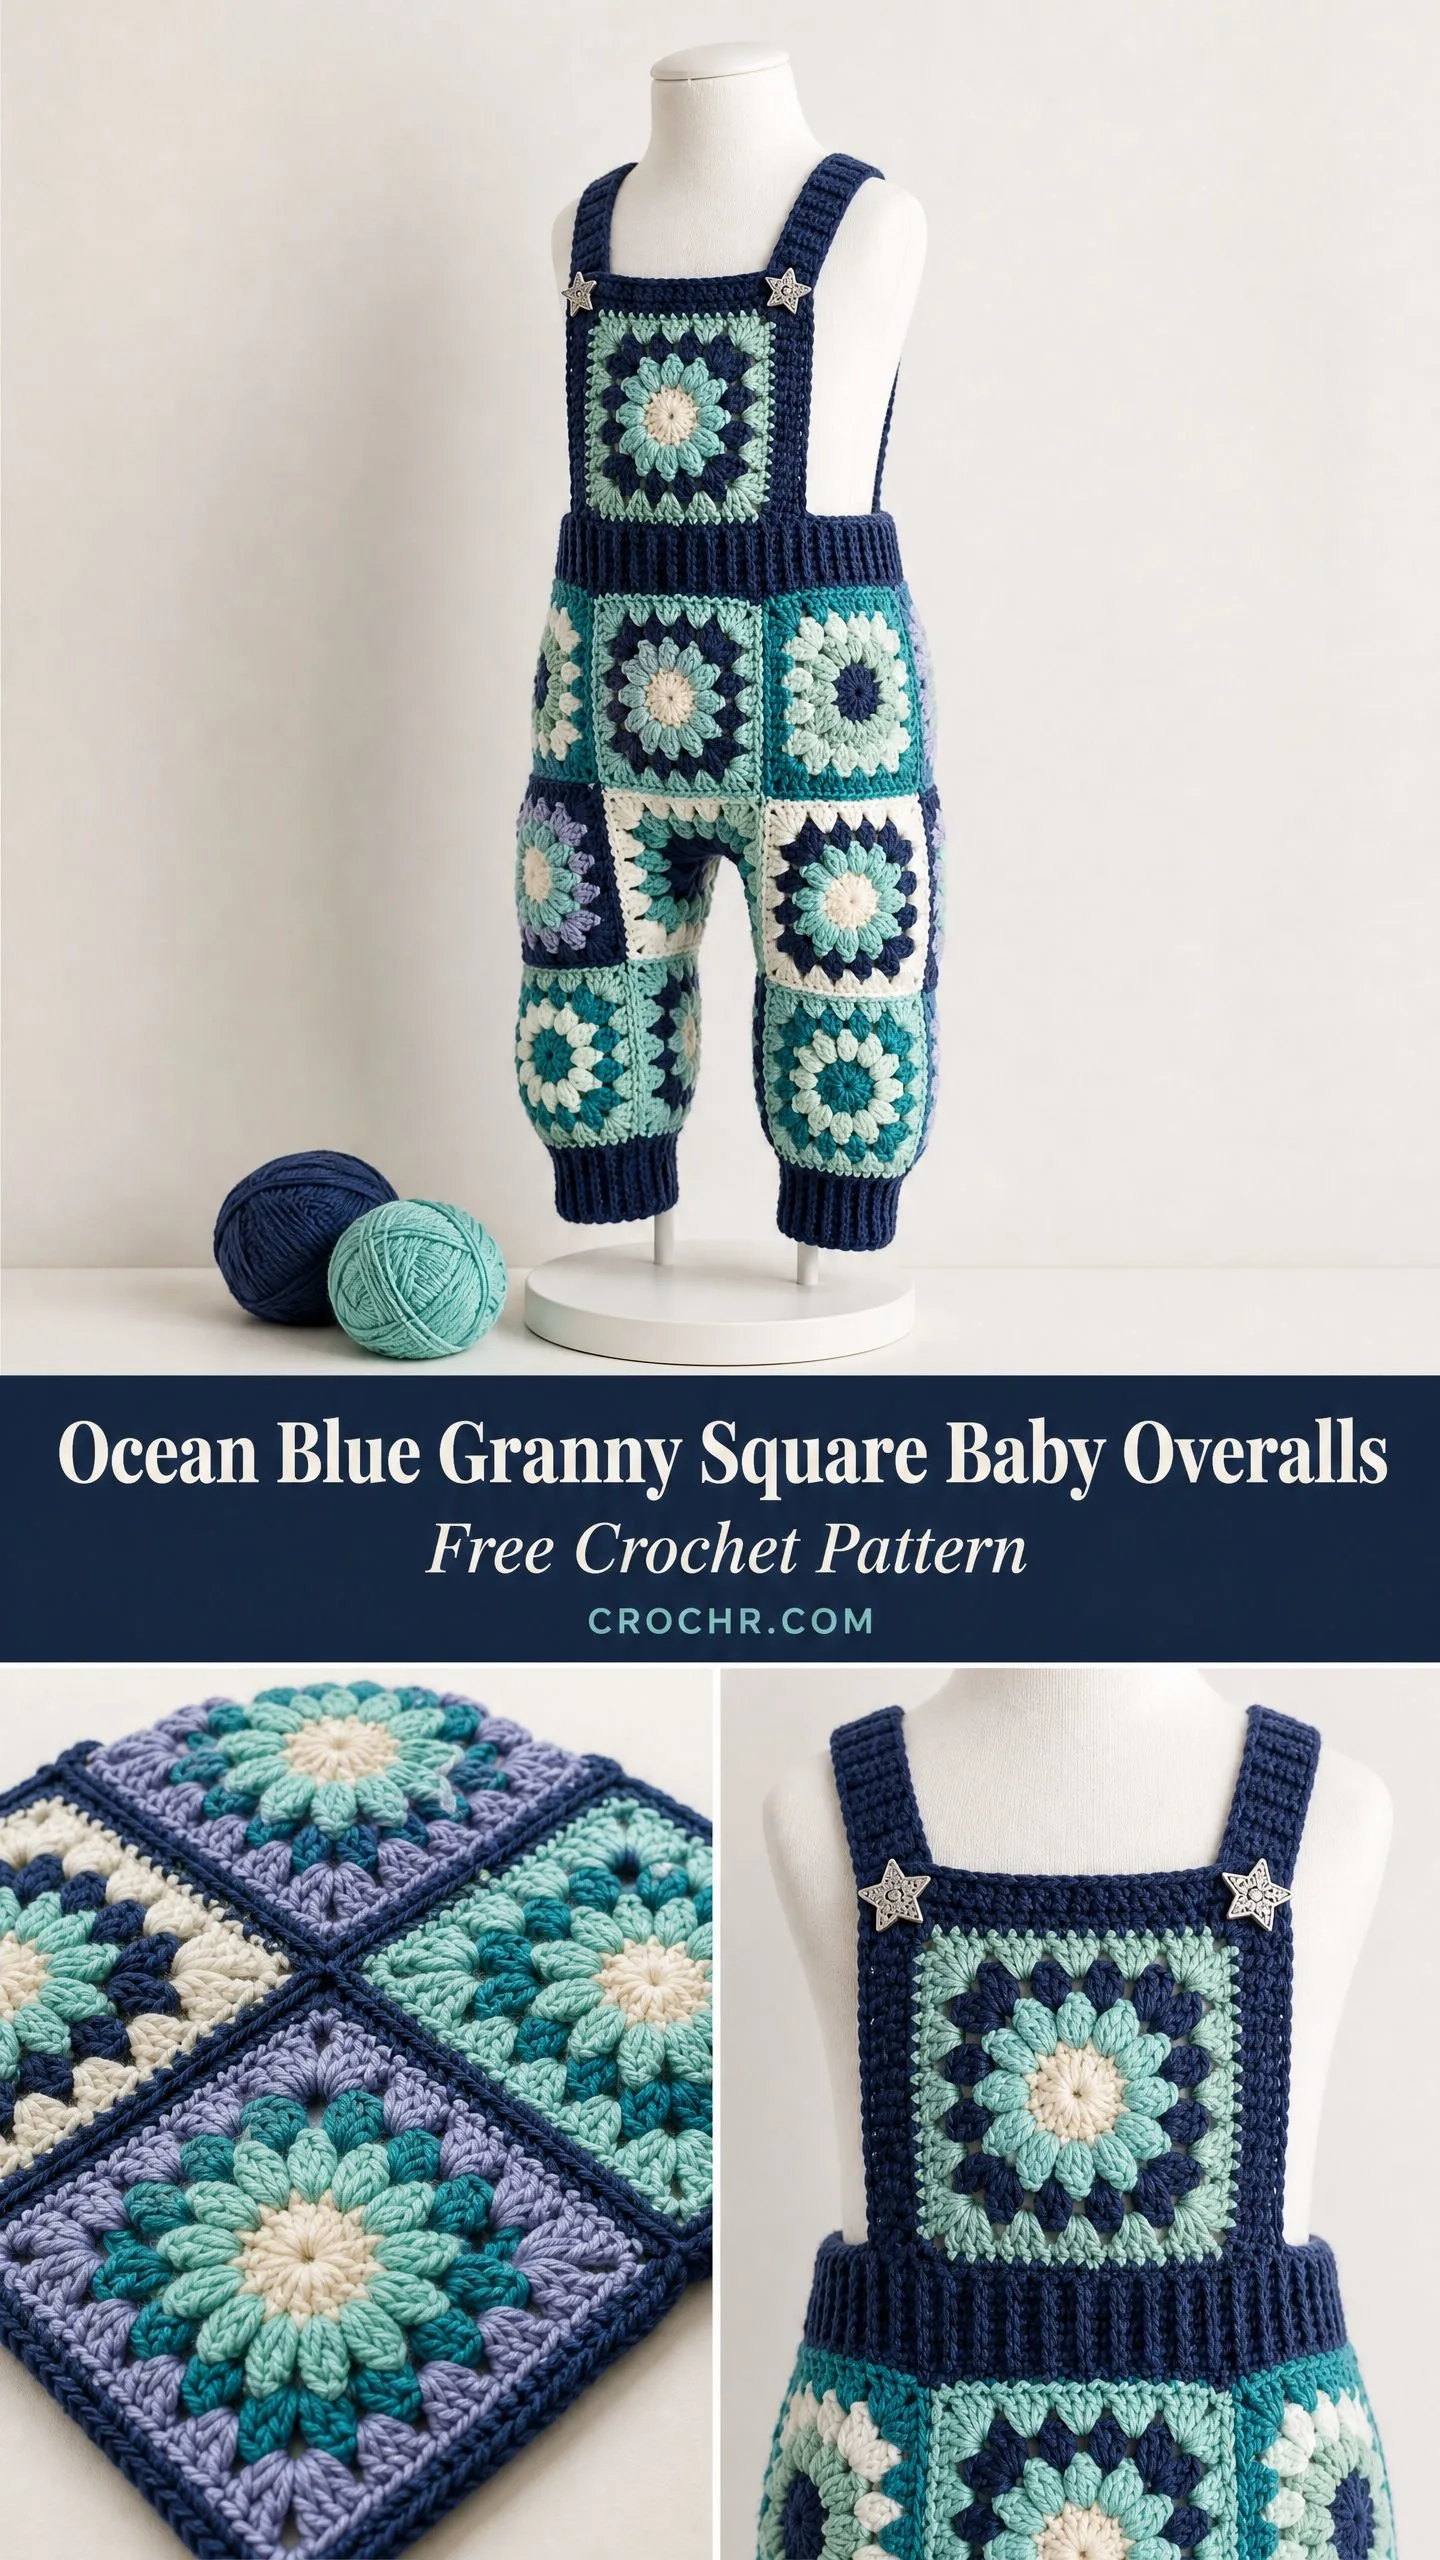
These Ocean Blue Granny Square Baby Overalls combine the classic sunflower-style granny square motif with practical garment construction. The design features a beautiful bib front with one large center square, trouser legs assembled from multiple joined squares, and clean ribbed details at the waistband, straps, and ankle cuffs.
The color palette uses navy, teal, mint, cream, and soft periwinkle to create that ocean-inspired look you see in the photos. Star-shaped buttons at the front add the perfect finishing touch. The result is a structured, wearable piece of art sized for toddlers 12 to 24 months.
Skill level: Intermediate to Advanced
The granny square motif itself is accessible to confident beginners. However, the join-as-you-go assembly, shaping of trouser legs, seaming, and strap construction require comfort with reading stitch counts carefully, working in multiple colors, and assembling flat pieces into a three-dimensional garment.
Time estimate: Approximately 25 to 35 hours total, including square construction, joining, assembly, ribbing, and finishing. Blocking and drying time is additional.
Finished Measurements
Materials Needed
Yarn
You’ll need worsted weight yarn (CYCA 4) with smooth plied construction for the best stitch definition in your granny squares.
Suggested yarns:
1. Lion Brand Pound of Love (100% acrylic, 1020 yards per 16 oz skein) offers excellent stitch definition, is machine washable, has a wide color range, and is budget friendly for gift giving.
2. Paintbox Yarns Simply DK (used at worsted tension with a slightly larger hook) provides very smooth texture and outstanding color consistency for colorwork squares. It’s 100% acrylic and machine washable.
3. Cascade 220 Superwash (100% superwash merino, 220 yards per 100g skein) gives superior drape and softness against baby skin. It’s machine washable but more expensive. Worth it for a luxurious result.
Substitution note: Choose any smooth worsted weight or heavy DK that achieves the listed gauge. Avoid fuzzy or bouclé yarns as they obscure the granny square pattern detail. Always swatch and wash your swatch before beginning, especially with natural fibers that may bloom after washing.
Color Requirements
Hooks
Notions
Gauge
With J hook and worsted weight yarn:
One granny square (4 rounds as written) = 4 inches x 4 inches / 10 cm x 10 cm after blocking.
Ribbing swatch with I hook in single crochet (sc) ribbing worked in rows:
14 stitches x 18 rows = 4 inches x 4 inches / 10 cm x 10 cm
Gauge is critical for this garment. Because the overall dimensions depend on the number and size of squares joined together, your square gauge must match exactly. Block your swatch square before measuring. If your square is larger than 4 inches, go down a hook size. If smaller, go up a hook size.
Abbreviations
Before we dive in, let me define every stitch abbreviation you’ll encounter:
Special Stitches
Magic Ring
Make an adjustable loop by wrapping yarn around fingers twice, insert hook through both loops, yarn over and pull up a loop, ch 1 to secure. This closes tightly when tail is pulled.
Cluster (CL)
Yarn over, insert hook into stitch or space, yarn over and pull up a loop, yarn over and pull through 2 loops on hook (1 half-closed dc made). Yarn over, insert hook into same stitch or space, yarn over and pull up a loop, yarn over and pull through 2 loops (2 half-closed dc). Yarn over and pull through all 3 loops on hook. This counts as 1 cluster stitch.
Petal Stitch
In the designated chain space, work (sl st, ch 3, 4 dc, ch 3, sl st). This forms one raised petal.
Joining Slip Stitch (for JAYG)
When joining a new square to a completed square, instead of working a ch-2 corner or ch-1 side chain, drop your loop from the hook, insert the hook from the front through the corresponding chain space of the adjacent completed square, pick up the dropped loop and pull it through. Continue with pattern. This creates a flat, nearly invisible seam.
Pattern Notes
1. All granny squares are worked in the round on the right side throughout. Do not turn after any round.
2. Fasten off and weave in ends after each color change within the square, unless specified otherwise.
3. The pattern uses join-as-you-go on the final round of each square so that seaming is built into construction. Work all squares in isolation through Round 3, then join on Round 4.
4. The overall is assembled as follows: make all squares, join into two leg panels, seam leg panels into tubes, join tubes to form crotch, add waistband, work bib front panel upward from waistband, work solid back panel upward from waistband, and finally work and attach straps.
5. Block all squares before joining. This ensures precise square dimensions and clean joining seams.
Square Color Assignments
Vary your colors for visual interest:
Total squares needed: 16 squares (8 per leg panel, arranged 2 wide x 4 tall) plus 1 bib front square (center front panel, made separately, Type 1). Total: 17 squares
Sunflower Granny Square Instructions
Make 17 total, varying color combos per notes above.
Foundation: With Color D, make a magic ring.
Round 1: Ch 3 (counts as first dc), work 11 dc into ring, sl st to top of beginning ch-3 to join. Pull ring tail tight. (12 dc)
Round 2: Join Color B (or assigned petal color) with sl st to any dc. Work one Petal Stitch (sl st, ch 3, 4 dc, ch 3, sl st) in each of the 12 dc around. Do not join between petals, simply work each petal in the next dc. After completing the 12th petal, sl st to base of first petal. Fasten off Color B. (12 petals)
Round 3: Join Color B (or same petal color as Round 2, per square type) with sl st to the back of any dc from Round 1, working behind the petals. Ch 3 (counts as first dc). Working behind all petals: dc in each dc from Round 1 around. Sl st to top of ch-3. (12 dc)
Note: To work Round 3, insert hook from the back side, behind the petal loops, directly into each Round 1 dc. This pushes petals forward and creates the layered sunflower effect.
Round 4: Working behind petals as in Round 3, or working into the Round 3 dc stitches: Join Color B or C (per square type) with sl st to any dc.
Ch 3 (counts as dc), dc in next dc. Corner: ch 2. Dc in next dc, dc in next dc. Side: ch 1. Dc in next dc, dc in next dc. Corner: ch 2. Dc in next dc, dc in next dc. Side: ch 1. Dc in next dc, dc in next dc. Corner: ch 2. Dc in next dc, dc in next dc. Side: ch 1. Dc in next dc, dc in next dc. Corner: ch 2. Sl st to top of beginning ch-3 to join. Fasten off.
Each side has 4 dc (including the ch-3 start) and 4 corners each with ch-2. (16 dc + 4 ch-2 corner spaces + 4 ch-1 side spaces)
Round 5 (final border round, worked in Color A, Navy): Join Color A with sl st to any corner ch-2 space.
Ch 3 (counts as first dc), dc in same corner sp, ch 2, 2 dc in same corner sp (corner made). Ch 1. 2 dc in next ch-1 side sp. Ch 1. 2 dc in next corner ch-2 sp, ch 2, 2 dc in same corner sp. Ch 1. 2 dc in next ch-1 side sp. Ch 1. Repeat from to two more times. Sl st to top of beginning ch-3 to join.
Each side now has: 2 dc (corner), ch-1, 2 dc (side group), ch-1, 2 dc (corner). That is 6 dc per side. (24 dc total + 4 ch-2 corner spaces + 8 ch-1 spaces)
For standalone squares (not being joined on this round): Fasten off Color A. Weave in ends. Block square to 4 x 4 inches.
CHECKPOINT: Each finished blocked square should measure exactly 4 inches x 4 inches / 10 cm x 10 cm. If your squares are off, adjust hook size and remake before continuing.
Join-As-You-Go Instructions
Join squares on Round 5 when indicated in the assembly sections. When working the second and subsequent squares, on the sides being joined, replace the ch-2 corner and ch-1 side chains with joining sl sts into the corresponding spaces of the adjacent completed square.
At a corner join: Instead of ch 2, work ch 1, insert hook into corner ch-2 sp of adjacent square, pull loop through, ch 1.
At a side join: Instead of ch 1, insert hook into corresponding ch-1 sp of adjacent square, pull loop through.
Work all non-joining sides and corners normally.
Assembly Layout
Each leg panel is a rectangle of 2 squares wide by 4 squares tall.
Leg Panel Layout (viewed flat before seaming):
When joined, each panel measures 8 inches wide x 16 inches tall / 20 cm wide x 40 cm tall.
Make 2 leg panels (left leg and right leg). Label them to keep orientation clear.
Leg Panel Construction
Work 8 squares per panel through Round 4 (without the final Round 5 border).
Begin joining on Round 5 working from top-right square (Square B) downward.
Square B, Round 5: Work a complete Round 5 standalone. Fasten off. This is your anchor square.
Square A, Round 5: Work Round 5 joining right side of Square A to left side of Square B using JAYG method. Fasten off.
Square D, Round 5: Work Round 5 joining top side of Square D to bottom side of Square B using JAYG method. Right side of Square D is not yet joined. Fasten off.
Square C, Round 5: Work Round 5 joining top side of Square C to bottom side of Square A, and right side of Square C to left side of Square D. At the shared corner between all four squares, work into the existing corner join. Fasten off.
Continue joining all 8 squares per panel in this manner, working from top-right to bottom-left diagonally so that each new square can always be joined on two sides using JAYG.
Complete both leg panels. Each panel should measure 8 inches x 16 inches / 20 cm x 40 cm after light blocking.
Seaming Legs Into Tubes
Fold each leg panel in half lengthwise, right sides together, so the two long edges meet. The panel is now 4 inches wide (one square wide on each side of the fold).
Using Color A and a yarn needle, whipstitch or mattress stitch the long vertical seam (the side seam of each leg). This seam runs 16 inches / 40 cm tall.
Turn right side out. Each leg tube should measure approximately 8 inches / 20 cm in circumference and 16 inches / 40 cm in height.
Ankle Cuffs
Work directly onto the bottom edge of each leg tube. The bottom edge is the bottom of the four ankle squares.
Join Color A with sl st to bottom edge at side seam.
Round 1: Join Color A, sc evenly around bottom opening. At each square side you should pick up approximately 8 sc (6 dc + 2 ch-sp = 8 sts). With 4 squares meeting at the bottom, the circumference of the cuff opening is 4 square edges x 8 sc = 32 sc. Sl st to join. (32 sc)
Adjust stitch count on this round if needed by skipping the corner chain spaces rather than working into them, so that the total is even at 32.
Rounds 2 through 6 (Ribbing): Ch 1, turn. Working in BLO, sc in each st around. Sl st to join. Turn. Rep this round 5 times (6 rounds total of BLO sc ribbing). (32 sc each round)
Fasten off Color A. Weave in ends.
Repeat for second leg.
Joining Legs at Crotch
Place the two leg tubes side by side, right sides out.
The top 4 inches / 10 cm of each leg (the top one square’s height) will become the crotch shaping. The front of each leg and the back of each leg meet at the center.
Identify the front center edge of each leg and the back center edge of each leg.
With Color A and yarn needle, mattress stitch the front center edges of both legs together for a seam measuring 2 inches / 5 cm down from the top. This creates the front rise.
Then mattress stitch the back center edges of both legs together for a seam measuring 3 inches / 7.5 cm down from the top. The back rise is slightly longer for comfortable fit. Leave remaining lower opening as the crotch opening sewn from the inside.
CHECKPOINT: After joining legs, your overalls from waist edge to ankle cuff should measure approximately 16 inches / 40.5 cm. The crotch seam should feel secure with no gaps at the joining point.
Waistband
The waistband is worked in the round directly on the top opening of the joined leg tubes.
Join Color A with sl st to top opening at side seam of left leg.
Round 1: Ch 1, sc evenly around top opening, picking up 1 sc per dc and 1 sc per chain space as before. At crotch join, work 2 sc evenly into the join to avoid puckering. Total: 64 sc. Sl st to join. (64 sc)
Rounds 2 through 8 (Ribbing): Ch 1, turn. In BLO, sc in each st around. Sl st to join. Turn. Repeat for 8 rounds total. (64 sc each round)
Fasten off. The waistband should measure approximately 1.75 inches / 4.5 cm tall.
Bib Front Panel
The bib front is the prepared bib square (the 17th square worked separately) plus a solid navy crochet panel that connects it to the waistband straps.
Step 1: Position the bib square centered at the front of the overalls at the top of the waistband.
With Color A and yarn needle, whipstitch the bottom edge of the bib square to the top edge of the front waistband, centered. The bib square is 4 inches / 10 cm wide, centered on the 8-inch / 20 cm wide front.
Step 2: Work a connecting panel above the bib square.
Join Color A to top-right corner of bib square.
Row 1 (RS): Ch 1, sc across the top edge of the bib square. Pick up 8 sc along the top border of the square. Turn. (8 sc)
Rows 2 through 4: Ch 1, sc in each sc across. Turn. (8 sc each row)
This small solid navy panel reinforces the top of the bib before the straps split.
Fasten off. This bib extension should measure approximately 1 inch / 2.5 cm tall.
Back Panel
The back panel is a solid navy hdc rectangle worked directly onto the back of the waistband, rising to match the bib front height plus strap attachment area.
Join Color A to the top back edge of the waistband at the back right corner.
Row 1 (RS): Ch 2 (does not count as st), hdc across the full back top edge. You should have 32 hdc across the back. Turn. (32 hdc)
Rows 2 through 10: Ch 2, hdc in each hdc across. Turn. (32 hdc each row)
The back panel should measure approximately 4 inches / 10 cm wide per leg and span the full back width of 8 inches / 20 cm, rising approximately 2.5 inches / 6.5 cm.
Fasten off.
CHECKPOINT: At this point, viewed from the front, you should have the bib square prominent at center front, with a small solid navy panel above it. From the back, a full-width solid navy panel rises from the waistband.
Straps (Make 2)
Each strap is worked in sc ribbing (BLO) for firmness and stretch. Straps attach at the back panel top corners and cross to the bib front, fastening with star buttons.
Foundation chain: With Color A and I hook, ch 7.
Row 1: Sc in 2nd ch from hook, sc in each ch across. Turn. (6 sc)
Rows 2 through 56: Ch 1, sc in BLO of each sc across. Turn. (6 sc each row)
Row count determines length. 56 rows at gauge = approximately 12.5 inches / 32 cm. This allows the strap to travel from the back top, over the shoulder, and attach at the bib front with a button, fitting a 12-24 month toddler.
Fasten off, leaving a 12-inch tail for seaming.
Strap attachment: Sew one short end of each strap to the top corners of the back panel using the yarn needle and tail. Use the mattress stitch for security. Weave tail ends completely.
At the front end of each strap, fold the top end flat and use sewing needle and thread to attach one star button through both layers of strap and through the bib front panel at the upper corners of the bib square. The button both decorates and secures the strap.
For a fully removable button closure: Work one buttonhole in the strap. On Row 55 of strap, ch 2, sk 2 sc, sc in last 4 sc (4 sc + ch-2 sp). On Row 56, sc in each sc and 2 sc in ch-2 sp to close. (6 sc) Then sew button to bib front corner.
Finishing
Weave in all remaining ends thoroughly, at least 6 inches into the fabric in different directions.
Block the completed overalls by soaking in cool water for 20 minutes, pressing out excess water in a towel without wringing, then pinning flat to blocking mats to the finished dimensions. Allow to dry completely, 24 to 48 hours.
Final measurements after blocking:
Size Customization Tips
For 6-12 months: Work each square to 3.5 inches x 3.5 inches by working only through Round 4 and using a smaller final border, or reduce hook to 5.5 mm throughout. Reduce waistband to 52 sc. Shorten straps to Row 44.
For 2T-3T: Work each square to 4.5 inches x 4.5 inches by adding an extra Round 5 border round before the final navy border. Increase waistband to 72 sc. Lengthen straps to Row 64. Add one additional square row to each leg panel (10 squares per leg instead of 8).
General principle: Every full square added to the leg height adds 4 inches / 10 cm to the inseam or rise. Every square added to the width increases the circumference by 4 inches / 10 cm. The waistband sc count should always match the stitch count picked up from the top of the leg panels.
Care Instructions
If using acrylic yarn: Machine wash cold, gentle cycle. Lay flat to dry. Do not tumble dry on high heat.
If using superwash merino: Hand wash or machine wash cold on delicate. Lay flat to dry.
Do not wring or twist. Keep away from direct heat sources. For gift items, include a care tag noting yarn fiber content so the recipient can care for the garment correctly.
Final Thoughts
These Ocean Blue Granny Square Baby Overalls are truly a labor of love. Yes, they take time. Yes, you need to pay attention to your gauge. But when you see a little one toddling around in something you made with your own hands, every single hour becomes worth it.
I hope this crochet tutorial has given you everything you need to create your own version of these sweet overalls. Whether you’re making them for your own child, a grandchild, or the lucky baby of a friend, these will become a treasured keepsake.
Thank you so much for choosing this pattern. Happy hooking, and I cannot wait to see what colors you choose for yours!
If this pattern is calling your name, go ahead and save it to your Pinterest boards so you can find it when you’re ready to start. And please, if you make these adorable overalls, drop a comment below or tag me on Instagram. Seeing your finished projects truly makes my day!
You Might Also Like
- Ocean Blue Beach Crochet Two-Piece Free Pattern
- Monochrome Black Flared Mini Dress Free Crochet Pattern
- Coral Sunset Baby Dress Free Crochet Pattern
- Dusty Rose Gradient Crochet Mini Dress Free Pattern
