
I call this one "Starfish Summer," and it has quite the backstory. About three years ago, I sketched this design in a beat-up notebook during a beach vacation in Portugal. The ocean was that perfect deep teal color, and I kept seeing starfish motifs everywhere in the local shops. I tucked the sketch away and forgot about it completely.
Then last spring, I found that notebook while cleaning out my craft room. The drawing was still there, a little faded, with measurements scribbled in the margins and yarn color ideas written in my messy handwriting. I decided it was finally time to bring Starfish Summer to life.
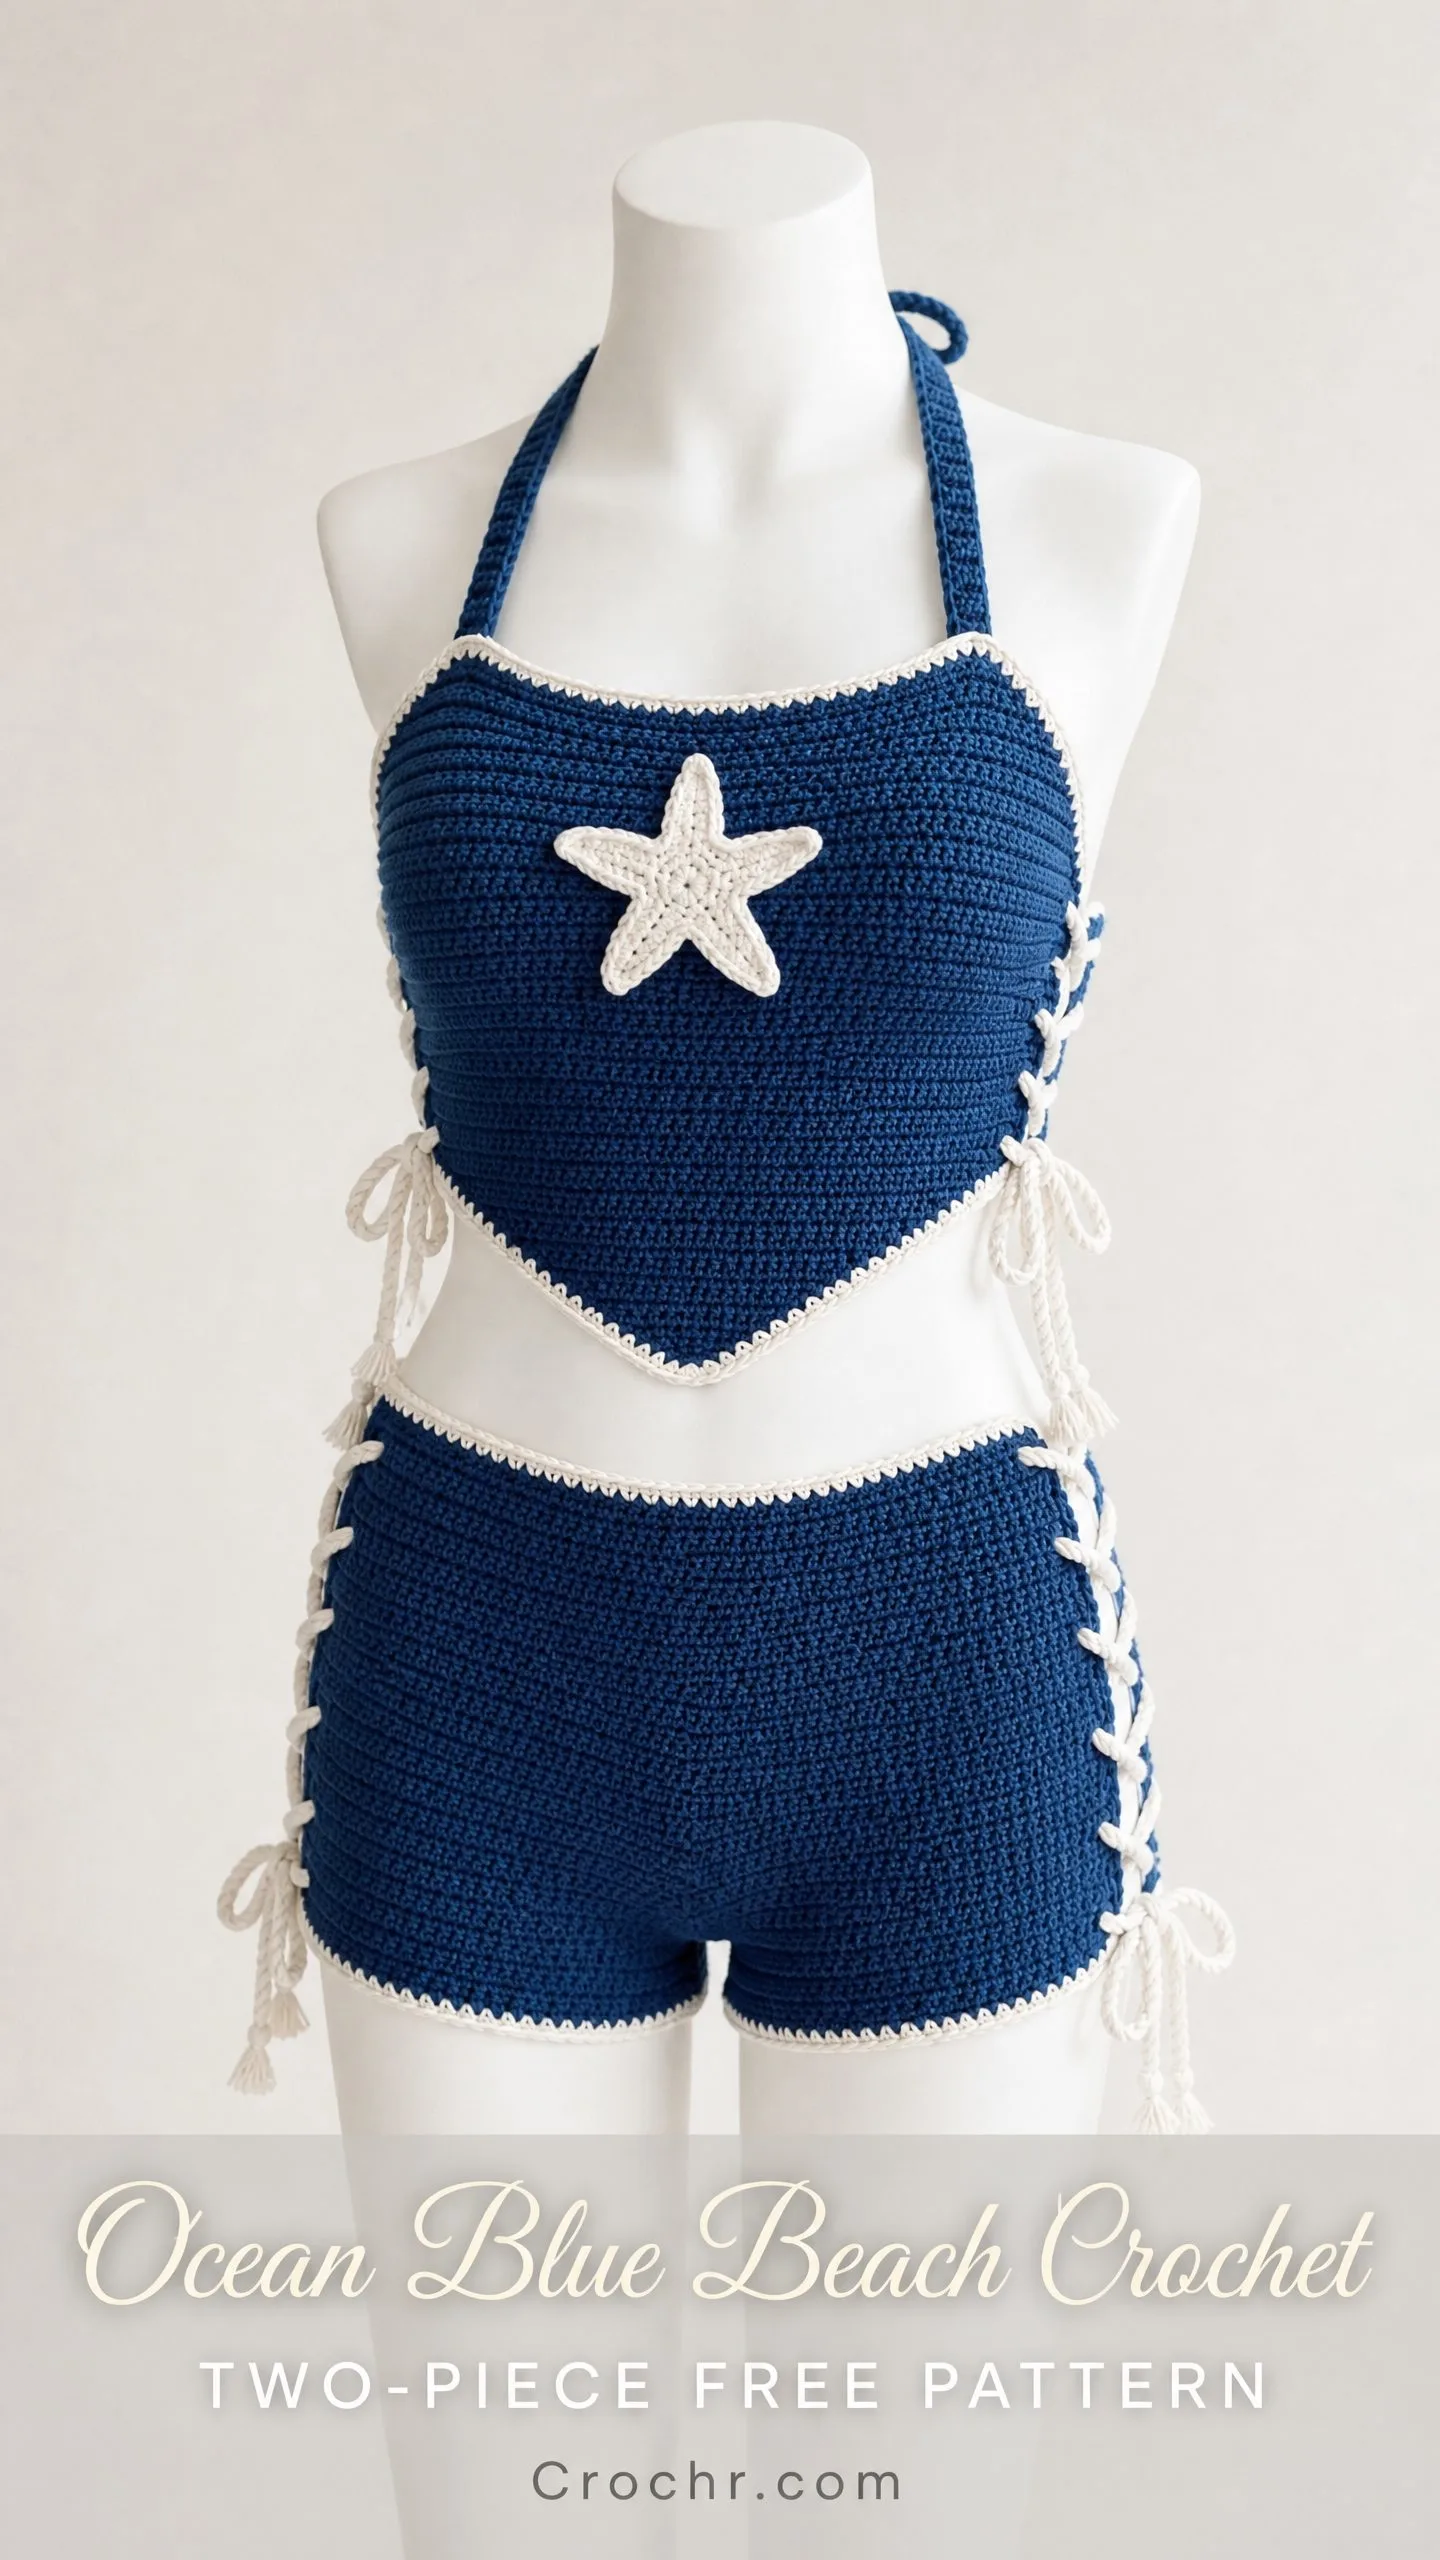
What you see here is exactly what I imagined on that sunny afternoon. A bold ocean blue two-piece beach set with cream accents, lace-up details on the sides, and a sweet crocheted starfish applique right at the center. This pattern pushed me to refine every detail, and I am so happy to finally share it with you.
What You’re Making
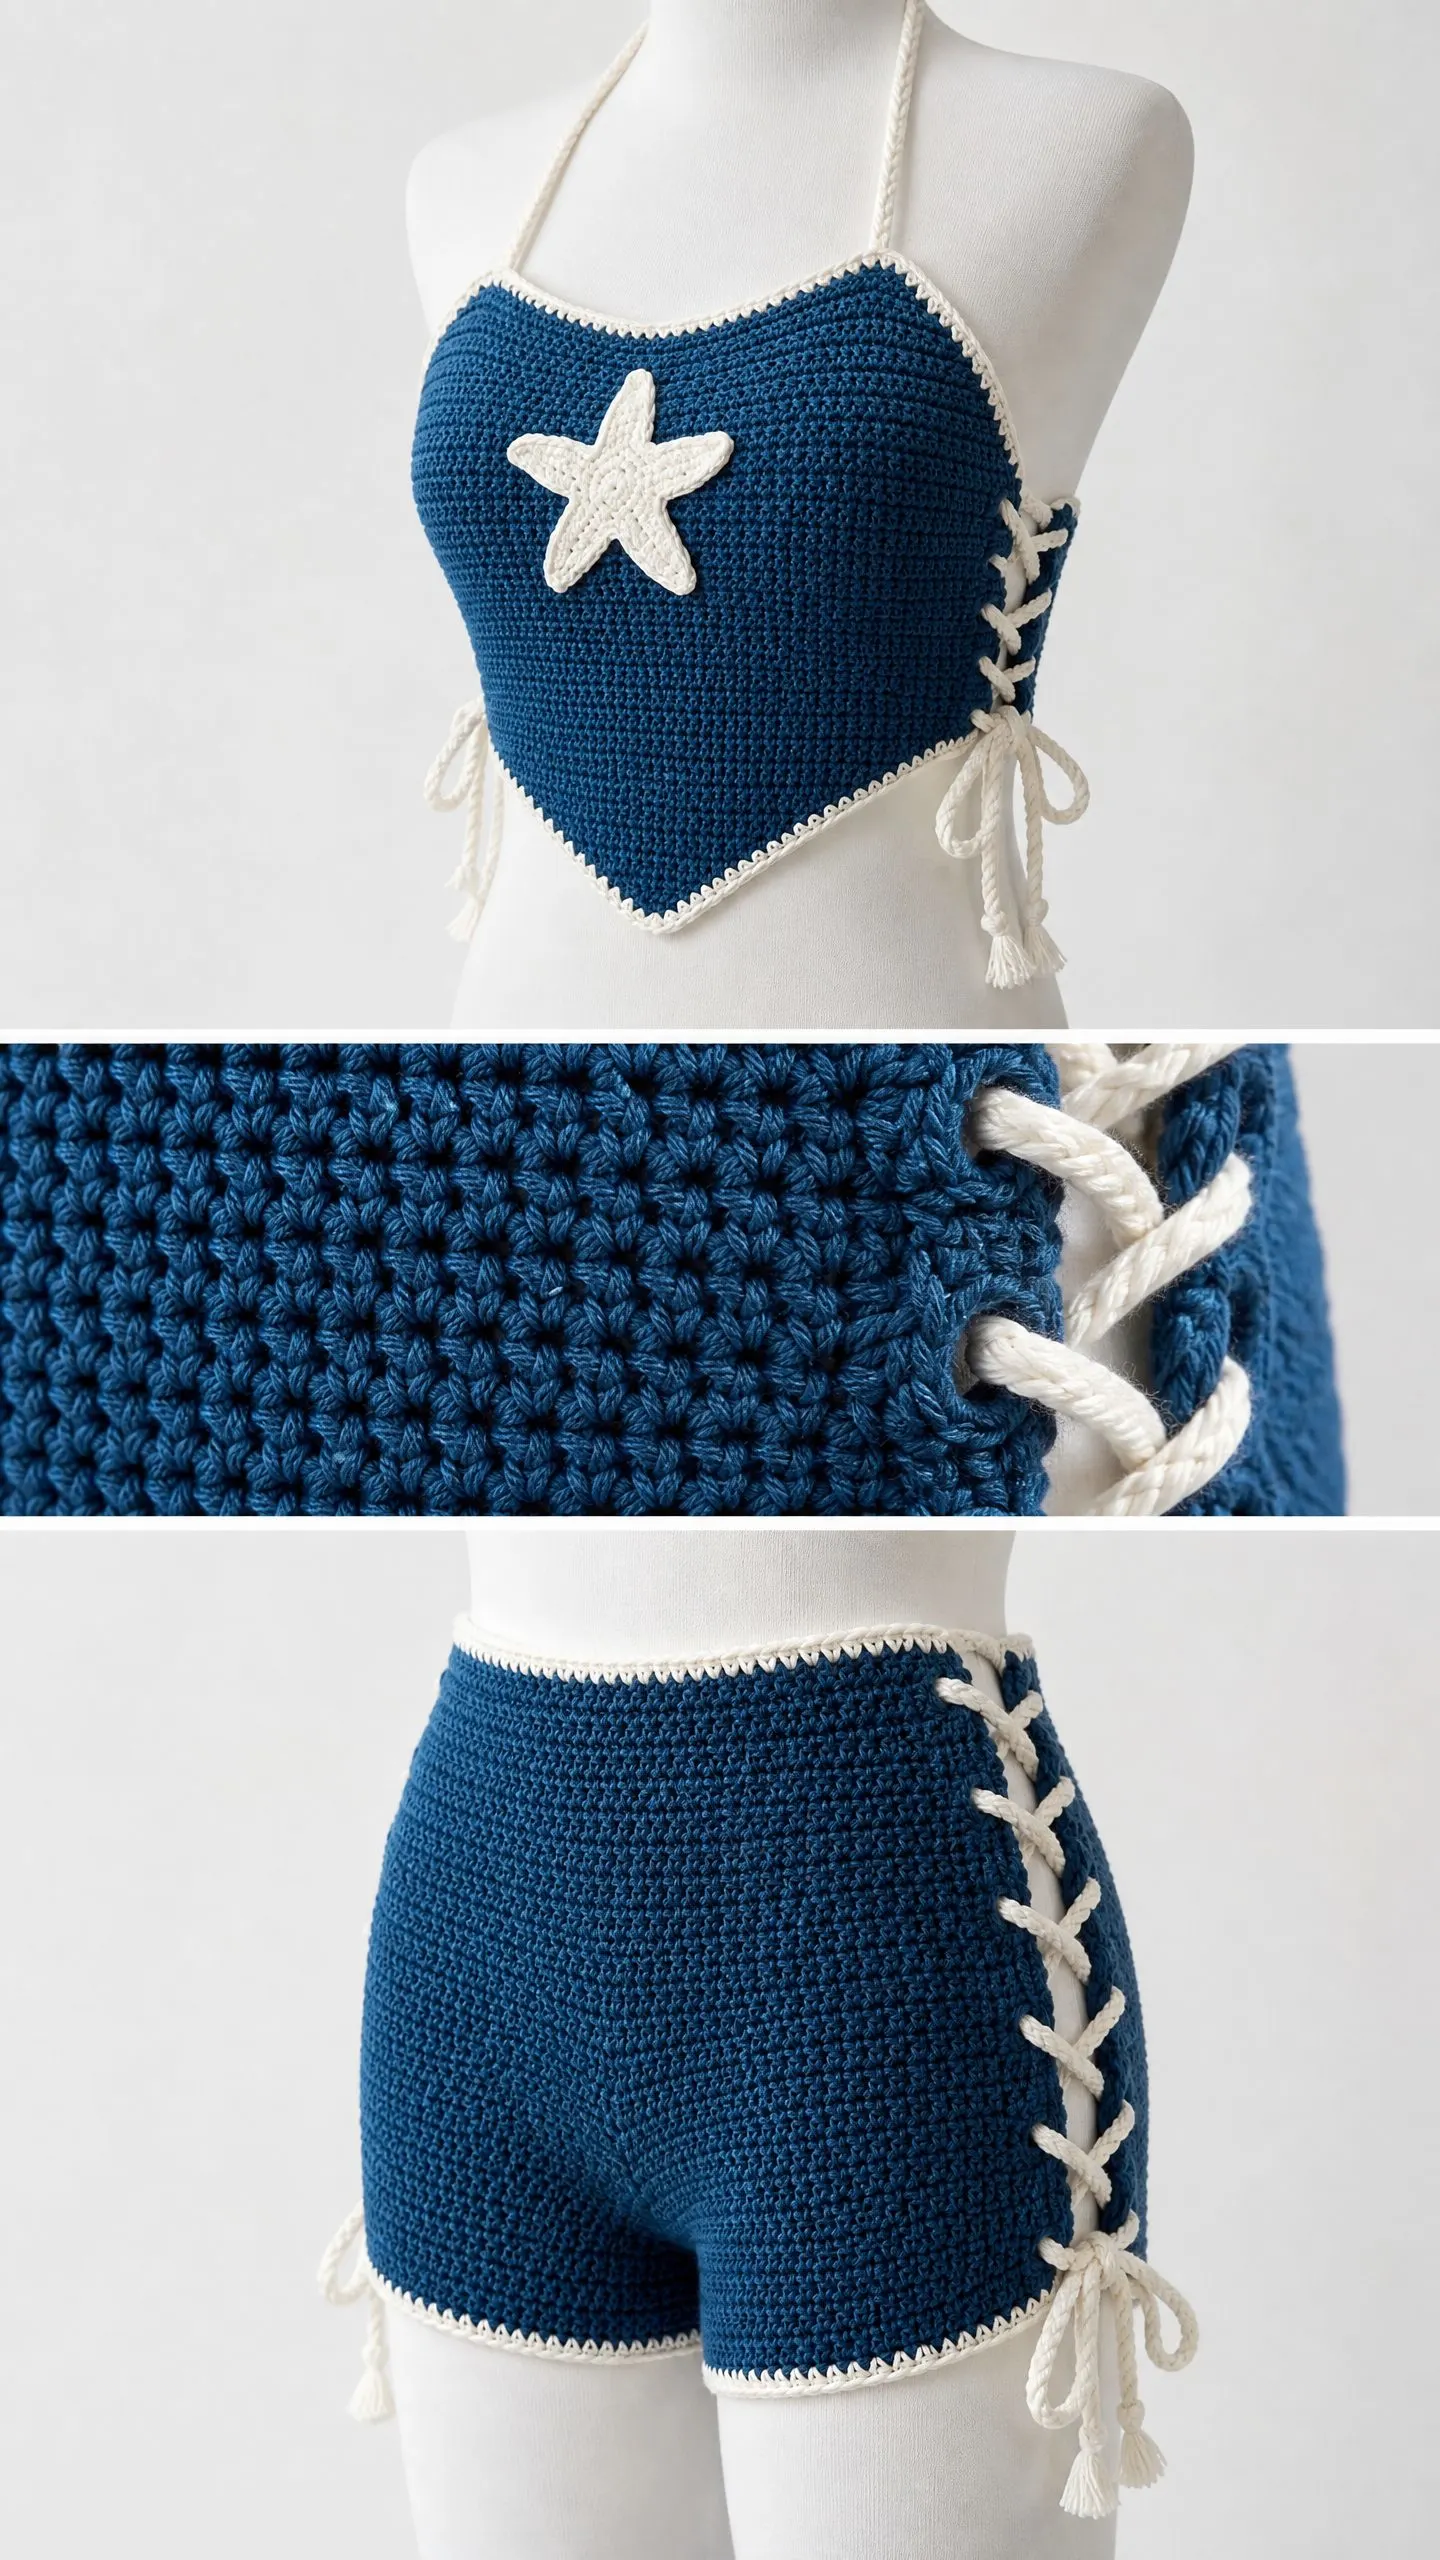
This beach set consists of two pieces. A halter crop top with a sweetheart neckline and high-waisted boy-short bottoms. Both pieces feature lace-up side details with rope-style cords that tie in bows. The top has a decorative starfish applique sewn at center front.
The construction uses flat panels that you seam together at the sides. You will work primarily in single crochet (sc), which creates the dense fabric you see in the photos. This fabric has good structure and resists stretching, making it perfect for a fitted garment.
Important note: This set is designed as a fashion coverup or beach set. It is not intended as a performance swimsuit for actual swimming.
Skill Level
I rate this pattern as intermediate. You should feel comfortable with the following techniques before starting:
If some of these techniques are new to you, that is okay. I will walk you through each one. Just take your time and do not rush.
Time Estimate
Plan for 12 to 18 hours to complete the entire set at an average pace. Here is how that breaks down:
This is a project you can work on over several evenings or a long weekend. I recommend working the top first since it comes together a bit faster and gives you confidence for the bottoms.
Finished Measurements
This pattern is written for size Small/Medium. Here are the finished measurements:
Top:
Bottoms:
Size customization tips appear at the end of this crochet pattern.
Materials You Will Need
Yarn
Recommended Yarn Brands
Option 1: Lion Brand 24/7 Cotton in Denim (blue) and Ecru (cream). This 100 percent mercerized cotton is machine washable and holds its shape beautifully. Each skein contains 186 yards.
Option 2: Paintbox Yarns Cotton DK in Royal Blue and Paper White. This yarn has excellent stitch definition and a slight sheen that enhances the nautical look. Each skein contains 137 yards.
Option 3: Drops Safran in Petrol Blue and Off White. This is a fine cotton DK with a matte finish that closely matches the original texture.
Substitution note: Choose 100 percent cotton or a cotton blend DK weight yarn with low stretch. Avoid yarns with lycra or elastic content. These will change how the fabric drapes and holds its shape. Always check your gauge with any substitute yarn.
Hook
Notions
Gauge
18 sc x 20 rows = 4 inches (10 cm) worked flat in single crochet using a US E-4 (3.5 mm) hook and DK weight cotton yarn, blocked.
Gauge is mandatory for a fitted garment. I cannot stress this enough. Swatch at least a 5 x 5 inch square, wash and block it, then measure the center 4 inches. If your gauge is off, adjust your hook size up or down until you match.
Abbreviations (US Terms)
Let me walk you through every abbreviation you will encounter in this crochet tutorial:
Special Stitches and Techniques
Sweetheart Dip
This technique creates the gentle V shape at the center front of the top. You work it over 3 stitches at center front.
Row step 1: Work sc2tog using the stitch immediately before center and the center stitch.
Row step 2: Work sc into the stitch immediately after center.
This creates a single-stitch decrease. When repeated over several rows at the same center position, it forms that pretty sweetheart curve.
Applied Slip Stitch Edging
This creates the clean cream border you see around the edges.
With RS facing and cream yarn, insert hook into edge stitch and draw up a loop. Chain 1. Work 1 sl st into each stitch or row end along the edge. Keep your tension consistent. At corners, work 3 sl sts into the corner stitch so the edge lies flat. Fasten off and weave in end.
Lace-Up Cord
Make a foundation chain of 120 chains for top side ties, or 160 chains for bottom side ties using cream yarn. Slip stitch into each chain back to the start. This creates a rounded cord. Fasten off leaving a 6-inch tail for securing. You will thread these cords through the side eyelets later.
Starfish Applique
This sweet applique is worked in the round using cream yarn. It has 5 points worked from a central ring.
Rnd 1: Make an adjustable ring. Ch 1. Work 10 sc into ring. Pull tail to close ring. Sl st to first sc to join. (10 sc)
Rnd 2: Ch 1. Work 2 sc into each st around. Sl st to join. (20 sc)
Rnd 3: Ch 1. Work 1 sc into first st, 2 sc into next st. Rep around. Sl st to join. (30 sc)
Now work 5 points. Each point uses 6 stitches from Rnd 3.
Point setup: Sl st to first st of point group. Ch 1. Work 6 sc across the 6 designated sts. Turn.
Point Row 2: Ch 1. Sc2tog, sc 2, sc2tog. Turn. (4 sc)
Point Row 3: Ch 1. Sc2tog, sc2tog. Turn. (2 sc)
Point Row 4: Ch 1. Sc2tog. (1 sc)
Fasten off. Rejoin yarn at base of next point group and repeat for all 5 points.
After all points are complete, use your yarn needle to work a light whipstitch around the outer edge of each point. This defines the shape. Block over cardboard to open the points before sewing to the top.
Eyelet Pair
This creates the channels for the lace-up cord.
On the appropriate rows, replace 2 consecutive stitches with: ch 2, sk 2 sts. On the following row, work 2 sc into the ch-2 sp. This creates a horizontal eyelet through which the cord threads.
Pattern Notes Before You Begin
Read through these notes before starting. They will save you confusion later.
Both pieces are worked flat in rows and seamed at the shoulders and sides. The exception is the lace-up side, which stays open and gets finished with eyelets and cord.
The top uses two front panels and one back panel. The two front panels create the sweetheart neckline by shaping independently, then joining at the lower point.
The bottoms use a front panel and a back panel. The back panel is slightly taller to accommodate seat coverage.
When joining a new color, always do it at the beginning of a row. Work the last yarn-over of your final stitch with the new color.
Use a stitch marker to track your center dip position when counting rows for sweetheart shaping.
Apply cream edging after all seaming is complete.
All turning chains count as nothing. The ch 1 at the start of each row is a turning chain only. Do not work into it at the end of the following row.
Instructions: Halter Crop Top
Section A: Back Panel
The back panel is worked as one flat piece.
Foundation: With blue yarn and E-4 hook, ch 74.
Row 1 (RS): Sc in 2nd ch from hook and in each ch across. Turn. (73 sc)
Rows 2 through 10: Ch 1. Sc in each st across. Turn. (73 sc)
Now begin upper shaping. The back panel tapers toward the top edge to follow the body.
Row 11: Ch 1. Sc2tog, sc to last 2 sts, sc2tog. Turn. (71 sc)
Row 12: Ch 1. Sc in each st across. Turn. (71 sc)
Row 13: Ch 1. Sc2tog, sc to last 2 sts, sc2tog. Turn. (69 sc)
Row 14: Ch 1. Sc in each st across. Turn. (69 sc)
Row 15: Ch 1. Sc2tog, sc to last 2 sts, sc2tog. Turn. (67 sc)
Row 16: Ch 1. Sc in each st across. Turn. (67 sc)
Row 17: Ch 1. Sc2tog, sc to last 2 sts, sc2tog. Turn. (65 sc)
Row 18: Ch 1. Sc in each st across. Turn. (65 sc)
Row 19: Ch 1. Sc2tog, sc to last 2 sts, sc2tog. Turn. (63 sc)
Row 20: Ch 1. Sc in each st across. Turn. (63 sc)
Row 21: Ch 1. Sc2tog, sc to last 2 sts, sc2tog. Turn. (61 sc)
Row 22: Ch 1. Sc in each st across. Turn. (61 sc)
Row 23: Ch 1. Sc2tog, sc to last 2 sts, sc2tog. Turn. (59 sc)
Row 24: Ch 1. Sc in each st across. Turn. (59 sc)
Row 25: Ch 1. Sc2tog, sc to last 2 sts, sc2tog. Turn. (57 sc)
Row 26: Ch 1. Sc in each st across. Turn. (57 sc)
Row 27: Ch 1. Sc2tog, sc to last 2 sts, sc2tog. Turn. (55 sc)
Row 28: Ch 1. Sc in each st across. Turn. (55 sc)
Row 29: Ch 1. Sc2tog, sc to last 2 sts, sc2tog. Turn. (53 sc)
Row 30: Ch 1. Sc in each st across. Turn. (53 sc)
Row 31: Ch 1. Sc2tog, sc to last 2 sts, sc2tog. Turn. (51 sc)
Row 32: Ch 1. Sc in each st across. Turn. (51 sc)
Fasten off and set aside.
Checkpoint: After Row 32, your back panel should measure approximately 6.4 inches (16 cm) tall and 11.3 inches (28.5 cm) wide at the top edge.
Section B: Front Left Panel
Foundation: With blue yarn and E-4 hook, ch 38.
Row 1 (RS): Sc in 2nd ch from hook and in each ch across. Turn. (37 sc)
Rows 2 through 10: Ch 1. Sc in each st across. Turn. (37 sc)
Now begin sweetheart and side shaping. The outer side decreases to shape the upper edge. The inner edge decreases to create the V of the sweetheart neckline.
Row 11: Ch 1. Sc2tog (outer edge decrease), sc to last 2 sts at inner edge, sc2tog. Turn. (35 sc)
Row 12: Ch 1. Sc in each st across. Turn. (35 sc)
Row 13: Ch 1. Sc2tog, sc to last 2 sts, sc2tog. Turn. (33 sc)
Row 14: Ch 1. Sc in each st across. Turn. (33 sc)
Row 15: Ch 1. Sc2tog, sc to last 2 sts, sc2tog. Turn. (31 sc)
Row 16: Ch 1. Sc in each st across. Turn. (31 sc)
Row 17: Ch 1. Sc2tog, sc to last 2 sts, sc2tog. Turn. (29 sc)
Row 18: Ch 1. Sc in each st across. Turn. (29 sc)
Row 19: Ch 1. Sc2tog, sc to last 2 sts, sc2tog. Turn. (27 sc)
Row 20: Ch 1. Sc in each st across. Turn. (27 sc)
Row 21: Ch 1. Sc2tog, sc to last 2 sts, sc2tog. Turn. (25 sc)
Row 22: Ch 1. Sc in each st across. Turn. (25 sc)
Row 23: Ch 1. Sc2tog, sc to last 2 sts, sc2tog. Turn. (23 sc)
Row 24: Ch 1. Sc in each st across. Turn. (23 sc)
Row 25: Ch 1. Sc2tog, sc to last 2 sts, sc2tog. Turn. (21 sc)
Row 26: Ch 1. Sc in each st across. Turn. (21 sc)
Row 27: Ch 1. Sc2tog, sc to last 2 sts, sc2tog. Turn. (19 sc)
Row 28: Ch 1. Sc in each st across. Turn. (19 sc)
Row 29: Ch 1. Sc2tog, sc to last 2 sts, sc2tog. Turn. (17 sc)
Row 30: Ch 1. Sc in each st across. Turn. (17 sc)
Row 31: Ch 1. Sc2tog, sc to last 2 sts, sc2tog. Turn. (15 sc)
Row 32: Ch 1. Sc in each st across. Turn. (15 sc)
Halter strap for left panel:
Row 33: Ch 1. Sc in first 3 sts only. Turn. (3 sc)
Rows 34 through 78: Ch 1. Sc 3. Turn. (3 sc)
This creates a halter strap approximately 18 inches (46 cm) long. Fasten off leaving a 10-inch tail for finishing and tying.
Section C: Front Right Panel
Foundation: With blue yarn and E-4 hook, ch 38.
Row 1 (RS): Sc in 2nd ch from hook and in each ch across. Turn. (37 sc)
Rows 2 through 10: Ch 1. Sc in each st across. Turn. (37 sc)
Begin shaping. This mirrors the left panel, so the outer edge is now on the right when RS is facing.
Row 11: Ch 1. Sc2tog (inner edge), sc to last 2 sts, sc2tog (outer edge). Turn. (35 sc)
Row 12: Ch 1. Sc in each st across. Turn. (35 sc)
Continue the same decrease pattern as the left panel through Row 32, ending with (15 sc).
Halter strap for right panel:
Row 33: Ch 1. Sc in last 3 sts only. Turn. (3 sc)
Rows 34 through 78: Ch 1. Sc 3. Turn. (3 sc)
Fasten off leaving a 10-inch tail.
Checkpoint: Each front panel should measure approximately 6.4 inches (16 cm) tall at Row 32. Each panel should be approximately 8.2 inches (21 cm) wide at the foundation. Straps should measure approximately 18 inches (46 cm) long.
Section D: Top Assembly and Side Eyelets
Join the two front panels at the lower center point. Hold the front left and front right panels with WS together, inner edges (sweetheart sides) aligned at the bottom. The panels do not join across the center top. They only seam at the lower bottom tip.
Slip stitch seam: Insert hook through both layers at the bottom point. Work 4 sl sts upward, joining the bottom 4 rows of the inner edges. This creates the sweetheart dip anchor. Fasten off and weave in.
The assembled front panel should be approximately 74 stitches wide at the foundation row, matching the back panel width of 73 stitches. The difference of 1 stitch is absorbed in the side seam.
Side seams: Align the front assembly and back panel at the lower edges with RS together. Whipstitch the right side seam from Row 1 up to Row 10 only. This is the lower 2 inches (5 cm). Leave the upper portion of the right side open for the lace-up detail.
The left side seam is worked from Row 1 up through Row 32 entirely, joining front and back across the full height.
Eyelet placement on right side (lace-up side):
After seaming the lower right side through Row 10, the open edges of Rows 11 through 32 form the lace-up channel. Using cream yarn and the applied slip stitch edging method, work 1 sl st edging along the open right side edge of the front panel from Row 11 to Row 32. Work into each row end. Repeat for the back panel open right edge. You will have two parallel edged strips.
Thread one Lace-Up Cord (120 ch length) in a criss-cross pattern through the row end spaces between the two edged strips. Begin at Row 11 and finish at Row 32. Tie at top and bottom with tasseled knots made by separating the yarn plies at the cord ends.
Section E: Cream Edging on Top
With cream yarn and E-4 hook, RS facing, work applied slip stitch edging around the entire lower edge of the top (foundation chain row), across the sweetheart neckline edges of both front panels, and along the upper straight edge of the back panel.
At the inner sweetheart corners (the V dip), work 1 sc instead of a sl st to prevent puckering.
At the outer upper corners of the front panels and back panel top edges, work 3 sl sts into the corner to keep the fabric flat.
Do not edge the strap lengths. Leave the straps as raw finished sc.
Fasten off and weave in all ends.
Section F: Attach Starfish Applique
Block the completed starfish as described earlier. Position it at the center front of the joined front panel, approximately 1.5 inches (4 cm) below the sweetheart neckline. Pin in place.
Using cream yarn and a yarn needle, work a small whipstitch around the entire perimeter of the starfish. Catch only the surface layer of the top fabric so your stitches are invisible from the WS. Fasten off and weave in.
Instructions: High-Waisted Boy-Short Bottoms
Section A: Front Panel of Bottoms
The front panel is a rectangle with upper waist shaping.
Foundation: With blue yarn and E-4 hook, ch 64.
Row 1 (RS): Sc in 2nd ch from hook and in each ch across. Turn. (63 sc)
Rows 2 through 5: Ch 1. Sc in each st across. Turn. (63 sc)
Begin hip shaping with gradual increases:
Row 6: Ch 1. Inc in first st, sc to last st, inc in last st. Turn. (65 sc)
Row 7: Ch 1. Sc in each st across. Turn. (65 sc)
Row 8: Ch 1. Inc in first st, sc to last st, inc in last st. Turn. (67 sc)
Row 9: Ch 1. Sc in each st across. Turn. (67 sc)
Row 10: Ch 1. Inc in first st, sc to last st, inc in last st. Turn. (69 sc)
Row 11: Ch 1. Sc in each st across. Turn. (69 sc)
Row 12: Ch 1. Inc in first st, sc to last st, inc in last st. Turn. (71 sc)
Row 13: Ch 1. Sc in each st across. Turn. (71 sc)
Row 14: Ch 1. Inc in first st, sc to last st, inc in last st. Turn. (73 sc)
Row 15: Ch 1. Sc in each st across. Turn. (73 sc)
Begin inseam shaping and leg opening. At Row 15, the panel divides for the crotch opening.
Row 16 (right leg portion): Ch 1. Sc in first 31 sts. Turn. (31 sc) Leave remaining sts unworked.
Row 17: Ch 1. Sc in each st across. Turn. (31 sc)
Row 18: Ch 1. Sc2tog, sc to end. Turn. (30 sc)
Row 19: Ch 1. Sc in each st across. Turn. (30 sc)
Row 20: Ch 1. Sc2tog, sc to end. Turn. (29 sc)
Row 21: Ch 1. Sc in each st across. Turn. (29 sc)
Row 22: Ch 1. Sc2tog, sc to end. Turn. (28 sc)
Row 23: Ch 1. Sc in each st across. Turn. (28 sc)
Row 24: Ch 1. Sc2tog, sc to end. Turn. (27 sc)
Fasten off.
Return to Row 15. Skip 11 center sts (these form the crotch gap). Rejoin blue yarn in 43rd st of Row 15.
Row 16 (left leg portion): Ch 1. Sc in next 31 sts. Turn. (31 sc)
Row 17: Ch 1. Sc in each st across. Turn. (31 sc)
Row 18: Ch 1. Sc to last 2 sts, sc2tog. Turn. (30 sc)
Row 19: Ch 1. Sc in each st across. Turn. (30 sc)
Row 20: Ch 1. Sc to last 2 sts, sc2tog. Turn. (29 sc)
Row 21: Ch 1. Sc in each st across. Turn. (29 sc)
Row 22: Ch 1. Sc to last 2 sts, sc2tog. Turn. (28 sc)
Row 23: Ch 1. Sc in each st across. Turn. (28 sc)
Row 24: Ch 1. Sc to last 2 sts, sc2tog. Turn. (27 sc)
Fasten off.
Checkpoint: The front panel should measure approximately 4.8 inches (12 cm) wide at the lower leg openings. The full panel with hip shaping should measure approximately 16.2 inches (41 cm) wide at the widest row (Row 15). Total height from foundation to Row 24 should be approximately 4.8 inches (12 cm).
Section B: Back Panel of Bottoms
The back panel is taller to accommodate seat coverage.
Foundation: With blue yarn and E-4 hook, ch 64.
Row 1 (RS): Sc in 2nd ch from hook and in each ch across. Turn. (63 sc)
Rows 2 through 5: Ch 1. Sc in each st across. Turn. (63 sc)
Begin hip shaping:
Rows 6 through 15: Work the same increase pattern as the front panel. (73 sc at end of Row 15)
Row 16: Ch 1. Inc in first st, sc to last st, inc in last st. Turn. (75 sc)
Row 17: Ch 1. Sc in each st across. Turn. (75 sc)
Row 18: Ch 1. Inc in first st, sc to last st, inc in last st. Turn. (77 sc)
Row 19: Ch 1. Sc in each st across. Turn. (77 sc)
Begin back crotch shaping:
Row 20 (right leg back): Ch 1. Sc in first 33 sts. Turn. (33 sc) Leave remaining sts unworked.
Row 21: Ch 1. Sc in each st across. Turn. (33 sc)
Row 22: Ch 1. Sc2tog, sc to end. Turn. (32 sc)
Row 23: Ch 1. Sc in each st across. Turn. (32 sc)
Row 24: Ch 1. Sc2tog, sc to end. Turn. (31 sc)
Row 25: Ch 1. Sc in each st across. Turn. (31 sc)
Row 26: Ch 1. Sc2tog, sc to end. Turn. (30 sc)
Row 27: Ch 1. Sc in each st across. Turn. (30 sc)
Row 28: Ch 1. Sc2tog, sc to end. Turn. (29 sc)
Fasten off.
Return to Row 19. Skip 11 center sts. Rejoin blue yarn in 45th st of Row 19.
Row 20 (left leg back): Ch 1. Sc in next 33 sts. Turn. (33 sc)
Continue with the same shaping through Row 28, ending with (29 sc).
Fasten off.
Checkpoint: The back panel should measure approximately 5.6 inches (14 cm) tall to the top of Row 28. It should be approximately 19.4 inches (49 cm) wide at Row 19.
Section C: Assembly of Bottoms
Crotch seam: Hold front and back panels with WS together. Align the 11 skipped center stitches of the front (Row 15, center 11) with the 11 skipped center stitches of the back (Row 19, center 11). Using blue yarn and a yarn needle, whipstitch these 11 stitches together to form the crotch seam.
Left side seam: Align the left side edges of front and back panels from the foundation row to the top of the leg openings. Using blue yarn and a whipstitch, seam the left side from foundation through Row 24 of front and corresponding rows of back. Continue seaming the waist edges together along the left side.
Right side seam (lace-up side): Do not seam the right side. Apply cream applied slip stitch edging to both the front right side edge and the back right side edge separately. Thread the longer Lace-Up Cord (160 ch length) through the channel in a criss-cross pattern, just as you did for the top.
Apply cream edging around the waistband and leg openings using the applied slip stitch method.
Final Finishing
Block both pieces lightly by laying flat on a towel and steaming or spritzing with water. Allow to dry completely before wearing.
Tie the halter straps in a bow or knot at the back of the neck. Adjust the lace-up cords on both pieces for a comfortable fit.
Thank You for Making This With Me
I really hope you love making this ocean blue beach crochet two-piece as much as I loved designing it. It took years for Starfish Summer to finally come to life, and seeing it on the mannequin still makes me smile. Thank you for trusting me with your time and yarn.
If you make this set, I would absolutely love to see it. Tag me on Instagram or share a photo in my Facebook group. Nothing makes my day like seeing your finished projects.
Go ahead and save this pattern to your Pinterest boards so you can find it when you are ready to start. And please leave a comment below if you give it a try. I read every single one and love hearing how your projects turn out.
You Might Also Like
- Forest Green Elegant Peplum Crochet Top Free Pattern
- Autumn Burnt Orange Monstera Crochet Plant Free Pattern
- Sunset Gradient Candy Bolster Pillow Free Crochet Pattern
- Woodland Creatures Anklet Free Crochet Pattern
