
Let me just say this upfront: Irish crochet looks impossibly intricate, but it is absolutely something you can learn. I know those layered petals and delicate mesh patterns seem like they belong in a museum or a couture fashion house. But here is the truth. Every single element of this stunning botanical lace collar breaks down into basic stitches you already know.
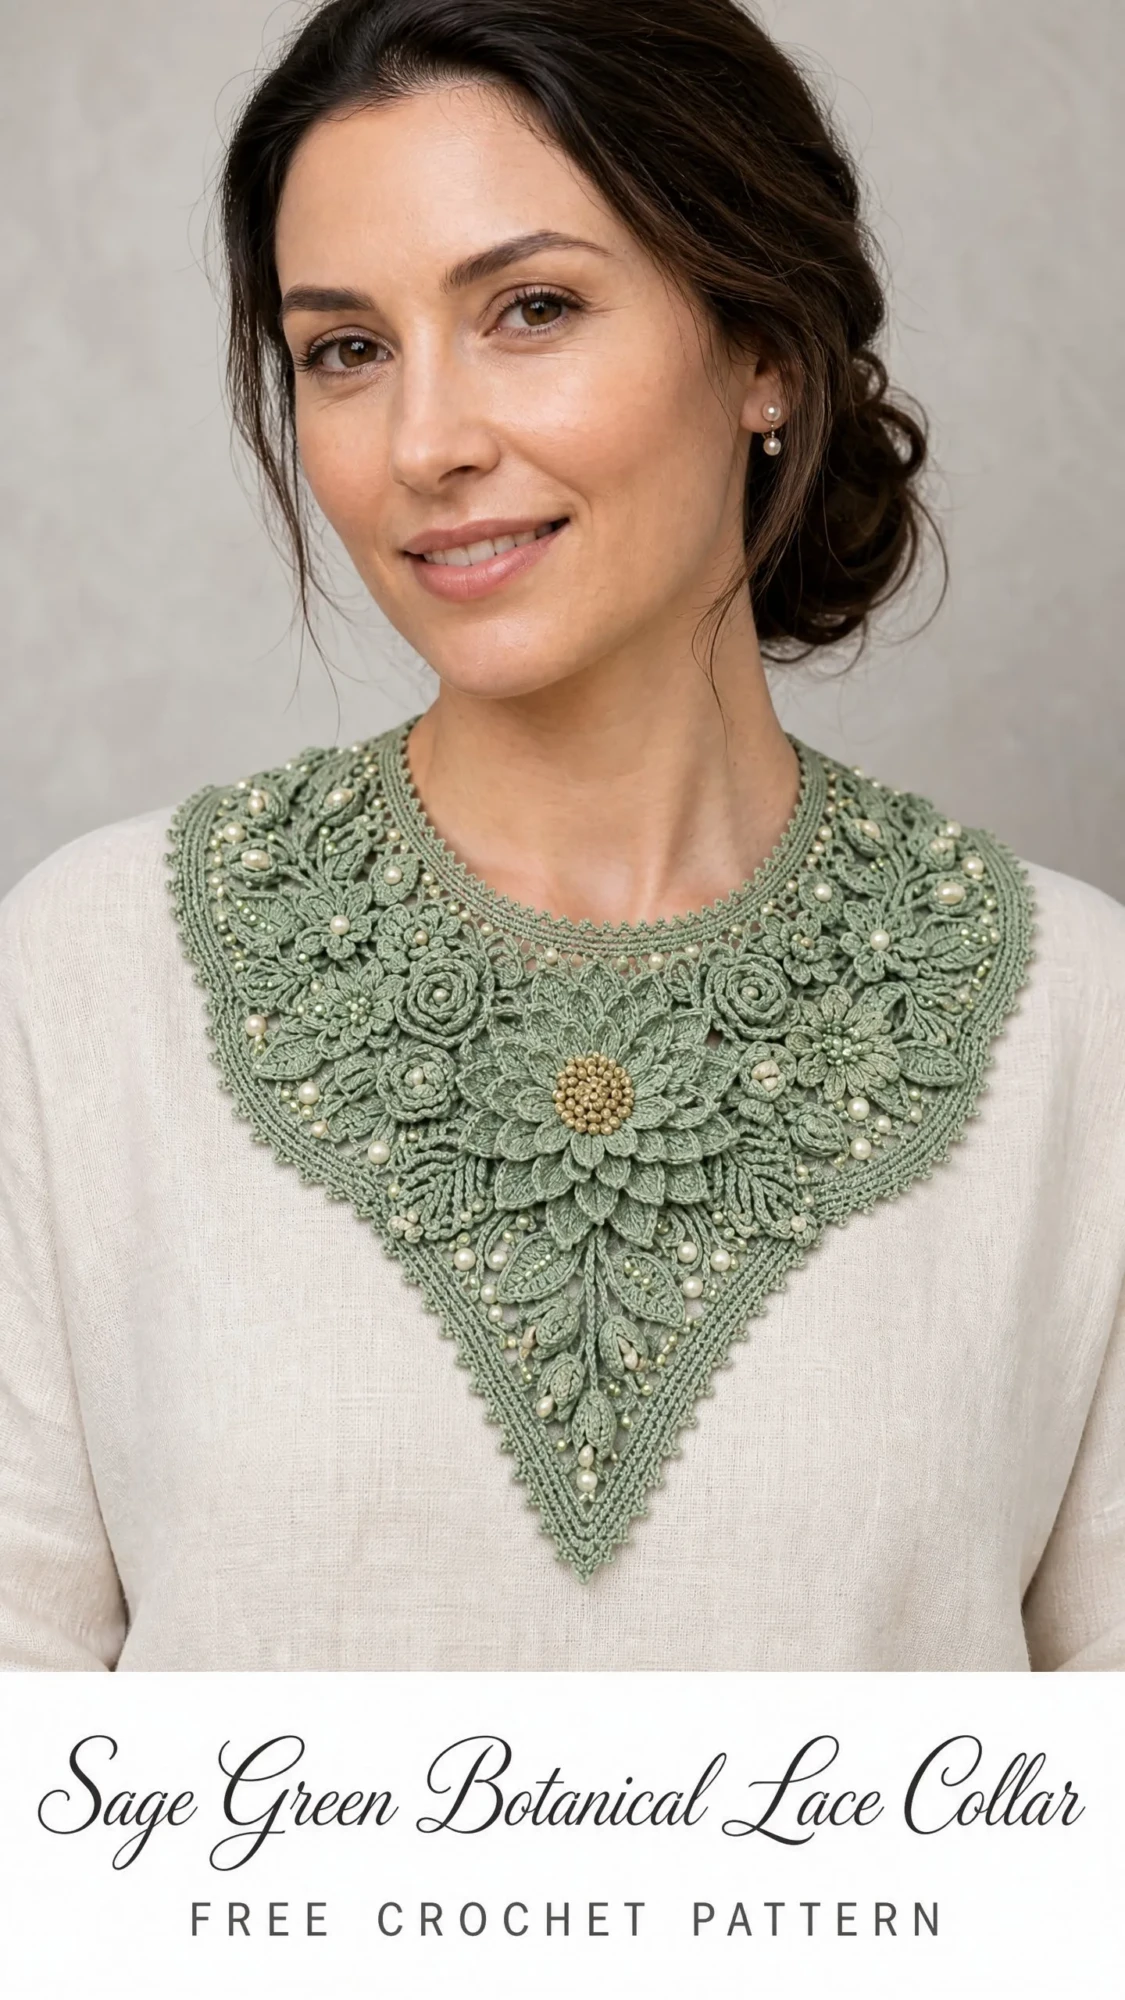
This is an advanced pattern, yes. I am not going to pretend otherwise. But if you can work a double crochet, a chain, and a slip stitch, you have the foundational skills. The rest is patience, practice, and following the steps one motif at a time. The dimensional flowers? They are just petals worked in rounds. The lacy background? Simple mesh with chains and double crochets. The raised leaves? A technique you will master after making just one or two.
So whether you have been crocheting for years and want a showstopper project, or you are an ambitious intermediate crocheter ready to level up, this sage green botanical lace collar is your moment. Let me walk you through everything.
About This Botanical Lace Collar Crochet Pattern
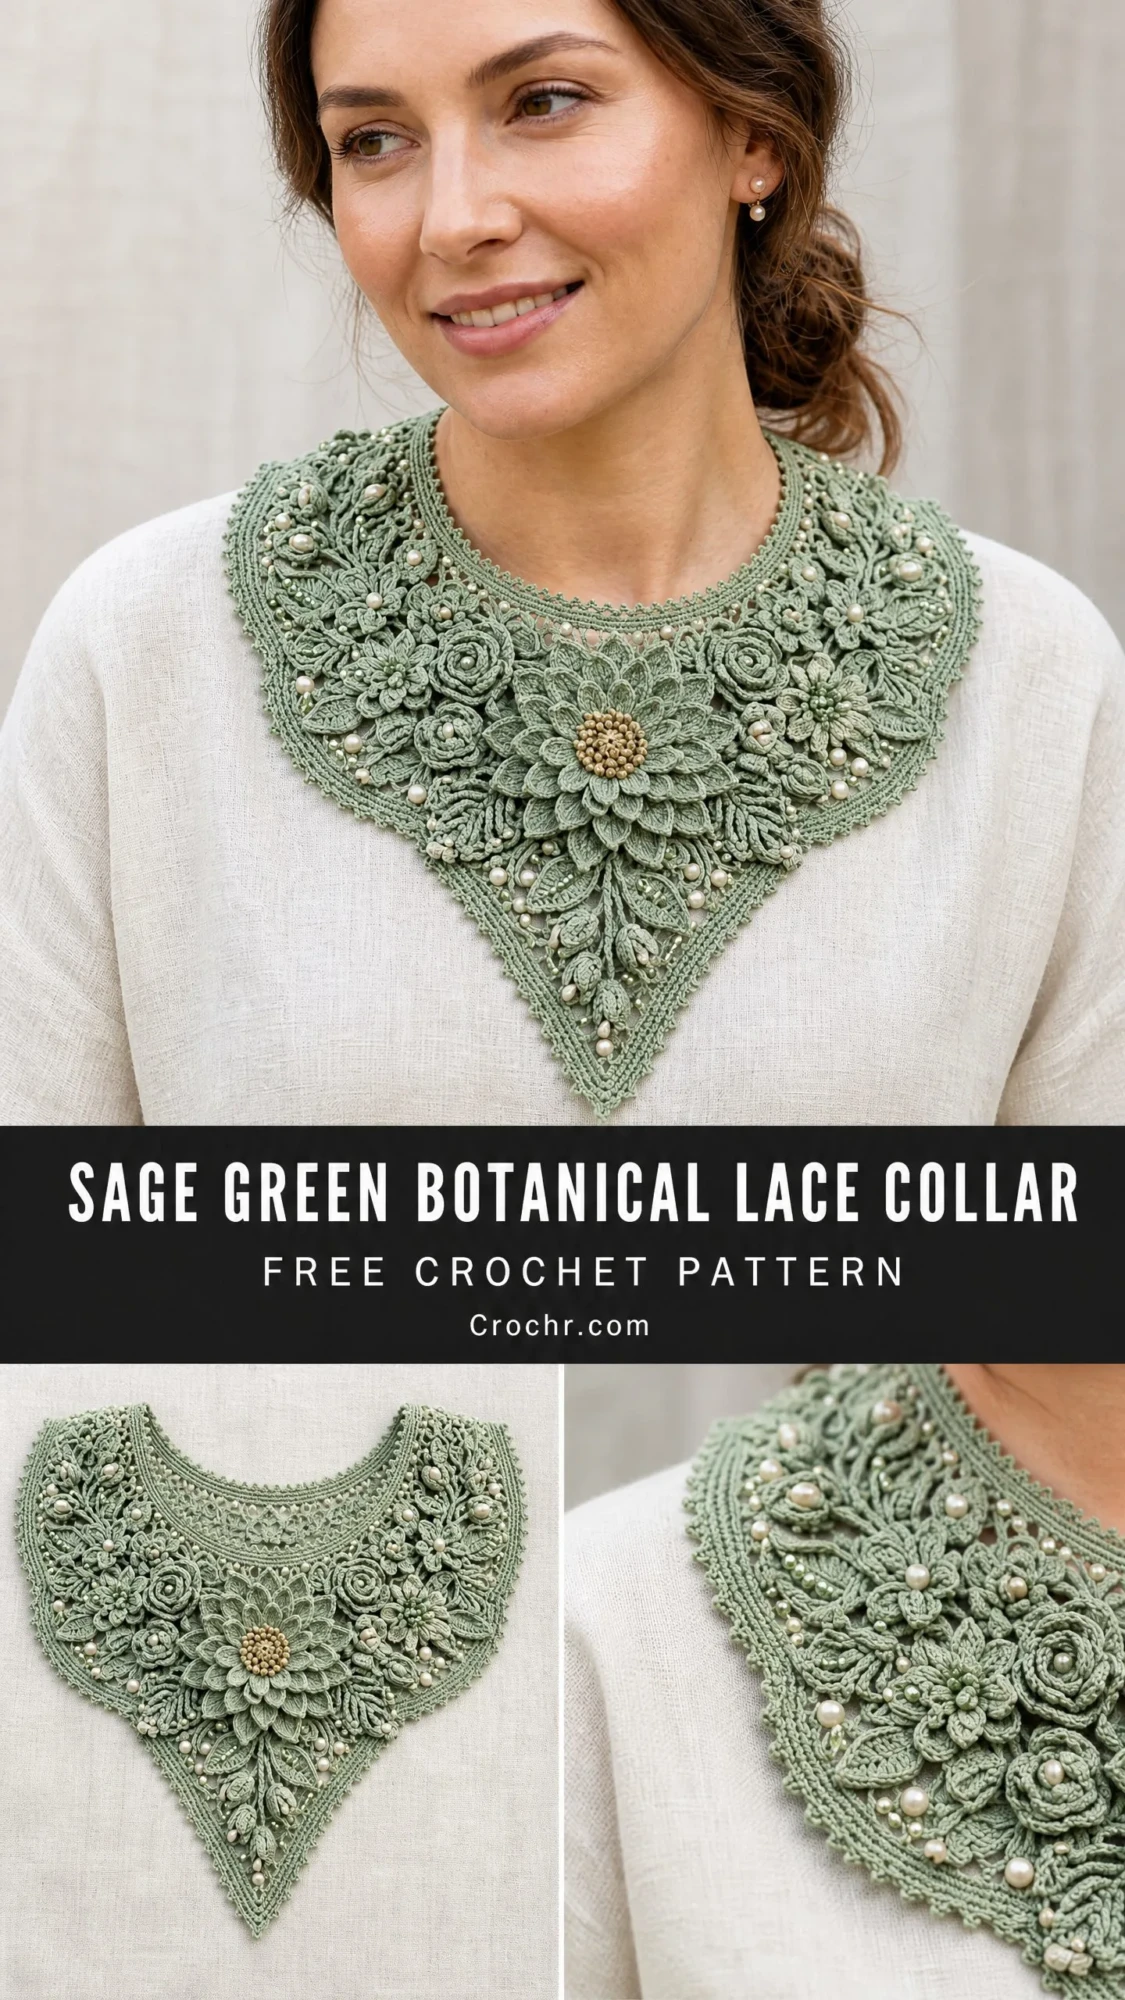
This wearable art piece sits beautifully across your shoulders and chest, creating a stunning V-shaped silhouette. The design features a large dimensional dahlia at center front, surrounded by smaller roses, rose buds, and twenty-two raised leaves. Pearl beads scattered throughout add elegance and catch the light.
The finished collar measures approximately 14 inches across the neckline opening and drops about 9.5 inches at the deepest center point. It fits neck circumferences of 14 to 16 inches with slight ease.
Construction happens in four distinct phases. First, you create a sturdy doubled neckband. Then you work the background mesh downward from the neckband, shaping it into the collar drape. Next, you make all the floral and leaf motifs separately. Finally, you assemble everything, add beads, and complete the finishing work.
Plan for 30 to 50 hours of work depending on your experience with Irish crochet techniques. The dimensional center dahlia alone takes 6 to 10 hours. I recommend working in short sessions to maintain consistent tension throughout.
Materials Needed
Yarn
Main Color (MC): Sage green 100% mercerized cotton in fingering weight. You will need approximately 650 yards or 595 meters total.
Accent Color (AC): Antique gold metallic fingering weight thread, approximately 40 yards or 36.5 meters. This is used only for the dahlia center stamens.
Yarn Suggestions:
Lizbeth 100% Egyptian cotton in size 10 works beautifully. Look for their "Sage Green Med" shade 672. It offers excellent stitch definition with moderate sheen and holds blocking well.
DMC Petra Size 5 Cotton Thread in color 5320 (moss green) is slightly heavier but produces gorgeous raised texture on the floral motifs. Swatch first to confirm gauge.
Scheepjes Twinkle in a solid sage colorway adds subtle integrated shimmer if you prefer that look.
Important: Choose smooth, tightly plied cotton or cotton blend thread. Mercerized cotton is strongly preferred for its natural sheen and superior blocking stability. Avoid fuzzy fibers as they obscure the delicate lace structure.
Hooks
US Steel hook size 7 (1.65 mm) for foundation and background lace sections
US Steel hook size 6 (1.80 mm) for dimensional floral motifs
Notions
Gauge
Getting gauge right is critical for this pattern. The collar’s fit depends on the neckline band matching the intended circumference.
Background lace section (using size 7 hook):
Dimensional motif gauge (using size 6 hook):
Work a swatch of the background mesh at least 3 inches square. Block it before measuring. Adjust your hook size as needed to match gauge.
Abbreviations
Special Stitches for This Crochet Pattern
Raised Leaf (RL)
This creates a three-dimensional leaf worked over a foundation chain.
Step 1: Create a foundation chain of 14 ch.
Step 2: Starting in the 2nd ch from hook, work 1 sc, 1 hdc, 3 dc, 1 tr, 3 dc, 1 hdc, 1 sc. Then work 3 sc along the bottom of the same chain to pivot.
Step 3: Working back along the opposite side of the foundation chain, work 1 sc, 1 hdc, 3 dc, 1 tr, 3 dc, 1 hdc, 1 sc.
Step 4: Sl st to join at the base. The leaf now has a central ridge and shaped tip. Fasten off, leaving a tail for assembly.
Bullion Stitch (BS)
This creates dense floral center texture.
Step 1: Yo 7 times.
Step 2: Insert hook into indicated stitch.
Step 3: Yo and draw up a loop.
Step 4: Yo and carefully draw through all 9 loops on hook (7 wrapped yos plus the 2 from the final yo).
Step 5: Ch 1 to lock. This creates a dense raised coil stitch.
Tip: Bullion stitches can be tricky at first. Keep your tension loose and be patient as you draw through all those loops.
Popcorn Stitch (PC)
Step 1: Work 5 dc into the same stitch or space.
Step 2: Remove hook from working loop.
Step 3: Insert hook from front to back through the top of the first dc of the 5-dc group.
Step 4: Reinsert hook into the dropped loop.
Step 5: Pull the dropped loop through the first dc.
Step 6: Ch 1 to secure. The popcorn pops forward on the RS.
Shell Stitch (SH)
Work 5 dc into the same stitch or space. All 5 stitches share the same base.
Place Bead (pb)
Thread beads onto yarn before beginning the section, or use a beading needle to thread them as needed.
Step 1: Slide one bead up the yarn to sit snugly against the hook.
Step 2: Insert hook into next stitch as directed.
Step 3: Yo and draw up a loop (bead is now between the two loops on hook).
Step 4: Yo and draw through both loops. The bead is now secured on the RS.
Irish Crochet Join (ICJ)
This joins independent motifs to the background mesh or to each other.
Step 1: Hold the motif against the mesh with RS facing.
Step 2: Using the working yarn attached to the mesh, insert the hook through both the mesh chain-space and the outer edge of the motif.
Step 3: Sl st through both layers.
Step 4: Continue the mesh round or row, incorporating the motif edge as directed.
Picot Edge (PE)
Ch 3, sl st back into the first ch of those 3 chains to form a small decorative loop.
Pattern Notes Before You Begin
This collar has an asymmetric floral arrangement. The large dimensional center dahlia sits at center front, displaced very slightly toward the right shoulder (viewer’s left when looking at you). Smaller roses and leaf clusters fill the left field and extend across both shoulders.
All motifs are worked as individual pieces and joined using the Irish Crochet Join method or sewn with a tapestry needle during finishing. Complete each motif before beginning assembly.
Pearl bead placement: Beads appear throughout in clusters of 3 around motif bases, strung along vine-like chains at the outer border, and placed individually at leaf tips. The 6 mm beads are reserved for the dahlia center and the three largest rose bud accents.
Right side identification: For flat background mesh, RS faces you on odd-numbered rows. For dimensional motifs, RS is always the side you work toward with raised petals and leaves facing you.
Blocking is mandatory before final assembly. Block the background mesh flat first. Then attach and arrange motifs. Then do a final light steam or spray block of the assembled collar.
Step-by-Step Instructions
Section 1: Neckband
The neckband is a narrow doubled-back strip forming the structural collar stand. It is firm and does not stretch.
Row 1 (foundation): Using MC and size 7 hook, ch 105. (This produces a working chain of 104 sts and 1 turning ch.)
Row 2: Sc in 2nd ch from hook and in each ch across. Turn. (104 sc)
Row 3: Ch 1, sc in each sc across. Turn. (104 sc)
Row 4: Ch 1, sc in each sc across. Turn. (104 sc)
Row 5: Ch 1, sc in each sc across. Turn. (104 sc)
Row 6: Ch 1, sc in each sc across. Do not turn. Fold the strip in half lengthwise so WS faces WS. Sl st the working edge to the foundation chain edge, inserting the hook through both layers simultaneously, working across all 104 stitches to create a firm doubled neckband. Fasten off. (104 sl sts joining both layers)
The completed neckband should measure approximately 14 inches or 35.5 cm long and 0.5 inches or 1.3 cm wide after joining.
Checkpoint: The neckband should lie flat without curling and feel firm and stable. If it curls, your foundation chain was too loose. Adjust hook size or chain tension.
Button loops: Rejoin MC at the top corner of the right-back end. Ch 6, sl st 3 sts along the edge to form a loop, sl st 3 more sts, ch 6, sl st to close the second loop. Fasten off.
Section 2: Background Mesh
The mesh is worked directly from the lower edge of the neckband, angling outward and downward. The shaping creates the collar’s drape across shoulders and the V-point at center front.
Mesh vocabulary: One mesh unit = 1 dc, ch 5.
Row 1 (mesh, RS): With RS of neckband facing and size 7 hook, join MC at the lower-right corner of the neckband. Ch 8 (counts as 1 dc plus ch 5). Sk 4 sts along neckband. (Dc in next st, ch 5, sk 4 sts) across the neckband to last st, dc in last st. Turn. (22 mesh units, 23 dc posts including border sts)
Row 2 (WS): Ch 8 (counts as dc plus ch 5). Dc in first ch-5 sp, (ch 5, dc in next ch-5 sp) across, ending dc in the top of the tch. Turn. (22 mesh units, 23 dc)
Row 3 (RS, width expansion): Ch 13 (this adds 2 new mesh units at the left end). Dc in 8th ch from hook, ch 5, dc in the next ch from that anchor. Now work across existing mesh: (ch 5, dc in next ch-5 sp) across to the last dc. Ch 5, dc in top of tch. Ch 5, sl st into the base of the row’s first dc to add 1 expansion unit at the right end. Turn. (24 mesh units, 25 dc)
Row 4 (WS): Ch 8, dc in first ch-5 sp, (ch 5, dc in next ch-5 sp) across, dc in top of tch. Turn. (24 mesh units, 25 dc)
Row 5 (RS, width expansion): Add 1 mesh unit at each outer end using the same method as Row 3. (26 mesh units, 27 dc)
Row 6 (WS): Ch 8, (dc in next ch-5 sp, ch 5) across, dc in top of tch. Turn. (26 mesh units, 27 dc)
Row 7 (RS, width expansion): Add 1 unit each side. (28 mesh units, 29 dc)
Row 8 (WS): Work even across. (28 mesh units, 29 dc)
Row 9 (RS, width expansion): Add 1 unit each side. (30 mesh units, 31 dc)
Row 10 (WS): Work even. (30 mesh units, 31 dc)
Row 11 (RS, width expansion): Add 1 unit each side. (32 mesh units, 33 dc)
Row 12 (WS): Work even. (32 mesh units, 33 dc)
Row 13 (RS): Work even. No expansion. (32 mesh units, 33 dc)
Row 14 (WS): Work even. (32 mesh units, 33 dc)
Now begin center-front V-shaping. The mesh divides into three sections: left shoulder panel (11 units), center-front V panel (10 units descending), and right shoulder panel (11 units). Work each separately.
Center Front V Panel
Row 15 (RS): Starting at the 12th mesh unit from the left (mark with stitch marker), work 10 consecutive mesh units (dc, ch 5 across 10 sp, ending with dc). Turn. Leave remaining stitches unworked. (10 mesh units, 11 dc)
Row 16 (WS): Ch 8, work 8 mesh units across, ending with dc in 9th sp. Leave last 2 units unworked. Turn. (8 mesh units, 9 dc)
Row 17 (RS): Ch 8, work 6 mesh units across, ending with dc in 7th sp. Leave last 2 units unworked. Turn. (6 mesh units, 7 dc)
Row 18 (WS): Ch 8, work 4 mesh units, dc in 5th sp. Turn. (4 mesh units, 5 dc)
Row 19 (RS): Ch 8, work 2 mesh units, dc in 3rd sp. Turn. (2 mesh units, 3 dc)
Row 20 (WS): Ch 8, dc in ch-5 sp, ch 5, dc in final dc. Turn. (1 mesh unit, 2 dc, forming the tip)
Row 21 (RS): Ch 1, sc in each of the 2 dc and into the ch-5 sp (3 sc). This creates a tight closure at the V tip. Fasten off. (3 sc)
Left Shoulder Panel
Rejoin yarn at the left outer edge of Row 14.
Rows 15L through 20L: Ch 8, work 11 mesh units across. Turn. Work even for 6 rows total. (11 mesh units, 12 dc each row)
Fasten off.
Right Shoulder Panel
Rejoin yarn at the right outer edge of Row 14.
Rows 15R through 20R: Mirror the Left Shoulder Panel exactly. Work even across 11 mesh units for 6 rows. Fasten off. (11 mesh units, 12 dc each row)
Checkpoint: Lay the piece flat. The neckband should span 14 inches. Shoulder panels should each measure approximately 4.75 inches wide and 4 inches deep from the neckband. The center front panel should taper to a point with the longest measurement from neckband being approximately 8.5 inches. Block the mesh flat at this stage before motif assembly.
Section 3: Motif Construction
Make all motifs before beginning assembly. Label them with stitch markers so you can arrange them on the blocked mesh.
Motif A: Large Center Dahlia (make 1)
This focal motif measures approximately 5 inches diameter with three tiers of petals plus a raised center.
Foundation ring: Ch 8, sl st to form ring.
Rnd 1 (inner petal base): Ch 1, work 16 sc into the ring. Sl st to first sc to join. (16 sc)
Rnd 2 (first petal tier): (Ch 4, sk 1 sc, sl st in next sc) 8 times. (8 ch-4 loops)
Rnd 3 (first petals): (Sc, hdc, 3 dc, hdc, sc) into each ch-4 loop. (8 petals formed, 56 sts total)
Rnd 4 (second petal base): Working behind the completed petals, reach behind and sl st into the skipped sc of Rnd 1. (Ch 5, sl st to next skipped sc of Rnd 1) 8 times. (8 ch-5 loops)
Rnd 5 (second petal tier): (Sc, hdc, 2 dc, tr, 2 dc, hdc, sc) into each ch-5 loop. (8 petals, 72 sts total)
Rnd 6 (third petal base): Working behind Rnd 5 petals, sl st into the sl st joins of Rnd 4. (Ch 7, sl st to next join of Rnd 4) 8 times. (8 ch-7 loops)
Rnd 7 (third petal tier): (Sc, hdc, dc, 2 tr, dc, hdc, sc, sl st) into each ch-7 loop. (8 outer petals, 72 sts plus 8 sl st anchors)
Rnd 8 (outer spacing): Work 1 sc between each pair of adjacent outer petals at the petal bases. Sl st to join. (8 sc)
Center stamen cluster (with AC): Join AC at the center ring with sl st. Work 12 BS evenly around the center ring, pulling each into the center for a dense raised cluster. Fasten off AC. Weave in ends invisibly.
Place three 6 mm pearl beads into the center using beading thread. Space them in a small triangle within the gold stamen cluster.
Motif B: Medium Dahlia (make 1)
Work exactly as Motif A but stop after Rnd 5 (only 2 petal tiers). Omit AC accent center. Instead work 8 BS in MC at the center. Finished diameter approximately 3 inches. Place two 6 mm pearls in the center.
Motif C: Rose (make 4)
Foundation ring: Ch 6, sl st to form ring.
Rnd 1: Ch 1, 10 sc into ring. Sl st to join. (10 sc)
Rnd 2: (Ch 3, sk 1 sc, sl st in next sc) 5 times. (5 ch-3 loops)
Rnd 3: (Sc, hdc, 3 dc, hdc, sc) into each ch-3 loop. (5 petals, 35 sts)
Rnd 4: Reach behind, sl st into each skipped sc of Rnd 1. (Ch 4, sl st to next skipped sc) 5 times. (5 ch-4 loops)
Rnd 5: (Sc, hdc, 2 dc, tr, 2 dc, hdc, sc) into each ch-4 loop. (5 larger petals, 45 sts)
Rnd 6: (Ch 5, sl st to join between Rnd 4 loops) 5 times. Work (sc, hdc, dc, tr, ch 1, tr, dc, hdc, sc) into each ch-5 loop. (5 outermost petals)
Finished diameter approximately 1.5 inches. Make 4 total.
Motif D: Small Rose Bud (make 6)
Foundation ring: Ch 4, sl st to form ring.
Rnd 1: Ch 1, 8 sc into ring. Sl st to join. (8 sc)
Rnd 2: (Ch 3, sl st into next sc) 4 times, working every other sc. (4 ch-3 loops)
Rnd 3: (Sc, hdc, 3 dc, hdc, sc) into each of the 4 ch-3 loops. (4 petals)
Finished diameter approximately 0.75 inches. For 2 of the 6 buds, place one 6 mm pearl at the center before fastening off.
Motif E: Raised Leaf (make 22)
Follow the Raised Leaf special stitch instructions. Create size variation:
Small leaf (make 8): Ch 12 foundation. Work sc, hdc, 2 dc, tr, 2 dc, hdc, sc along each side. Pivot with 3 sc at tip. Finished length approximately 1 inch.
Medium leaf (make 10): Ch 14 foundation. Work sc, hdc, 3 dc, tr, 3 dc, hdc, sc each side. Finished length approximately 1.4 inches.
Large leaf (make 4): Ch 17 foundation. Work sc, hdc, 2 dc, 2 tr, 2 dc, hdc, sc each side. Finished length approximately 1.75 inches.
Place one 4 mm pearl bead at the tip of each medium and large leaf using beading thread.
Motif F: Vine Tendril (make 8)
Ch 20, sl st back in 2nd ch from hook and every other ch to create a twisted cord effect. Fasten off. Finished length approximately 1 inch.
Section 4: Outer Border
Before attaching motifs, complete the outer border.
Join MC at the top right corner of the neckband’s lower edge. Work sc evenly around the entire outer perimeter of the mesh. Work 1 sc per dc post and 5 sc per ch-5 mesh unit. At the V-tip, work 3 sc into the point. At outer corners of shoulder panels, work 3 sc to turn the corner. Sl st to join.
Picot Edge row: Sl st across each sc. At every 4th sc, work 1 PE (ch 3, sl st in first ch). Continue around entire perimeter. At the V-point, work 3 consecutive picots for a decorative cluster. Fasten off.
Section 5: Assembly and Motif Placement
Block the background mesh and outer border flat before attaching motifs. Pin to blocking board to finished dimensions. Spray thoroughly with cool water. Allow to dry completely, approximately 12 to 24 hours.
Arrange all motifs on the mesh using stitch markers to pin in place before sewing.
Placement guide (as worn):
Large Center Dahlia (Motif A): Place at center front with dahlia center approximately 3 inches below the center front neckband edge. Offset 0.5 inch toward the right shoulder (wearer’s right) for visual asymmetry.
Medium Dahlia (Motif B): Place to upper right of Motif A, overlapping its left edge beneath the right petals of Motif A, approximately 1.5 inches from Motif A’s center.
Rose motifs (Motif C): Place one to upper left of Motif A near neckband. One to lower left moving toward V-point. One on right shoulder panel. One on left shoulder panel.
Small Rose Buds (Motif D): Scatter at bases of larger flowers and along vine paths. Two pearl-centered buds go at neckband edge near center-left.
Leaves (Motif E): Four large leaves radiate from Motif A’s base in cardinal directions. Medium leaves fill gaps between roses. Small leaves line the picot border at approximately 1.5 inch intervals around shoulder edges.
Vine tendrils (Motif F): Place 2 flanking V-tip point, 2 at lower left flower cluster, 4 scattered along outer border between leaves.
Sewing: Use tapestry needle and fine sewing thread in matching green. Stitch through mesh grid and outer edges of each motif at 4 to 6 anchor points per motif. For dahlias, stitch at every other outer petal base. For roses, stitch at 4 points around the outer petal ring. Leaves are stitched at base and midway up each side.
Bead placement: After all motifs are sewn, add 4 mm pearl beads in clusters of 3 using beading thread. Place clusters at the base of each rose (12 beads total), scattered along vine tendril paths (approximately 20 beads), at V-tip cluster (5 beads in curved arc), along neckband lower edge (10 beads spaced 0.75 inch apart), and at remaining gaps to taste. Stitch each bead through twice and knot off on WS.
Closure Finishing
Sew two small (3/8 inch) buttons to the left end of the neckband. Align with button loops for center back closure. Use pearl-style round cream colored buttons.
Alternative: Sew a 12-inch length of 0.25-inch satin ribbon in sage green or ivory at each neckband end for a tie closure.
Final Blocking
Soak completed collar in cool water with gentle fiber soak for 15 minutes. Gently press out excess water without wringing. Roll in clean towel. Pin to blocking board right side up to exact finished measurements. Use blocking wires along outer border. Pin V-point with single straight pin at exact tip. Allow to dry completely flat. Do not apply heat directly to pearl beads.
Weave in all yarn ends on WS, threading each tail through at least 1 inch of worked stitches in two different directions.
Size Customization Tips
To increase neckline circumference: Add groups of 5 chains to foundation chain. Each group of 5 adds approximately 0.9 inches. A 16-inch neck needs foundation chain 115 instead of 105, producing 24 mesh units in Row 1.
To increase collar depth: Work additional expansion rows in background mesh before V-shaping. Each additional pair of expansion rows adds approximately 0.75 inch of depth.
To decrease collar depth: Reduce the number of expansion rows and begin V-shaping earlier.
Final Thoughts on This Botanical Lace Collar Crochet Tutorial
This sage green botanical lace collar is truly a labor of love. Every single motif, every carefully placed bead, every hour of patient stitching results in a piece of wearable art that will take people’s breath away. Wear it over a simple linen blouse for an elegant look. Display it on a mannequin or frame when not wearing it. Pass it down as an heirloom.
The step by step instructions in this crochet pattern guide you through every technique. Take your time. Celebrate each completed motif. And remember that even master crocheters once made their first Irish rose.
Thank you so much for choosing this pattern for your next project. I genuinely cannot wait to see what you create. If you make this collar, please share your photos on Instagram or Facebook and tag me. I love seeing your work more than you know.
Save this botanical lace collar pattern to your Pinterest boards so you can find it whenever inspiration strikes. And if you make one, please drop a comment below. I would absolutely love to hear how your collar turns out and see your color choices.
You Might Also Like
- Mint Green Rose Drawstring Backpack Free Crochet Pattern
- Charcoal Gray Modern Crochet Lace Boots Free Pattern
- Butter Yellow Chunky Bag on Bed Free Pattern
- Moonlight Snake Plant Amigurumi Free Crochet Pattern
