
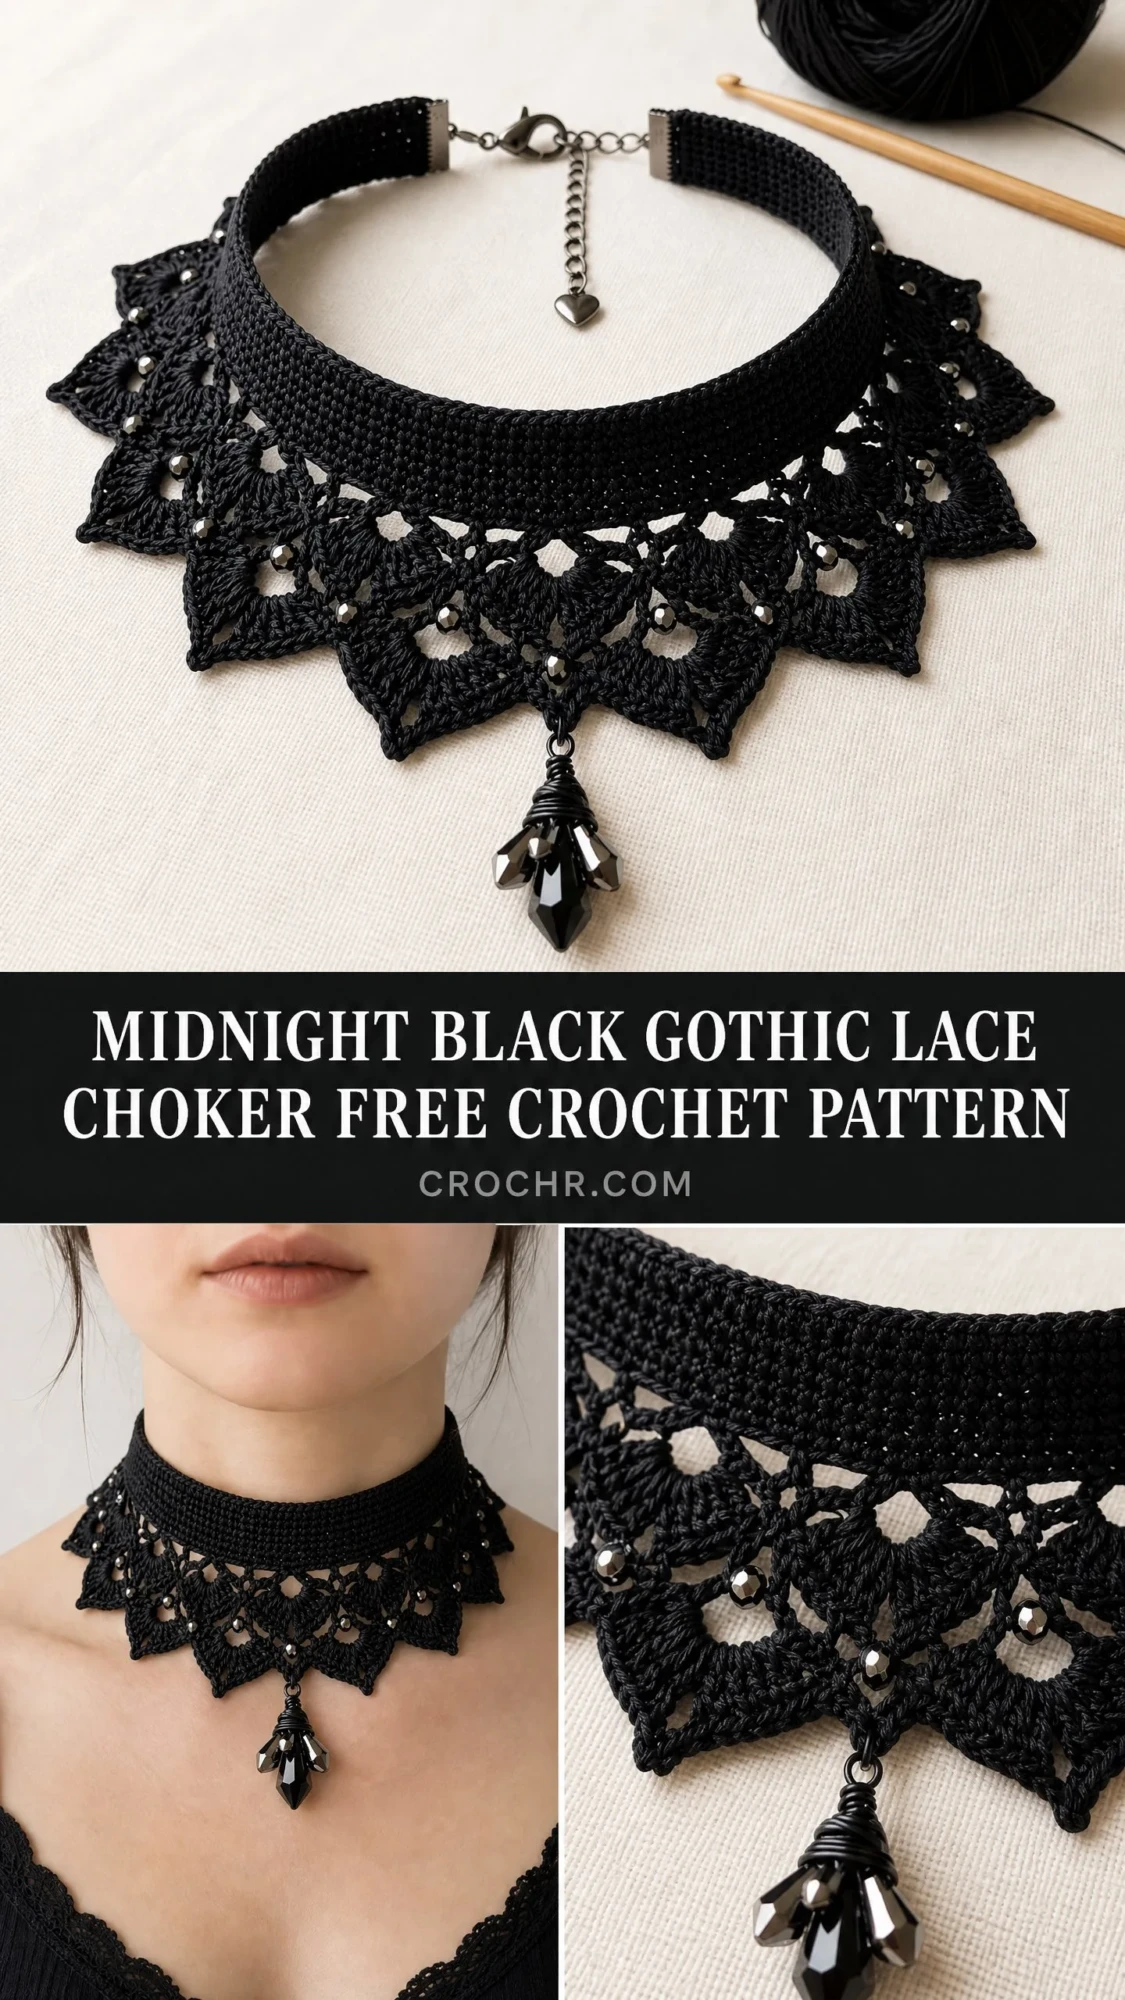
This is a dramatic gothic lace choker crocheted with size 10 thread. You will need intermediate skills and experience with shell stitches, picots, and threading beads onto yarn. The finished piece features a structured band, seven pointed lace motifs, seed bead accents, and a wire-wrapped crystal pendant drop at center front.
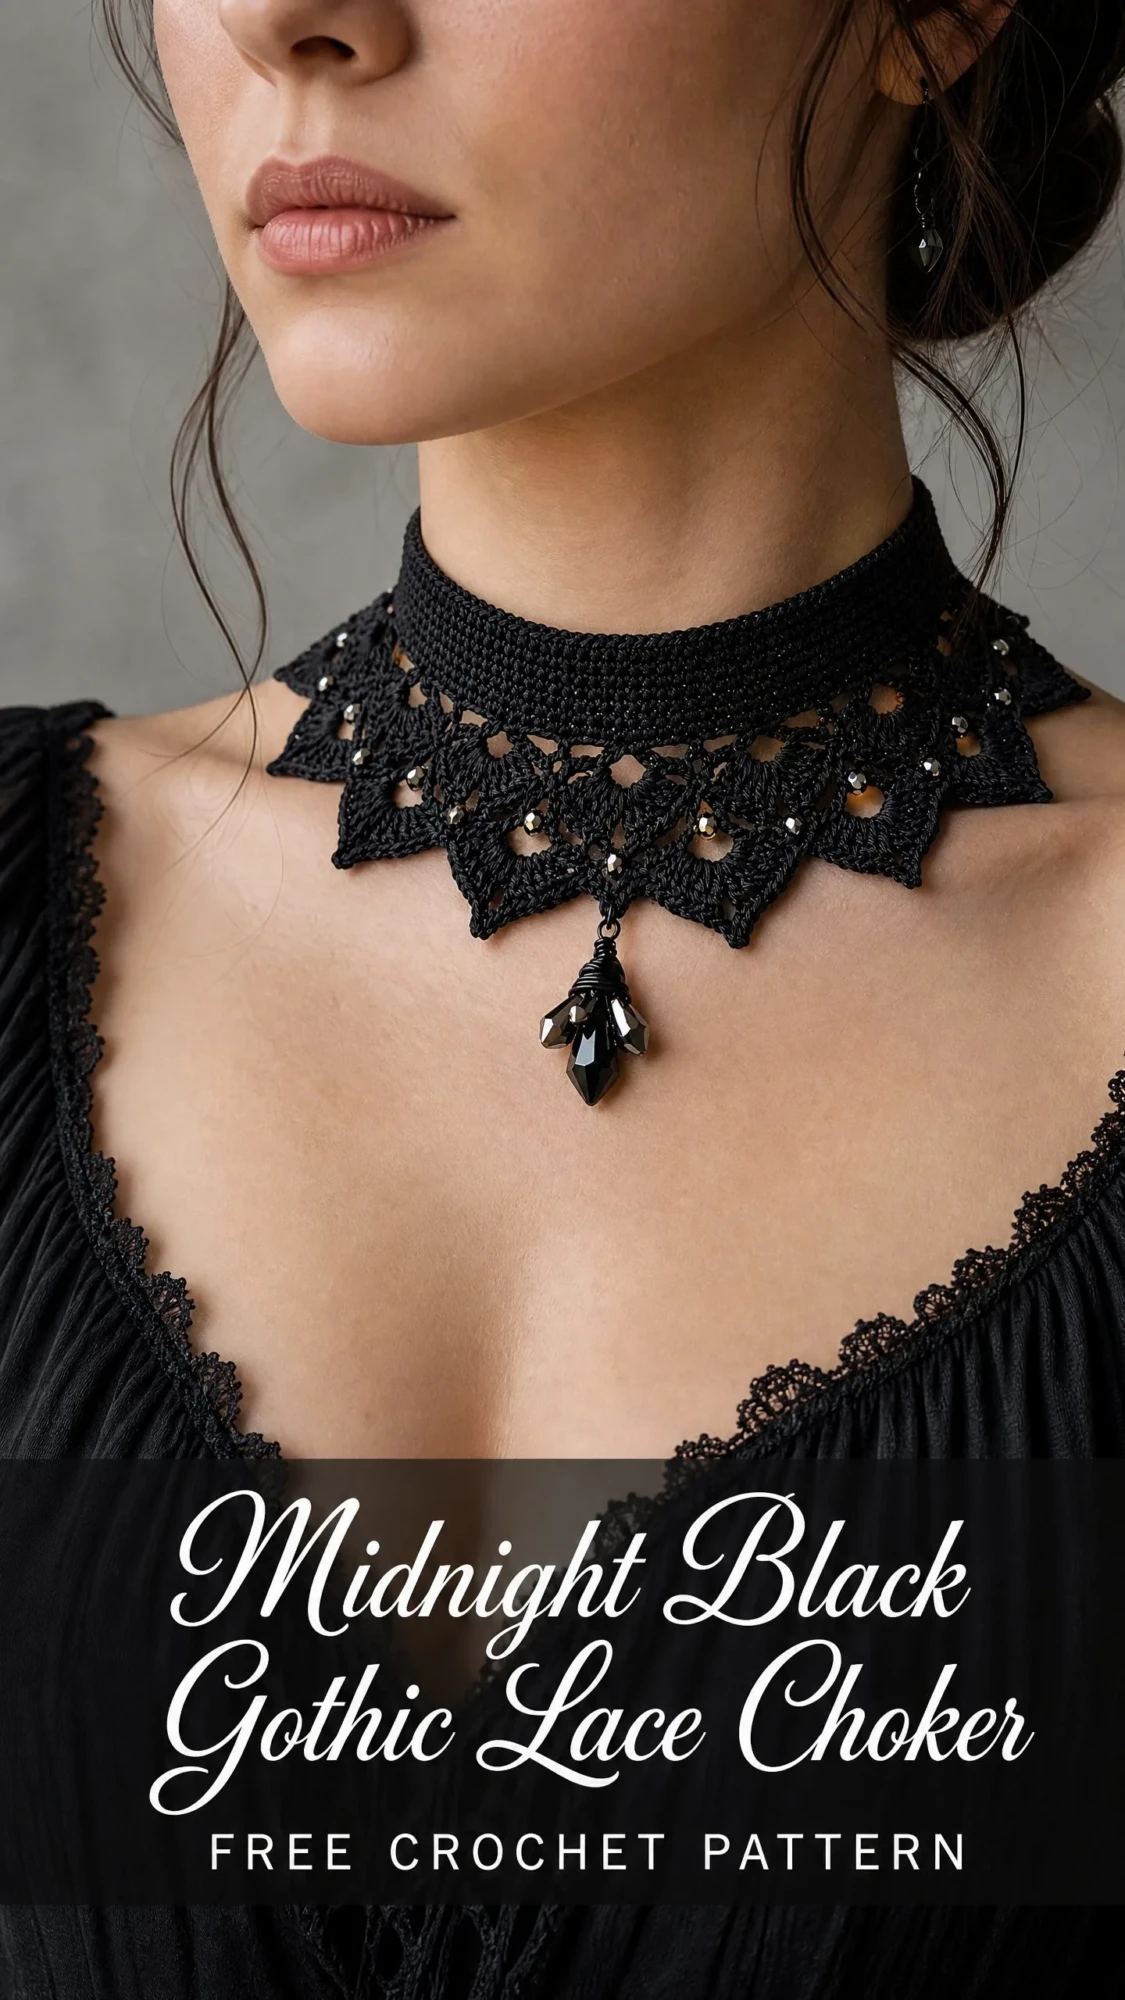
The construction is straightforward once you understand the flow. You crochet a flat single crochet band first, then work the lace edging downward from one long edge. Ribbon crimp findings attach at each end, and a lobster claw clasp with an extender chain closes the piece at the back of the neck.
If you have ever wanted to try thread crochet jewelry, this choker is a stunning place to start. The band section is simple rows of single crochet. The lace edging builds on familiar techniques. And the beaded details add sparkle without complicated bead crochet methods.
Why This Gothic Lace Choker Pattern Works
The design sits close to the throat and frames the collarbone beautifully. Seven pointed lace motifs create a dramatic silhouette that works for special occasions, costume pieces, or everyday gothic style. The black thread with hematite-toned beads gives the piece an elegant edge.
What I love about this construction method is the stability. The single crochet (sc) band provides a firm foundation that holds its shape against the neck. No flopping, no curling, no awkward gaps. The lace edging hangs naturally from this stable base.
The beads get threaded onto your yarn before you begin the lace section. As you crochet, you simply slide them into position when the pattern calls for a bead stitch. This technique is much easier than it sounds.
Skill Level and Time Estimate
This pattern is rated intermediate. You should be comfortable with slip stitch joins, working into foundation chains, shell stitches, picots, and basic jewelry finishing techniques.
Total time estimate: 4 to 6 hours
Here is how that breaks down:
Take your time with this one. Thread crochet moves more slowly than worsted weight projects. The small hook and fine thread require patience, but the results are absolutely worth it.
Finished Measurements
Length (not including hardware): 13 inches / 33 cm, adjustable to approximately 15 inches / 38 cm with the extender chain
Band height: 1.5 inches / 3.8 cm
Total drop from bottom of band to tip of longest lace point: approximately 2.25 inches / 5.7 cm
Pendant drop: adds an additional 1 inch / 2.5 cm below the center point
Materials for the Gothic Lace Choker
Yarn: Size 10 crochet thread (also labeled as crochet cotton thread, size 10), black, approximately 150 yards / 137 meters total. A thread with a slight sheen or mercerized finish gives the most authentic look.
Recommended yarn options:
Any size 10 crochet cotton or cotton-blend thread will work. Avoid very fuzzy or loosely spun threads. Lace openwork requires crisp stitch definition. Do not substitute a heavier weight. The band will become too stiff and the lace points too large to sit correctly against the body.
Hook: US Steel Hook Size 7 / 1.65 mm. If your band comes out wider or narrower than gauge, adjust one hook size in either direction.
Notions:
Gauge
18 sc x 20 rows = 2 inches / 5 cm square, worked in single crochet with a US Steel Hook Size 7 / 1.65 mm, after blocking.
Take your gauge swatch seriously for this project. The band length determines fit, and thread crochet has very little stretch. If you are 1 stitch per inch off, the choker can be a full inch too tight or too loose.
Abbreviations (US Terms)
Before we dive into the step by step instructions, let me define every stitch and abbreviation you will encounter:
bead-ch: slide one bead up to the hook, then complete the chain stitch, enclosing the bead in the chain
ch: chain (yarn over, pull through loop on hook)
ch-sp: chain space (the gap created by chain stitches in the previous row)
dc: double crochet (yarn over, insert hook, pull up loop, yarn over and pull through 2 loops twice)
hdc: half double crochet (yarn over, insert hook, pull up loop, yarn over and pull through all 3 loops)
RS: right side (the public-facing side of your work)
sc: single crochet (insert hook, pull up loop, yarn over and pull through both loops)
sk: skip (pass over the indicated stitch without working into it)
sl st: slip stitch (insert hook, pull up loop and through loop on hook in one motion)
st(s): stitch(es)
t-ch: turning chain
tr: treble crochet (yarn over twice, insert hook, pull up loop, yarn over and pull through 2 loops three times)
WS: wrong side (the back or inside of your work)
yo: yarn over
Special Stitches for This Crochet Pattern
Bead Single Crochet (bead-sc):
Before beginning a bead-sc, the bead must already be threaded onto the working thread. Insert hook into indicated stitch or space, pull up a loop (two loops on hook), slide one bead up the thread so it sits snugly against the back of the work, yarn over and pull through both loops on hook. The bead is now locked on the wrong side, which will be the public-facing underside of the lace edging. When the edging is worn, the beads appear on the front. Work this stitch firmly so the bead does not migrate.
Shell (sh):
Work 5 dc all into the same stitch or space. This creates a fan-shaped cluster that forms the body of each lace point.
Picot:
Chain 3, slip stitch into the first chain made (the one closest to the hook). This creates a small decorative loop at the tip of each lace point.
Beaded Picot:
Chain 1, slide one bead up to the hook, chain 1, chain 1 more (3 chains total, bead enclosed in the middle chain), slip stitch into the first chain made. This places a bead at the tip of the lace point.
V-stitch (V-st):
Work (dc, ch 2, dc) all into the same stitch or space.
Pattern Notes
Note 1: Thread all beads onto the working thread before you begin the lace edging section. Count out approximately 85 beads for a standard 13-inch choker. Thread them all at once using a beading needle or twisted-wire needle. As you crochet, slide beads down the thread away from the hook and call them forward only when a bead stitch is indicated.
Note 2: The band is worked as a flat rectangle in rows. After the band is complete and the lace edging is attached, the two short ends are finished with crimp findings rather than being joined. This keeps the neckline open at the back where the clasp attaches.
Note 3: The right side of the band is the side facing you on right-side rows (odd-numbered rows in this pattern). The lace edging is worked along the bottom long edge of the band with the right side of the band facing you.
Note 4: The lace edging repeat is 16 stitches wide and produces one full pointed motif. For a 13-inch finished length, the band has 118 single crochet across its working length. The lace edging uses 112 of those stitches across 7 complete repeats. The 3 stitches at each short end of the band are left unworked during the lace edging to allow for the crimp findings.
Note 5: To size up or down, add or subtract complete multiples of 16 stitches from the foundation chain. Each 16-stitch repeat equals approximately 1.75 inches / 4.5 cm of band length and adds one lace point. For a 12-inch choker, use 6 repeats (102 foundation chain). For a 14-inch choker, use 8 repeats (134 foundation chain).
Note 6: The pendant drop attaches to the center lace point by passing the loop at the top of the pendant through the picot at the tip and closing it with pliers, or by using a small jump ring.
Note 7: Turning chains in the band section count as the first single crochet of each row and are treated as a stitch. Turn the work at the end of each row.
Step by Step Instructions
Section 1: The Band
Setup: With size 10 black crochet thread and US Steel Hook Size 7, leaving a 6-inch tail, make a foundation chain.
Foundation chain: Ch 119. (This produces 118 working single crochet stitches across the band. At gauge of 9 sc per inch, 118 sc gives approximately 13 inches before blocking.)
Row 1 (RS): Sc in 2nd ch from hook and in each ch across. Turn. (118 sc)
Row 2 (WS): Ch 1, sc in each sc across. Turn. (118 sc)
Row 3 (RS): Ch 1, sc in each sc across. Turn. (118 sc)
Row 4 (WS): Ch 1, sc in each sc across. Turn. (118 sc)
Row 5 (RS): Ch 1, sc in each sc across. Turn. (118 sc)
Row 6 (WS): Ch 1, sc in each sc across. Turn. (118 sc)
Row 7 (RS): Ch 1, sc in each sc across. Turn. (118 sc)
Row 8 (WS): Ch 1, sc in each sc across. Turn. (118 sc)
Row 9 (RS): Ch 1, sc in each sc across. Turn. (118 sc)
Row 10 (WS): Ch 1, sc in each sc across. Turn. (118 sc)
Row 11 (RS): Ch 1, sc in each sc across. Turn. (118 sc)
Row 12 (WS): Ch 1, sc in each sc across. Turn. (118 sc)
Row 13 (RS): Ch 1, sc in each sc across. Turn. (118 sc)
Row 14 (WS): Ch 1, sc in each sc across. Do not turn. Do not fasten off. (118 sc)
Checkpoint 1: After Row 14, the band should measure approximately 13 inches / 33 cm wide and 1.5 inches / 3.8 cm tall. All rows should be even and flat with no curling. If the band is curling significantly, wet block it flat before continuing. The band has a firm, ribbon-like hand.
Section 2: Top Edge Finish
After completing Row 14, rotate the work so that the long edge worked from the foundation chain is at the top and the right side of the band faces you.
Top Edge Row: Working along the top long edge of the band into the foundation chain row, join yarn with a sl st at the right-hand end. Ch 1. Sc evenly across the top edge, working 1 sc into each foundation chain. (118 sc) Fasten off and weave in the end. This creates a clean, slightly reinforced top edge.
Section 3: Lace Edging
Thread approximately 85 beads onto the working thread before beginning this section.
The lace edging is worked along the bottom long edge of the band. With RS of band facing and working into the bottom edge of Row 14, join yarn with sl st in the 4th stitch from the right-hand end (this skips 3 stitches for the crimp finding allowance).
Lace Row 1 (Setup): Ch 1. Sc in the joining stitch. Sc in each of the next 111 stitches across, stopping 3 stitches before the left-hand end. Do not work into the last 3 stitches. Turn. (112 sc)
Checkpoint 2: You now have 112 sc in the lace setup row. Confirm this is 7 groups of 16. 7 x 16 = 112.
Continue working the lace edging rows according to the shell and chain structure, building each of the seven pointed motifs with beaded accents placed at decorative intervals. Work firmly to maintain crisp stitch definition throughout the lace section.
Finishing Your Gothic Choker
Once the lace edging is complete, weave in all remaining ends securely with your tapestry needle.
Blocking: Pin the choker flat on your blocking board using T-pins. Mist lightly with water. Pin each lace point into its proper shape, stretching gently to open the lace pattern. Allow to dry completely before removing pins.
Attaching Hardware: Slide each short end of the band into a ribbon crimp finding. Use flat-nose pliers to close the crimp firmly around the fabric. Apply a small amount of jewelry glue inside the crimp before closing if desired for extra security.
Attach the lobster claw clasp to one crimp finding using a jump ring. Attach the extender chain to the other crimp finding. Add the small heart charm to the end of the extender chain.
Attaching the Pendant: Thread the loop at the top of your wire-wrapped crystal pendant through the picot at the center lace point (the 4th point from either end). Close the loop with round-nose pliers, or use a small jump ring to connect.
Tips for Success with This Crochet Tutorial
Thread crochet requires good lighting and patience. Work in a well-lit area where you can see each individual stitch clearly.
If you have never threaded beads onto yarn before, practice with a few beads on a scrap piece of thread first. A twisted-wire beading needle makes this process much easier than trying to stiffen the thread end and poke it through bead holes.
Keep your tension consistent throughout the band section. Uneven tension will cause the band to twist or ripple.
When working the bead stitches, push the bead firmly against the back of your work before completing the stitch. This locks the bead in place.
Count your stitches at the end of each row, especially in the band section. Thread crochet stitches are small and easy to skip accidentally.
Styling Your Finished Choker
This gothic lace choker pairs beautifully with simple necklines. A plain black top or dress allows the intricate lacework to take center stage.
For a dramatic evening look, wear the choker with your hair swept up to showcase the full design against your neck and collarbone.
The adjustable extender chain allows you to position the choker higher or lower on your neck depending on your preference and outfit.
I hope you enjoy making this gothic lace choker as much as I enjoyed designing it. The combination of structured crochet, delicate lace, and sparkling beads creates a truly statement piece.
If you make this pattern, I would absolutely love to see your finished choker. Tag me on Instagram or share a photo in my Facebook group. Save this pattern to your Pinterest boards so you can find it whenever you are ready to start. And please drop a comment below to let me know how your project turns out or if you have any questions along the way. Happy crocheting!
You Might Also Like
- Autumn Burnt Orange Monstera Crochet Plant Free Pattern
- Mermaid Tail Sparkle Baby Blanket Free Crochet Pattern
- Dusty Rose Romantic Crochet Dress Free Pattern
- Mint Green Summer Baby Romper Free Crochet Pattern
