
I don’t know about you, but I have always dreamed of wearing my love for nature right on my sleeves. Or in this case, on my wings.
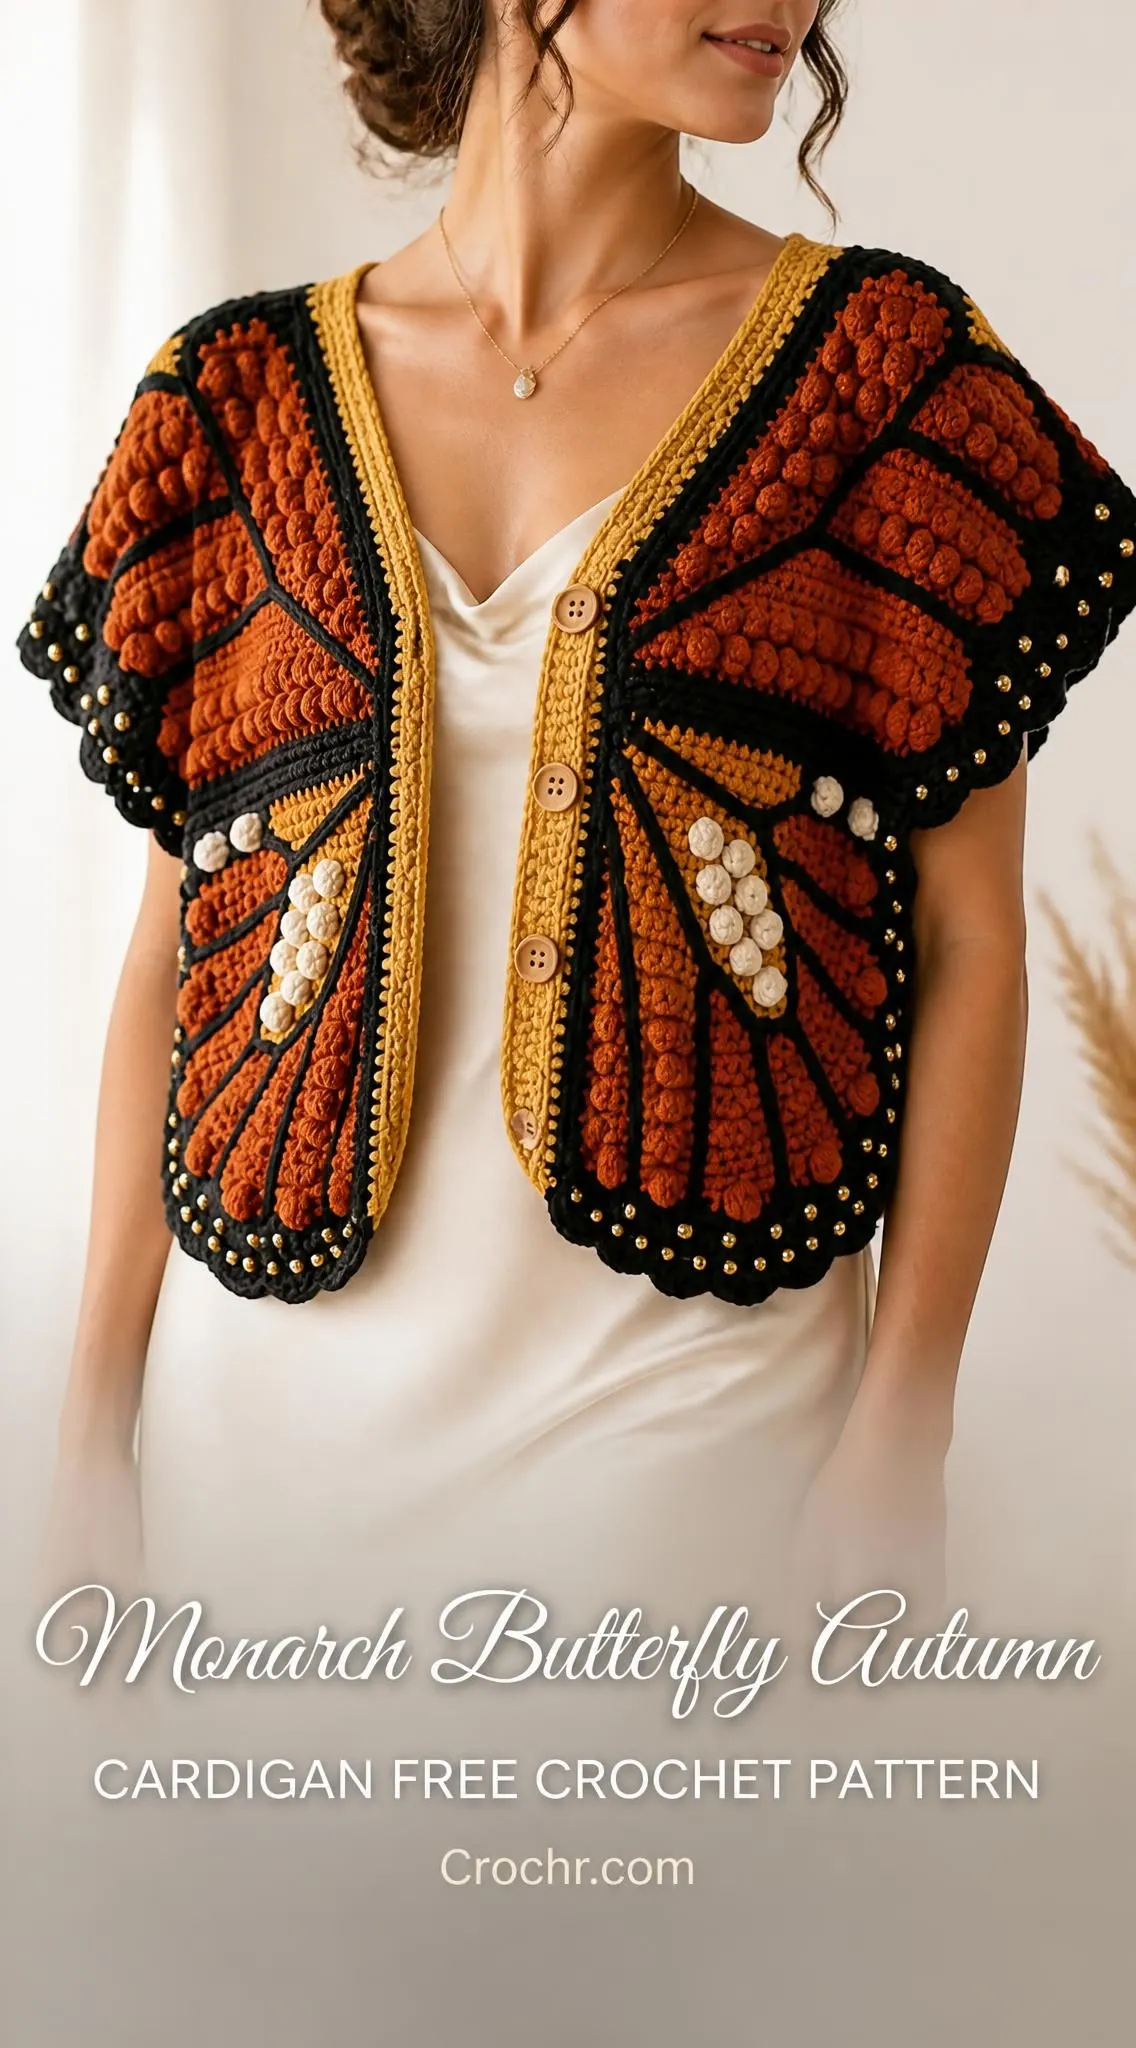
This monarch butterfly cardigan is the kind of project that makes people stop you on the street. It transforms a simple cropped cardigan into wearable art, complete with the iconic orange and black wing pattern, textured bobble cells, and those signature white spot markings along the lower wings. When you spread your arms, you become the butterfly.
Fair warning: this is not a weekend project. But if you have ever wanted to create something truly show-stopping, something that captures the beauty of autumn migration season in yarn form, this is your pattern. Let me walk you through every single step.
Why This Pattern is Worth the Effort
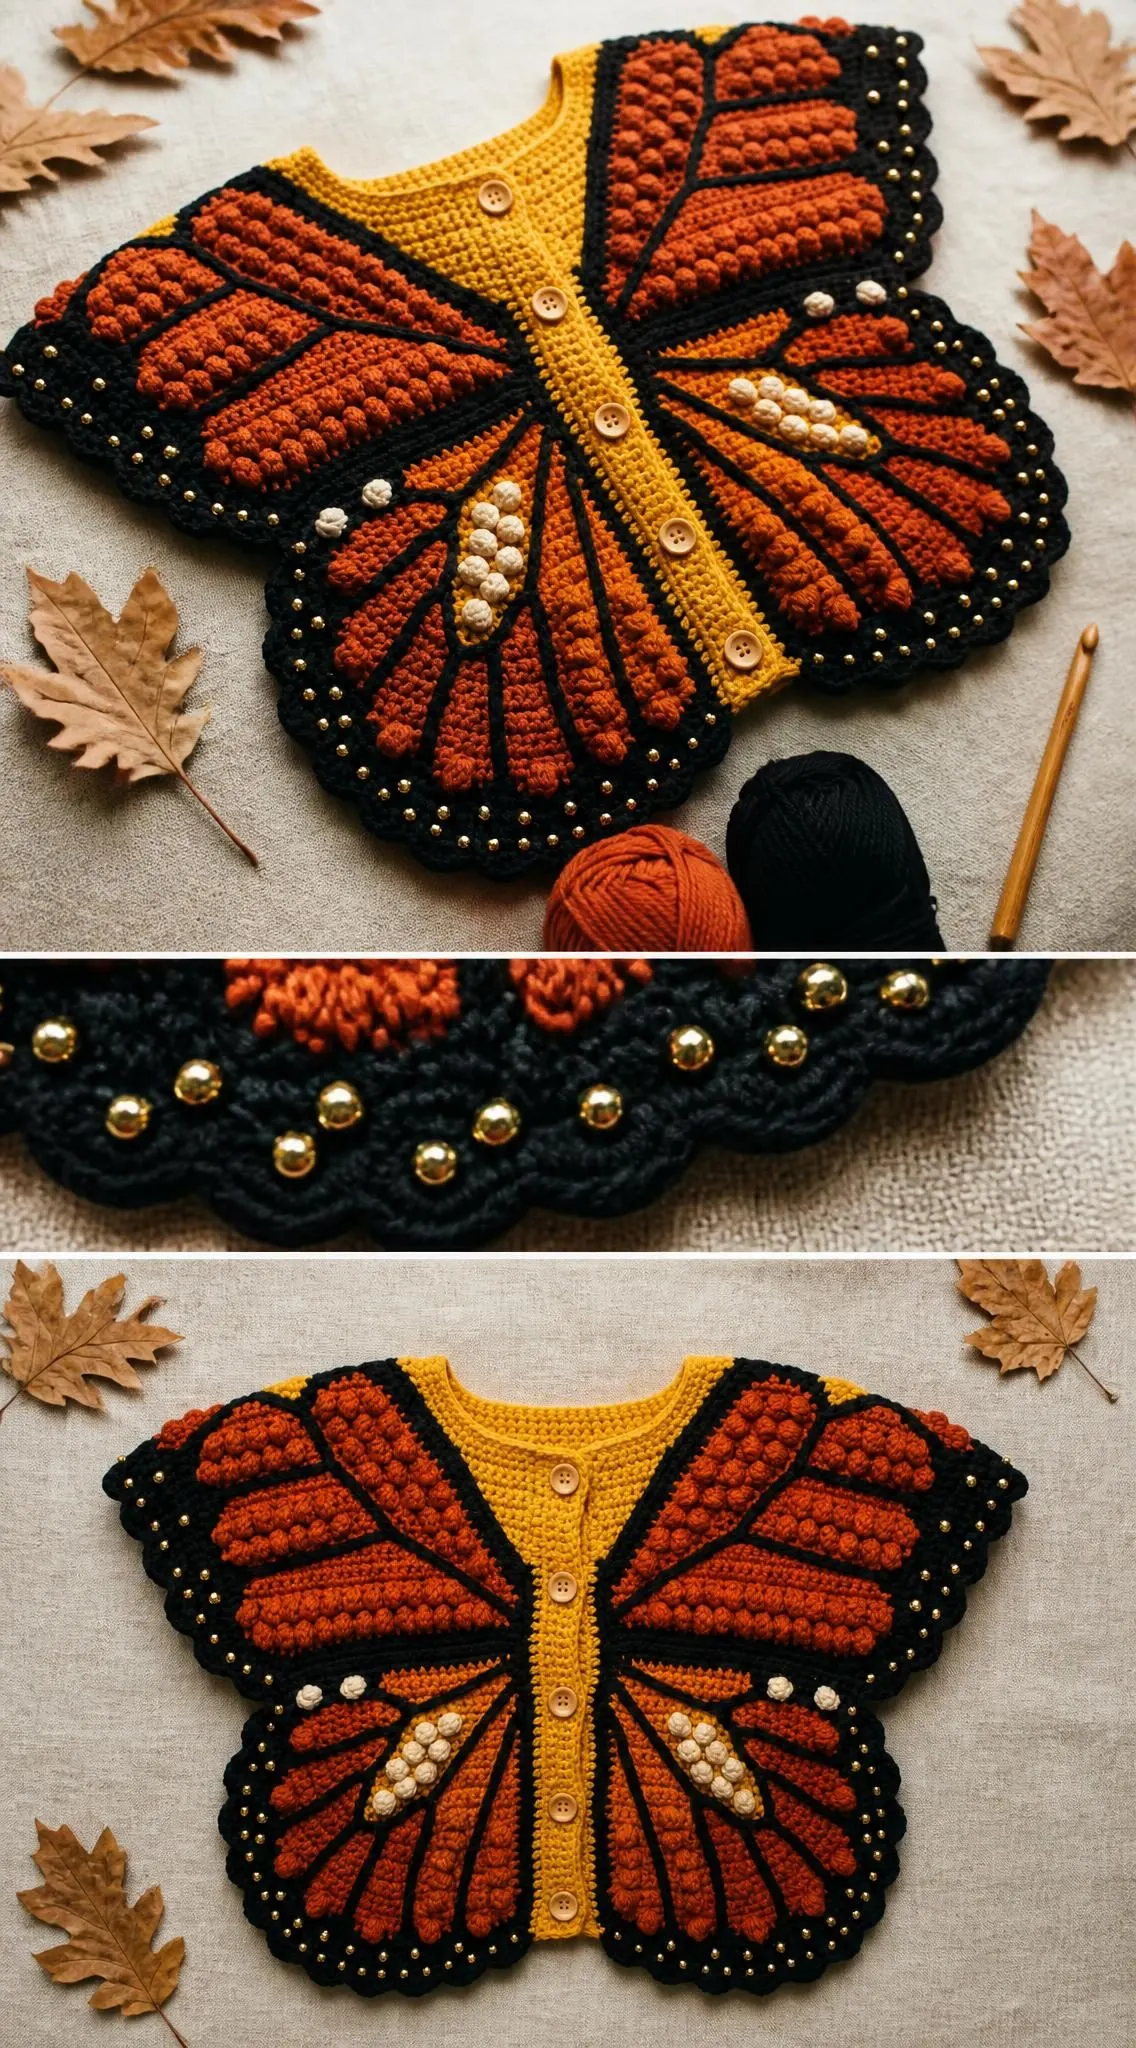
The monarch butterfly cardigan is an advanced intermediate to advanced project that takes approximately 40 to 60 hours to complete. I know that sounds like a lot. But consider what you are creating: a fully shaped garment with realistic wing silhouettes, dimensional bobble texture mimicking wing cells, surface crochet veining, gold bead embellishments, and cream accent clusters for those distinctive white spots.
Every element serves the design. The golden yellow center represents the butterfly’s body. The burnt orange and deep amber sections create the wing fill. The black edging and veining bring the whole piece together with that unmistakable monarch look.
This cardigan fits an adult medium to large with a finished chest circumference of approximately 42 inches and a total wingspan of 46 inches tip to tip. When you button it up and stretch out your arms, the full butterfly effect comes to life.
Materials You Will Need
Gather these supplies before you begin. Having everything ready makes colorwork projects so much smoother.
Yarn (all worsted weight, category 4):
Recommended Yarn Options:
Lion Brand Pound of Love works beautifully for this project. It is affordable, widely available, and gives excellent stitch definition for the bobbles. You could also use Paintbox Yarns Simply DK held double, or for a premium option, Malabrigo Rios in coordinating colorways.
Hooks:
Notions:
Gauge
With your J-10 / 6.0 mm hook and worsted weight yarn:
Please swatch. I cannot stress this enough. The wing shaping depends entirely on accurate gauge. If your gauge is off, your butterfly will not look right. The bobble stitch occupies approximately the same horizontal space as two single crochet stitches, and bobble rows run slightly taller than plain rows. The pattern accounts for this.
Finished Measurements
Abbreviations and Stitch Definitions
Let me break down every abbreviation you will encounter. If you are newer to garment construction, bookmark this section.
Special Stitches
Bobble Stitch (bo)
The bobble creates the textured cell clusters in the upper wing sections. Here is how to work it:
1. Yarn over, insert hook into the indicated stitch
2. Yarn over and pull up a loop. Yarn over and pull through two loops on hook. You now have an incomplete double crochet with two loops remaining on hook.
3. Repeat steps 1 and 2 four more times into the same stitch. You will have six loops on hook.
4. Yarn over and pull through all six loops.
5. Chain 1 to close the bobble and lock it to the front of the work.
The closing chain-1 does not count as a stitch. The bobble counts as one stitch.
Surface Slip Stitch (for veining)
This technique adds the black wing veins after the main fabric is complete:
1. Join Color D with a slip knot at the starting point of the vein line
2. Insert hook through fabric from front to back
3. Yarn over and pull a loop through both the fabric and the loop on hook
4. Continue along the vein path, inserting hook one stitch or row ahead each time
5. Fasten off and weave tail through back of surface stitches
Scallop Border Stitch
This creates the distinctive scalloped black edge:
1. Join Color D to the wing edge
2. Work 1 sc in joining stitch
3. Skip 1 stitch, work 5 dc into next stitch (shell made)
4. Skip 1 stitch, work 1 sc into next stitch
5. Repeat steps 3 and 4 around
Cream Bobble Cluster
The white spots are groups of three bobbles worked side by side in cream yarn. Work three consecutive bobbles to form one elongated spot marking.
Construction Overview
Before diving into the row-by-row instructions, understand how this cardigan comes together. The garment is worked flat in three separate pieces: back panel, left front panel, and right front panel. Each piece starts at the neck/shoulder edge and works downward.
The wing silhouette is shaped through strategic increases at outer wing edges and decreases toward the armhole areas. The lower wing flare comes from additional increases in the lower half of each panel.
Color placement throughout:
Back Panel Instructions
The back panel is worked from the neckline down to the lower wing tips.
Back Panel Setup
With Color A and your J-10 hook, chain 51.
Row 1 (RS): Starting in 2nd chain from hook, sc across. Turn. (50 sc)
This foundation row forms the upper back neckline edge, measuring approximately 14.25 inches.
Back Panel Upper Wing Section (Rows 2-29)
The center 14 stitches remain in Color A throughout. Stitches on either side are worked in Color B with bobble texture.
Color layout:
Row 2 (RS): With Color B, 2 sc in first st (inc made), sc across to center 14 sts, join Color A and sc across center 14, join Color B and sc across to last st, 2 sc in last st. Turn. (52 sc)
Row 3 (WS): With Color B, sc across to center, Color A across center 14, Color B across to end. Turn. (52 sc)
Row 4 (RS): With Color B, 2 sc in first st, sc 1, bo in next st, (sc 2, bo in next st) rep to 2 sts before center, sc 2, Color A sc 14, Color B sc 2, (bo in next st, sc 2) rep to last 3 sts, bo in next st, sc 1, 2 sc in last st. Turn. (54 sc)
Row 5 (WS): Color B sc across to center, Color A sc 14, Color B sc to end. Turn. (54 sc)
Row 6 (RS): Color B 2 sc in first st, sc across to 1 st before center, sc 1, Color A sc 14, Color B sc 1, sc across to last st, 2 sc in last st. Turn. (56 sc)
Row 7 (WS): Work even across in established colors. Turn. (56 sc)
Row 8 (RS): Color B 2 sc in first st, sc 2, bo in next st, (sc 3, bo in next st) rep to 2 sts before center, sc 2, Color A sc 14, Color B sc 2, (bo in next st, sc 3) rep to last 4 sts, bo in next st, sc 2, 2 sc in last st. Turn. (58 sc)
Row 9 (WS): Work even in established colors. Turn. (58 sc)
Row 10 (RS): Color B 2 sc in first st, sc across to 1 st before center, Color A sc 14, Color B sc across to last st, 2 sc in last st. Turn. (60 sc)
Row 11 (WS): Work even. Turn. (60 sc)
Row 12 (RS): Color B 2 sc in first st, sc 2, bo, (sc 3, bo) rep to 2 sts before center, sc 2, Color A sc 14, Color B sc 2, (bo, sc 3) rep to last 4 sts, bo, sc 2, 2 sc in last st. Turn. (62 sc)
Row 13 (WS): Work even. Turn. (62 sc)
Row 14 (RS): Color B 2 sc in first st, sc across to 1 st before center, Color A sc 14, Color B sc across to last st, 2 sc in last st. Turn. (64 sc)
Row 15 (WS): Work even. Turn. (64 sc)
Row 16 (RS): Color B 2 sc in first st, sc 2, bo, (sc 3, bo) rep to 2 sts before center, sc 2, Color A sc 14, Color B sc 2, (bo, sc 3) rep to last 4 sts, bo, sc 2, 2 sc in last st. Turn. (66 sc)
Row 17 (WS): Work even. Turn. (66 sc)
Row 18 (RS): Color B 2 sc in first st, sc across to 1 st before center, Color A sc 14, Color B sc across to last st, 2 sc in last st. Turn. (68 sc)
Row 19 (WS): Work even. Turn. (68 sc)
Row 20 (RS): Color B 2 sc in first st, sc 2, bo, (sc 3, bo) rep to 2 sts before center, sc 2, Color A sc 14, Color B sc 2, (bo, sc 3) rep to last 4 sts, bo, sc 2, 2 sc in last st. Turn. (70 sc)
Row 21 (WS): Work even. Turn. (70 sc)
Row 22 (RS): Color B 2 sc in first st, sc across to 1 st before center, Color A sc 14, Color B sc across to last st, 2 sc in last st. Turn. (72 sc)
Row 23 (WS): Work even. Turn. (72 sc)
Row 24 (RS): Color B 2 sc in first st, sc 1, bo, (sc 3, bo) rep to 2 sts before center, sc 2, Color A sc 14, Color B sc 2, (bo, sc 3) rep to last 3 sts, bo, sc 1, 2 sc in last st. Turn. (74 sc)
Row 25 (WS): Work even. Turn. (74 sc)
Row 26 (RS): Color B 2 sc in first st, sc across to 1 st before center, Color A sc 14, Color B sc across to last st, 2 sc in last st. Turn. (76 sc)
Row 27 (WS): Work even. Turn. (76 sc)
Row 28 (RS): Color B sc across to 1 st before center (no increase this row), Color A sc 14, Color B sc across to end. Turn. (76 sc)
Row 29 (WS): Work even. Turn. (76 sc)
Checkpoint: Your back panel should now measure approximately 7.25 inches from the foundation chain and approximately 21.75 inches wide. The outer corners should have a gently rounded appearance.
Upper Wing to Lower Wing Transition (Rows 30-41)
The wing narrows slightly here before expanding again for the lower wing. Begin introducing Color C on the outermost 10 stitches of each wing section starting at Row 38.
Row 30 (RS): Color B sc2tog at beg, sc across to 1 st before center, Color A sc 14, Color B sc across to last 2 sts, sc2tog. Turn. (74 sc)
Row 31 (WS): Work even. Turn. (74 sc)
Row 32 (RS): Color B sc2tog, sc 1, bo, (sc 3, bo) rep to 2 sts before center, sc 2, Color A sc 14, Color B sc 2, (bo, sc 3) rep to last 4 sts, bo, sc 1, sc2tog. Turn. (72 sc)
Row 33 (WS): Work even. Turn. (72 sc)
Row 34 (RS): Color B sc2tog, sc across to 1 st before center, Color A sc 14, Color B sc across to last 2 sts, sc2tog. Turn. (70 sc)
Row 35 (WS): Work even. Turn. (70 sc)
Row 36 (RS): Color B sc2tog, sc across to 1 st before center, Color A sc 14, Color B sc across to last 2 sts, sc2tog. Turn. (68 sc)
Row 37 (WS): Work even. Turn. (68 sc)
Color C introduction layout:
Row 38 (RS): Color C 2 sc in first st, sc 8, Color B sc across to 1 st before center, Color A sc 14, Color B sc across to last 10 sts, Color C sc 8, 2 sc in last st. Turn. (70 sc)
Row 39 (WS): Color C sc 10, Color B sc across to center 14, Color A sc 14, Color B sc across to last 10, Color C sc 10. Turn. (70 sc)
Row 40 (RS): Color C 2 sc in first st, sc across Color C section to Color B, Color B sc across bo section (sc 1, bo, sc 3, bo pattern) to center, Color A sc 14, Color B bo section to last Color C sts, Color C sc across to last st, 2 sc in last st. Turn. (72 sc)
Row 41 (WS): Work even in established three-color layout. Turn. (72 sc)
Checkpoint: Your panel is now at the wing indentation. It should measure approximately 10 inches from foundation and approximately 20.5 inches wide.
Lower Wing Section (Rows 42-63)
The lower wing expands aggressively. White spot clusters appear in Rows 56-58.
Row 42 (RS): Color C 2 sc in first st, sc across Color C section, Color B sc across to 1 st before center, Color A sc 14, Color B sc across to Color C, Color C sc across to last st, 2 sc in last st. Turn. (74 sc)
Row 43 (WS): Work even in established colors. Turn. (74 sc)
Row 44 (RS): Color C 2 sc in first st, sc across Color C, Color B sc across with bo pattern to center, Color A sc 14, Color B bo pattern to Color C, Color C sc to last st, 2 sc in last st. Turn. (76 sc)
Row 45 (WS): Work even. Turn. (76 sc)
Row 46 (RS): Color C 2 sc in first st, sc across Color C, Color B sc to center, Color A sc 14, Color B sc to Color C, Color C sc to last st, 2 sc in last st. Turn. (78 sc)
Row 47 (WS): Work even. Turn. (78 sc)
Row 48 (RS): Color C 2 sc in first st, sc across Color C, Color B sc across with bo pattern to center, Color A sc 14, Color B bo pattern to Color C, Color C sc to last st, 2 sc in last st. Turn. (80 sc)
Row 49 (WS): Work even. Turn. (80 sc)
Row 50 (RS): Color C 2 sc in first st, sc across Color C, Color B sc to center, Color A sc 14, Color B sc to Color C, Color C sc to last st, 2 sc in last st. Turn. (82 sc)
Row 51 (WS): Work even. Turn. (82 sc)
Row 52 (RS): Color C 2 sc in first st, sc across Color C, Color B sc bo pattern to center, Color A sc 14, Color B bo pattern to Color C, Color C sc to last st, 2 sc in last st. Turn. (84 sc)
Row 53 (WS): Work even. Turn. (84 sc)
Row 54 (RS): Color C 2 sc in first st, sc across Color C, Color B sc to center, Color A sc 14, Color B sc to Color C, Color C sc to last st, 2 sc in last st. Turn. (86 sc)
Row 55 (WS): Work even. Turn. (86 sc)
White Spot Placement (Rows 56-58)
Row 56 (RS): Color C 2 sc in first st, sc 5, cream bo, cream bo, cream bo (first cluster), sc across remainder of Color C, Color B sc to center, Color A sc 14, Color B sc across to Color C, Color C sc 5, cream bo, cream bo, cream bo (second cluster on left side), sc to last st, 2 sc in last st. Turn. (88 sc)
Row 57 (WS): Work even in established colors, treating cream bobbles as sc stitches. Turn. (88 sc)
Row 58 (RS): Color C 2 sc in first st, sc 11, cream bo, cream bo, cream bo (second cluster on right side), sc to end of Color C, Color B sc bo pattern to center, Color A sc 14, Color B bo pattern to Color C, Color C sc 11, cream bo, cream bo, cream bo (second cluster on left side), sc to last st, 2 sc in last st. Turn. (90 sc)
Row 59 (WS): Work even. Turn. (90 sc)
Row 60 (RS): Color C 2 sc in first st, sc across Color C, Color B sc to center, Color A sc 14, Color B sc to Color C, Color C sc to last st, 2 sc in last st. Turn. (92 sc)
Row 61 (WS): Work even. Turn. (92 sc)
Row 62 (RS): Color C 2 sc in first st, sc across Color C, Color B bo pattern to center, Color A sc 14, Color B bo pattern to Color C, Color C sc to last st, 2 sc in last st. Turn. (94 sc)
Row 63 (WS): Work even. Turn. (94 sc)
Lower Wing Tip Shaping (Rows 64-93)
The lower wings now taper toward the points. The Color A center extends lower than the outer edges.
Row 64 (RS): Color C sc2tog, sc across Color C to Color B, Color B sc to center, Color A sc 14, Color B sc to Color C, Color C sc across to last 2 sts, sc2tog. Turn. (92 sc)
Row 65 (WS): Work even. Turn. (92 sc)
Row 66 (RS): Color C sc2tog, sc across Color C, Color B sc bo pattern to center, Color A sc 14, Color B bo pattern to Color C, Color C sc to last 2 sts, sc2tog. Turn. (90 sc)
Row 67 (WS): Work even. Turn. (90 sc)
Row 68 (RS): Color C sc2tog, sc across Color C, Color B sc to center, Color A sc 14, Color B sc to Color C, Color C sc to last 2 sts, sc2tog. Turn. (88 sc)
Row 69 (WS): Work even. Turn. (88 sc)
Row 70 (RS): Color C sc2tog at beg and end, Color B sc bo pattern to center, Color A sc 14, Color B bo pattern, Color C sc2tog at end. Turn. (86 sc)
Row 71 (WS): Work even. Turn. (86 sc)
Row 72 (RS): Color C sc2tog at each outer edge, sc across in established colors. Turn. (84 sc)
Row 73 (WS): Work even. Turn. (84 sc)
Row 74 (RS): Color C sc2tog, sc to Color B, Color B sc2tog at Color C join and at center join, sc to center, Color A sc 14, Color B sc2tog at center join and at Color C join, sc to Color C, Color C sc to last 2 sts, sc2tog. Turn. (78 sc)
Row 75 (WS): Work even. Turn. (78 sc)
Row 76 (RS): Color C sc2tog, sc to Color B, Color B sc2tog, sc to center, Color A sc 14, Color B sc2tog, sc to Color C, Color C sc to last 2, sc2tog. Turn. (74 sc)
Row 77 (WS): Work even. Turn. (74 sc)
Row 78 (RS): Color C sc2tog, sc 2, Color B sc2tog, sc to center, Color A sc 14, Color B sc to last of Color B, sc2tog, Color C sc 2, sc2tog. Turn. (70 sc)
Row 79 (WS): Work even. Turn. (70 sc)
Row 80 (RS): Color B sc2tog at beg, sc to center, Color A sc 14, Color B sc to last 2 sts, sc2tog. Turn. (68 sc)
Row 81 (WS): Work even in Color B and Color A only. Turn. (68 sc)
Row 82 (RS): Color B sc2tog, sc to center, Color A sc 14, Color B sc to last 2 sts, sc2tog. Turn. (66 sc)
Row 83 (WS): Work even. Turn. (66 sc)
Row 84 (RS): Color B sc2tog, sc to 2 sts before center, sc2tog, Color A sc 14, Color B sc2tog, sc to last 2 sts, sc2tog. Turn. (62 sc)
Row 85 (WS): Work even. Turn. (62 sc)
Row 86 (RS): Color B sc2tog, sc to center, Color A sc 14, Color B sc to last 2, sc2tog. Turn. (60 sc)
Row 87 (WS): Work even. Turn. (60 sc)
Row 88 (RS): Color B sc2tog at each side. Turn. (58 sc)
Row 89 (WS): Work even. Turn. (58 sc)
Row 90 (RS): Color B sc2tog, sc2tog (double decrease at each side). Turn. (54 sc)
Row 91 (WS): Work even. Turn. (54 sc)
Row 92 (RS): Color B sc2tog at each side. Turn. (52 sc)
Continue decreasing until the lower body tab is complete, following the established decrease pattern.
Front Panel Instructions
The left and right front panels mirror each other. Each begins with a foundation chain at the shoulder and works downward, following the same color layout principles. The center body column (Color A) runs along the button band edge, with wing sections expanding outward.
Work each front panel to match the back, adjusting stitch counts proportionally. The button band is added after seaming.
Assembly and Finishing
Blocking
Block all three panels before seaming. Pin each piece to your blocking mats, stretching gently to achieve the wing silhouette. Spray with water and allow to dry completely.
Seaming
Join the back and front panels at the shoulders using mattress stitch or whip stitch. Leave the side edges open, as these form the armholes.
Surface Slip Stitch Veining
Using Color D and the surface slip stitch technique, add the black vein lines. Follow the natural wing vein pattern: lines radiating from the body center outward toward the wing edges. Space veins approximately 1.5 to 2 inches apart, curving to follow the wing contours.
Scallop Border
With Color D and your J-10 hook, work the scallop border around all outer wing edges. Adjust shell placement at wing tips and indentations to keep the border smooth.
Neckline and Button Band
Using your I-9 hook and Color A, work single crochet trim around the neckline. Continue down each front edge for the button bands. Create button loops on one side by chaining 3 and skipping 3 stitches at evenly spaced intervals for five buttons.
Bead Application
Thread your beading needle with matching thread. Sew gold seed beads individually along the scallop border, placing beads in the dips between shells for a consistent look.
Buttons
Sew five wooden buttons to the button band opposite the loops.
Pattern Notes and Tips
Take your time with this project. The colorwork requires attention, but each section builds on the last. If you lose your place, count your stitches at the end of every row.
The bobble texture really pops after blocking. Do not skip this step.
When working the surface slip stitch veining, use a photo of a real monarch butterfly as reference. The natural variation in vein placement makes each cardigan unique.
You Did It
This monarch butterfly cardigan is a labor of love, but the result speaks for itself. You have created something that celebrates both craft and nature in one stunning piece. Every bobble, every bead, every carefully placed vein line comes together to honor one of the most beautiful creatures in the natural world.
I would absolutely love to see your finished cardigans. Save this pattern to your Pinterest boards so you can find it whenever inspiration strikes, and please leave a comment below when you complete yours. Your photos make my day, and I know they inspire other crafters to take on ambitious projects like this one. Happy crocheting, friend.
You Might Also Like
- Lavender Garden Baby Dress Free Crochet Pattern
- Charcoal Gray Button Cuff Slipper Boots Free Crochet Pattern
- Sage Green Daisy Square Mini Dress Free Crochet Pattern
- Lavender Granny Square Sofa Cover Free Crochet Pattern
