
Last summer, I found myself standing in line at the farmer’s market, juggling two canvas bags that kept sliding off my shoulders while trying to pay for tomatoes. One bag was too small, the other was that sad, floppy thing that never holds its shape. I remember thinking, "I could make something better than this." And honestly? That frustrating Saturday morning is exactly why this tote exists.
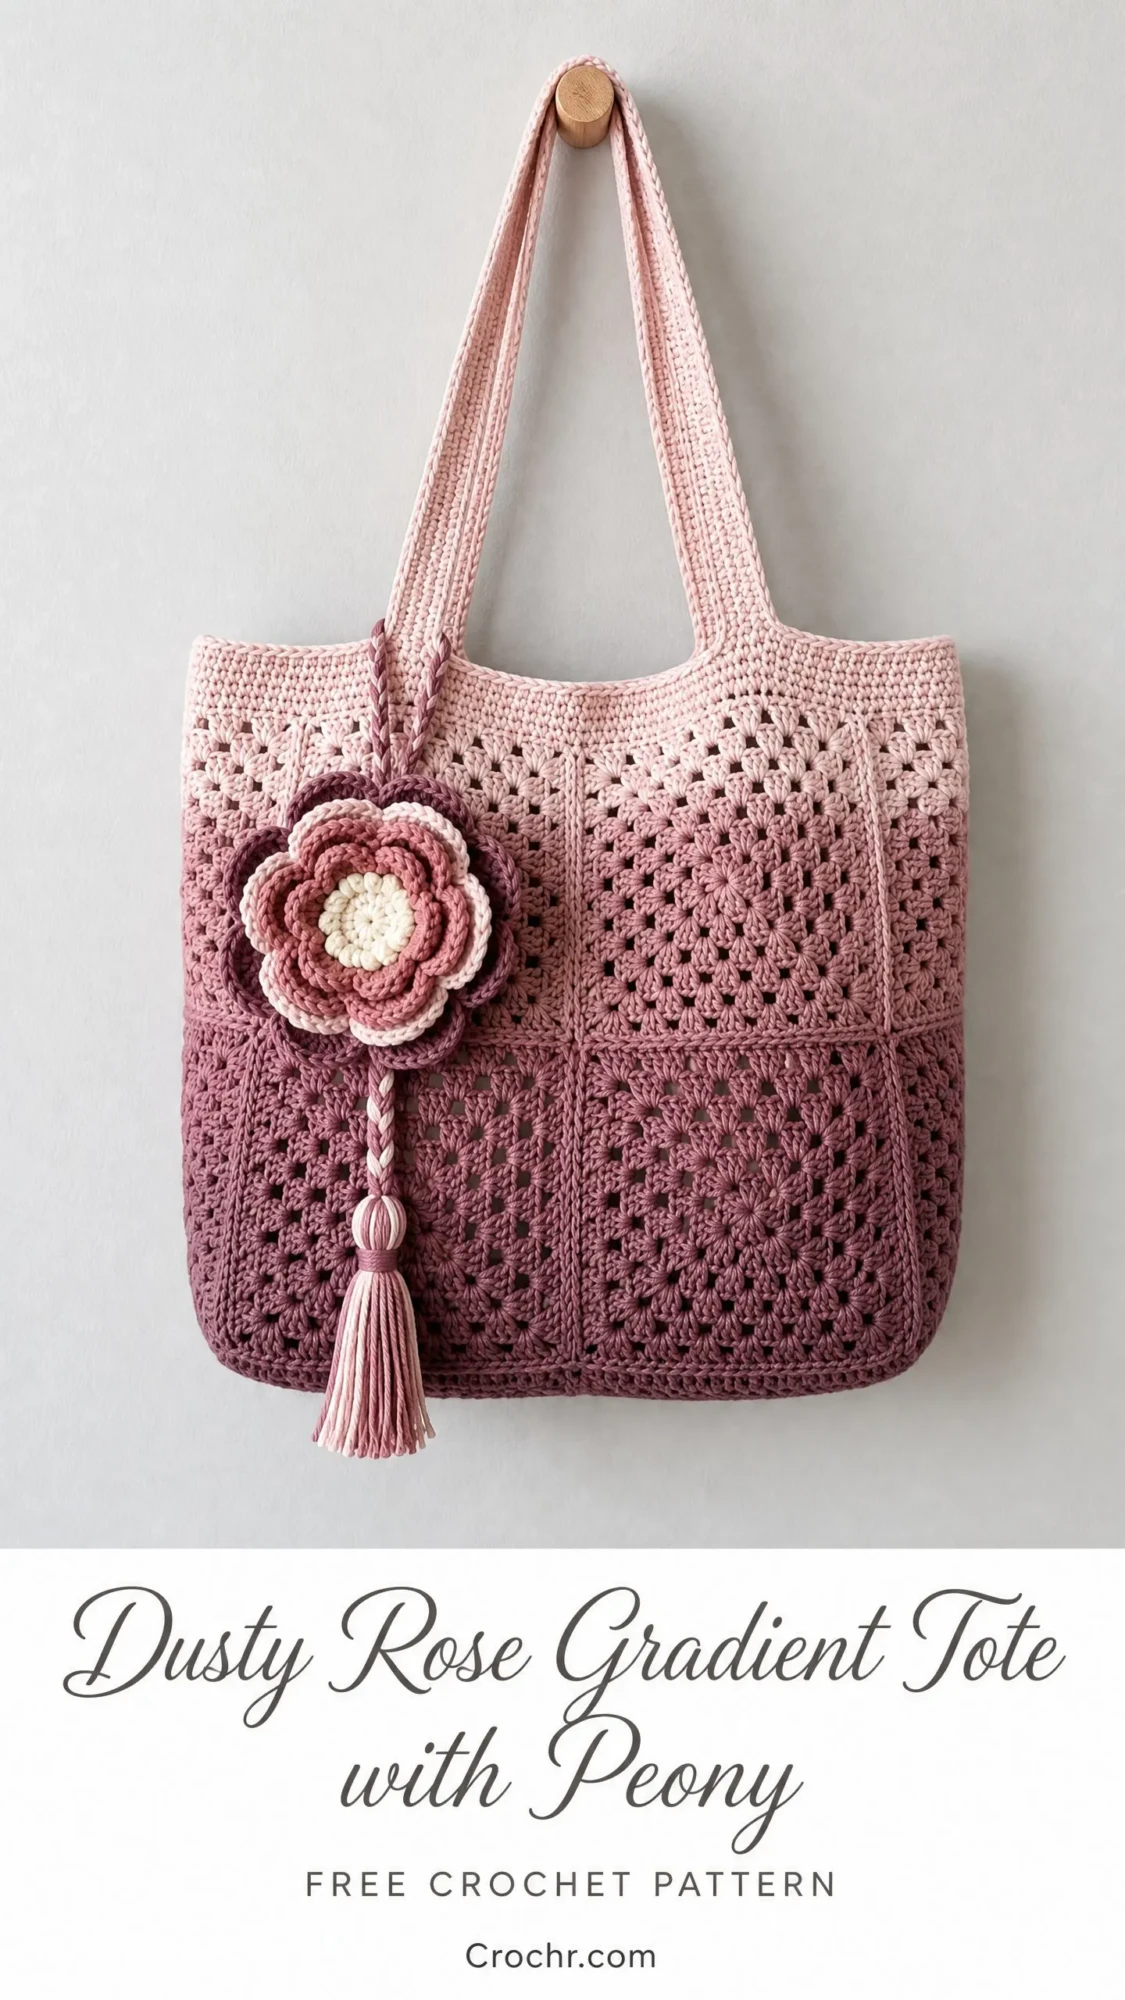
I wanted a bag that could actually stand up on its own, hold a decent amount without stretching into a sad hammock shape, and look beautiful while doing it. The gradient effect happened almost by accident when I was playing with three pink skeins from my stash, and the peony embellishment came later when the bag felt like it needed just one more special touch.
This project combines classic granny squares with thoughtful color placement to create that gorgeous ombre flow from soft blush to deep dusty mauve. If you have been wanting to try color transitions or level up your granny square game, this tote is the perfect excuse to dive in.
About This Crochet Pattern
This structured tote bag is built entirely from classic granny squares arranged in a 2×2 grid on both the front and back panels. The squares are joined seamlessly and worked in a gradient colorway that transitions from pale blush at the top edge to deep dusty mauve at the base. A solid top border and long shoulder straps complete the bag, while a removable peony flower embellishment with a braided cord and tassel adds that extra bit of charm.
Skill Level: Intermediate. You should be comfortable with joining granny squares, working color changes smoothly, crocheting uniform straps, and assembling a dimensional flower. No complex shaping is required, but neat finishing and consistent tension are essential for a polished result.
Time Estimate: 12 to 18 hours total, spread across multiple sessions.
Finished Measurements
Bag body: approximately 13 inches wide by 12 inches tall (33 cm by 30.5 cm), excluding straps
Each granny square: approximately 6 inches by 6 inches (15 cm by 15 cm) before joining, 5.75 inches by 5.75 inches (14.5 cm by 14.5 cm) after joining seam is absorbed
Strap length: approximately 22 inches (56 cm) from top edge of bag to top of strap loop
Total strap drop (shoulder carry): approximately 11 inches (28 cm)
Materials You Will Need
Yarn: Approximately 600 to 700 yards (550 to 640 m) total of DK weight cotton or cotton-blend yarn (CYCA weight 3) distributed across three shades:
Hook: US Size G-6 (4.0 mm) for bag body, US Size F-5 (3.75 mm) for straps (optional, to keep straps firm)
Notions:
Recommended Yarn Options
Option 1: Lion Brand 24/7 Cotton in Dusty Pink (Color A), Mauve (Color B), and Dusty Purple (Color C). This 100% cotton yarn is widely available, machine washable, and takes on stitch definition beautifully for granny squares.
Option 2: Paintbox Yarns Cotton DK in Blush Pink, Dusty Rose, and Vintage Pink. This yarn is smooth and affordable, ideal for the clean color transitions this bag requires.
Option 3: Drops Safran (70% cotton, 30% viscose) in shades Rose, Old Pink, and Antique Pink. The slight sheen from the viscose content gives the finished bag a subtle polish.
Substitution note: Choose any DK weight (CYCA 3) cotton or cotton-blend yarn. Avoid wool or acrylic for this project because cotton holds structure better in a bag, resists stretching under load, and blocks to flat granny squares more reliably.
Gauge
With US G-6 hook and DK cotton:
One completed 5-round granny square = 6 inches by 6 inches (15 cm by 15 cm), measured after a light blocking.
Alternatively: 16 single crochet (sc) x 18 rows = 4 inches by 4 inches (10 cm by 10 cm) in single crochet.
Gauge matters here. Each finished panel must measure approximately 12 inches wide by 12 inches tall so the bag dimensions stay consistent. If your squares come out smaller, go up one hook size. If they come out larger, go down one hook size.
Abbreviations
Special Stitches
3-dc shell: Work 3 double crochet stitches into the same stitch or space. This creates one full granny square "arm."
Flat join: Hold two squares with WS together or RS together as specified. Insert hook through both corresponding corner or edge stitches, draw up a loop, slip stitch to join. Continue slip stitch evenly across the edge, working through both layers.
Crab stitch (reverse single crochet): With RS facing, do not turn. Insert hook into the stitch to the RIGHT (opposite direction of normal crochet), yarn over, draw up a loop, yarn over, pull through both loops on hook. This creates a decorative twisted edge.
Braided cord: Cut 6 strands of Color C, each 30 inches (76 cm) long. Hold all 6 together and fold in half to create a looped end. Divide into 3 groups of 4 strands each. Braid for approximately 8 inches (20 cm). Knot at the end and trim evenly.
Pattern Notes Before You Begin
1. The gradient color change follows this logic: Rounds 1 through 2 of each square are worked in Color A (palest), Rounds 3 through 4 in Color B (mid), and Round 5 in Color C (darkest). The visual gradient from pale at the top to dark at the bottom is achieved by rotating the squares so Color A faces upward.
2. The bag body is made from 8 granny squares total: 4 for the front panel, 4 for the back panel. The squares on each panel are arranged 2 wide by 2 tall.
3. All rounds are worked with RS facing. At the end of each round, join with a slip stitch to the top of the beginning ch-3 (which counts as the first dc).
4. When changing colors between rounds, finish the last slip stitch join of the current round with the new color. Cut and fasten off the old color. Weave in ends as you go to reduce finishing time.
5. Chain-3 at the beginning of a dc round counts as the first dc throughout.
Part One: Granny Squares (Make 8 Total)
Each square is 5 rounds. The color sequence is:
Granny Square Instructions
Foundation: With Color A, make a magic ring (or ch 4 and join with sl st to form a ring).
Round 1 (Color A):
Ch 3 (counts as dc), work 2 dc into ring, ch 2, [3 dc into ring, ch 2] 3 times, sl st to top of beg ch-3 to join. Fasten off Color A. (12 dc, 4 ch-2 corner sps)
Round 2 (Color A):
Join Color A with sl st to any ch-2 corner sp. Ch 3, work 2 dc into same corner sp, ch 2, 3 dc into same corner sp (corner made), ch 1, [work (3 dc, ch 2, 3 dc) into next ch-2 corner sp, ch 1] 3 times, sl st to top of beg ch-3 to join. Fasten off Color A. (24 dc, 4 ch-2 corner sps, 4 ch-1 sps)
Round 3 (Color B):
Join Color B with sl st to any ch-2 corner sp. Ch 3, work 2 dc into same corner sp, ch 2, 3 dc into same corner sp (corner made), ch 1, 3 dc into next ch-1 sp, ch 1, [work (3 dc, ch 2, 3 dc) into next ch-2 corner sp, ch 1, 3 dc into next ch-1 sp, ch 1] 3 times, sl st to top of beg ch-3 to join. Fasten off Color B. (36 dc, 4 ch-2 corner sps, 8 ch-1 sps)
Round 4 (Color B):
Join Color B with sl st to any ch-2 corner sp. Ch 3, work 2 dc into same corner sp, ch 2, 3 dc into same corner sp (corner made), [ch 1, 3 dc into next ch-1 sp] twice, ch 1, [work (3 dc, ch 2, 3 dc) into next ch-2 corner sp, (ch 1, 3 dc into next ch-1 sp) twice, ch 1] 3 times, sl st to top of beg ch-3 to join. Fasten off Color B. (48 dc, 4 ch-2 corner sps, 12 ch-1 sps)
Round 5 (Color C):
Join Color C with sl st to any ch-2 corner sp. Ch 3, work 2 dc into same corner sp, ch 2, 3 dc into same corner sp (corner made), [ch 1, 3 dc into next ch-1 sp] 3 times, ch 1, [work (3 dc, ch 2, 3 dc) into next ch-2 corner sp, (ch 1, 3 dc into next ch-1 sp) 3 times, ch 1] 3 times, sl st to top of beg ch-3 to join. Fasten off Color C. (60 dc, 4 ch-2 corner sps, 16 ch-1 sps)
Checkpoint: Each finished square should measure 6 inches by 6 inches after light blocking. Make 8 squares total. Lay all 8 out and confirm the gradient is consistent before moving on.
Part Two: Joining Squares Into Panels
Arrange 4 squares into a 2-wide by 2-tall panel for the front. Repeat for the back. On each panel, orient the squares so Color A is at the top rows and Color C is at the bottom rows, creating the ombre effect.
For this bag, join with RS together (seam on inside) using Color C.
Step 1: Hold the bottom-right square of the top row and the top-right square of the bottom row with RS facing each other. Align the adjoining edges.
Step 2: Join Color C with a sl st at the corner ch-2 sp. Working through both layers, sl st into each corresponding st and ch-sp across the edge. At the far corner, sl st into both ch-2 corner sps. Fasten off.
Step 3: Repeat for the left half: join the bottom-left square of the top row to the top-left square of the bottom row in the same way.
Step 4: Now join the two halves together along the vertical center seam. Hold the joined left pair and joined right pair with RS facing each other. Join Color C at the top corner, sl st through both layers along the full vertical center seam. Fasten off.
You now have one complete 2×2 panel. Repeat the entire joining process for the back panel.
Checkpoint: Each completed panel should measure approximately 12 inches wide by 12 inches tall.
Part Three: Joining Front to Back and Working the Base
Hold the front panel and back panel with WS together (RS facing outward on both sides).
Base Seam:
Join Color C at the bottom-right corner with a sl st. Working through both layers along the bottom edge, sc through every corresponding dc, ch-sp, and corner sp across the bottom. At the end, do not fasten off. (Approximately 40 to 44 sc across the bottom edge.)
Side Seams:
Turn the work 90 degrees. Working up the right side edge through both layers, sc evenly up the side, working 1 sc per dc and 1 sc per ch-sp, placing 2 sc at corner ch-2 sps. At the top-right corner, do not fasten off.
Continue along the top edge, working across the front panel top only (not joining, just sc across the top edge of the front panel): sc across all dc and ch-sps of the top edge.
At the top-left corner, work down the left side through both layers, sc evenly down the left side seam to the bottom-left corner.
At the bottom-left corner, sl st to the first sc of the base seam to close. Fasten off and weave in ends.
Checkpoint: The bag body should now stand open at the top and be seamed on three sides.
Part Four: Top Border
Join Color A with sl st to any point along the top opening edge.
Round 1 (Color A):
Ch 1, sc evenly around the entire top opening, working 1 sc per dc, 1 sc per ch, and placing 2 sc at each outer corner. Join with sl st to first sc. (Target: approximately 84 to 88 sc around the top opening.)
Round 2 (Color A):
Ch 1, sc in each sc around. Join with sl st to first sc.
Round 3 (Color A):
Do not ch 1, do not turn. Work crab stitch (reverse sc) in each sc around. Join with sl st to first st. Fasten off.
Part Five: Straps (Make 2)
Each strap is worked as a long sc strip, folded in half, and seamed to make a firm double-thick tube.
Foundation chain: With Color A and US F-5 (or G-6) hook, ch 97.
Row 1: Sc in 2nd ch from hook and in each ch across. Turn. (96 sc)
Row 2: Ch 1, sc in each sc across. Turn. (96 sc)
Row 3: Ch 1, sc in each sc across. Turn. (96 sc)
Row 4: Ch 1, sc in each sc across. Do not turn. Fasten off leaving a 24-inch sewing tail.
Fold the strip in half lengthwise (so the long edges meet). Using the tail and a tapestry needle, whipstitch the two long edges together to create a doubled tube. The finished strap is approximately 22 inches long and approximately 0.75 inch wide.
Make 2 straps.
Attaching Straps
Position each strap approximately 3 inches in from the side edges of the bag, centered over the top border. On the front panel, pin the strap ends down approximately 1.5 inches below the top edge. Repeat on the back panel with the same strap.
Using Color A and a tapestry needle, whipstitch each strap end firmly to the bag, working a rectangle of stitches across the full width of the strap for reinforcement. Repeat for the second strap.
Part Six: Peony Flower Embellishment
The peony is built from four rounds of petals worked in concentric layers.
Flower Center
With Color D (cream) and G-6 hook, make a magic ring.
Round 1: Ch 1, work 6 sc into ring, sl st to join. (6 sc)
Round 2: Ch 1, work 2 sc in each sc around, sl st to join. (12 sc)
Round 3 (Color C, innermost petal layer):
Join Color C. [Ch 3, work 3 dc in same st, ch 3, sl st in same st, sl st in next st] 6 times. (6 small petals formed)
Round 4 (Color C, second petal layer):
Working behind Round 3 petals, sl st into each sc of Round 2, keeping the stitches of Round 3 in front. [Ch 4, work 4 dc in same st, ch 4, sl st in same st, sl st in next st] 6 times. (6 medium petals)
Round 5 (Color B, third petal layer):
Join Color B. Working behind Round 4 petals into the sl sts of Round 2, [ch 5, work 5 dc in same position, ch 5, sl st in same position, sl st forward] 6 times. (6 larger petals in Color B)
Round 6 (Color B, outer petal layer):
Join Color B. Working around the back edge of the whole flower, insert hook into spaces between the base of each Round 5 petal and work [ch 5, hdc, dc, tr, dc, hdc, ch 5, sl st] 6 times evenly spaced around. (6 outermost petals)
Fasten off, leaving a 12-inch tail for sewing. The finished flower should measure approximately 3.5 to 4 inches in diameter.
Tassel
Cut approximately 30 strands of Color A, each 8 inches long. Fold in half. Loop the fold through the knotted end of the braided cord. Pass the cut ends through the loop and pull snug. Wrap a separate length of yarn around the tassel approximately 0.5 inch below the fold to form the tassel head. Knot and hide the wrapping tail inside the tassel. Trim the tassel ends evenly to approximately 3.5 inches below the head.
Assembly
Thread the tail onto a tapestry needle. Pull the tail through the center back of the flower and use it to attach the flower securely to the top of the braided cord. The looped end of the cord passes through the strap to hang the charm removably.
Finishing and Blocking Your Dusty Rose Gradient Tote
1. Weave in all remaining ends securely, burying them in the dc clusters where they are hidden best.
2. Fill the bag with plastic bags or loosely crumpled paper to hold its shape.
3. Lightly mist the entire bag with water or use a damp pressing cloth. Gently press (do not iron directly) to even out the granny squares.
4. Allow to dry completely in shape, approximately 24 hours.
5. If adding a fabric lining, cut fabric to 13 inches by 26 inches. Fold in half. Sew side seams. Fold the top edge over by 0.5 inch and press. Insert into bag with WS of lining against WS of bag. Hand stitch the top folded edge of the lining to the inside of the top border.
Care Instructions
Machine wash on gentle cycle in cold water, or hand wash in cool water with mild detergent. Lay flat to dry. Do not tumble dry, as this can shrink cotton and distort the granny square structure. Reshape while damp if needed. The flower charm can be spot cleaned with a damp cloth. Store the bag stuffed lightly with tissue to maintain its shape.

Size Customization Tips
Larger bag: Work 6-round granny squares instead of 5-round squares. Each square will measure approximately 7.5 inches. A 2×2 panel will yield a bag approximately 15 inches wide by 15 inches tall.
Smaller bag: Work 4-round granny squares (omit Round 5). Each square will measure approximately 4.5 inches. A 2×2 panel yields a bag approximately 9 inches wide by 9 inches tall.
Deeper bag: Add a 3×2 arrangement (3 squares tall, 2 squares wide) per panel instead of 2×2.
I really hope you love making this tote as much as I loved designing it. That peony just makes the whole thing feel so special, and the gradient never fails to get compliments. Thank you so much for choosing this pattern for your next project.
If this dusty rose gradient tote is calling your name but you are not quite ready to start, go ahead and save this pattern to your Pinterest boards so you can find it easily later. And if you do make one, I would absolutely love to see it! Drop a comment below and share your finished bag. Happy crocheting!
You Might Also Like
- Rose Garden Bracelet Free Crochet Pattern
- Ocean Blue Seashell Motif Tote Free Crochet Pattern
- Sunset Ombre Crochet Palazzo Jumpsuit Free Pattern
- Autumn Sunset Ombre Granny Square Cardigan Free Pattern
