I call this one the Autumn Sunset cardigan, and honestly, it has been sitting in my notebook for three years now. I originally sketched it out after a fall hike where the leaves were doing that incredible gradient thing from pale gold to deep rust. I finally pulled out those notes last month and made myself sit down and bring it to life. The result is everything I hoped it would be. Cozy, colorful, and absolutely perfect for layering over a turtleneck when the air gets crisp.
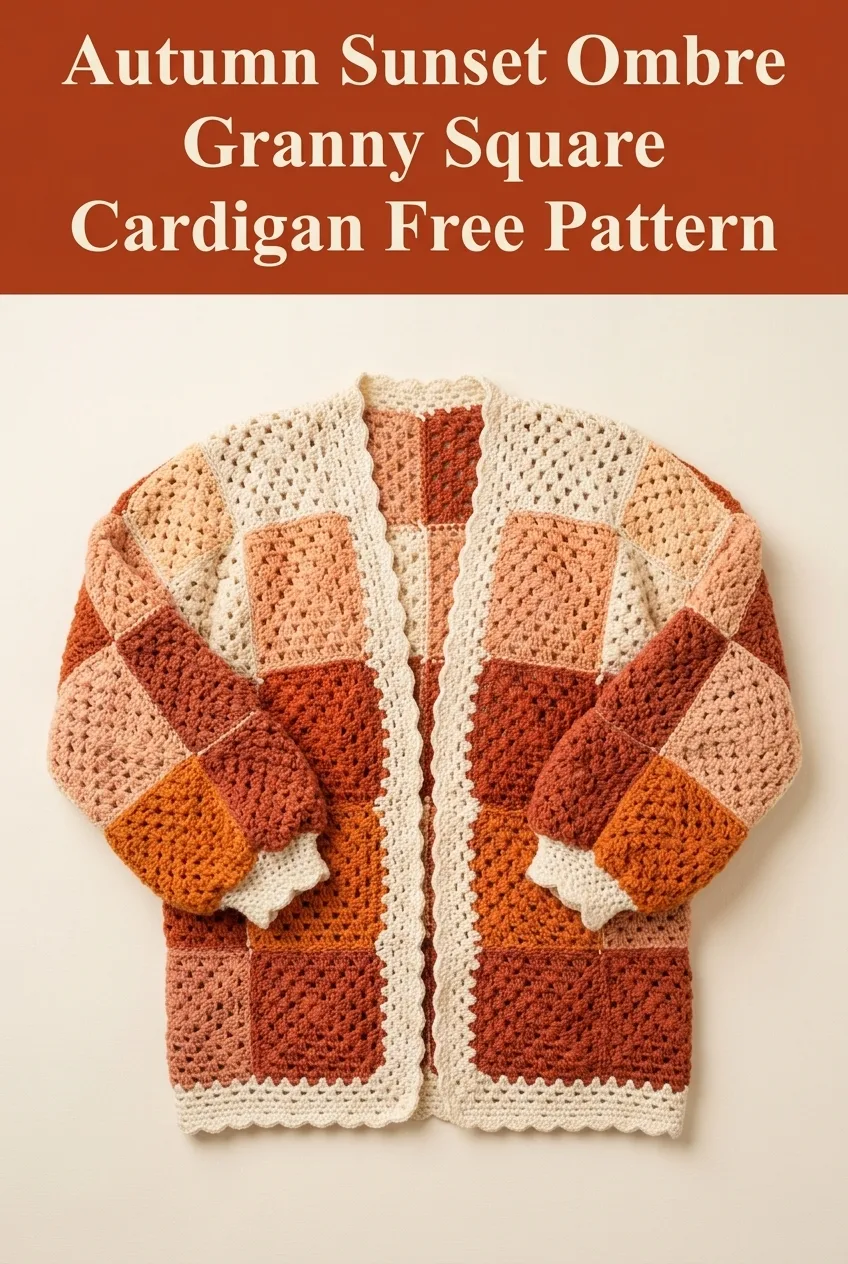
This granny square cardigan pattern uses simple construction that even adventurous beginners can tackle. You will make individual squares, join them together, and add a beautiful border that ties everything into one cohesive piece. The ombre effect happens naturally as you arrange your finished squares from light to dark. No complicated color changes mid-row. No stress.
Why This Granny Square Cardigan Pattern Works
Granny squares are the backbone of crochet for a reason. They work up quickly, travel well, and give you that satisfying sense of progress as your stack grows. This cardigan takes that classic technique and turns it into a wearable piece that looks way more impressive than the skill level required.
The construction is straightforward. You will make a bunch of solid-colored squares, arrange them in an ombre gradient, join them with a simple method, and finish with a lacy border. The border adds polish and structure while keeping that handmade, vintage-inspired feel.
Skill level: Confident beginner to intermediate. If you can make a granny square and are willing to learn basic joining, you can absolutely make this cardigan.
Materials Needed for Your Crochet Cardigan
Yarn:
I recommend a soft acrylic or acrylic blend for easy care and good stitch definition. Something like Lion Brand Vanna’s Choice or Red Heart Soft works beautifully here.
Hook:
Notions:
Gauge and Finished Measurements
Gauge: One completed granny square measures approximately 5 inches by 5 inches after blocking.
Finished size (as shown, approximate Medium/Large):
To adjust sizing, add or subtract squares from the body panels and sleeves. I will give you layout guidance below.
Stitch Abbreviations and Definitions
Let me walk you through every stitch you will use in this pattern.
Ch (chain): Wrap yarn over hook, pull through the loop on your hook. This creates the foundation for most crochet projects.
Sl st (slip stitch): Insert hook into stitch, yarn over, pull through both the stitch and the loop on your hook in one motion. Used for joining and moving across stitches invisibly.
Dc (double crochet): Yarn over, insert hook into stitch, yarn over and pull up a loop (3 loops on hook), yarn over and pull through 2 loops (2 loops remain), yarn over and pull through remaining 2 loops. This tall stitch is the star of granny squares.
Dc3tog (double crochet 3 together, also called a cluster): Work 3 double crochets into the same space, but stop each one before the final pull-through. You will have 4 loops on your hook, then yarn over and pull through all 4 at once. This creates the classic granny cluster.
Sc (single crochet): Insert hook into stitch, yarn over and pull up a loop (2 loops on hook), yarn over and pull through both loops. A short, tight stitch used in borders.
How to Make a Basic Granny Square
Each square is worked in solid color. You will make multiples in each color to create the gradient effect.
Round 1: With chosen color, ch 4. Sl st to first ch to form a ring. Ch 3 (counts as first dc), 2 dc into ring, ch 2, *3 dc into ring, ch 2* repeat 3 more times. Sl st to top of beginning ch-3 to join. (4 clusters, 4 ch-2 corner spaces)
Round 2: Sl st across to first corner ch-2 space. Ch 3, 2 dc in same corner space, ch 2, 3 dc in same corner space (corner made). *Ch 1, in next corner ch-2 space work (3 dc, ch 2, 3 dc)*. Repeat around. Ch 1, sl st to top of beginning ch-3. (8 clusters total, 4 corners, 4 ch-1 side spaces)
Round 3: Sl st to corner space. Ch 3, 2 dc, ch 2, 3 dc in same corner. *Ch 1, 3 dc in next ch-1 space, ch 1, (3 dc, ch 2, 3 dc) in corner space*. Repeat around, ending with ch 1, sl st to beginning ch-3. (12 clusters total)
Round 4: Repeat the corner and side pattern. Work (3 dc, ch 2, 3 dc) in each corner space. Work 3 dc in each ch-1 space along sides, with ch 1 between clusters. Sl st to join. (16 clusters total)
Fasten off. Weave in ends. Your square should measure about 5 inches across.
Square Count and Color Distribution
For the cardigan shown (approximately size Medium/Large), you need:
Total: 34 squares
This breaks down as:
Arranging the Ombre Gradient
This is the fun part. Lay out all your squares on the floor or a bed before joining.
For the back panel (3 columns, 4 rows from top to bottom):
For each front panel (2 columns, 3 rows):
Follow the same gradient flow, matching the back at the shoulder and hem lines.
For sleeves:
Start with lighter colors at the shoulder and graduate to darker at the cuff.
Play with placement until you love the flow. There is no wrong answer here. The ombre effect is forgiving.
Joining Your Granny Squares
I recommend the flat slip stitch join for a clean, visible seam that adds to the handmade aesthetic.
Hold two squares with wrong sides together. Working through both layers, insert hook through corresponding stitches on both squares. Using Color A (cream), sl st through both layers across the entire edge. This creates a raised ridge on the right side that becomes a design element.
Join order:
1. Join back panel squares into one piece (rows first, then columns)
2. Join each front panel
3. Attach front panels to back at shoulders, leaving neck opening
4. Attach front panels to back at sides, leaving armhole openings
5. Join sleeve squares into tubes
6. Attach sleeves to armholes
Adding the Border
The cream border unifies everything and adds that polished, finished look.
Bottom and Front Edges:
With Color A, join yarn at bottom back corner with sl st.
Round 1: Sc evenly around entire outer edge of cardigan (bottom hem, up right front, around neck, down left front). Work 3 sc in each corner to keep edges flat. Sl st to join.
Round 2: Ch 3, dc in each sc around, working 3 dc in corner stitches. Sl st to join.
Round 3: Ch 3, *skip 1 st, dc in next st, ch 1* repeat around for a lacy effect. Work extra stitches in corners as needed to keep flat. Sl st to join.
Round 4: Sc in each dc and each ch-1 space around. Sl st to join. Fasten off.
Sleeve Cuffs:
Work 2 to 3 rounds of the same border pattern around each sleeve opening.
Finishing Your Autumn Sunset Cardigan
Block your finished cardigan for the best drape and appearance. Wet blocking works well with acrylic yarn. Soak in cool water, gently squeeze out excess moisture (never wring), and lay flat to dry on blocking mats.
Weave in all remaining ends with your yarn needle. Take your time here. Secure ends are the difference between a cardigan that lasts and one that unravels after a few wears.
Customization Tips
Make it smaller: Remove one row of squares from the body length or one square from each side width. Adjust sleeve tubes accordingly.
Make it larger: Add squares to width and length as needed. Remember to purchase extra yarn.
Change the vibe: Try cool tones like sage, dusty blue, and charcoal for a completely different look. Or go bold with jewel tones.
Add buttons: If you want a closure, add buttonholes to the front border during Round 3 by working (ch 2, skip 2) at even intervals.
Care Instructions
Machine wash on gentle cycle with cold water. Lay flat to dry. Avoid the dryer, as it can distort the shape over time. Store folded rather than hung to prevent stretching at the shoulders.
Final Thoughts on This Granny Square Cardigan Pattern
This Autumn Sunset Ombre Granny Square Cardigan brings together everything I love about crochet. Simple stitches, satisfying construction, and a finished piece that looks like it took way more effort than it actually did. The granny square technique is approachable for beginners while still engaging for experienced crocheters who want a relaxing project.
I hope you love making this cardigan as much as I loved designing it. Thank you for trusting me with your yarn time. If you make one, I would absolutely love to see it. Tag me on Instagram or share a photo on Facebook so I can cheer you on.
If this pattern is calling your name but you are not quite ready to start, go ahead and save it to your Pinterest boards so you can find it when the crocheting mood strikes. And please drop a comment below if you make your own Autumn Sunset cardigan. I read every single one and they genuinely make my day.
