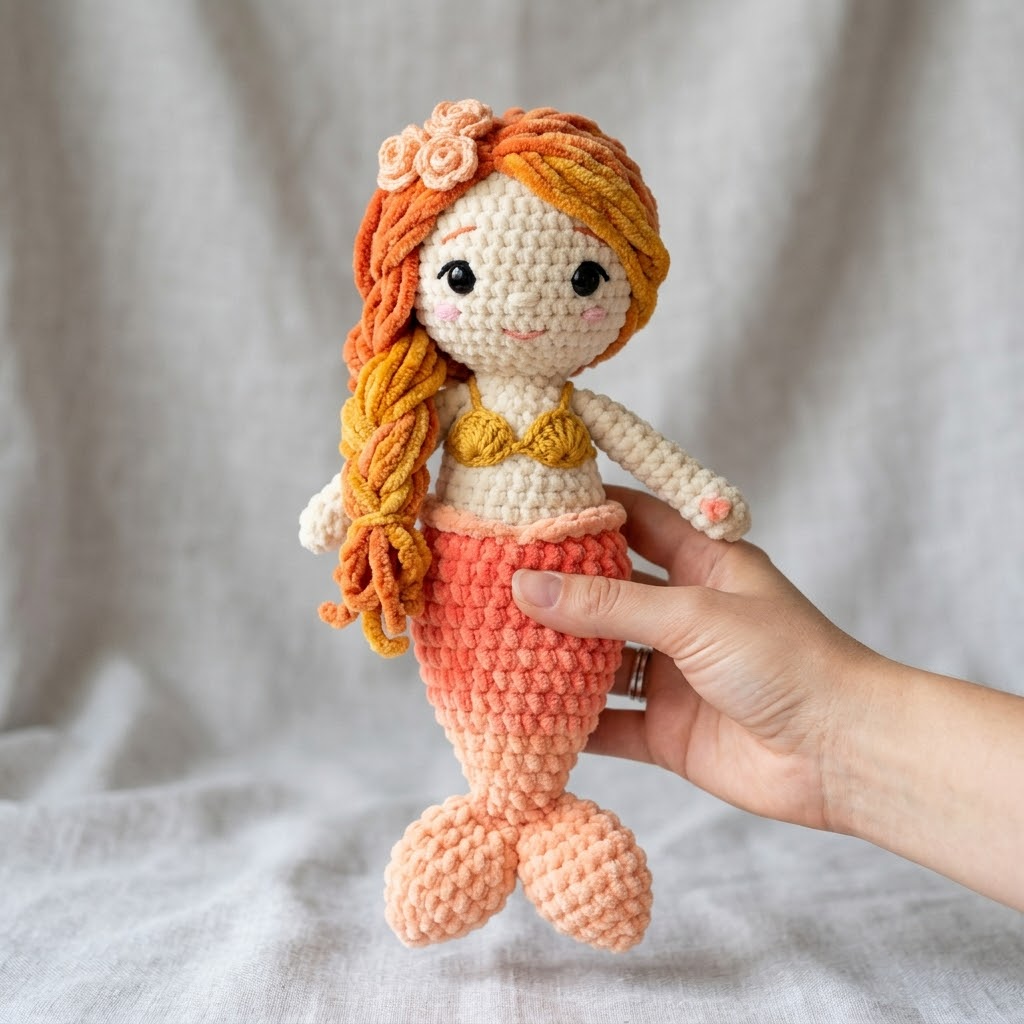
She’s sitting in my hands right now, this little coral and gold beauty, and I genuinely cannot stop smiling. This Sunset Mermaid Amigurumi Doll crochet pattern combines everything I love about amigurumi: a sweet face, gorgeous color flow, and that satisfying squishy texture that makes you want to squeeze her.
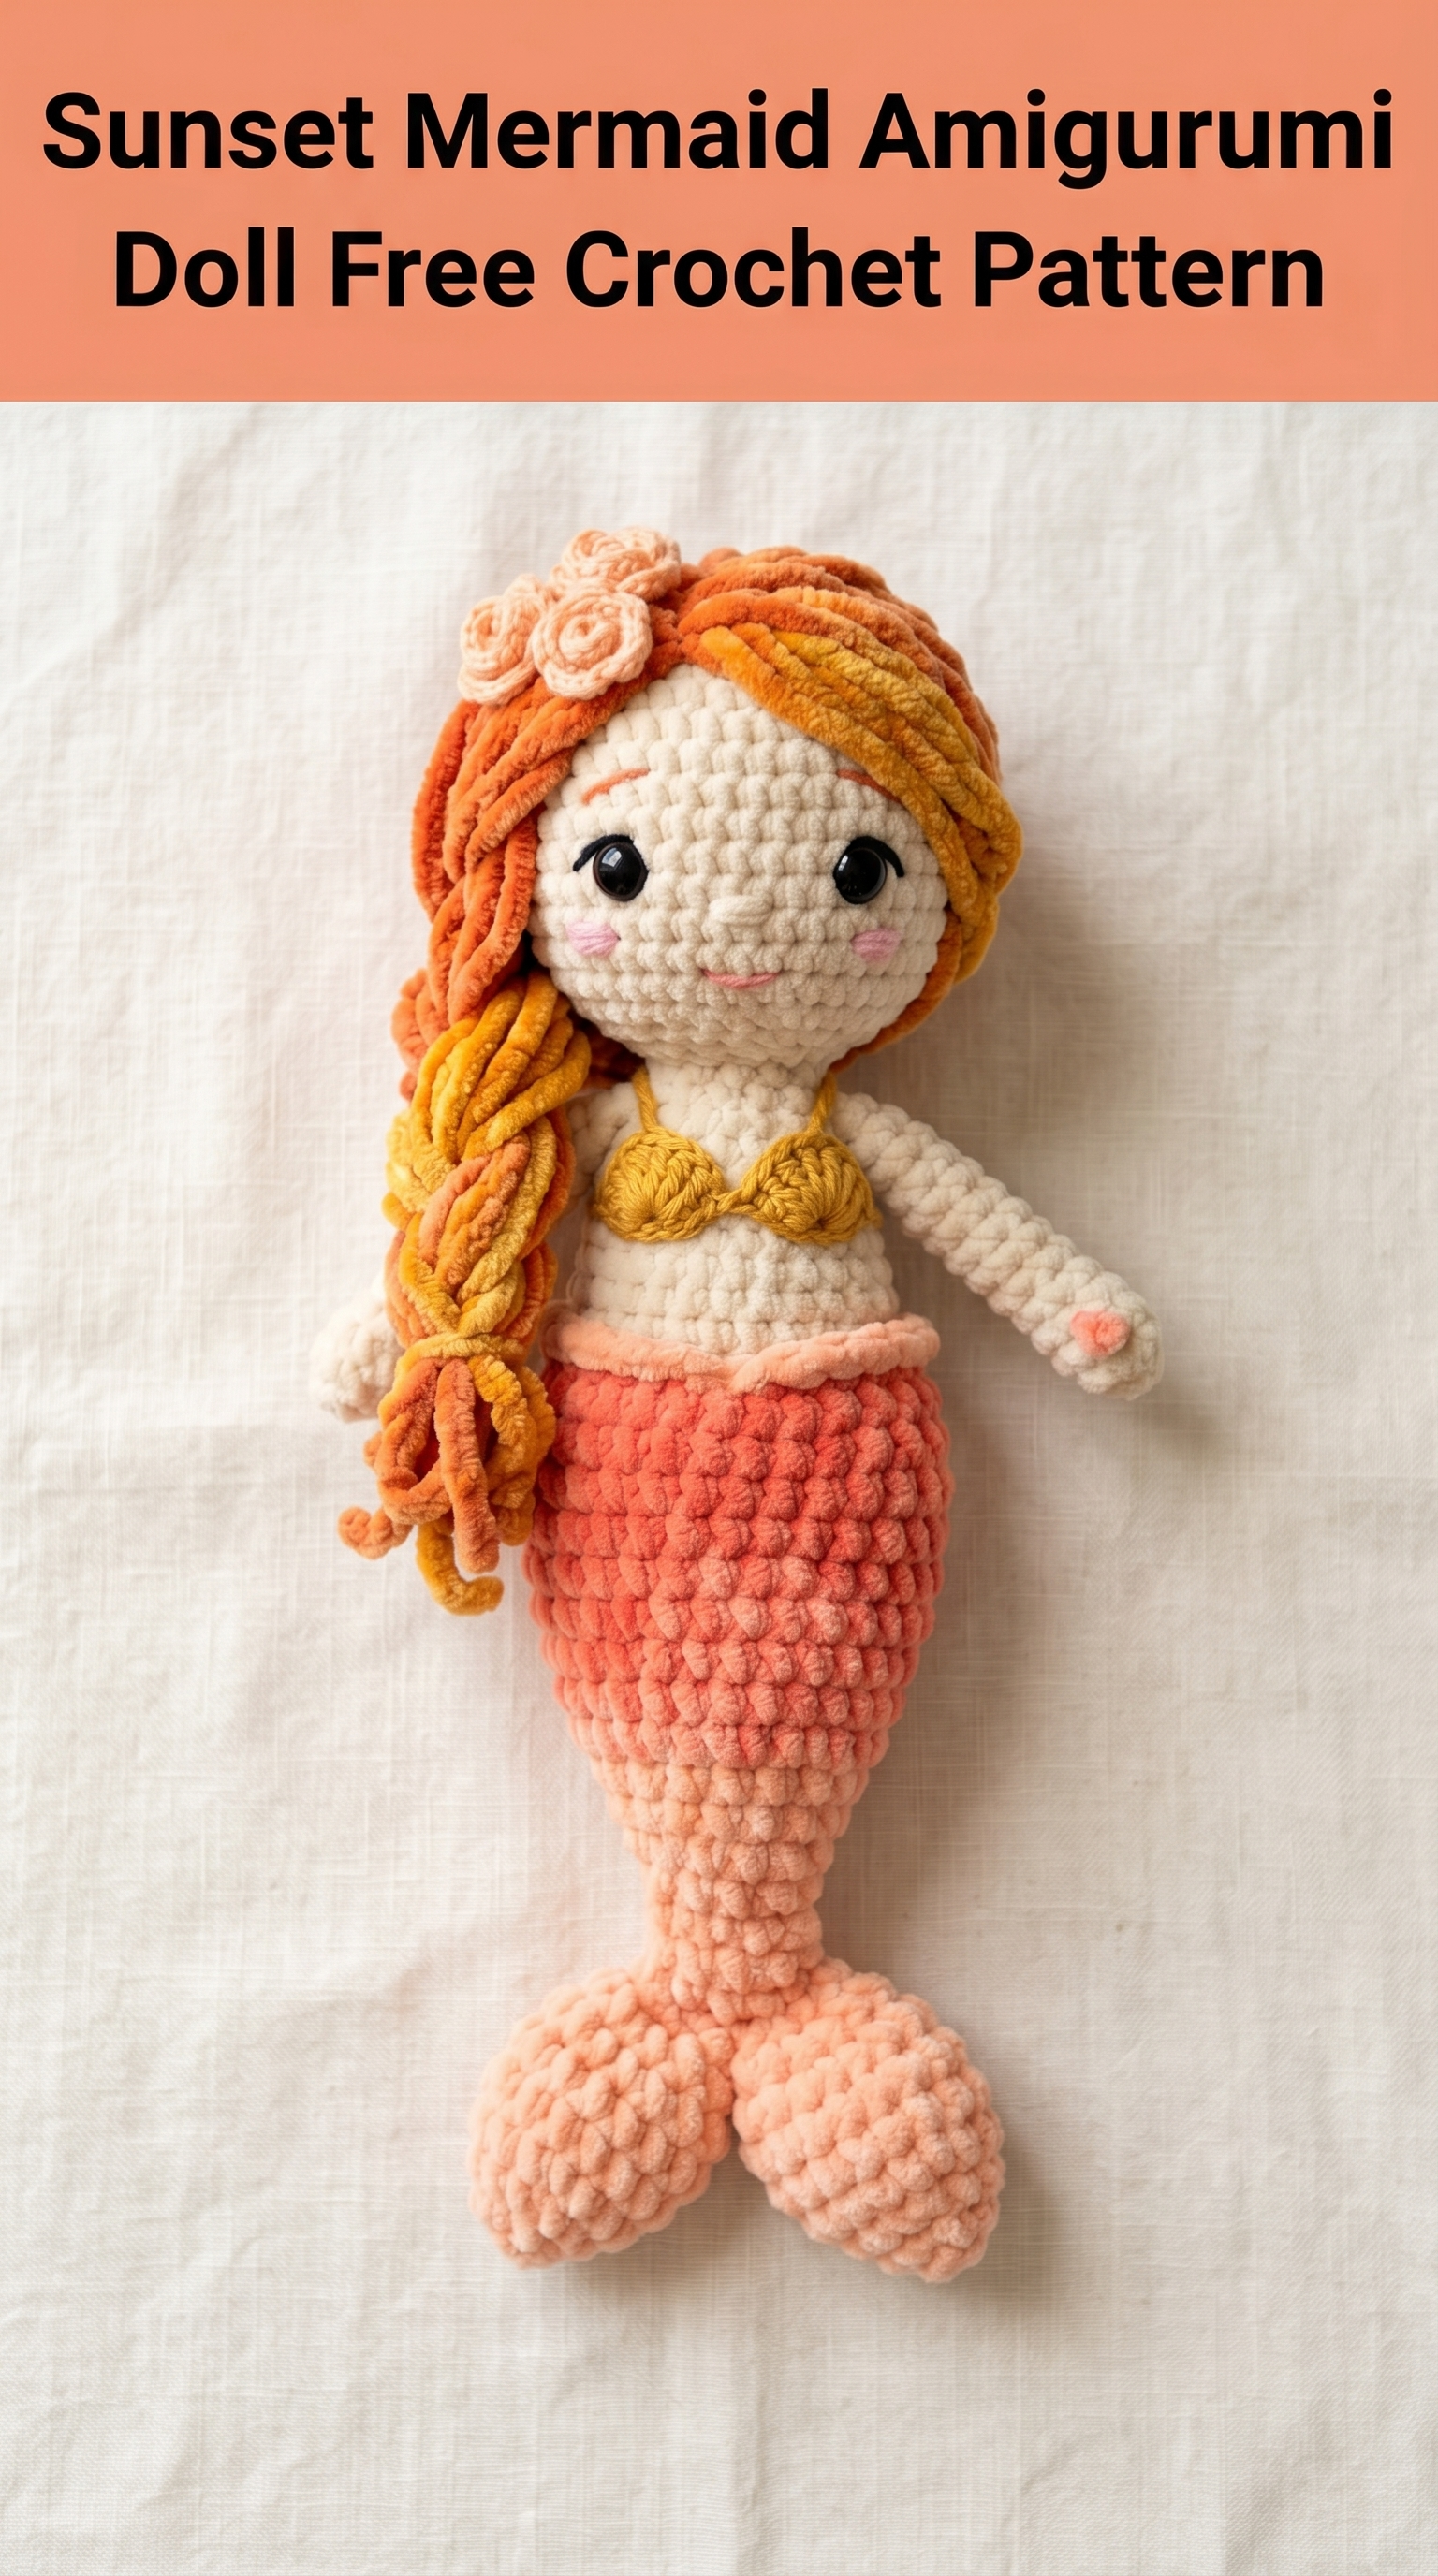
If you’ve made a few amigurumi projects before and feel comfortable working in the round, you can absolutely make this mermaid. She looks intricate, but I promise she’s just basic stitches assembled thoughtfully. The magic is in the details: that flowing braided hair, the tiny seashell top, and those adorable fin details.
Let me walk you through exactly how to create her.
What Makes This Mermaid Doll Pattern Special
This amigurumi mermaid stands approximately 12 to 13 inches tall when finished, which makes her the perfect cuddle size for little ones or a stunning display piece for your craft room. The sunset color palette moves from deep coral through peachy pink to soft cream, giving her that warm golden hour glow.
What I love most about this crochet mermaid doll is how the chunky yarn creates such satisfying texture while working up quickly. You get that beautiful bobbled look without any complicated stitch work. Just single crochets all the way through.
The hair deserves special mention. See that gorgeous braided section? It’s made using a variegated velvet yarn in oranges and golds, which creates natural highlights without any color changing on your part. So clever, so easy.
Materials You Will Need
Before you start crocheting, gather everything. There’s nothing worse than getting halfway through and realizing you’re missing safety eyes.
Yarn
For the body and head:
For the tail:
For the hair:
For details:
Tools
Abbreviations and Stitch Definitions
Let me explain every stitch before we begin. If you’re newer to amigurumi, read through this section carefully.
Magic Ring (MR): An adjustable loop that closes completely, leaving no hole at the center of your work. You’ll start most pieces this way.
Chain (ch): The foundation stitch. Yarn over, pull through the loop on your hook.
Single Crochet (sc): Insert hook into stitch, yarn over and pull up a loop (2 loops on hook), yarn over and pull through both loops.
Increase (inc): Work 2 single crochets into the same stitch. This adds one stitch to your count.
Invisible Decrease (dec): Insert hook through front loops only of the next 2 stitches, yarn over and pull through both front loops, yarn over and pull through both loops on hook. This creates a neater decrease than the standard method.
Slip Stitch (sl st): Insert hook, yarn over, pull through stitch and loop on hook in one motion. Used for joining or creating a flat finish.
Front Loop Only (FLO): Work into only the front loop of the stitch, leaving the back loop unworked.
Back Loop Only (BLO): Work into only the back loop of the stitch.
Gauge and Sizing Notes
With chunky chenille yarn and a 4.0mm hook, you should get approximately 4 single crochets per inch. Your mermaid’s head should measure about 3 inches in diameter after Round 9.
Amigurumi gauge matters less than garment gauge, but if your stitches look loose and you can see stuffing through them, go down a hook size. We want nice tight fabric.
The Pattern: Step by Step Crochet Tutorial
Head (Cream Chunky Yarn, 4.0mm Hook)
Work in continuous rounds. Use a stitch marker to track your first stitch.
Round 1: MR, 6 sc into ring. (6 sts)
Round 2: Inc in each st around. (12 sts)
Round 3: *Sc 1, inc* repeat around. (18 sts)
Round 4: *Sc 2, inc* repeat around. (24 sts)
Round 5: *Sc 3, inc* repeat around. (30 sts)
Round 6: *Sc 4, inc* repeat around. (36 sts)
Rounds 7 through 12: Sc in each st around. (36 sts)
Round 13: *Sc 4, dec* repeat around. (30 sts)
Insert safety eyes between Rounds 9 and 10, approximately 8 stitches apart. Take your time with placement. I always pin them first and look from multiple angles.
Round 14: *Sc 3, dec* repeat around. (24 sts)
Begin stuffing firmly.
Round 15: *Sc 2, dec* repeat around. (18 sts)
Round 16: *Sc 1, dec* repeat around. (12 sts)
Add more stuffing. The head should feel solid but not stretched.
Do not fasten off. Continue directly to body.
Body (Cream Chunky Yarn)
Round 17: Working into the 12 stitches remaining, *sc 1, inc* repeat around. (18 sts)
Round 18: Sc in each st around. (18 sts)
Rounds 19 through 22: Sc in each st around. (18 sts)
Fasten off cream yarn. Join coral yarn.
Tail Upper Section (Coral Chunky Yarn)
Round 23: With coral, sc in each st around. (18 sts)
Round 24: *Sc 7, dec* repeat twice. (16 sts)
Rounds 25 through 28: Sc in each st around. (16 sts)
Fasten off coral. Join light peach yarn.
Tail Lower Section (Light Peach Chunky Yarn)
Round 29: With light peach, sc in each st around. (16 sts)
Round 30: *Sc 6, dec* repeat twice. (14 sts)
Rounds 31 and 32: Sc in each st around. (14 sts)
Round 33: *Sc 5, dec* repeat twice. (12 sts)
Round 34: Sc in each st around. (12 sts)
Round 35: *Sc 4, dec* repeat twice. (10 sts)
Stuff the tail section now. Pack it moderately, not as firmly as the head.
Round 36: *Sc 3, dec* repeat twice. (8 sts)
Round 37: Dec 4 times. (4 sts)
Fasten off, leaving a long tail. Sew the opening closed.
Arms (Make 2, Cream Chunky Yarn)
Round 1: MR, 6 sc into ring. (6 sts)
Round 2: *Sc 1, inc* repeat around. (9 sts)
Rounds 3 through 10: Sc in each st around. (9 sts)
Stuff lightly, mainly in the hand area. Arms should be slightly floppy.
Round 11: Flatten opening, work 4 sc through both layers to close.
Fasten off, leaving a long tail for sewing.
Fins (Make 2, Light Peach Chunky Yarn)
Round 1: MR, 6 sc into ring. (6 sts)
Round 2: Inc in each st around. (12 sts)
Rounds 3 through 5: Sc in each st around. (12 sts)
Round 6: *Sc 1, dec* repeat around. (8 sts)
Stuff lightly.
Round 7: Dec 4 times. (4 sts)
Fasten off, leaving tail for sewing. Make two identical fins.
Seashell Top (Make 2, Golden Yellow Worsted, 3.5mm Hook)
Row 1: Ch 4, sc in 2nd ch from hook, sc in next 2 ch, turn. (3 sts)
Row 2: Ch 1, 2 sc in first st, sc 1, 2 sc in last st, turn. (5 sts)
Row 3: Ch 1, 2 sc in first st, sc 3, 2 sc in last st. (7 sts)
Fasten off, leaving tail for sewing. These small triangular shapes create the classic seashell bikini top look.
Waist Ruffle (Light Peach Worsted, 3.5mm Hook)
This creates the frilly detail where the body meets the tail.
Ch 30, 2 dc in 3rd ch from hook, 3 dc in each remaining ch across.
Fasten off. This creates a naturally ruffled strip. Wrap it around the waist at the color change line and sew in place.
Hair
This is my favorite part, and it’s easier than it looks.
Cut approximately 40 strands of your variegated orange/gold yarn, each about 16 inches long.
Using your hook, attach strands to the head using the latch hook method: fold strand in half, insert hook under a stitch on the head, pull the folded loop through, then pull the cut ends through that loop and tighten.
Start at the hairline (around Round 7) and work in rows toward the crown and down the back. Cover the entire back and top of the head, leaving the face clear.
For the braid, gather a section of strands from one side and create a simple three strand braid. Secure the end with a small piece of matching yarn tied tightly.
For the flowers in the hair, use peach worsted weight yarn:
MR, *ch 2, sl st into ring* repeat 5 times. Fasten off. This creates a tiny rose. Make 2 or 3 and sew them into the hair near the top of the head.
Assembly Instructions
Sewing the arms: Position arms at Round 18, just below where the neck meets the body. Pin first, then sew securely using the long tails. I go around twice for durability.
Attaching the fins: Sew one fin to each side of the tail bottom, angling them slightly outward. They should sit at the very end of the tail, giving that classic mermaid silhouette.
Seashell top: Position the two shell pieces on the chest area, points facing down, about 4 stitches apart. Sew in place. You can add a small chain between them for a strap detail if desired.
Face details: Using pink yarn, embroider a tiny curved mouth between the eyes. Add small pink circles for rosy cheeks using satin stitch or French knots.
Tips for Success
Stuffing matters. The head needs to be firm so it holds its shape. The tail can be softer. Arms should be lightly stuffed so they drape naturally.
Eye placement changes everything. Before inserting safety eyes permanently, try different positions. Lower eyes create a sweeter look. Wider spacing looks more innocent. Trust your instincts.
The hair takes patience. Don’t rush this step. Uneven strand lengths actually look more natural, so don’t stress about perfection.
Chenille yarn can be tricky. If you’re new to it, practice a few rounds on a test swatch first. The yarn tends to split, so work slowly and make sure your hook catches the entire strand.
Pattern Variations to Try
Once you’ve made this sunset mermaid amigurumi, you might want to create a whole collection. Try these color combinations:
Ocean Blue Mermaid: Navy to aqua gradient tail, blonde hair
Purple Dream Mermaid: Lavender to violet tail, black hair
Tropical Mermaid: Bright pink to coral tail, turquoise hair accents
The pattern structure stays identical. Just swap your colors and watch the personality completely change.

Your Mermaid is Complete
Look at her. That sunset glow in her tail, those sweet rosy cheeks, that gorgeous flowing braid. You made this entire magical creature with just yarn and a hook.
This Sunset Mermaid Amigurumi Doll crochet pattern was an absolute joy to design, and I truly hope you love making her as much as I did. She makes an incredible gift for any mermaid loving child or a beautiful addition to your handmade collection.
Thank you so much for choosing to spend your crafting time here with me. I genuinely appreciate every single one of you who tries my patterns.
I would absolutely love to see your finished mermaid. Tag me on Instagram or share in my Facebook group. Seeing your creations honestly makes my entire week.
Happy crocheting, friend. Now go make some magic.
