
Last fall, my sister called in a panic. Her daughter’s apple orchard photo shoot was in three weeks, and she had nothing for her to wear. "Something handmade," she said. "Something that looks like autumn." I grabbed my hook that night and started sketching.
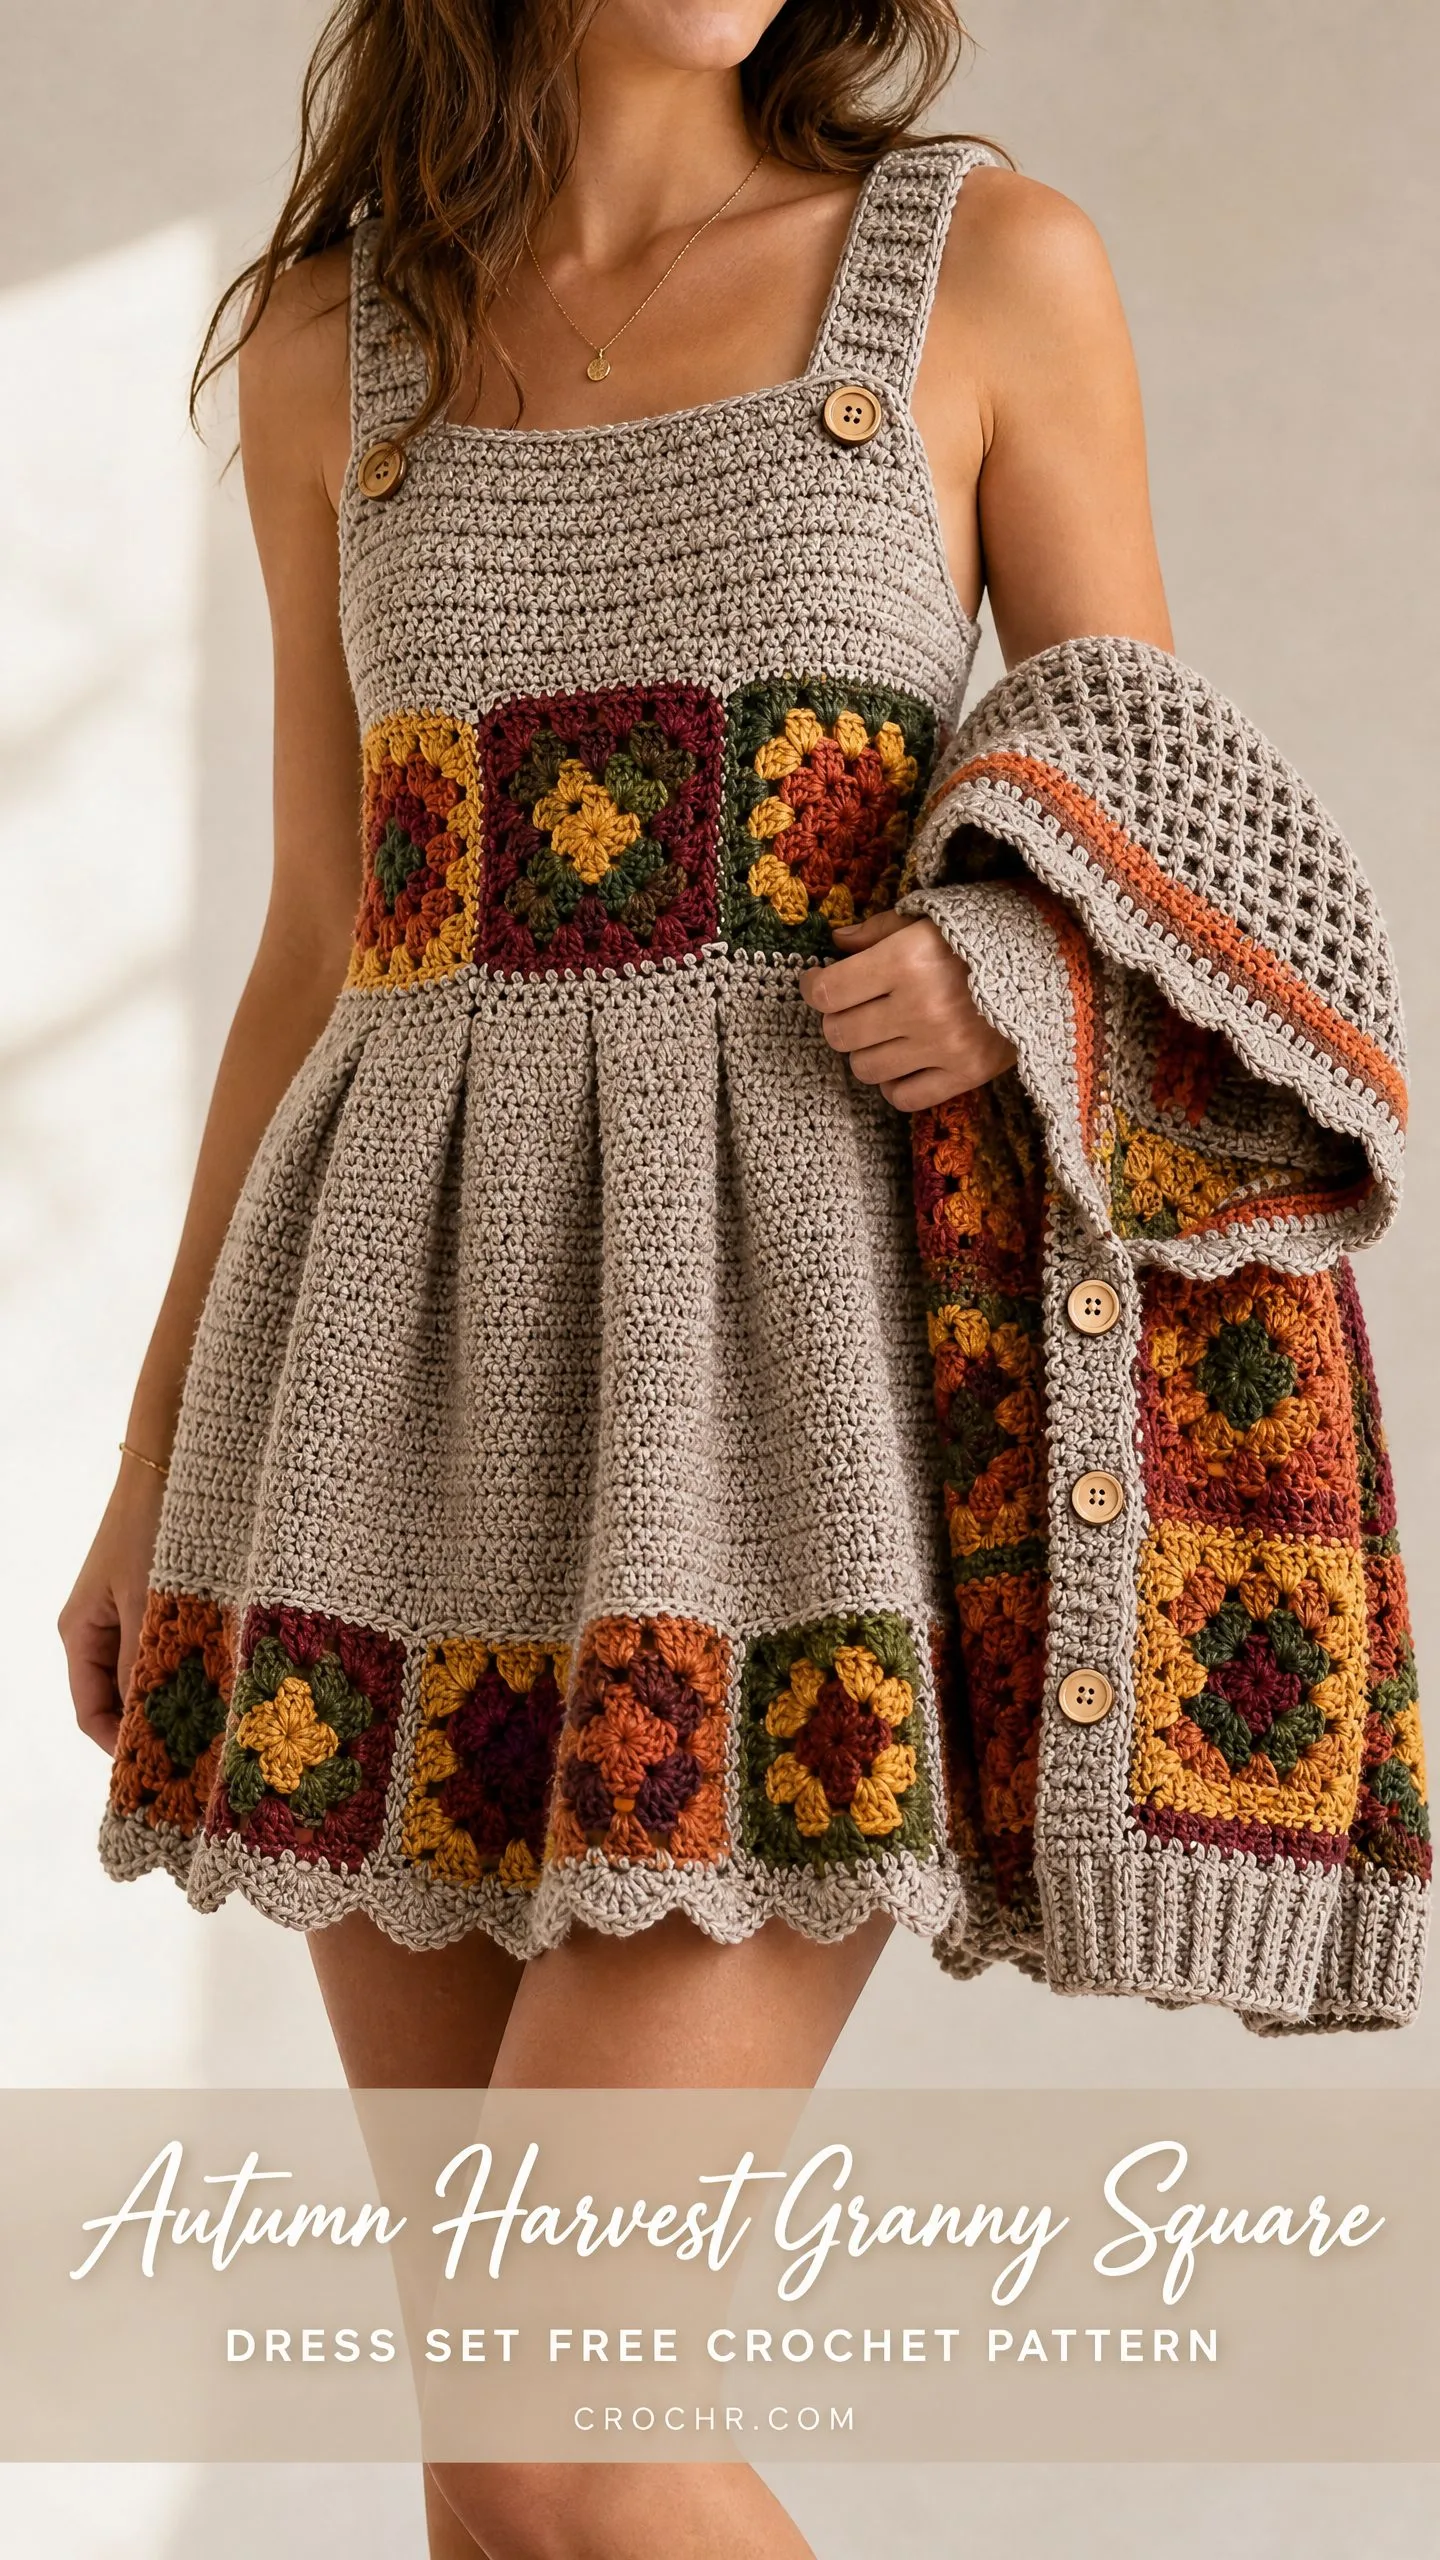
What came out of that late-night brainstorm is this coordinating dress and cardigan set. The warm taupe base plays beautifully against those burnt orange, rust, forest green, and golden yellow granny squares. Every time I look at it, I think of crunchy leaves and pumpkin patches.
This pattern taught me something important. Sometimes the best projects come from a little pressure and a lot of love. Whether you are making this for a photo shoot, a holiday gathering, or just because that baby deserves something beautiful, I think you are going to fall hard for this one.
About This Autumn Harvest Granny Square Dress Set Crochet Pattern
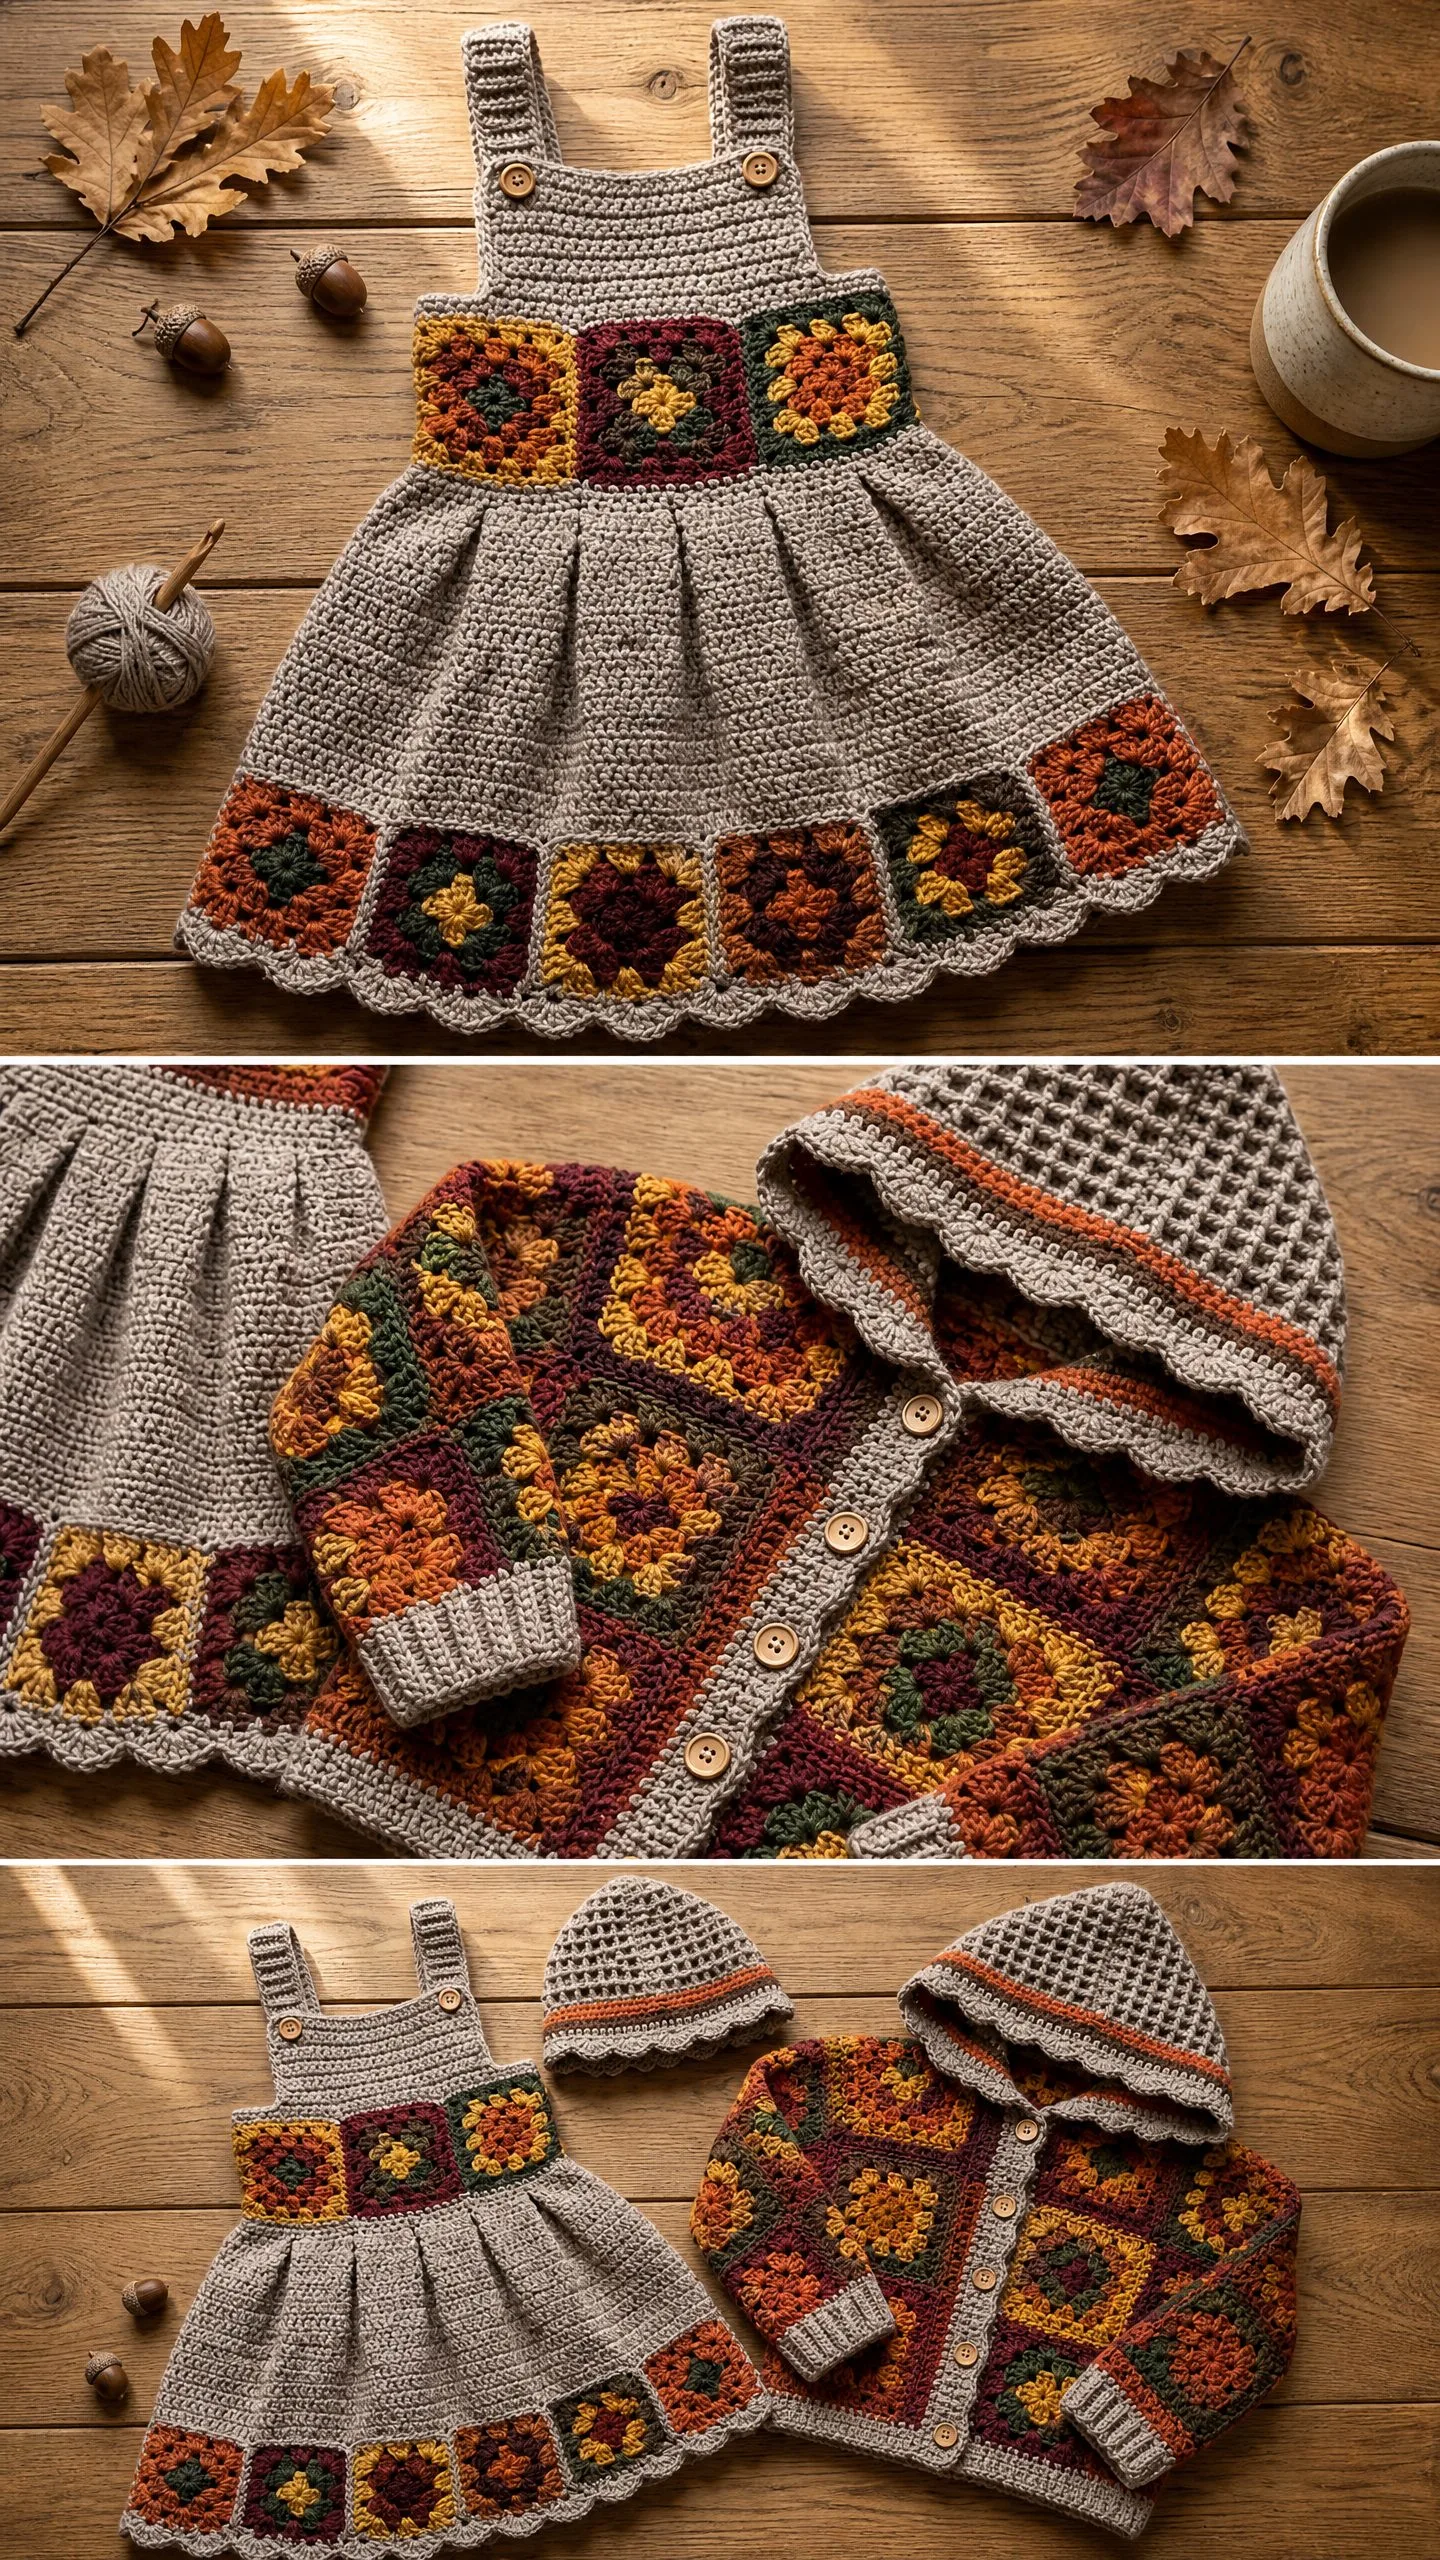
This crochet pattern creates a stunning three-piece autumn-themed set for babies and toddlers. You will make a pinafore-style dress with a structured bodice and pleated skirt, a granny square hooded cardigan with ribbed cuffs and button band, and a matching bonnet-style hat in waffle stitch.
The dress features decorative granny square panels at both the yoke and hem border. The cardigan is constructed entirely from joined granny squares with that gorgeous textured hood. All three pieces share the same warm autumn color palette that photographs beautifully.
Skill level: Intermediate. You should be comfortable with granny squares, joining motifs, working flat and in the round, basic garment shaping with increases and decreases, pleating, and reading multi-section instructions. Nothing here is advanced, but clean joins and consistent gauge matter for a polished result.
Time estimate: Approximately 25 to 35 hours total for all three pieces. The granny squares take the most time, so I recommend completing all 30 squares first before moving to assembly.
Finished Sizes
This pattern includes three sizes:
Size 6 to 12 months: Chest 18 in / 45.5 cm, Dress length 13 in / 33 cm
Size 12 to 18 months: Chest 20 in / 51 cm, Dress length 14.5 in / 37 cm
Size 2T: Chest 22 in / 56 cm, Dress length 16 in / 40.5 cm
The cardigan is sized to match the dress chest measurement. The hat fits 16 to 18 in / 40.5 to 45.5 cm head circumference across all sizes.
Instructions are written for size 6 to 12 months. Changes for larger sizes appear in parentheses throughout as: 6-12 months (12-18 months, 2T).
Materials Needed
Yarn:
Hooks:
Notions:
Yarn Suggestions
Paintbox Yarns Simply DK (100% acrylic, 273 yd / 250 m per 100 g ball) in Champagne, Burnt Orange, Pillar Red, Grass Green, and Buttercup Yellow. Machine washable, budget-friendly, excellent stitch definition.
Drops Safran (70% cotton, 30% polyamide, 175 yd / 160 m per 50 g ball) in Stone, Orange, Red, Dark Olive Green, and Yellow. The cotton content gives granny squares beautiful crispness.
Lion Brand Pound of Love (100% acrylic, 1020 yd / 932 m per 454 g skein) in Fisherman plus coordinating skeins for accent colors. One skein covers all three pieces with yardage to spare.
Any smooth DK weight yarn works well. Avoid fuzzy or bouclé yarns as they obscure the granny square motifs.
Gauge
With G-6 / 4.0 mm hook: 18 sc x 22 rows = 4 in x 4 in / 10 cm x 10 cm in single crochet (sc) with Yarn A
1 completed granny square (after Round 3) = 3 in x 3 in / 7.5 cm x 7.5 cm blocked
With F-5 / 3.75 mm hook: 20 sc x 24 rows = 4 in x 4 in / 10 cm x 10 cm in single crochet ribbing
Gauge is critical for garment fit. Work a swatch, block it, and measure before beginning.
Abbreviations and Stitch Definitions
Special Stitches for This Crochet Tutorial
Granny Square Cluster (Cl)
Yarn over, insert hook into indicated chain space, yarn over and pull up a loop, yarn over and pull through 2 loops on hook. Repeat this step 2 more times in the same chain space (4 loops on hook). Yarn over and pull through all 4 loops. One cluster made.
Standing Double Crochet
Begin with a slip knot on hook. Yarn over, insert hook into indicated stitch or space, yarn over and pull up a loop, yarn over and pull through 2 loops, yarn over and pull through remaining 2 loops. Use this to join a new color without a starting slip stitch.
Waffle Stitch (worked in rows)
Requires a stitch count divisible by 3, plus 1 for turning chain.
Row 1 (RS): Ch 1, sc in first st, (FPdc in next st, sc in next st) across, sc in last st. Turn.
Row 2 (WS): Ch 1, sc in each st across. Turn.
Row 3 (RS): Ch 1, sc in first st, (BPdc in next st, sc in next st) across, sc in last st. Turn.
Row 4 (WS): Ch 1, sc in each st across. Turn.
Repeat Rows 1 through 4 for pattern.
FPdc (Front Post Double Crochet): Yarn over, insert hook from front to back to front around the post of the indicated stitch below, yarn over and pull up a loop, (yarn over, pull through 2 loops) twice.
BPdc (Back Post Double Crochet): Yarn over, insert hook from back to front to back around the post of the indicated stitch below, yarn over and pull up a loop, (yarn over, pull through 2 loops) twice.
Scallop Edging
Sl st in first st, (sk 1 st, 5 dc in next st, sk 1 st, sl st in next st) across.
Pleat
Fold fabric so 3 stitches stack on top of each other. Insert hook through all 3 layers and work 1 sc through all layers to secure.
Pattern Notes Before You Begin
The dress is worked in two main sections: the bodice (worked flat from bottom to top) and the skirt (worked flat from top to bottom and pleated onto the bodice). Granny square panels are attached at the yoke and hem.
Make all granny squares first. All squares are identical in construction. Only the color sequence changes. Complete all 30 squares before beginning any garment assembly.
Chain 3 at the beginning of granny square rounds counts as 1 dc throughout.
When working granny squares, always join new colors with a standing dc to avoid a visible knot.
The dress straps are button-adjustable. Sew the button on the front bodice. The strap has multiple button holes.
Block all pieces before final assembly. Wet block natural fiber yarns. Steam block acrylic yarns under a damp pressing cloth.
Step by Step Instructions
Granny Squares (Make 30 Total)
You will need 12 squares for the dress and 18 for the cardigan.
Color Assignments:
Foundation Ring: With first color, ch 4. Join with sl st to first ch to form a ring.
Round 1: Ch 3 (counts as dc), 2 dc in ring, ch 2, (3 dc in ring, ch 2) 3 times. Join with sl st to top of beg ch-3. Fasten off. (12 dc, 4 ch-2 sp)
Round 2: Join second color with standing dc in any ch-2 sp. Work 2 dc in same sp, ch 2, 3 dc in same sp (corner made). Ch 1. (3 dc, ch 2, 3 dc) in next ch-2 sp (corner). Ch 1. Repeat from beginning 2 more times. Join with sl st to top of beg standing dc. Fasten off. (24 dc, 4 ch-2 corner sp, 4 ch-1 side sp)
Round 3: Join third color with standing dc in any ch-2 corner sp. Work 2 dc in same sp, ch 2, 3 dc in same sp (corner). Ch 1. 3 dc in ch-1 side sp, ch 1. (3 dc, ch 2, 3 dc) in next ch-2 corner sp. Ch 1. 3 dc in ch-1 side sp, ch 1. Repeat from beginning 2 more times. Join with sl st to top of beg standing dc. Fasten off. (36 dc, 4 ch-2 corner sp, 8 ch-1 side sp)
Completed square measures 3 in / 7.5 cm x 3 in / 7.5 cm after blocking.
Weave in all ends on every square before proceeding.
Dress Bodice
The bodice is worked flat from the bottom up. Use Yarn A and G-6 / 4.0 mm hook throughout.
Foundation Chain: Ch 83 (91, 101).
Row 1 (RS): Sc in 2nd ch from hook and in each ch across. Turn. (82, 90, 100 sc)
Row 2 (WS): Ch 1, sc in each st across. Turn. (82, 90, 100 sc)
Row 3 (RS): Ch 1, sc in each st across. Turn. (82, 90, 100 sc)
Rows 4 through 8: Repeat Row 2 and Row 3 alternately. After Row 8: (82, 90, 100 sc)
Row 9 (armhole shaping, RS): Ch 1, sc in first 18 (20, 22) sts (right front panel), ch 4, sk 10 (10, 12) sts (right armhole), sc in next 26 (30, 32) sts (back panel), ch 4, sk 10 (10, 12) sts (left armhole), sc in last 18 (20, 22) sts (left front panel). Turn. (62, 70, 76 sc plus 2 ch-4 armhole spaces)
Row 10 (WS): Ch 1, sc in first 18 (20, 22) sts, 4 sc in ch-4 sp, sc in next 26 (30, 32) sts, 4 sc in ch-4 sp, sc in last 18 (20, 22) sts. Turn. (70, 78, 84 sc)
Rows 11 through 16: Ch 1, sc in each st across. Turn. (70, 78, 84 sc)
Row 17 (neck shaping, RS): Ch 1, sc in first 22 (25, 27) sts (left strap/shoulder area), ch 2, sk 2 sts (button hole), sc in next 22 (24, 26) sts (front neck), ch 2, sk 2 sts (button hole), sc in last 22 (25, 27) sts. Turn. (66, 74, 80 sc plus 2 ch-2 spaces)
Row 18 (WS): Ch 1, sc in first 22 (25, 27) sts, 2 sc in ch-2 sp, sc in next 22 (24, 26) sts, 2 sc in ch-2 sp, sc in last 22 (25, 27) sts. Turn. (70, 78, 84 sc)
Rows 19 through 22: Ch 1, sc in each st across. Turn. (70, 78, 84 sc)
Fasten off. Bodice is complete.
Checkpoint: The bodice should measure approximately 4 in / 10 cm tall (6-12 mo), 4.5 in / 11.5 cm tall (12-18 mo), or 5 in / 12.5 cm tall (2T), and 15.5 in / 39 cm (17 in / 43 cm, 18.5 in / 47 cm) wide at the lower edge.
Granny Square Yoke Panels
The yoke panels are sewn onto the front of the bodice between Rows 5 and 8, centered between the armhole lines.
Arrange 3 squares horizontally side by side (all sizes). For size 2T, leave a 1/4 in / 6 mm gap between squares.
Center the 3-square panel on the front bodice and pin. Using Yarn A and yarn needle, whipstitch along all four sides of each square, catching only the front bodice fabric so the seam does not show on the wrong side.
Straps (Make 2)
Work flat with Yarn A and G-6 hook.
Foundation Chain: Ch 7.
Row 1: Sc in 2nd ch from hook and in each ch across. Turn. (6 sc)
Rows 2 through 3: Ch 1, sc in each st across. Turn. (6 sc)
Row 4 (button hole row): Ch 1, sc in first 2 sts, ch 2, sk 2 sts, sc in last 2 sts. Turn. (4 sc plus ch-2 sp)
Row 5: Ch 1, sc in first 2 sts, 2 sc in ch-2 sp, sc in last 2 sts. Turn. (6 sc)
Rows 6 through 8: Ch 1, sc in each st across. Turn. (6 sc)
Row 9 (second button hole): Repeat Row 4. (4 sc plus ch-2 sp)
Row 10: Repeat Row 5. (6 sc)
Rows 11 through 26 (11 through 30, 11 through 34): Ch 1, sc in each st across. Turn. (6 sc)
Fasten off.
Attach straps: At the back of the bodice, align each strap with the upper edge 1.5 in / 3.8 cm from center back on each side. Sew securely. At the front bodice, sew one 5/8 in button on each side at the position matching the strap button holes.
Skirt
Work flat from top to bottom with Yarn A and G-6 hook.
Foundation Chain: Ch 165 (181, 201).
Row 1 (RS): Sc in 2nd ch from hook and in each ch across. Turn. (164, 180, 200 sc)
Rows 2 through 4: Ch 1, sc in each st across. Turn. (164, 180, 200 sc)
Continue in sc without shaping for a total of 22 (26, 30) rows from foundation.
Checkpoint: Skirt body should measure approximately 4 in / 10 cm (4.75 in / 12 cm, 5.5 in / 14 cm) tall before the border.
Granny Square Hem Border
Arrange 8 (9, 10) granny squares side by side along the lower edge of the skirt.
Using Yarn A and yarn needle, whipstitch the top edge of each square to the lower edge of the skirt body. Ensure squares are evenly spaced across the full width. Then whipstitch the squares to each other at their side edges.
After all squares are attached, work the scallop edging across the bottom of the squares using Yarn A and G-6 hook:
Attach yarn at lower left corner of the leftmost square. Sl st in first st along lower edge of squares. (Sk 1 st, 5 dc in next st, sk 1 st, sl st in next st) across entire lower edge. Fasten off.
Pleating and Joining Skirt to Bodice
Before pleating, the skirt top edge has 164 (180, 200) sts and the bodice lower edge has 82 (90, 100) sts.
Mark the center of the skirt top edge and the center of the bodice lower edge with stitch markers.
To work a pleat: Fold the skirt fabric to bring 3 adjacent stitches together. Insert hook through all 3 layers and work 1 sc through all layers to secure. Each pleat consumes 3 skirt stitches and produces 1 stitch.
Work pleats evenly across the skirt to reduce 164 (180, 200) skirt stitches to 82 (90, 100) stitches total. Work 2 sc without pleat, then 1 pleat (consuming 3 sts), alternating across.
With RS of bodice facing and skirt below it, use Yarn A to whipstitch or sl st the pleated top edge of the skirt to the lower edge of the bodice across all 82 (90, 100) stitches.
Checkpoint: The full dress should measure 13 in / 33 cm (14.5 in / 37 cm, 16 in / 40.5 cm) from shoulder strap attachment to hem scallop tip.
Dress Finishing
Weave in all ends. Block dress. Sew buttons to front bodice for straps. Optionally, work a single row of sc around each armhole opening to neaten edges.
Cardigan Construction
The cardigan is built from an 18-square grid assembled using join-as-you-go (JAYG). The layout is 6 squares wide by 3 squares tall for size 6-12 months. Use 7 squares wide for 12-18 months, 8 squares wide for 2T.
Joining Squares (Join-As-You-Go)
When working Round 3 of each subsequent square, join to the neighbor during the final round:
At each shared edge, replace the ch 2 corner or ch 1 side chain with: ch 1, sl st into corresponding corner or side ch-sp of adjacent square, ch 1 (corner join) or sl st into corresponding ch-1 side sp of adjacent square (side join).
Work all body squares in the 6 (7, 8) x 3 grid using JAYG.
Assembling the Body
Fold the grid in half along the horizontal center. The fold creates the shoulder line.
For size 6-12 months (6 squares wide): Leave the center 2 squares on each side open for armholes. Seam the remaining 1 square on each side at the side seams.
For size 12-18 months (7 squares wide): Leave center 2 squares on each side for armholes. Seam 1.5 squares on each side.
For 2T (8 squares wide): Leave 2 squares on each side for armholes. Seam 2 squares on each side.
Using Yarn A and yarn needle, whipstitch the side seams. The cardigan opens at the center front.
Ribbed Cuffs
With F-5 / 3.75 mm hook and Yarn A, work cuffs into the lower edge of each sleeve tube.
Foundation: Join yarn at lower edge of sleeve. Ch 7.
Row 1: Sc in 2nd ch from hook and in each ch across. Sl st into next available stitch on sleeve edge. Turn. (6 sc)
Row 2: Working in BLO, sc in each sc across. Turn. (6 sc)
Continue until cuff has traveled all the way around the sleeve lower edge. Seam the cuff foundation edge to the final row edge. Cuff depth: 6 rows = approximately 1 in / 2.5 cm.
Button Band
With F-5 / 3.75 mm hook and Yarn A, work attached sc ribbing along each center front edge.
Right Front Band (buttonholes): Foundation ch 7. Work 6 rows sc ribbing in BLO attached to right front edge, then work buttonhole row:
Buttonhole Row: Sc in first 2 sts, ch 2, sk 2 sts, sc in last 2 sts. Work buttonhole rows at Rows 3, 9, 15, and 21.
Left Front Band (plain): Work identically without buttonhole rows.
Sew buttons on left front band opposite each buttonhole.
Cardigan Ribbed Lower Band
With F-5 / 3.75 mm hook and Yarn A, work 8 rows of sc ribbing in BLO attached to the entire lower edge of the cardigan body. Fasten off. Seam ends at the button band edges.
Hood
With G-6 / 4.0 mm hook and Yarn A, pick up stitches along the neckline.
Pick-up row: With RS facing, join Yarn A at right front neckline corner. Sc evenly across neckline. Target stitch count: 45 (48, 51) sc. Turn. (45, 48, 51 sc)
Rows 1 through 4: Work Rows 1 through 4 of Waffle Stitch pattern. (45, 48, 51 sts)
Rows 5 through 28 (5 through 32, 5 through 36): Continue in waffle stitch pattern without shaping. (45, 48, 51 sts)
Fold the hood panel in half vertically. Seam the top edge closed using whipstitch or sl st seam.
Hood Scallop Trim
With G-6 / 4.0 mm hook and Yarn A, work scallop edging along the front opening edge of the hood. Work 1 row of sc to establish a base, then work: (Sk 1 st, 5 dc in next st, sk 1 st, sl st in next st) across.
Hood Stripe Accent
With F-5 / 3.75 mm hook and Yarn B, work 1 row of sc across the base of the hood where it meets the neckline, then 1 row of sl sts in Yarn A.
Checkpoint: The assembled cardigan should measure 9 in / 23 cm (10 in / 25.5 cm, 11 in / 28 cm) from shoulder fold to lower hem edge and 18 in / 45.5 cm (20 in / 51 cm, 22 in / 56 cm) across the chest when laid flat.
Bonnet Hat
Work in the round from the crown downward in waffle stitch.
With G-6 / 4.0 mm hook and Yarn A, make a magic ring.
Round 1: Ch 1, 6 sc in ring. Join with sl st to first sc. (6 sc)
Round 2: Ch 1, 2 sc in each st around. Join. (12 sc)
Continue increasing 6 sts per round until hat measures 16 to 18 in / 40.5 to 45.5 cm in circumference. Then work even in waffle stitch pattern to desired depth, approximately 5 to 6 in / 12.5 to 15 cm.
Add striped brim using Yarn B and Yarn A in alternating rows of sc. Finish with scallop edging.
Beginner Friendly Tips for This Pattern
Do not let the length of this pattern intimidate you. Break it into manageable chunks. Make all your granny squares first while watching your favorite show. That is the most repetitive part, and once those are done, the rest comes together quickly.
If your pleats look uneven on the first try, practice on a scrap swatch. The technique feels awkward at first but becomes intuitive after a few repetitions.
When joining granny squares, take your time. Rushed joins show in the finished piece. A little patience here makes a big difference.
Block every piece before assembly. Seriously. It evens out your tension and makes seaming so much easier.
Final Thoughts on This Autumn Harvest Crochet Pattern
This Autumn Harvest Granny Square Dress Set is the kind of project that makes you proud to be a crocheter. Yes, it takes time. Yes, there are multiple pieces and techniques involved. But when you see it all come together, when you button those little wooden buttons and admire those perfect autumn-colored squares, you will understand why it was worth every stitch.
The dress with its sweet pleated skirt and scalloped hem. The cardigan with that textured waffle stitch hood. These pieces photograph beautifully and hold up to real toddler life. They are the kind of handmade items that become heirlooms.
Thank you so much for choosing this pattern. I really hope you love making it as much as I loved designing it. If you have questions along the way, do not hesitate to reach out. And when you finish, I would absolutely love to see your version! Tag me on Instagram or share in my Facebook group.
If this pattern is calling your name, go ahead and save it to your Pinterest boards so you can find it when you are ready to start. And if you make this set, please leave a comment below. I love seeing what colors you choose and hearing about the little ones who get to wear your handmade creations.
You Might Also Like
- Woodland Creatures Anklet Free Crochet Pattern
- Lavender Garden Granny Square Purse Free Crochet Pattern
- Cream Lace Flutter Sleeve Baby Dress Free Crochet Pattern
- Navy Blue Elegant Crochet Lace Dress Free Pattern
