Looking for a handmade gift that feels truly special? This delicate crochet flower bracelet works up beautifully using thread crochet techniques and basic stitches like chains, single crochet, and double crochet. The design is perfect for intermediate crocheters who want to try their hand at micro crochet jewelry. Each tiny dahlia flower takes just minutes to complete, and the adjustable sliding closure means it fits most wrist sizes without any metal findings. This makes a gorgeous gift for birthdays, Mother’s Day, or bridesmaids.
Why You’ll Love This Crochet Flower Bracelet Pattern
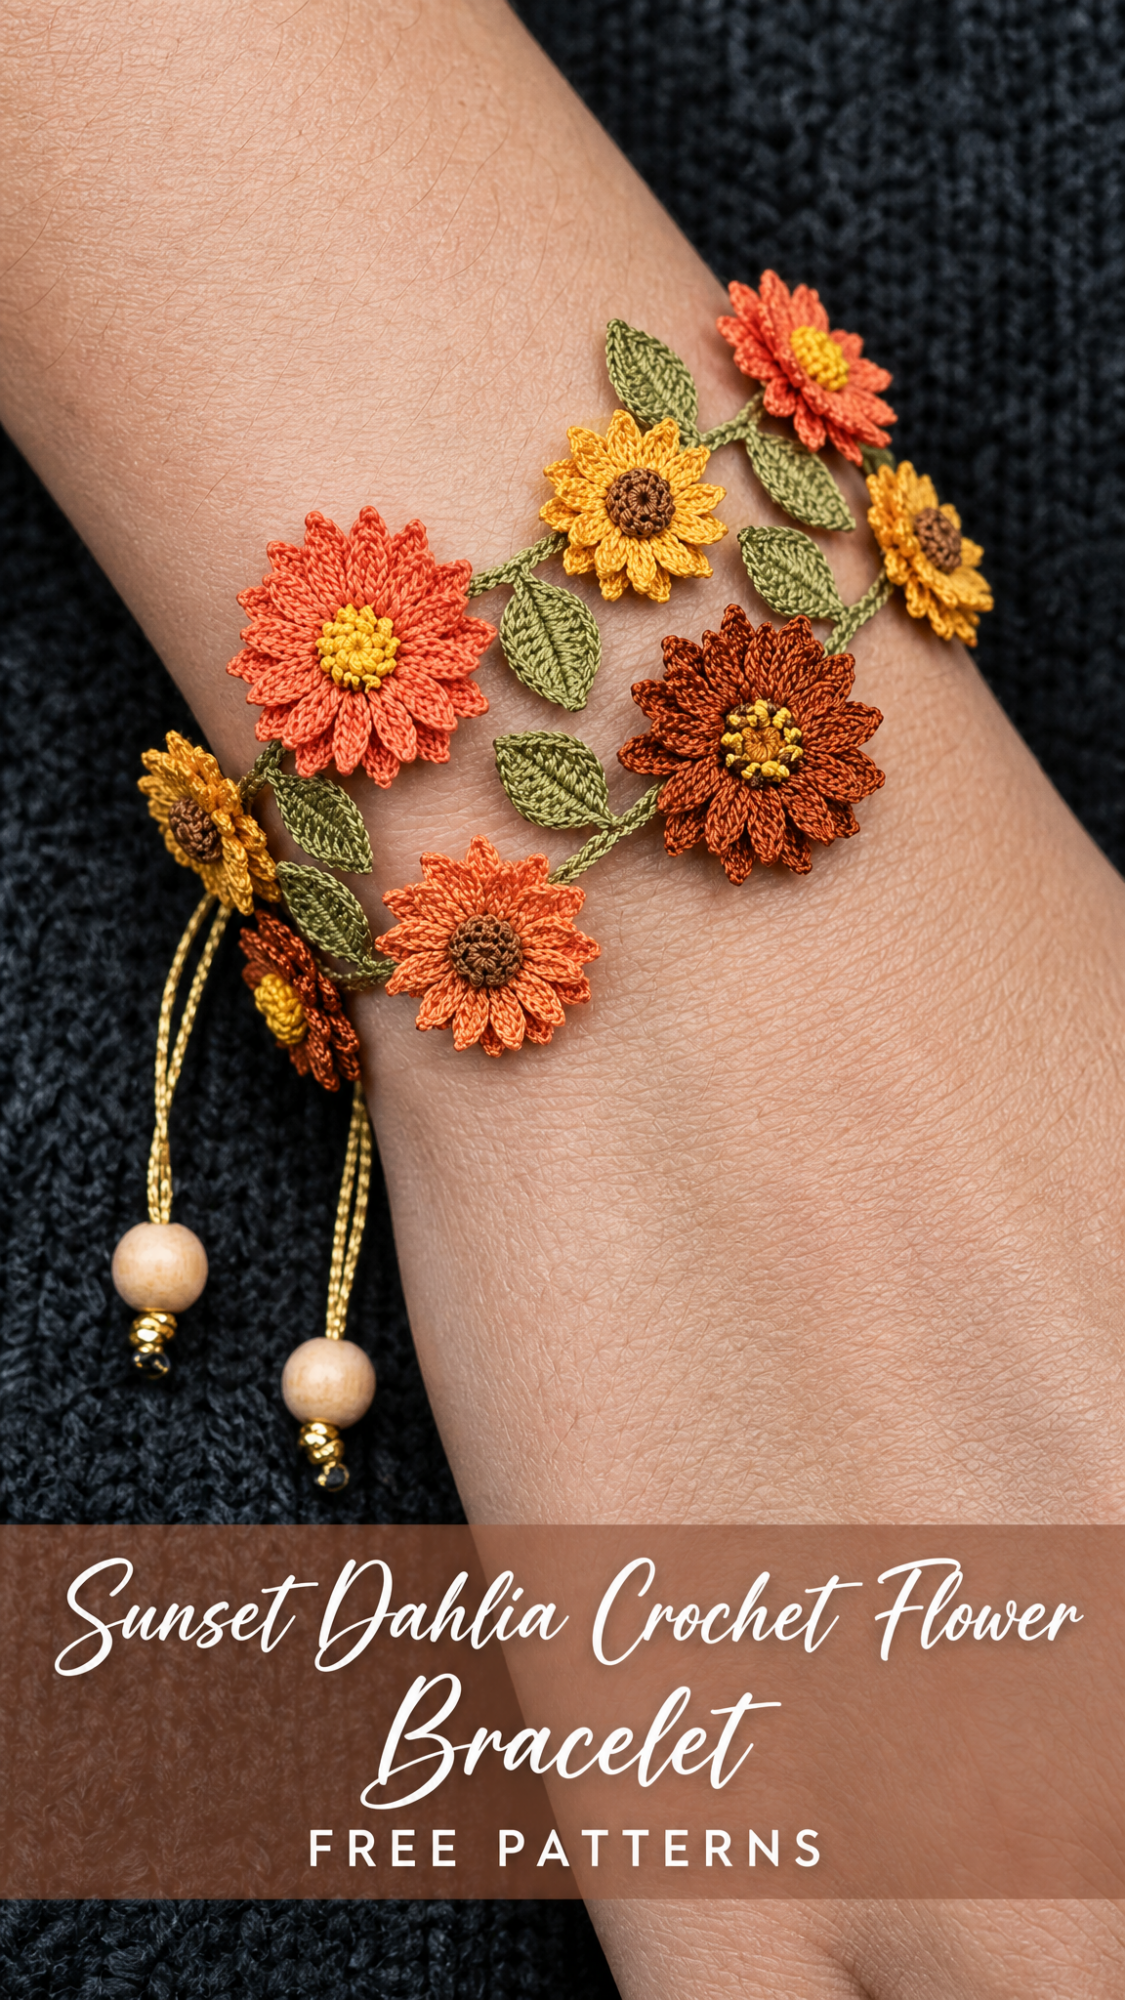
This Sunset Dahlia Crochet Flower Bracelet captures all the warmth of autumn in wearable form. The rich coral, burnt orange, golden yellow, and sage green color palette reminds me of a garden at golden hour. Each flower is worked separately and then joined to a vine base, which means you can customize the length and flower placement to suit any wrist.
The bracelet features two rows of flowers connected by leafy vines. The sliding knot closure with wooden bead accents keeps everything secure while allowing easy adjustment. No clasps or jewelry findings required.
What makes this pattern special:
Skill Level
Intermediate. You should be comfortable with basic stitches and working in the round. The tiny gauge can feel fiddly at first, but the stitch patterns themselves are straightforward. If you have made any crochet flowers before, you can absolutely handle this.
New to thread crochet? I recommend practicing the flower motif a few times before committing to the full bracelet. The small hook and fine thread take some getting used to, but your tension will relax after the first flower or two.
Materials Needed for Your Crochet Dahlia Bracelet
Thread:
– Coral pink (approximately 15 yards)
– Burnt orange/rust (approximately 15 yards)
– Golden yellow (approximately 15 yards)
– Sage green (approximately 25 yards)
– Brown (approximately 5 yards for flower centers)
– Tan or gold (approximately 10 yards for closure cord)
I recommend DMC Petra Size 5 or Aunt Lydia’s Classic Crochet Thread Size 10 for this project. Both have excellent stitch definition and come in gorgeous autumn shades.
Hook:
Notions:
Gauge
Gauge is flexible for jewelry, but aim for tight, firm stitches. Your finished flowers should measure approximately 1 inch (2.5cm) across for the larger dahlias and 3/4 inch (2cm) for the smaller flowers.
Finished Size
Adjustable from 6 inches to 8.5 inches (15cm to 22cm) wrist circumference. The decorative flower portion measures approximately 6.5 inches (16.5cm) in length.
Abbreviations and Stitch Definitions
Before we begin, let me walk you through every stitch you will need. I define each one so you know exactly what to do.
Pattern Instructions
This bracelet is constructed in parts: first the individual flowers, then the leaves, then the vine base, and finally assembly with the adjustable closure.
Large Dahlia Flower (Make 4 total: 2 coral, 1 rust, 1 gold)
These are the showstopper flowers with the textured puff centers.
Center (worked in brown):
Round 1: Make a magic ring. Ch 1, work 6 sc into the ring. Pull ring closed. Sl st to first sc to join. (6 sts)
Round 2: Ch 1, work 2 sc in each st around. Sl st to first sc to join. (12 sts)
Round 3: Ch 1, sc in first st, *ch 2, skip 1 st, sc in next st*. Repeat from * around. Sl st to first sc. (6 small loops created)
Fasten off brown. This creates the textured bobble center you see in the photos.
Petals (join flower color to any sc of Round 3):
Round 4: *In next ch-2 sp, work (sl st, ch 2, 3 dc, ch 2, sl st)*. Repeat from * in each ch-2 sp around. (6 inner petals)
Round 5: Working behind the petals just made, sl st into the back loop of the next sc from Round 3. *Ch 3, sl st into back loop of next sc*. Repeat around. (6 ch-3 loops behind petals)
Round 6: *In next ch-3 sp, work (sl st, ch 2, 5 dc, ch 2, sl st)*. Repeat in each ch-3 sp around. (6 outer petals)
Fasten off and weave in ends.
Small Daisy Flower (Make 6 total: 2 coral, 2 gold, 2 rust)
Center (worked in brown or contrasting color):
Round 1: Make a magic ring. Ch 1, work 6 sc into ring. Pull closed. Sl st to join. (6 sts)
Fasten off center color if changing. Join petal color.
Round 2 (Petals): *Ch 4, tr in same st, ch 4, sl st in same st, sl st in next st*. Repeat from * around. (6 pointed petals)
Fasten off and weave in ends.
Leaves (Make 14 in sage green)
Row 1: Ch 8. Starting in 2nd ch from hook: sl st, sc, hdc, dc, hdc, sc, sl st. (7 sts)
Row 2: Ch 1, turn. Working in remaining loops on opposite side of foundation chain: sl st, sc, hdc, dc, hdc, sc, sl st. (7 sts)
This creates an oval leaf shape. Fasten off, leaving a 4 inch tail for attaching later.
Vine Base (Make 2 in sage green)
This creates the connecting spine that holds everything together.
Row 1: Ch 65 loosely. Sc in 2nd ch from hook and in each ch across. (64 sts)
Fasten off, leaving long tails at both ends for joining.
Tip: Your vine should measure approximately 6 to 6.5 inches. Adjust chain count if needed for a longer or shorter bracelet.
Assembly Instructions
Now comes the fun part. Lay out your pieces before attaching anything so you can plan the placement.
Step 1: Arrange Your Design
Lay both vine bases parallel to each other, about 1 inch apart. Arrange the large dahlia flowers as focal points, spacing them evenly. Fill gaps with small daisy flowers. Tuck leaves between and around the flowers.
The photos show an organic, slightly asymmetrical arrangement. Some flowers overlap, some leaves peek out from behind petals. This is intentional and adds to the natural garden feel.
Step 2: Attach Flowers to Vines
Using matching thread and your tapestry needle, whip stitch the back of each flower center to the vine bases. Most flowers will attach to both vines, bridging the gap between them. Work a few stitches through the back loops only so they stay invisible from the front.
Step 3: Attach Leaves
Sew leaves in place using the tails you left. Position them along the vines between flowers. Some should tuck behind flower petals, others can extend outward from the vine edge.
Step 4: Create the Adjustable Sliding Closure
This is the clever bit that makes the bracelet adjustable without any metal hardware.
For each closure cord:
Using tan or gold thread, ch 80. Fasten off, leaving a 12 inch tail.
To assemble:
1. Thread one cord through the tapestry needle
2. Weave through the last few stitches at one vine end
3. Leave equal lengths on both sides
4. Thread a wooden bead onto each cord end
5. Tie an overhand knot below each bead to secure
6. Repeat on the opposite end with the second cord
Creating the sliding knot:
Lay both cords parallel in the center back of the bracelet. Using a separate 8 inch length of matching thread, wrap tightly around both cords about 15 times. Secure with a knot and weave in the ends. This creates the adjustable slider that lets you tighten or loosen the bracelet.
Finishing Touches
Weave in all remaining ends securely. For added durability, you can apply a light coat of fabric stiffener to the flowers and leaves. This helps them hold their shape during wear.
Block gently if needed by pinning the flat bracelet to a foam board and spritzing with water. Let dry completely before wearing.
Pattern Variations and Tips
Color swaps: This design works beautifully in spring pastels, winter whites and silvers, or classic red roses with dark green leaves.
Make it a choker: Simply extend the vine length and add more flowers for a stunning necklace.
Earrings: Use single large dahlias with jump rings and ear wires for matching accessories.
Thicker thread: Try size 5 thread for a chunkier look that works up faster. Your finished bracelet will be larger and more substantial.
Caring for Your Crochet Jewelry
Hand wash gently in cool water with mild soap. Reshape while damp and lay flat to dry. Avoid pulling or stretching the sliding closure. Store flat or loosely coiled to prevent crushing the flowers.
I hope you love making this Sunset Dahlia Crochet Flower Bracelet as much as I loved designing it. Thank you so much for choosing this pattern. If you make one, I would absolutely love to see it! Tag me on Instagram or share a photo in my Facebook group.
If this pattern inspired you, go ahead and pin it to your favorite Pinterest board so you can find it when you are ready to start. And please drop a comment below if you give it a try. I read every single one and love hearing how your projects turn out!
