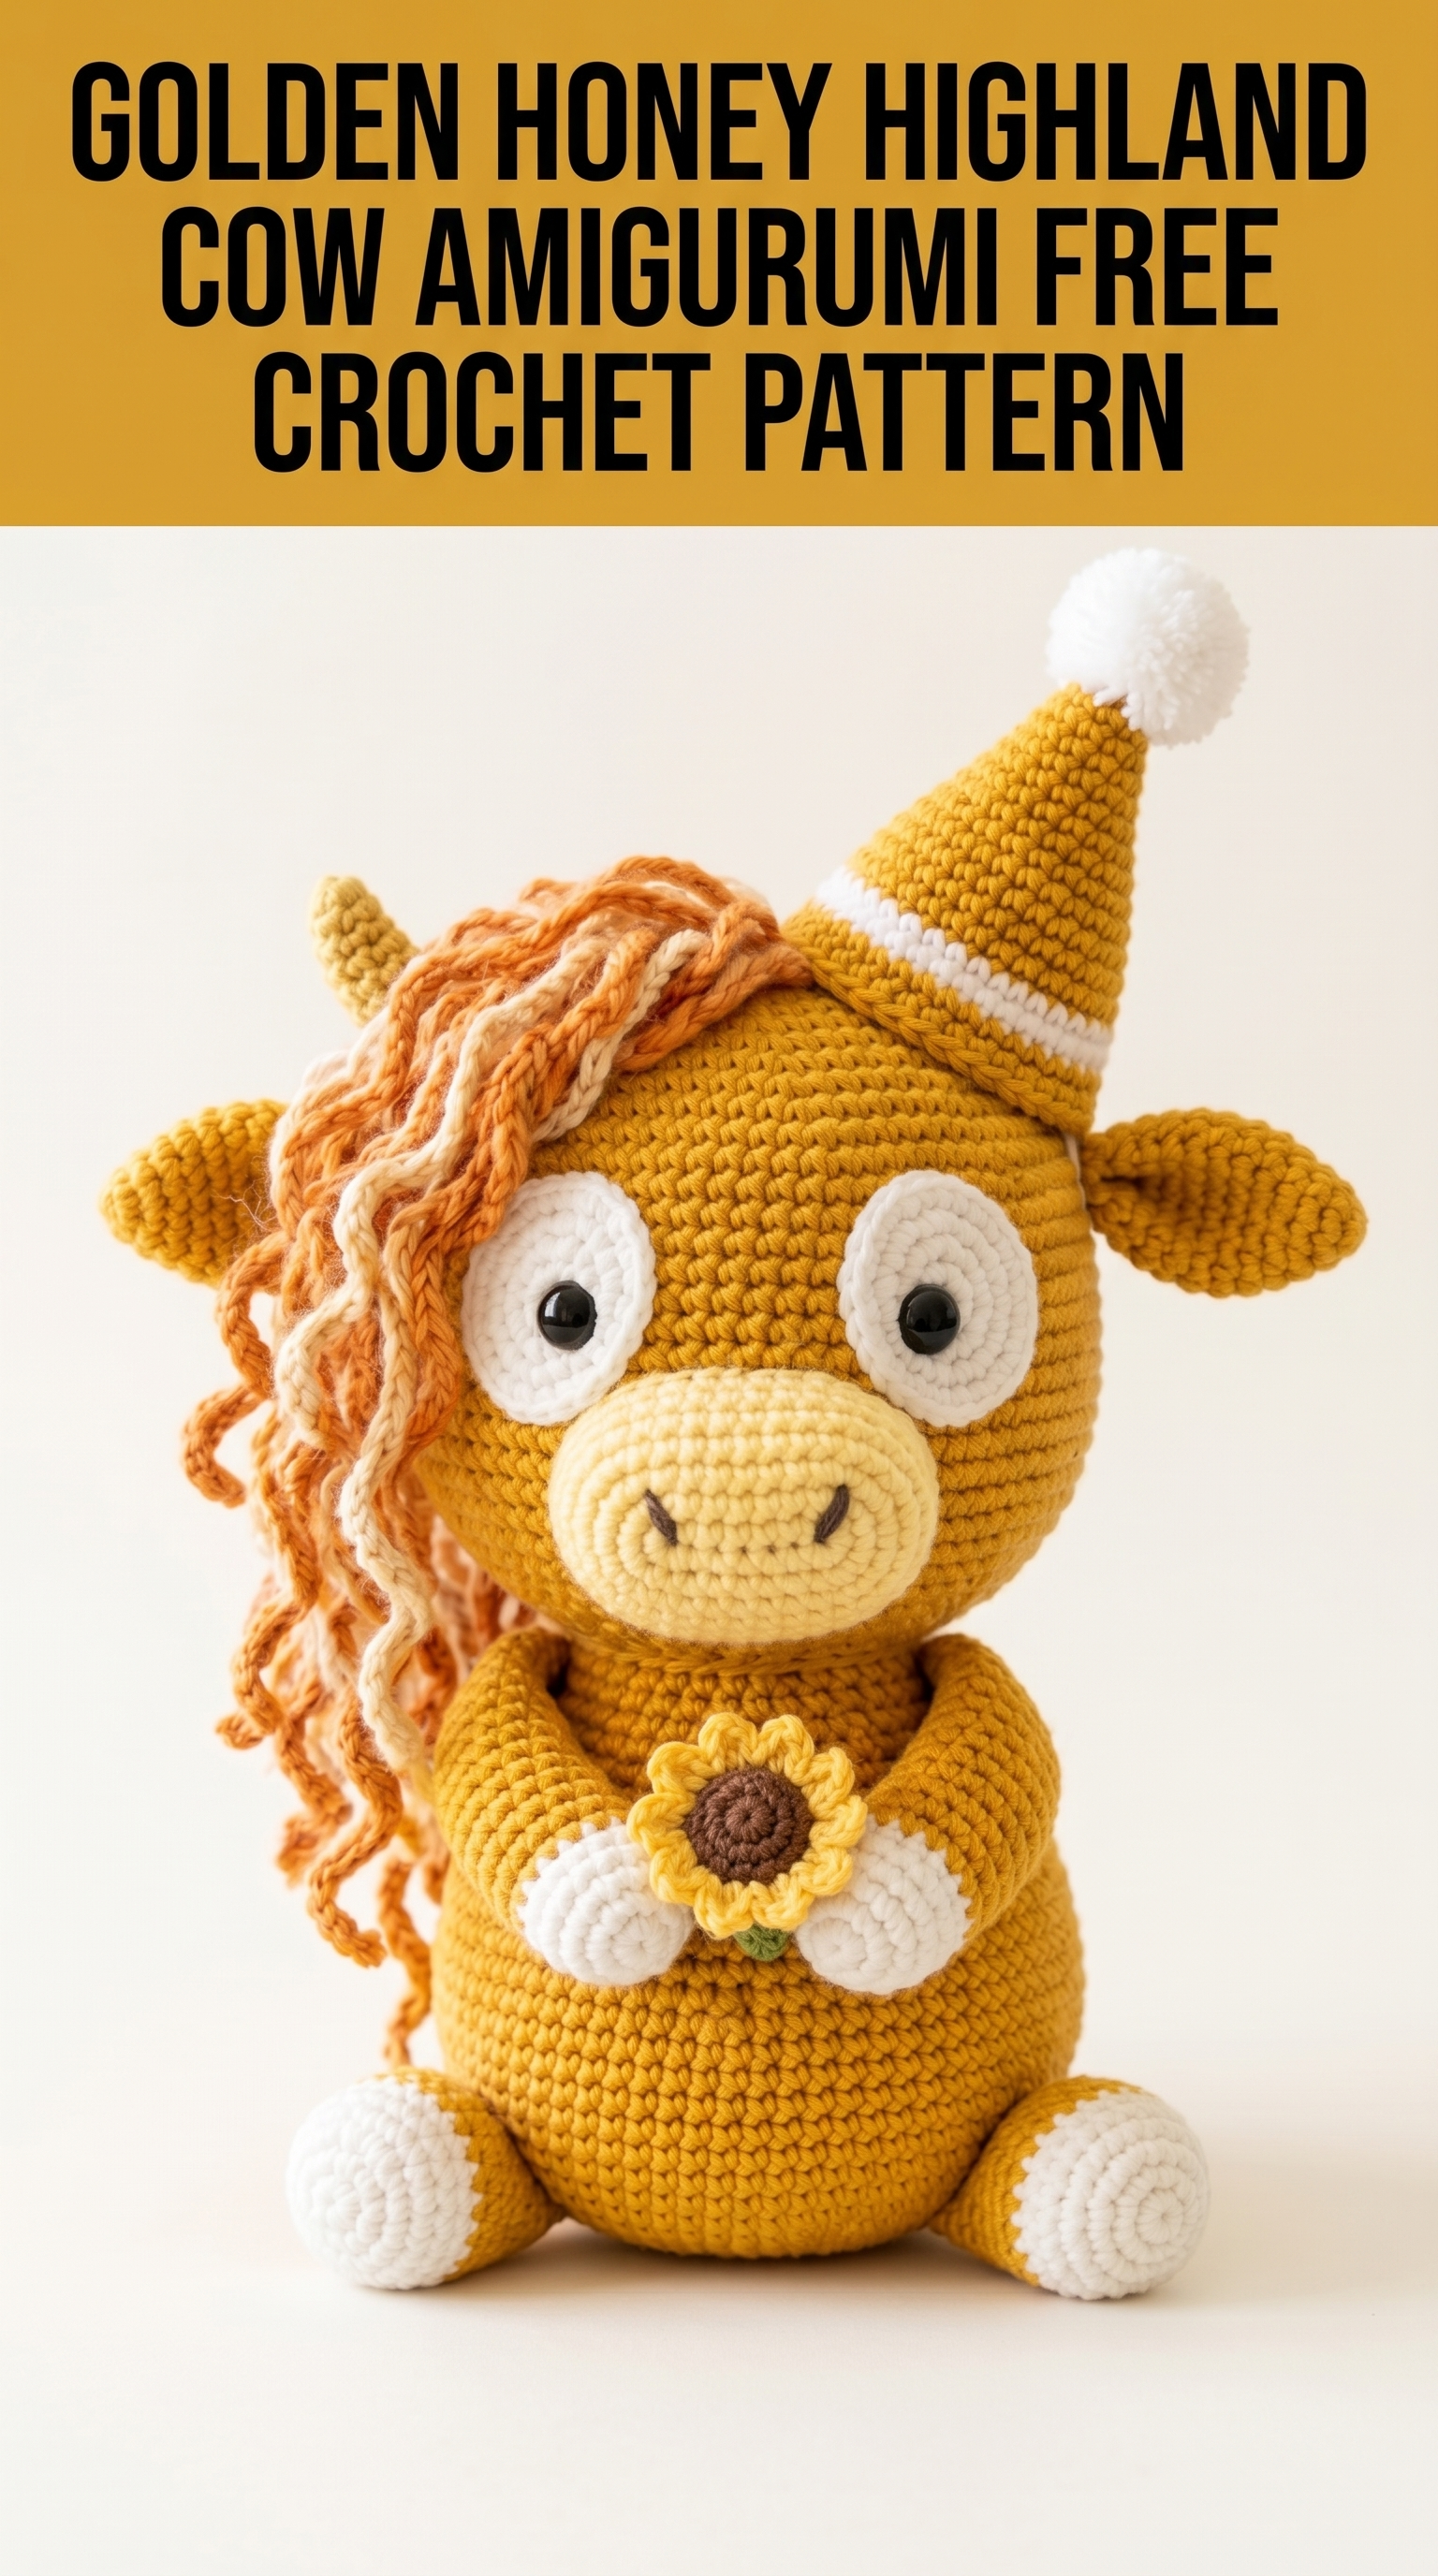
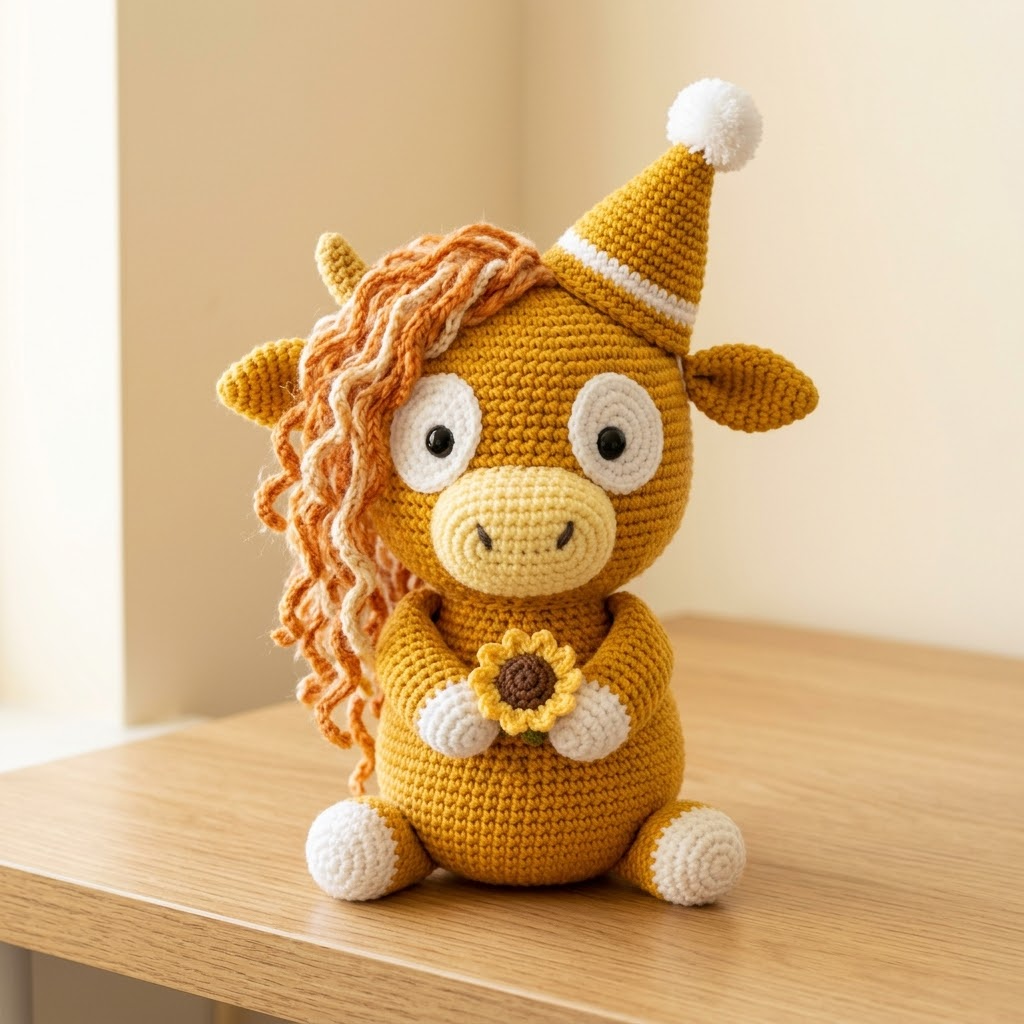
There she is. A sweet little highland cow in the most gorgeous golden honey shade, complete with a party hat and a tiny sunflower clutched in her hooves. This charming amigurumi project combines everything I love about crochet. Texture from that wavy mane, personality from those big googly eyes, and just enough detail to make her feel special without overwhelming you.
If you have made a basic amigurumi ball before, you can absolutely make this highland cow crochet pattern. I promise. The construction is straightforward. The pieces are simple shapes. And that gorgeous curly fringe? Way easier than it looks.
Let me walk you through everything you need to bring this golden beauty to life.
Why This Highland Cow Amigurumi Pattern Works
Highland cows have become such a beloved subject in the crochet community, and I completely understand why. Those shaggy bangs, the sweet faces, the chunky proportions. They translate perfectly into amigurumi form.
What makes this particular highland cow crochet pattern special is the color palette. That rich mustard gold feels warm and modern. The cream accents on the hooves, eyes, and hat stripe keep everything balanced. And the multi-toned mane in peachy orange shades adds depth without requiring complicated colorwork.
The sunflower accessory is a sweet finishing touch that takes maybe fifteen minutes but adds so much personality. You could easily swap it for a heart, a tiny pumpkin, or leave it off entirely.
Skill Level
Confident beginner to intermediate. You should be comfortable with:
If any of those make you nervous, do not worry. I will explain as we go.
Finished Dimensions
Based on the proportions visible, this highland cow stands approximately 8 to 9 inches tall when seated, including the party hat. The body is nicely chunky, around 4 inches wide at the widest point.
Materials You Will Need
Yarn
You will need worsted weight yarn (weight 4) in the following colors:
I recommend a smooth acrylic or cotton blend. Something like Red Heart Super Saver, Paintbox Yarns Simply Aran, or Scheepjes Catona works beautifully. Avoid anything too fuzzy for the main pieces since you want stitch definition.
Hook
3.5mm (E/4) crochet hook for tight amigurumi fabric. You want your stitches snug enough that stuffing does not show through. If your tension runs loose, drop down to a 3.25mm or even 3mm hook.
Notions
Abbreviations and Stitch Definitions
Let me define every stitch before we begin. Refer back here anytime you need a refresher.
MR — Magic Ring. An adjustable starting loop that pulls completely closed. If you prefer, you can chain 2 and work your starting stitches into the second chain from the hook instead.
ch — Chain. Wrap yarn over hook, pull through the loop on your hook. Creates a foundation or adds height.
sc — Single Crochet. Insert hook into stitch, yarn over, pull up a loop (2 loops on hook), yarn over, pull through both loops. This is your main stitch throughout.
inc — Increase. Work 2 single crochets into the same stitch. This adds one stitch to your count.
dec — Invisible Decrease. Insert hook through the front loops only of the next 2 stitches, yarn over, pull through both front loops, yarn over, pull through both loops on hook. Creates a neater decrease than the standard method.
sl st — Slip Stitch. Insert hook, yarn over, pull through stitch and loop on hook in one motion. Used for joining and surface details.
FO — Fasten Off. Cut yarn, pull tail through final loop, tighten.
BLO — Back Loop Only. Work into just the back loop of the stitch instead of both loops.
The numbers in parentheses at the end of each round indicate your total stitch count for that round. Always count to make sure you are on track.
The Pattern: Step by Step Instructions
Head
Start with golden honey yarn and your 3.5mm hook.
Round 1: 6 sc in MR (6 sts)
Round 2: inc in each st around (12 sts)
Round 3: (sc 1, inc) repeat around (18 sts)
Round 4: (sc 2, inc) repeat around (24 sts)
Round 5: (sc 3, inc) repeat around (30 sts)
Round 6: (sc 4, inc) repeat around (36 sts)
Round 7: (sc 5, inc) repeat around (42 sts)
Rounds 8 through 14: sc in each st around (42 sts) — 7 rounds total
Round 15: (sc 5, dec) repeat around (36 sts)
Round 16: (sc 4, dec) repeat around (30 sts)
Insert safety eyes between rounds 10 and 11, approximately 8 to 9 stitches apart. I will explain eye placement more in the assembly section.
Round 17: (sc 3, dec) repeat around (24 sts)
Begin stuffing firmly.
Round 18: (sc 2, dec) repeat around (18 sts)
Round 19: (sc 1, dec) repeat around (12 sts)
Finish stuffing.
Round 20: dec around (6 sts)
FO, sew hole closed, weave in end.
Body
Continue with golden honey yarn.
Round 1: 6 sc in MR (6 sts)
Round 2: inc in each st around (12 sts)
Round 3: (sc 1, inc) repeat around (18 sts)
Round 4: (sc 2, inc) repeat around (24 sts)
Round 5: (sc 3, inc) repeat around (30 sts)
Round 6: (sc 4, inc) repeat around (36 sts)
Round 7: (sc 5, inc) repeat around (42 sts)
Rounds 8 through 18: sc in each st around (42 sts) — 11 rounds total
Round 19: (sc 5, dec) repeat around (36 sts)
Round 20: (sc 4, dec) repeat around (30 sts)
Round 21: (sc 3, dec) repeat around (24 sts)
Stuff body firmly. You want it nice and plump.
Round 22: (sc 2, dec) repeat around (18 sts)
Leave open for sewing to head. FO with long tail.
Muzzle
Switch to pale yellow yarn.
Round 1: 6 sc in MR (6 sts)
Round 2: inc in each st around (12 sts)
Round 3: (sc 1, inc) repeat around (18 sts)
Round 4: (sc 2, inc) repeat around (24 sts)
Rounds 5 through 7: sc in each st around (24 sts)
FO with long tail for sewing. Stuff lightly before attaching.
Using black yarn, embroider a small curved line for the mouth and two small nostrils. Keep it simple. A smile and two dots work perfectly.
Eyes (Make 2)
Using cream yarn:
Round 1: 6 sc in MR (6 sts)
Round 2: inc in each st around (12 sts)
Round 3: (sc 1, inc) repeat around (18 sts)
Round 4: sc in each st around (18 sts)
FO with long tail.
These white circles frame the safety eyes and give that characteristic wide-eyed highland cow look. You will sew these onto the head first, then insert the safety eyes through both layers.
Ears (Make 2)
Using golden honey yarn:
Round 1: 6 sc in MR (6 sts)
Round 2: inc in each st around (12 sts)
Rounds 3 through 5: sc in each st around (12 sts)
FO with long tail. Do not stuff. Flatten and pinch the base slightly before sewing to create that folded ear shape.
Legs (Make 4)
Start with cream yarn:
Round 1: 6 sc in MR (6 sts)
Round 2: inc in each st around (12 sts)
Rounds 3 through 4: sc in each st around (12 sts)
Switch to golden honey yarn:
Rounds 5 through 10: sc in each st around (12 sts)
FO with long tail. Stuff the bottom half firmly, leave the top softer so legs can be positioned flat against the body.
Party Hat
Using golden honey yarn:
Round 1: 4 sc in MR (4 sts)
Round 2: (sc 1, inc) repeat around (6 sts)
Round 3: sc in each st around (6 sts)
Round 4: (sc 2, inc) repeat around (8 sts)
Round 5: sc in each st around (8 sts)
Switch to cream yarn:
Round 6: sc in each st around (8 sts)
Switch to golden honey:
Round 7: (sc 3, inc) repeat around (10 sts)
Round 8: sc in each st around (10 sts)
Round 9: (sc 4, inc) repeat around (12 sts)
Round 10: sc in each st around (12 sts)
Round 11: (sc 5, inc) repeat around (14 sts)
Round 12: sc in each st around (14 sts)
FO with long tail. Stuff lightly. Add a small white pom pom to the tip using cream yarn scraps. You can make a tiny pom pom or crochet a small ball.
Sunflower
Center (brown yarn):
Round 1: 6 sc in MR (6 sts)
Round 2: inc in each st around (12 sts)
FO with tail.
Petals (cream and golden honey):
Using cream, ch 4, sl st in 2nd ch from hook, sc in next, hdc in next. Repeat to create 6 to 8 petals, joining each to the edge of the brown center as you go. Alternatively, make individual petals and sew them around the center.
Add a small yellow petal layer on top if desired. This is entirely optional but adds nice dimension.
Curly Mane
This is the fun part! Cut approximately 30 to 40 strands of yarn in your peach, coral, and orange shades. Each strand should be about 8 inches long.
To create the curl: Wet each strand lightly, wrap tightly around a pencil or thin dowel, and allow to dry completely. Alternatively, you can simply finger-twist and the yarn will hold some wave.
Attach each strand individually to the top and side of the head using a lark’s head knot. Insert your hook under a stitch, fold the strand in half, pull the loop through, then pull the ends through the loop and tighten.
Work from the top of the head down one side, creating that signature highland cow swoop. Layer different shades for dimension. Trim to desired length once all strands are attached.
Assembly Instructions
Take your time here. Good assembly makes all the difference.
1. Position the eye circles on the head first. Pin them in place, checking from multiple angles. They should sit fairly close together in the center of the face.
2. Insert the safety eyes through the center of each white eye circle and through the head. Secure with washers on the inside.
3. Attach the muzzle below and slightly between the eyes. It should overlap the bottom edges of the eye circles just slightly.
4. Sew the ears to the sides of the head, positioned just above the eye circles.
5. Attach the head to the body using a whip stitch. Make sure the head is centered and facing forward.
6. Sew the legs to the body. Two in front, two in back. Position them so the cow sits upright and stable.
7. Attach the party hat to the top of the head, tilted slightly to one side.
8. Add the curly mane as described above.
9. Sew the sunflower to the front of the body, positioned as if being held.
Tips for Success
Tension matters. Keep your stitches tight enough that white stuffing does not peek through. This is especially important for the golden yarn since any gaps will be noticeable.
Count every round. Amigurumi shaping relies on precise stitch counts. Use stitch markers generously.
Stuff as you go. It is much harder to stuff properly after you have decreased too far. Add filling in stages.
Take breaks. Small detailed work can strain your hands and eyes. Step away and come back fresh.

Wrapping Up This Highland Cow Crochet Pattern
And there you have it. Your very own golden honey highland cow, complete with a festive party hat and the sweetest little sunflower. She makes an absolutely darling gift, nursery decor piece, or addition to your own amigurumi collection.
This step by step crochet tutorial has everything you need to create this charming project from start to finish. The techniques are beginner friendly once you understand the basics, and the result is absolutely worth the effort.
I would absolutely love to see your finished highland cows. Truly. Tag me on Instagram or share in my Facebook group so I can admire your work. Every single version is unique and beautiful, and seeing your creations makes my whole day.
Thank you so much for choosing this pattern. Happy crocheting, friend.
