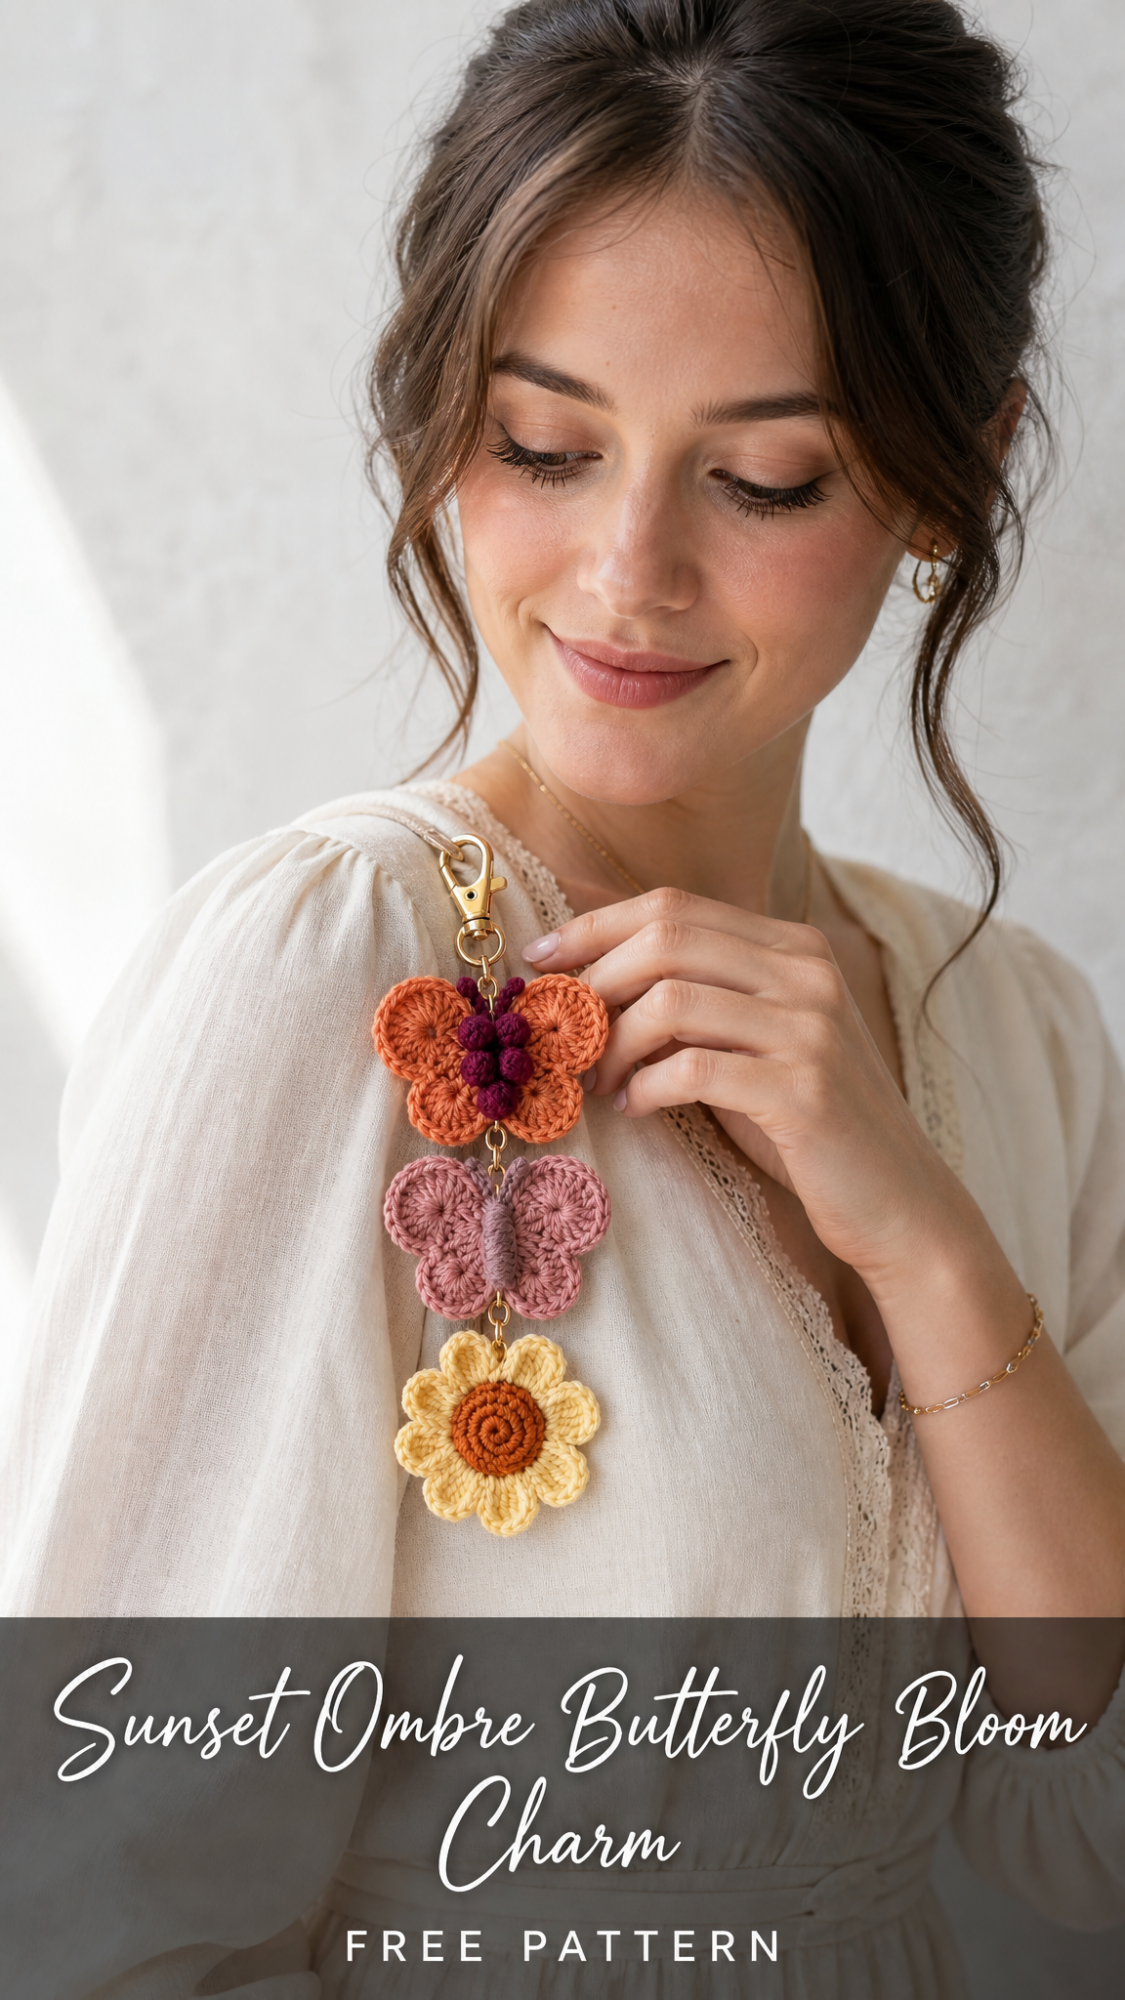
This crochet keychain charm features two butterflies and a daisy connected by small jump rings. It uses basic stitches, works up in about an hour, and makes an adorable bag accessory or gift. If you can crochet in the round and know how to double crochet, you can absolutely make this.
Why You’ll Love This Crochet Butterfly Keychain Pattern
I designed this charm to be the perfect scrap yarn project. Those little bits of cotton yarn leftover from bigger projects finally have a purpose. The warm sunset color palette, with burnt orange, dusty rose, burgundy, and soft yellow, gives this piece a boho vibe that looks beautiful on a handbag, backpack, or set of keys.
Each motif is small and works up quickly. The butterflies use a simple four-circle wing construction joined to a bobble body. The daisy has a spiral center with petal loops around the edge. Nothing complicated here.
This crochet tutorial is perfect for confident beginners who want to try something new without committing to a big project. You’ll practice working in the round, making bobble stitches, and assembling multiple pieces. These are skills that transfer to so many other patterns.
Finished Measurements
Each butterfly measures approximately 2 inches wide by 1.5 inches tall.
The daisy measures approximately 1.5 inches in diameter.
The complete assembled charm hangs approximately 5 to 6 inches long from the lobster clasp to the bottom of the daisy.
Skill Level
Easy to Intermediate
You should be comfortable with basic crochet stitches and working in the round. The bobble stitch for the butterfly body might be new to some crocheters, but I’ll walk you through it step by step.
Materials Needed
Yarn:
– Burnt orange (approximately 15 yards) for the large butterfly wings
– Dusty rose (approximately 12 yards) for the small butterfly wings
– Burgundy (approximately 8 yards) for the large butterfly body
– Gray or mauve (approximately 6 yards) for the small butterfly body
– Soft yellow (approximately 10 yards) for the daisy petals
– Rust or copper (approximately 5 yards) for the daisy center
I used a cotton blend similar to Scheepjes Catona or DMC Natura. Any smooth cotton yarn will give you crisp stitch definition for these small motifs.
Hook:
A smaller hook creates tighter stitches, which helps these tiny pieces hold their shape.
Notions:
Abbreviations and Stitch Definitions
Ch = Chain: Yarn over, pull through loop on hook.
Sl st = Slip stitch: Insert hook, yarn over, pull through stitch and loop on hook in one motion.
Sc = Single crochet: Insert hook, yarn over, pull up a loop (2 loops on hook), yarn over, pull through both loops.
Hdc = Half double crochet: Yarn over, insert hook, yarn over, pull up a loop (3 loops on hook), yarn over, pull through all 3 loops.
Dc = Double crochet: Yarn over, insert hook, yarn over, pull up a loop (3 loops on hook), yarn over, pull through 2 loops, yarn over, pull through remaining 2 loops.
Tr = Treble crochet: Yarn over twice, insert hook, yarn over, pull up a loop (4 loops on hook), yarn over, pull through 2 loops three times.
Bobble = Bobble stitch: Work 4 double crochets into the same stitch but stop before the final yarn over on each dc (leaving 2 loops on hook each time). You’ll have 5 loops on your hook after all 4 incomplete dc stitches. Yarn over and pull through all 5 loops at once.
Magic ring = Adjustable starting loop: Create a loop with your yarn tail, insert hook, yarn over and pull up a loop, chain to secure. Work your stitches into this ring, then pull the tail to close the center hole.
If you’ve never made a magic ring before, don’t worry. You can substitute by chaining 4 and slip stitching to form a ring. Work your first round stitches into the center of that ring instead.
Crochet Butterfly Pattern
You will make two butterflies using this pattern. The first butterfly uses burnt orange wings with a burgundy body. The second butterfly uses dusty rose wings with a gray body.
Butterfly Wings (Make 4 Per Butterfly)
Each butterfly has four wings. All four wings are identical circles that get joined together during assembly.
With wing color, make a magic ring.
Round 1: Ch 3 (counts as first dc), work 11 dc into the magic ring. Sl st to top of ch-3 to join. Pull magic ring closed. (12 dc)
Round 2: Ch 3 (counts as first dc), dc in same st, 2 dc in each st around. Sl st to top of ch-3 to join. (24 dc)
Fasten off, leaving a 6-inch tail for sewing.
Quick tip: These little circles should cup slightly. That’s normal and actually helps them look more dimensional when assembled.
Make 4 circles total for each butterfly. So if you’re making both butterflies in this charm, you’ll crochet 8 wing circles altogether.
Butterfly Body
The body is worked in rows and features three bobble stitches that create the head and body segments you see in the finished piece.
With body color, ch 8.
Row 1: Starting in 2nd ch from hook, sl st, sc, bobble in next ch, sc, bobble in next ch, sc, bobble in next ch. (3 bobbles, 3 sc, 1 sl st)
Do not fasten off. You’ll use the working yarn to help with assembly.
The three bobbles create the segmented body look. The first bobble is the head, and the other two form the thorax and abdomen.
Butterfly Antennae
Still attached to the body piece, ch 5, sl st in 2nd ch from hook, sl st in next 3 ch. This creates the first antenna.
Sl st into the top of the first bobble (the head), ch 5, sl st in 2nd ch from hook, sl st in next 3 ch. Fasten off, leaving a long tail.
You now have two little antennae curling up from the head.
Assembling the Butterfly
Lay out your four wing circles in a butterfly shape. Two on top, two on bottom, with the circles slightly overlapping in the center.
Place the body piece vertically down the middle, with the head bobble at the top between the upper wings.
Using your tapestry needle and the tail from your body piece:
1. Whip stitch the body to all four wings where they overlap in the center.
2. Tack the wings together where they touch each other.
3. Use the tails from your wing circles to secure any loose edges and add stability.
The wings don’t need to be perfectly symmetrical. A little variation looks natural and charming.
Weave in all ends securely on the back of the butterfly.
Crochet Daisy Pattern
This cheerful daisy has a raised spiral center with looped petals around the edge.
Daisy Center
With rust or copper yarn, make a magic ring.
Round 1: Ch 1, work 6 sc into the magic ring. Do not join. Work in a continuous spiral. (6 sc)
Round 2: 2 sc in each st around. (12 sc)
Round 3: Sc in each st around. (12 sc)
Sl st to next st to even out the round. Fasten off, leaving a tail for sewing.
The center will curl into a slight dome shape. This is intentional and creates that pretty raised spiral look you see in the photos.
Daisy Petals
With soft yellow yarn, make a magic ring.
Round 1: Ch 1, work 8 sc into the magic ring. Sl st to first sc to join. Pull ring closed. (8 sc)
Round 2 (Petal Round): *Ch 4, tr in same st, ch 4, sl st in same st, sl st in next st.* Repeat from * to * around. (8 petals)
Each petal is created by the ch-4, tr, ch-4, sl st sequence. The chains create the curved petal edges while the treble crochet adds height.
Fasten off, leaving a tail for sewing.
Assembling the Daisy
Center the rust spiral piece on top of the yellow petal piece. The dome should face up.
Using your tapestry needle and the tail from the center piece, whip stitch around the edge of the center, attaching it to the petal base. Try to keep your stitches hidden between the spirals.
Weave in all ends securely on the back.
Assembling the Complete Charm
Now comes the fun part. You’ll connect all three motifs with jump rings to create the dangling charm.
You will need:
Attachment Points
On each butterfly, identify a spot at the top center (between the antennae) and the bottom center (between the lower wings) where you can thread a jump ring through the stitches.
On the daisy, identify a spot between two petals at the top edge.
Connecting the Pieces
Step 1: Open a jump ring by twisting it sideways (not pulling it apart). Thread it through the top of the burnt orange butterfly and through the ring on your lobster clasp. Close the jump ring securely.
Step 2: Open another jump ring. Thread it through the bottom center of the burnt orange butterfly and through the top center of the dusty rose butterfly. Close securely.
Step 3: Open another jump ring. Thread it through the bottom center of the dusty rose butterfly and through the top edge of the daisy (between two petals). Close securely.
Optional: If you want extra security, you can use two jump rings at each connection point. This also adds a tiny bit of extra length between motifs.
Test your connections by gently tugging on each piece. Everything should feel secure.
Pattern Variations and Customization Ideas
This crochet butterfly charm pattern is incredibly versatile. Here are some ideas to make it your own:
Color combinations: Try classic black and yellow for bumblebee vibes, or pastels for spring. A rainbow gradient using different colored wings on each butterfly looks stunning.
Single motif keychains: Make just one butterfly or one daisy attached directly to a keyring. Quick gifts that take under 30 minutes.
Different flowers: Swap the daisy for a simple rose, a sunflower, or a tulip. Any small crochet flower motif works beautifully.
Add beads: Thread small beads onto your jump rings before closing them for extra sparkle.
Bag charm vs keychain: Use a larger lobster clasp for bags or a simple split ring for keys.
Tips for Success
Tension matters with small motifs. Keep your stitches firm and even. Loose stitches will make your butterflies look floppy.
Block if needed. If your pieces curl or look uneven, pin them to a blocking mat, spritz with water, and let dry completely. This works wonders for cotton yarn.
Count your stitches. With only 12 or 24 stitches per round, one missed stitch is very noticeable. Count at the end of each round.
Use stitch markers. Place a marker in the first stitch of each round if you lose your place easily. Even experienced crocheters do this.
Quality hardware matters. Cheap jump rings can open unexpectedly. Look for jewelry-quality findings at your local craft store.
Care Instructions
Because this charm will likely be attached to a frequently used bag or keychain, it will get dirty over time. Here’s how to keep it looking fresh:
Spot clean with a damp cloth and mild soap for small marks.
Hand wash in cool water with gentle detergent if it needs a deeper clean. Reshape the motifs while damp and lay flat to dry.
Avoid the dryer. Heat can warp the cotton and damage the metal hardware.
Cotton yarn is durable and will hold up well to regular use. The colors may soften slightly over time, which honestly just adds to the vintage boho charm.
Why This Makes a Great Gift
Let me tell you, this butterfly bloom charm is a crowd pleaser. I’ve made several of these for friends, and every single person has asked for another one in different colors.
The project works up quickly. You can complete the entire charm in one to two hours once you’ve made the first butterfly and know the rhythm.
It uses minimal materials. Scrap yarn and a few dollars worth of jewelry findings. That’s it.
It’s universally appealing. Butterflies and flowers? Everyone loves those. The sunset color palette works year round but feels especially perfect for spring and fall.
It photographs beautifully. Your recipient will definitely post it on social media. Trust me.
Consider making a few extras to have on hand for last-minute birthdays, teacher gifts, or market sales.
Final Thoughts on the Sunset Ombre Butterfly Bloom Charm Crochet Pattern
This little charm packs so much personality into such a small project. The combination of the two butterflies and the sweet daisy creates a whimsical accessory that brings joy every time you reach for your bag or keys.
I love how this crochet pattern uses simple techniques to create something that looks intricate and impressive. The bobble stitch body, the petal construction, the layered assembly. These are all foundational skills that will serve you well in countless future projects.
Whether you’re making this for yourself or crafting it as a thoughtful handmade gift, I hope you enjoy the process as much as I did designing it.
Thank you so much for choosing this pattern. It means the world to me that you’re here, making beautiful things with your own hands. If you make this butterfly bloom charm, I would absolutely love to see it. Tag me on Instagram or share your finished project in my Facebook group. Seeing your creations honestly makes my whole day.
If you loved this pattern, go ahead and save it to your Pinterest boards so you can find it easily when you’re ready to start. And please drop a comment below if you give it a try. I read every single one and I’m always cheering you on.
