
Crocheted jewelry looks intimidating. I get it. Tiny hooks, fine thread, and all those delicate little pieces that somehow need to become wearable art. But here is the truth: if you can single crochet and double crochet, you can absolutely make this stunning sunflower ear climber.
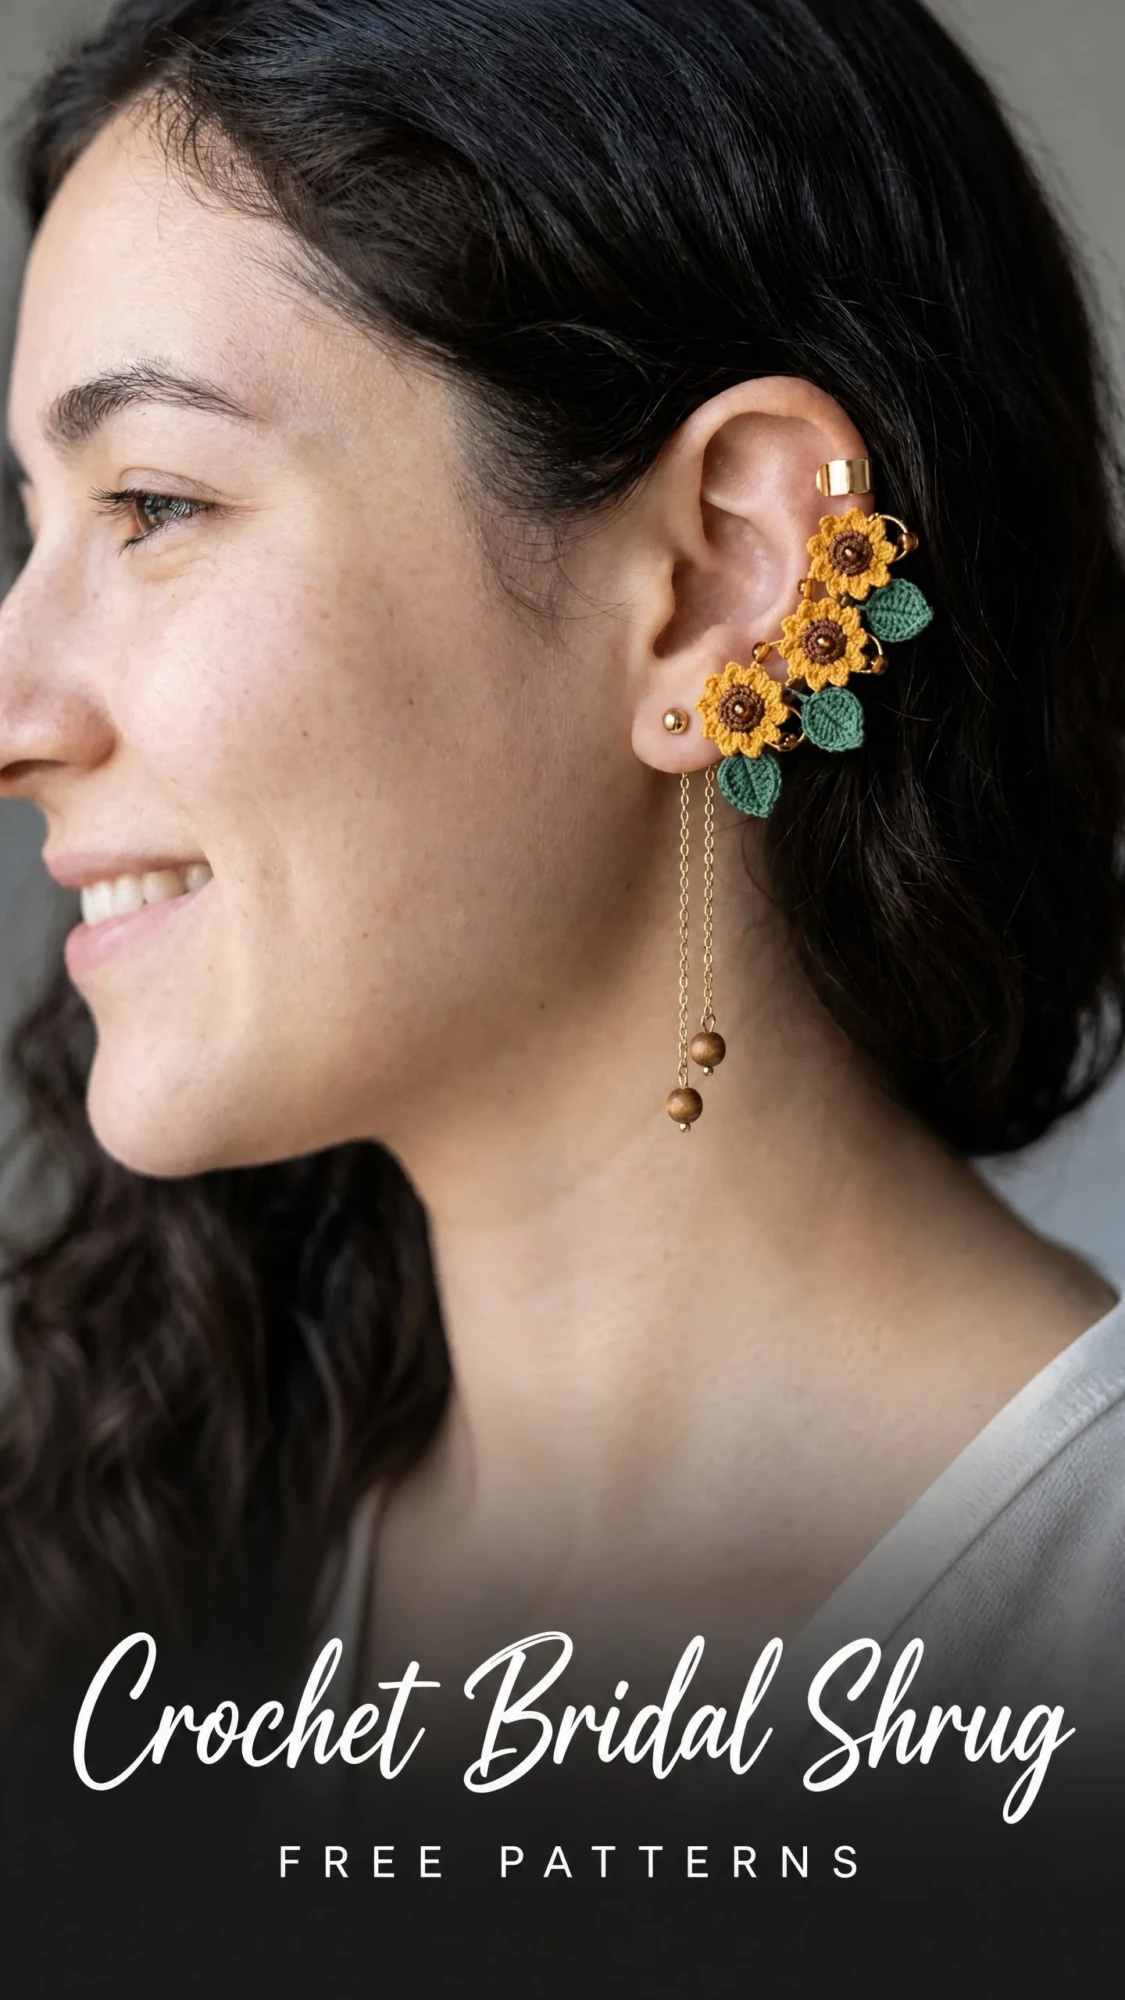
The individual flower motifs are actually quite simple. You are working in small circles, building up just three rounds per flower. The leaves are even easier. What makes this piece look so impressive is the assembly, the way each component comes together on that curved wire frame. And I am going to walk you through every single step.
Whether you are a confident crocheter ready to try something new or a jewelry maker curious about adding crochet to your repertoire, this pattern breaks everything down into manageable pieces. Literally. You make each flower separately, each leaf separately, and then you put them all together like a little botanical puzzle.
About This Sunflower Ear Climber Crochet Pattern
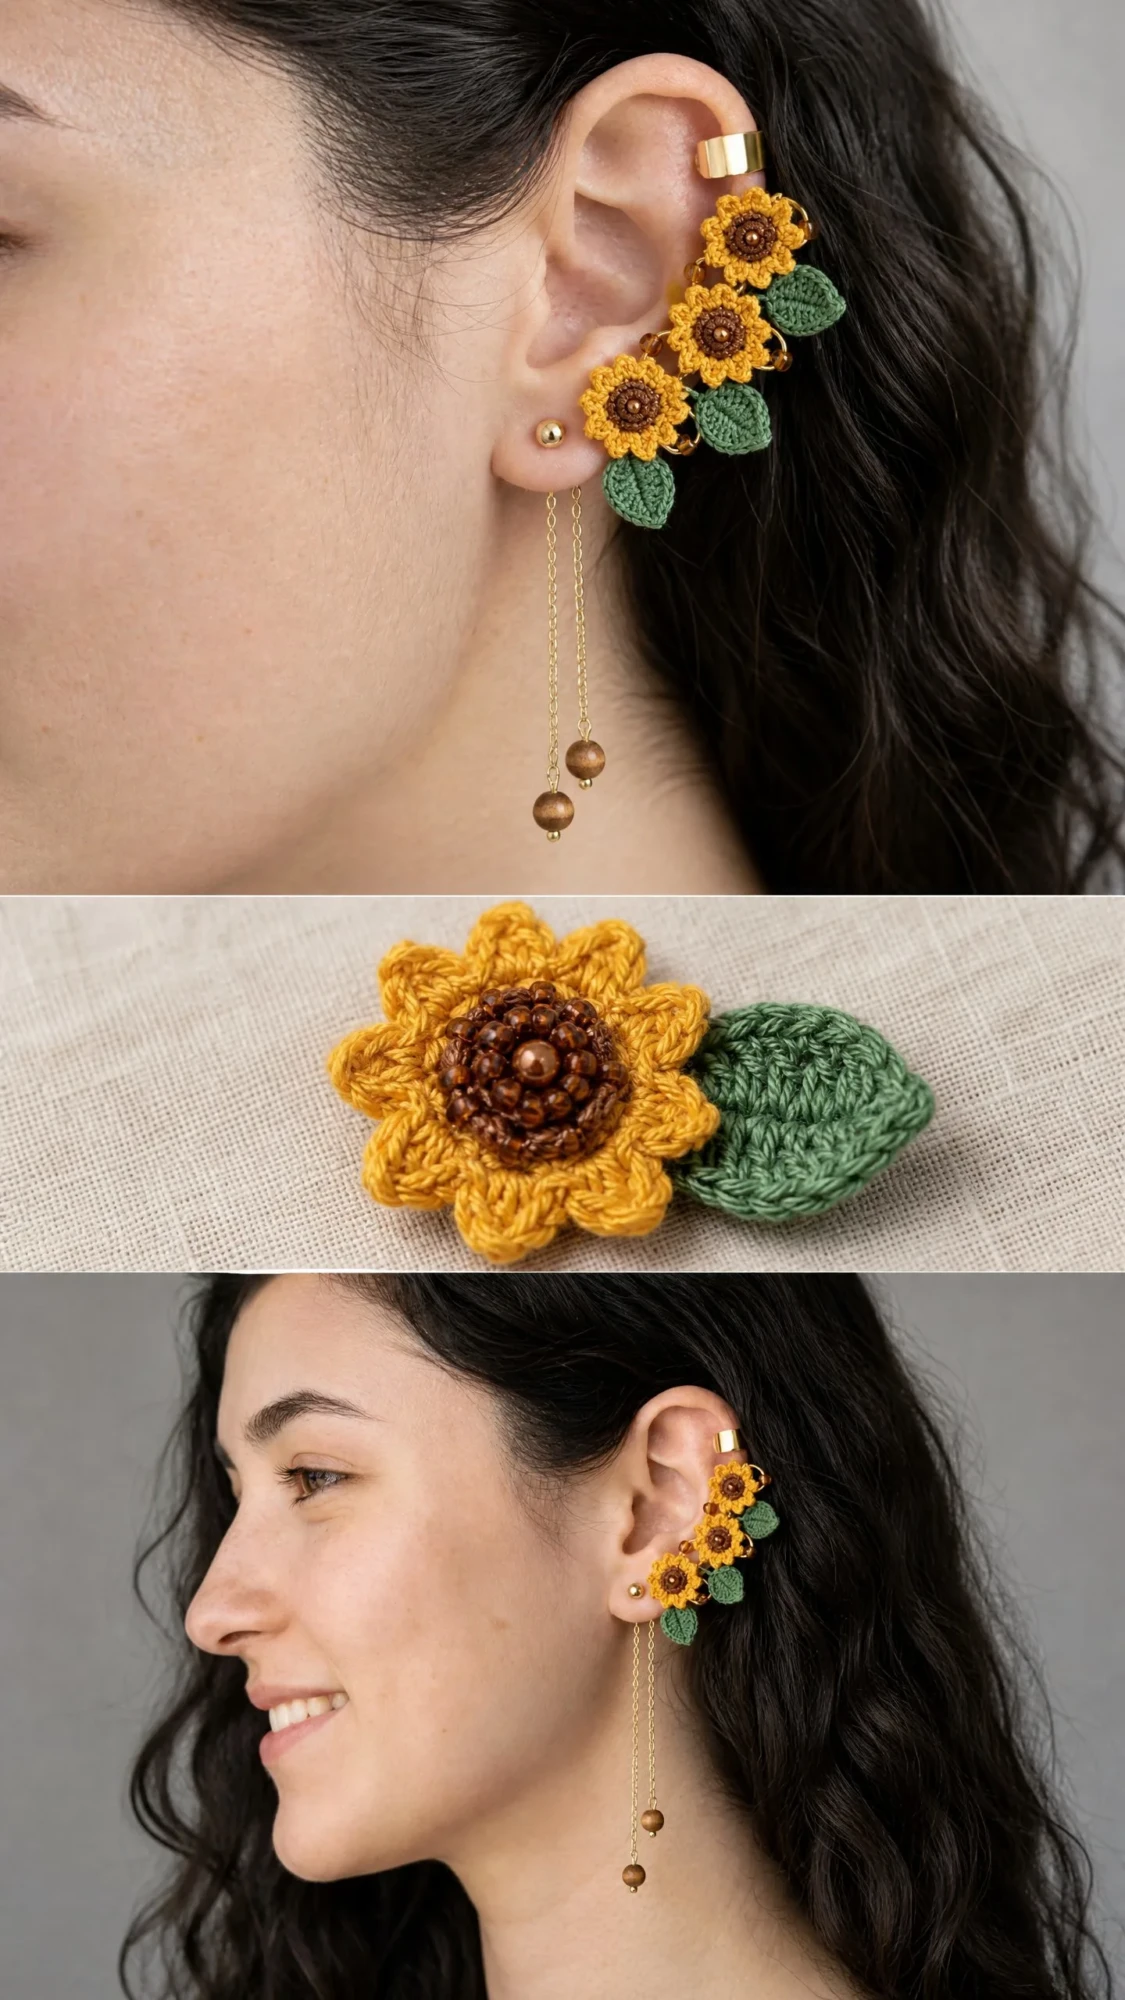
This ear climber is a cascading jewelry piece featuring three crocheted sunflower motifs arranged along a curved gold wire frame. The frame spans from your earlobe up to your upper ear cartilage, creating that dramatic ear climber effect that looks so striking.
Each sunflower is worked in the round with a dark brown center and golden yellow petals. Small crocheted leaves in sage green tuck between the flowers. Amber seed beads fill the gaps, and a delicate gold chain hangs from the bottom with two wooden beads dangling at the end.
The finished piece measures approximately 2.75 inches tall by 1.25 inches wide when mounted on the wire frame. Each sunflower motif measures about 0.6 inch in diameter after blocking. Each leaf measures approximately 0.5 inch long.
This is an intermediate level project. The stitches themselves are basic, but you will be working at a miniature scale with fine thread and a tiny steel hook. You will also need to be comfortable with basic jewelry assembly techniques like wire wrapping. If you have never worked with crochet thread before, I recommend practicing the flower motif once or twice before starting your final pieces.
Time estimate: 4 to 6 hours total, including drying time and assembly.
Materials You Will Need
Thread and Hook
Hardware and Findings
Thread Suggestions
Aunt Lydia’s Classic Crochet Thread, Size 10 works beautifully for this project. Look for Goldenrod, Brown, and Sage colorways. Coats and Clark South Maid Crochet Thread, Size 10 is another excellent option with slightly softer hand.
If you prefer easier handling, DMC Petra Crochet Cotton, Size 5 will work, but your motifs will be approximately 20 percent larger. You will need a longer wire blank to accommodate the bigger flowers.
Avoid thread with high sheen or wax coating. These resist stiffener and will not hold their shape properly.
Gauge
One completed sunflower motif worked through Round 3 measures 0.6 inch (1.5 cm) in diameter after blocking and stiffening.
Gauge is not critical for wearability, but it matters for fitting everything onto the wire blank properly. If your motifs are too large, move down to a US size 8 steel hook (1.50 mm). If they are too small, move up to a US size 6 steel hook (1.80 mm).
Abbreviations
Special Stitch: Petal Stitch
This stitch creates the rounded petals on your sunflowers. It looks complicated written out, but once you do it once, it clicks.
Petal Stitch (worked in a ch-1 space):
Insert hook into the indicated chain-1 space. Yarn over and pull up a loop (2 loops on hook). Yarn over and pull through 1 loop to create a chain base.
Now work 4 partial double crochets into the same space: yarn over, insert hook into same space, yarn over, pull up a loop, yarn over, pull through 2 loops. Repeat this 3 more times. You should have 5 loops on your hook plus 1 from the beginning.
Yarn over and pull through all 6 loops on hook. Chain 1 to close.
That creates one rounded petal. I strongly recommend practicing this stitch on scrap thread before starting your actual flowers.
Pattern Notes
1. All motifs begin with a magic ring (MR). Pull the ring snug before continuing to the next round.
2. You will make 3 sunflower motifs and 4 leaves. All three flowers are identical. Positioning on the wire differentiates them.
3. Weave in all thread ends securely before assembly. Ends that are not woven in will show through the stiffener.
4. Stiffening is essential. Apply fabric stiffener or a mixture of equal parts white craft glue and water to each motif and leaf before assembly. Without stiffening, the tiny motifs will droop on the wire.
5. Join each round with a slip stitch to the first stitch of that round unless instructed otherwise.
6. Do not turn between rounds unless explicitly told to do so.
7. This pattern is sized for the right ear as shown. For the left ear, mirror the assembly by curving the wire blank in the opposite direction.
Sunflower Motif Instructions (Make 3)
Center (Color B)
Round 1: Begin with MR. Ch 1 (does not count as a stitch here or throughout). Work 6 sc into MR. Pull ring closed. Join with sl st to first sc. (6 sc)
Round 2: Ch 1. Working in both loops, [sc in next st, ch 1] 6 times. Join with sl st to first sc. (6 sc, 6 ch-1 spaces)
Fasten off Color B, leaving a 4-inch tail. Use the tail to weave through the center back to reinforce the magic ring.
Petals (Color A)
Round 3: Join Color A with sl st to any ch-1 space from Round 2. Work one Petal Stitch into same ch-1 space. [Sl st to next ch-1 space, work one Petal Stitch into same ch-1 space] 5 times. Join with sl st to top of first Petal Stitch. (6 Petal Stitches)
Fasten off Color A, leaving a 6-inch tail for attachment to wire.
Your completed motif should lie flat and circular with 6 evenly spaced rounded petals surrounding the brown center.
Checkpoint: Each sunflower should measure approximately 0.6 inch across at the widest point after stiffening. If larger than 0.75 inch, reduce hook size. If smaller than 0.5 inch, increase hook size.
Leaf Instructions (Make 4)
Use Color C throughout.
Foundation: Ch 6.
Row 1 (RS): Sc in second ch from hook, sc in next 2 ch, hdc in next ch, 4 hdc in last ch (this is the tip of the leaf). Rotating to work along the opposite side of the foundation chain: hdc in next ch, sc in next 2 ch, sc in last ch. Do not join. (12 sts total around the leaf outline)
Row 2: Ch 1, sl st in first sc, sc in next sc, hdc in next sc, hdc in next hdc, sk 2 sts of tip cluster, sl st in center st of 4-hdc tip cluster, sk 2 sts of tip cluster, hdc in next hdc, hdc in next sc, sc in next sc, sl st in last sc. (10 sts)
Fasten off, leaving a 5-inch tail for attachment.
The leaf will naturally curl slightly at the tip. Stiffening and pinning it flat will correct this.
Checkpoint: Each leaf should measure approximately 0.5 inch long and 0.3 inch at the widest point after blocking.
Assembly Instructions
Step 1: Stiffen All Motifs and Leaves
Mix equal parts white craft glue and water in a small dish, or use undiluted liquid fabric stiffener. Dip each motif and leaf into the mixture and gently squeeze out excess.
Lay all pieces flat on a foam pinning board with the right side facing up. Use straight pins to hold petals open and leaves flat. Allow to dry completely, at least 2 hours or overnight.
Step 2: Prepare the Wire Armature
Examine your ear climber wire blank. It should have a coiled or looped section at the top (the ear cuff portion) and a flat pad or loop at the bottom (where the stud post attaches).
If the bottom does not already have a stud post, adhere the flat-pad stud post to the bottom loop using jewelry adhesive. Allow to cure fully before continuing.
Cut approximately 18 inches of 28-gauge wire for binding components to the armature.
Step 3: Position Flowers and Leaves
Lay the wire blank flat with the ear cuff at top and stud post at bottom. Position the three sunflowers along the curve, evenly spaced approximately 0.7 inch apart from center to center.
Position leaves as follows:
Step 4: Wire-Wrap Flowers Onto Armature
Thread the 28-gauge wire through the back center of Sunflower 1 (through the magic ring) and wrap it around the armature wire. Make 4 to 5 tight coils around the armature, then bring the wire back through the sunflower center again to lock it flat. Twist the wire ends on the back and tuck them in.
Repeat for Sunflower 2 and Sunflower 3, using fresh wire lengths of approximately 5 inches each.
Step 5: Wire-Wrap Leaves Onto Armature
Using short lengths of 28-gauge wire (approximately 3 to 4 inches each), thread through the base of each leaf and wrap around the armature wire at the designated position. Twist tight on the back and tuck the wire ends behind the armature so they do not scratch your ear.
Step 6: Add Seed Beads
Thread 3 to 5 amber seed beads onto the armature wire in the spaces between motifs. You can also attach them using short lengths of wire looped through the armature at each gap. The beads add sparkle and fill visual gaps between the flower motifs.
Step 7: Attach Chain and Wooden Beads
Open the 4 mm jump ring using flat-nose pliers. Loop it through the bottom connection point of the armature, just above the stud post. Attach one end of the 2-inch chain segment to this jump ring. Close the jump ring.
String the two wooden beads onto a 2-inch length of wire. Fold the wire in half so both beads hang from the fold. Twist the wire ends together above the beads, then thread the twisted wire through the bottom link of the chain. Loop and wrap to secure. Trim excess wire.
For a staggered look like the finished piece, attach one bead to the main chain and the second bead to a separate short chain hanging from the same jump ring.
Step 8: Final Reinforcement
Apply a small amount of jewelry adhesive to each wire-wrapped join on the back of the armature. Allow to cure overnight before wearing.
Finishing Touches
Run your finger along the back of the piece to confirm it is smooth and comfortable. If any wire ends poke out, use flat-nose pliers to press them flat against the armature.
Weave in all remaining thread tails using a fine tapestry needle. A small dot of jewelry adhesive on each woven tail will prevent unraveling over time.
Care Instructions
The stiffened thread motifs are not washable. Spot clean only with a barely damp cotton swab if needed. Store flat or hanging to prevent chain tangling. Avoid exposing the piece to perfume, hairspray, or moisture. Remove before swimming, bathing, or exercising.
Size Customization Tips
For a longer ear climber, purchase a wire blank up to 3.5 inches and add a fourth sunflower motif using the same instructions.
For larger flowers, use size 5 crochet thread and a US size 5 steel hook. Each motif will measure approximately 0.9 inch in diameter.
For a more delicate look, use size 20 crochet thread and a US size 10 steel hook. Motifs will measure closer to 0.45 inch.
Thank you so much for trying this sunflower ear climber crochet pattern. I really hope you love making it as much as I loved designing it. These little botanical pieces make such thoughtful gifts, and they are a wonderful way to show off your crochet skills in an unexpected format.
If you make this ear climber, I would absolutely love to see it. Save this pattern to your Pinterest boards so you can find it when you are ready to start, and please leave a comment below to share your finished piece. Your photos always make my day!
You Might Also Like
- Navy Blue Elegant Crochet Lace Dress Free Pattern
- Mint Green Summer Baby Romper Free Crochet Pattern
- Cream Lace Bridal Barrel Bag Free Crochet Pattern
- Coral Hibiscus Tropical Backpack Free Pattern
