
This is a crocheted floral headpiece featuring layered sunflowers, pointed leaves, and small berry clusters on a covered plastic headband. You will work single crochet around a purchased headband, create three sunflower motifs with double-layer petals, shape pointed leaves, and stuff tiny berries. The stitches include single crochet, half double crochet, double crochet, and treble crochet. If you can work in the round and sew pieces together, you can make this.
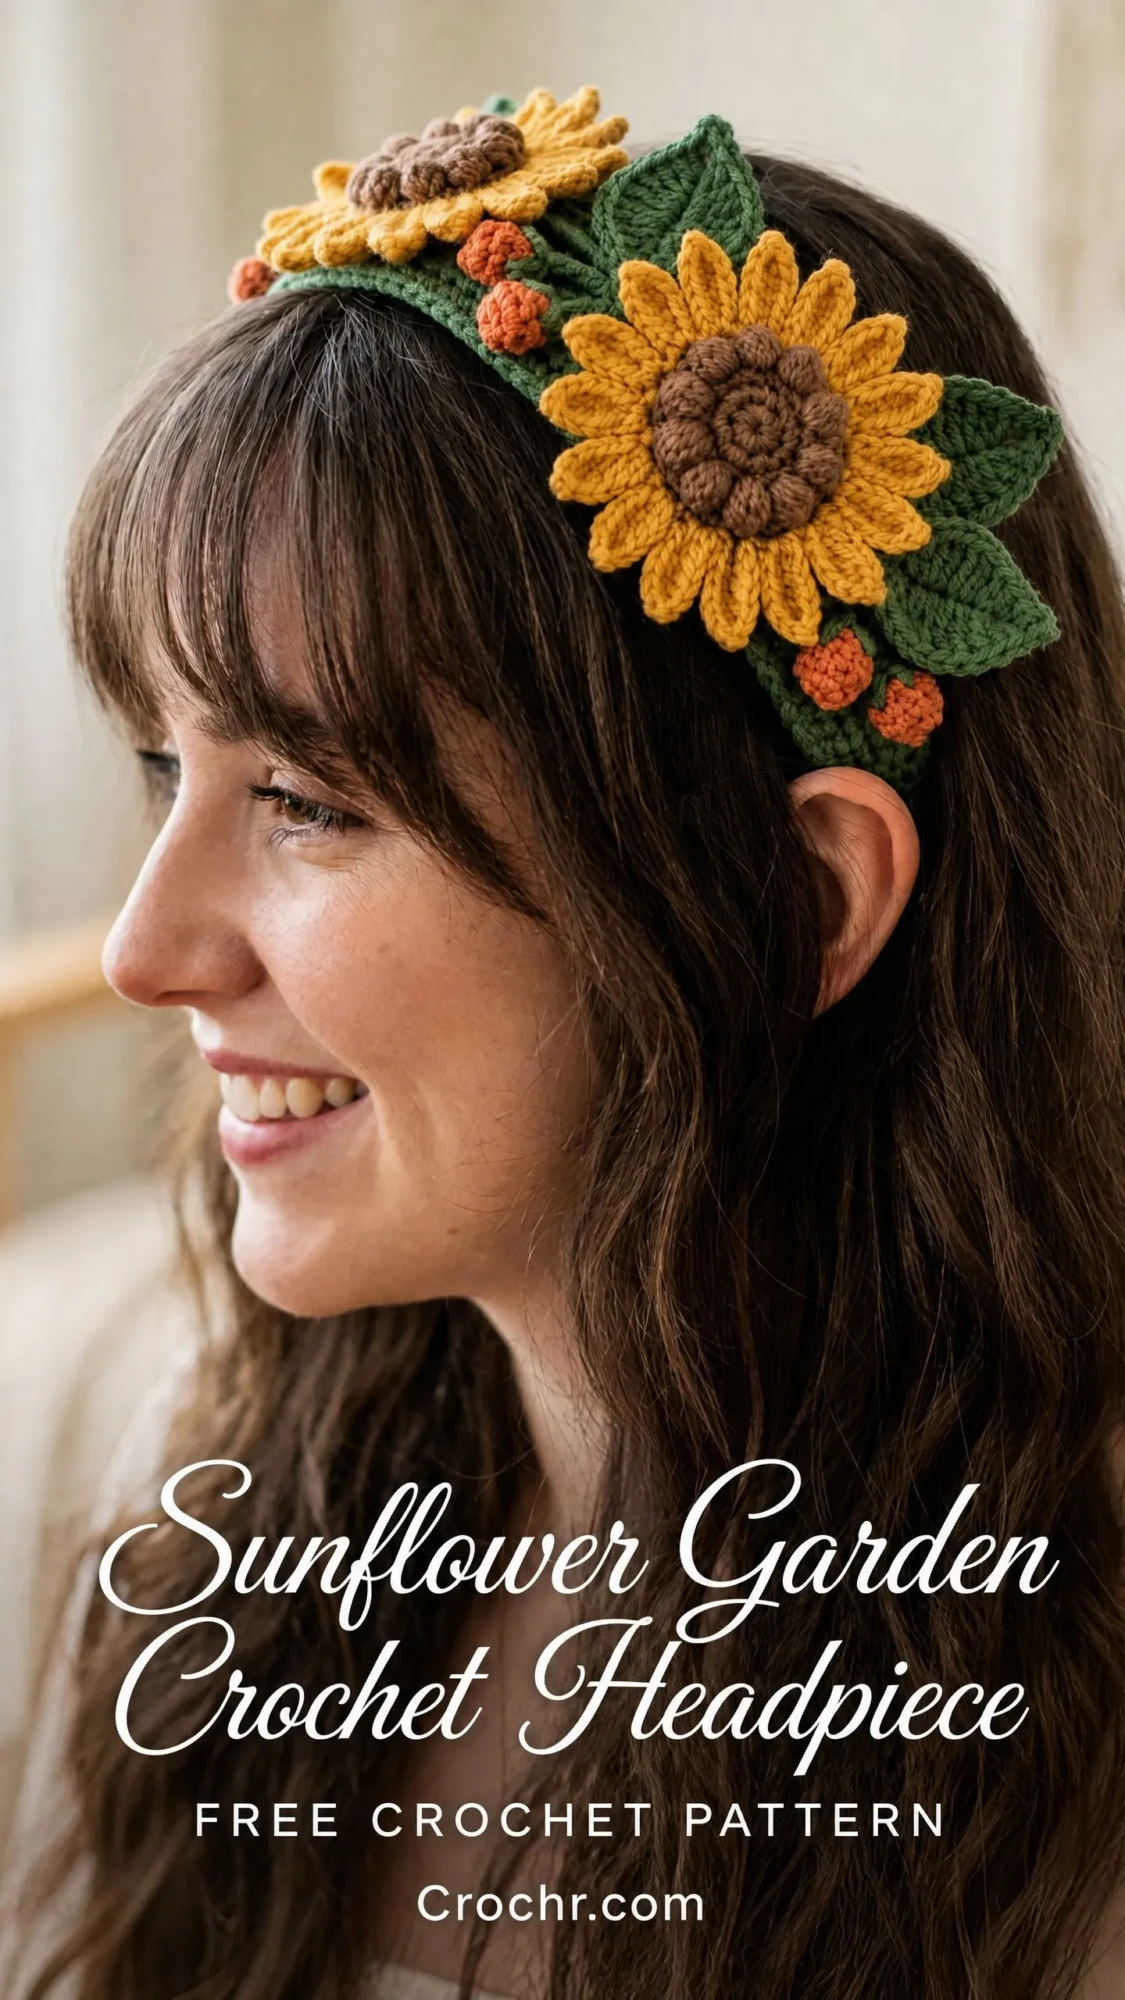
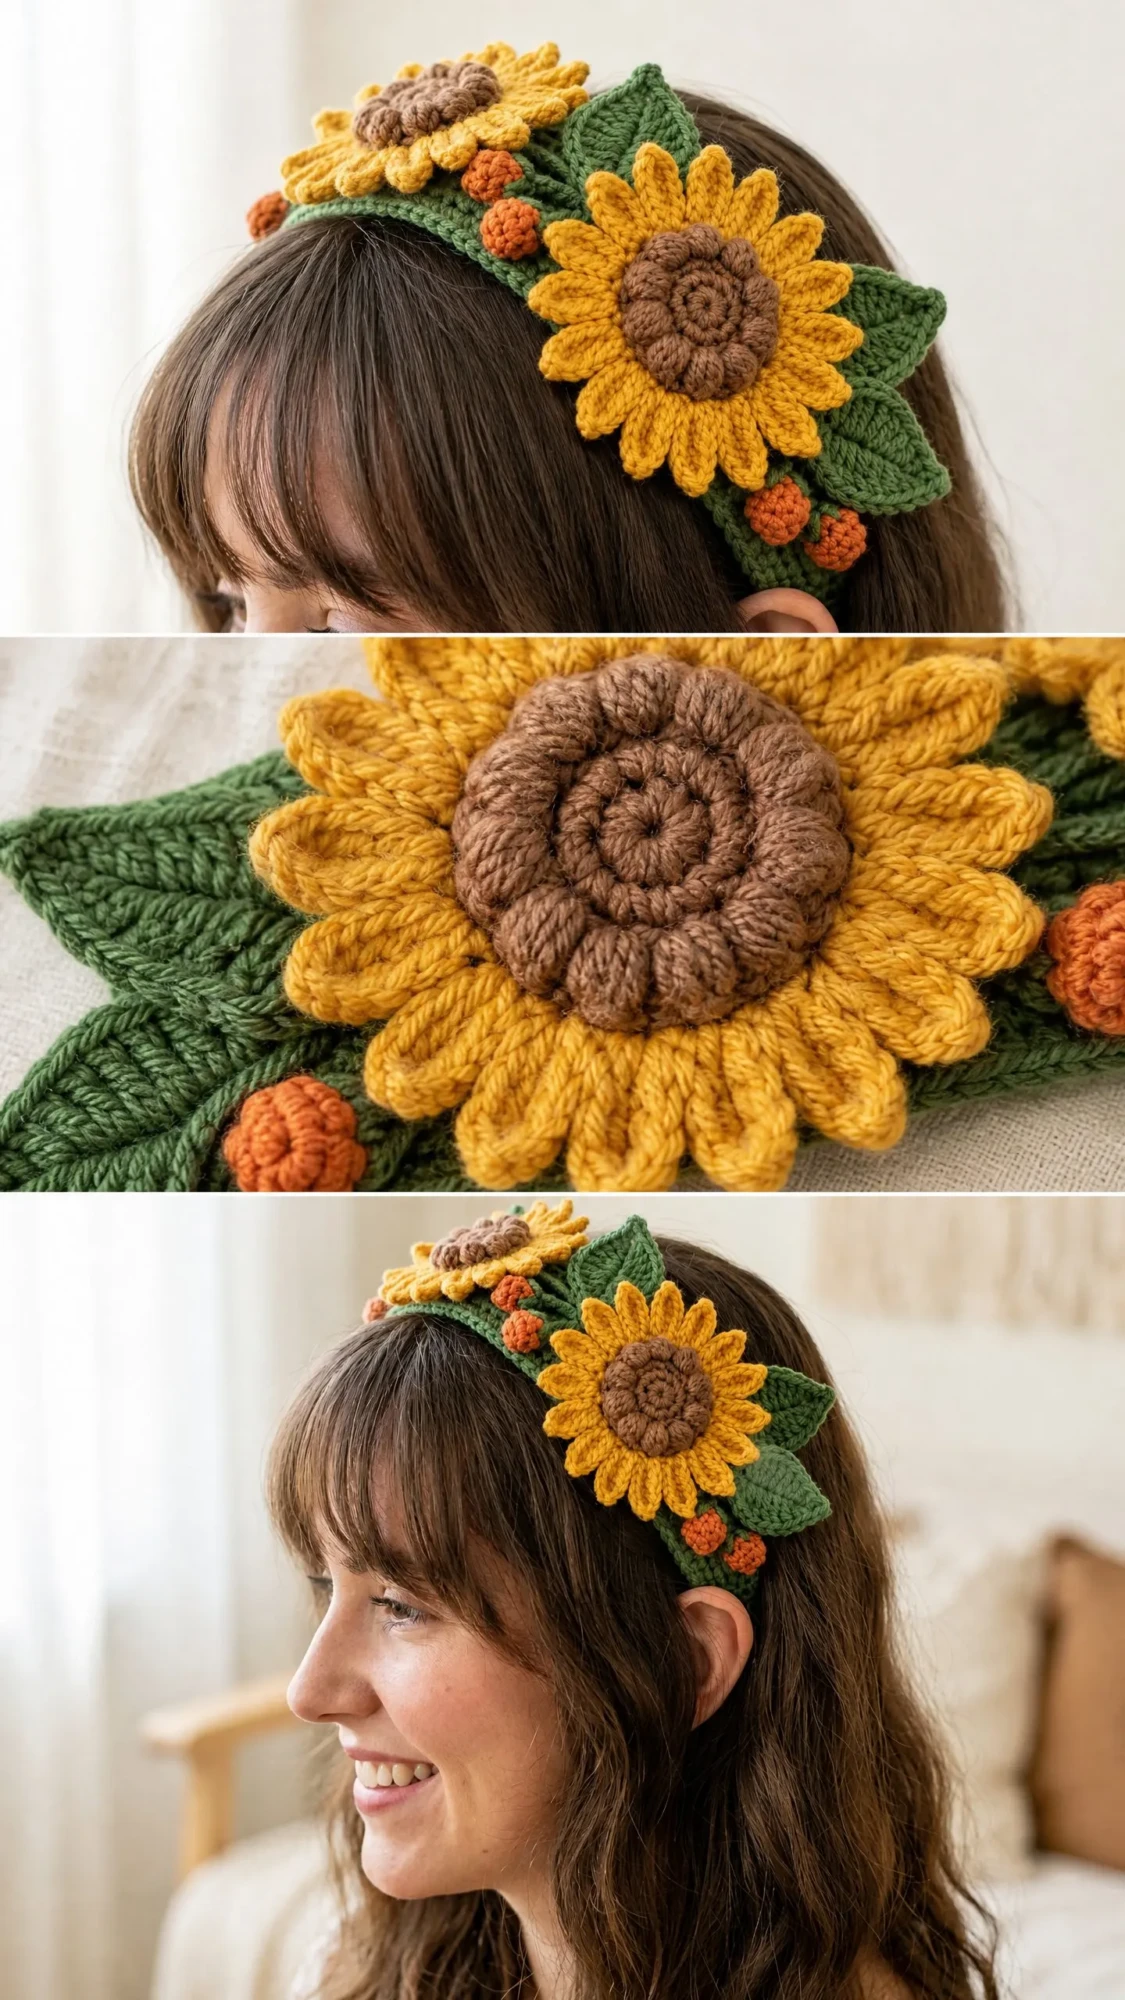
The finished piece sits like a garden crown on your head. Two large sunflowers anchor the design toward one side, a smaller sunflower balances them near the center, and green leaves fan out beneath everything. Little orange berries fill the gaps and add a pop of warmth. It looks impressive, but every component is worked separately and assembled at the end.
This pattern takes between 8 and 12 hours total. Plan to spend about 2 hours on the headband cover, 3 hours on the sunflowers, 2 hours on leaves and berries, and another 1 to 2 hours for blocking and sewing everything together.
Why This Headpiece Works So Well
The construction method makes this project more approachable than it appears. Instead of working one complicated piece, you create small manageable components. Each sunflower starts with a simple center disc worked in rounds. The petals attach in two layers using the front loops and back loops of the same round. This clever technique creates that dimensional, realistic sunflower look without any complicated colorwork or shaping.
The band cover wraps around a purchased plastic headband, which gives the finished piece structure and ensures it stays put on your head. You are not trying to create a stretchy headband from scratch. The plastic form does the structural work while your crochet provides the decorative covering.
Every element uses basic stitches arranged in specific ways. If you have never worked treble crochet before, this is a great project to learn. The petal instructions walk you through each step clearly.
Materials You Will Need
Yarn (DK weight, category 3):
Recommended Yarn Options:
Lion Brand Comfy Cotton Blend works beautifully here. The 50% cotton and 50% microfiber blend gives clean stitch definition with a slight sheen that photographs well.
Paintbox Yarns Simply DK offers excellent color consistency and stitch definition at a budget-friendly price point.
Paintbox Yarns Cotton DK provides a firmer hand that helps petals hold their shape without stiffening spray.
Avoid fuzzy or textured yarns for this project. You need clear stitch definition so the petal and leaf shapes read properly.
Hook: US size E-4 or 3.5 mm
Notions:
Gauge
18 single crochet by 20 rows equals 4 inches or 10 cm, worked in single crochet (sc) in rows, blocked.
Gauge matters here. The band cover needs to fit snugly over your specific headband, and the sunflower petals need to fall at the correct proportions. Swatch and adjust your hook size if needed.
Finished Measurements
Skill Level
Intermediate. The band cover and berries are beginner friendly. The layered sunflower petals require comfort with working into foundation chains, slip stitches, and managing multiple yarn layers at once. Assembly requires basic sewing skills and understanding of three-dimensional placement.
Abbreviations and Stitch Definitions
ch: chain. Wrap yarn over hook and pull through the loop on your hook to create one chain stitch.
sl st: slip stitch. Insert hook into stitch, yarn over, pull through both the stitch and the loop on your hook in one motion.
sc: single crochet. Insert hook into stitch, yarn over, pull up a loop (2 loops on hook), yarn over, pull through both loops.
hdc: half double crochet. Yarn over, insert hook into stitch, yarn over, pull up a loop (3 loops on hook), yarn over, pull through all 3 loops.
dc: double crochet. Yarn over, insert hook into stitch, yarn over, pull up a loop (3 loops on hook), yarn over, pull through 2 loops (2 loops remain), yarn over, pull through remaining 2 loops.
tr: treble crochet. Yarn over twice, insert hook into stitch, yarn over, pull up a loop (4 loops on hook), yarn over, pull through 2 loops three separate times.
sc2tog: single crochet two together (decrease). Insert hook into first stitch, pull up a loop, insert hook into next stitch, pull up a loop (3 loops on hook), yarn over, pull through all 3 loops.
st(s): stitch(es)
sp: space
RS: right side
WS: wrong side
BLO: back loop only
FLO: front loop only
MR: magic ring
pm: place marker
rm: remove marker
rep: repeat
sk: skip
yo: yarn over
approx: approximately
rem: remaining
inc: increase (work 2 sc in the same stitch)
rnd: round
tog: together
Special Stitches Explained
Sunflower Petal
This creates the inner layer of petals on each sunflower.
Step 1: Slip stitch into the base stitch to anchor.
Step 2: Chain 2. This forms the base of the petal.
Step 3: Work 4 dc into the same stitch or space.
Step 4: Chain 2.
Step 5: Slip stitch into the same stitch or space to close the petal base.
One petal complete.
Long Treble Petal
This creates the outer layer of petals on the large sunflowers.
Step 1: Slip stitch into the designated stitch.
Step 2: Chain 3.
Step 3: Work 2 tr into the same stitch.
Step 4: Chain 3.
Step 5: Slip stitch into the same stitch.
One long treble petal complete.
Berry Closing Round
Cut yarn leaving a 10-inch or 25 cm tail. Thread the tail onto your yarn needle. Working from front to back, pass the needle through the front loop of each remaining stitch around the circle. Pull tight to close the opening completely. Knot securely.
Pattern Instructions
Section 1: Band Cover
Using Color A (Forest Green) and your E-4 or 3.5 mm hook, hold the plastic headband in your non-dominant hand with the outer curve facing up.
Row 1 (Setup): Insert hook into the space beside the headband, yo with Color A, pull up a loop, ch 1 (does not count as a stitch). Work sc tightly around the headband from one end to the other, encasing the band. Work approximately 60 sc across the outer curve of the band, keeping stitches snug and evenly spaced. Check that the band is fully enclosed and does not show through. (60 sc)
A note about Row 1: The exact stitch count will vary depending on your specific headband. The goal is a tight, even cover with no gaps. Adjust your stitch count in increments of 2 if needed.
Row 2: Ch 1, turn. Working in BLO, sc across. (60 sc)
Row 3: Ch 1, turn. Sc across. (60 sc)
Repeat Row 3 until the cover wraps over the top of the headband. You will work approximately 6 to 8 rows total depending on your band width. The fabric should wrap snugly without pulling or gapping.
After your final row, do not fasten off. Fold the crocheted fabric over the band and sl st the final row to the foundation row on the underside of the band to close the cover. You can use your yarn needle or hook to connect through both layers. Fasten off and weave in ends securely.
Checkpoint: Your headband should be completely encased in forest green fabric with no plastic showing. The cover should not slip when you handle it.
Section 2: Large Sunflower (Make 2)
Using Color C (Warm Brown) and your E-4 or 3.5 mm hook.
Center Disc:
Rnd 1: Make a MR. Work 6 sc into the ring. Pull ring closed. (6 sc)
Rnd 2: Work 2 sc in each st around. (12 sc)
Rnd 3: (Sc in next st, 2 sc in next st) rep 6 times. (18 sc)
Rnd 4: (Sc in next 2 sts, 2 sc in next st) rep 6 times. (24 sc)
Rnd 5: (Sc in next 3 sts, 2 sc in next st) rep 6 times. (30 sc)
Sl st to next st to even tension. Do not fasten off. The center disc should measure approximately 1.5 inches or 3.8 cm in diameter. Change to Color B (Golden Yellow).
Inner Petal Layer:
Rnd 6 (Inner petals, worked in FLO of Rnd 5): Working into the front loops of Rnd 5 only, (sl st into next st, ch 2, 4 dc in same st, ch 2, sl st into same st) rep 10 times, working into every 3rd st and skipping 2 sts between petals. You will use all 30 sts of Rnd 5 as 10 petal bases with 2 skipped sts between each. (10 petals)
Work the sl st and petal sequence into stitches 1, 4, 7, 10, 13, 16, 19, 22, 25, and 28. This distributes 10 petals evenly around the 30-stitch disc.
After completing Rnd 6, sl st into the back loop (the unworked loops from Rnd 5) of the first stitch of Rnd 5 to reposition. Do not cut yarn.
Outer Petal Layer:
Rnd 7 (Outer petals, worked in BLO of Rnd 5): Working into the back loops of Rnd 5 only, (sl st into next st, ch 3, 2 tr into same st, ch 3, sl st into same st) rep 10 times into the same stitch positions used in Rnd 6. (10 long petals)
These longer petals will fan out behind the inner petals, creating that beautiful two-layer effect. Fasten off, leaving a 12-inch or 30 cm tail for sewing.
Checkpoint: Each large sunflower should measure approximately 4 inches or 10 cm in diameter with 10 inner petals and 10 outer petals visible from the front.
Section 3: Small Sunflower (Make 1)
Using Color C (Warm Brown) and your E-4 or 3.5 mm hook.
Center Disc:
Rnd 1: Make a MR. Work 6 sc into the ring. Pull ring closed. (6 sc)
Rnd 2: Work 2 sc in each st around. (12 sc)
Rnd 3: (Sc in next st, 2 sc in next st) rep 6 times. (18 sc)
Sl st to next st. Change to Color B (Golden Yellow).
Inner Petal Layer:
Rnd 4 (Inner petals, worked in FLO of Rnd 3): Working into the front loops of Rnd 3 only, (sl st into next st, ch 2, 4 dc in same st, ch 2, sl st into same st) rep 6 times, working into every 3rd st (stitches 1, 4, 7, 10, 13, 16). (6 petals)
Outer Petal Layer:
Rnd 5 (Outer petals, worked in BLO of Rnd 3): Working into the back loops of Rnd 3 only, (sl st into next st, ch 3, 2 tr into same st, ch 3, sl st into same st) rep 6 times into the same stitch positions used in Rnd 4. (6 long petals)
Fasten off, leaving a 12-inch or 30 cm tail for sewing.
Checkpoint: The small sunflower should measure approximately 2.5 inches or 6.5 cm in diameter.
Section 4: Leaves (Make 6 to 8)
Using Color A (Forest Green) and your E-4 or 3.5 mm hook.
Ch 14.
Row 1 (RS): Starting in 2nd ch from hook, sc in next 5 sts, hdc in next st, dc in next st, hdc in next st, sc in next 4 sts, work 3 sc in the last ch (this is the tip of the leaf). Do not turn. Working back along the opposite side of the foundation chain, sc in next 4 sts, hdc in next st, dc in next st, hdc in next st, sc in next 5 sts. Sl st to first sc to join. (30 sts around the leaf perimeter, plus 3 sc at tip)
The leaf is worked in a single pass around both sides of the foundation chain, creating an oval with a pointed tip at one end.
Fasten off, leaving a 10-inch or 25 cm tail for sewing.
Lightly press each leaf flat with a cool iron or block with pins to flatten and shape the point.
Checkpoint: Each leaf should be a flat, pointed oval approximately 2.5 inches or 6.5 cm long and 1 inch or 2.5 cm wide.
Section 5: Berries (Make 10 to 14)
Using Color D (Burnt Orange) and your E-4 or 3.5 mm hook.
Rnd 1: Make a MR. Work 6 sc into the ring. Pull ring closed. (6 sc)
Rnd 2: Work 2 sc in each st around. (12 sc)
Rnd 3: (Sc2tog) rep 6 times. (6 sc)
Stuff lightly with a small pinch of fiberfill or a yarn scrap.
Rnd 4 (Berry Closing Round): Cut yarn leaving a 10-inch or 25 cm tail. Thread tail onto yarn needle. Pass needle through the front loop of each of the 6 remaining stitches. Pull tight to close. Knot securely. Leave remaining tail for sewing.
Each berry is a small sphere approximately 0.5 inches or 1.25 cm in diameter.
Checkpoint: You should have between 10 and 14 berries, each firm and round, with no fiberfill showing.
Section 6: Assembly
Lay all your components on a flat surface and arrange them as follows, working from your perspective looking down at the front of the headband as it would be worn.
Placement Guide:
Position the first large sunflower at the right front of the band (from the wearer’s perspective), centered vertically on the top width of the band, with the flower face pointing slightly forward and to the right.
Position the second large sunflower slightly to the left and behind the first, overlapping it at the lower edge by approximately 0.5 inches or 1.25 cm.
Position the small sunflower to the upper left of the second large sunflower, near the center of the band’s top arc.
Tuck 3 or 4 leaves behind and around each large sunflower, with the leaf tips extending out from beneath the petals.
Cluster 3 to 5 berries together in the gaps between the flowers and leaves, using the orange color to add warmth between the green and gold elements.
Pin all pieces in place before sewing.
Sewing Sequence:
Step 1: Sew leaves first using the yarn tails. Attach the base of each leaf securely to the band cover, working through both the crocheted leaf and the band cover, then back again. Knot firmly on the underside.
Step 2: Sew the two large sunflowers, working the tail in and out around the center disc perimeter. Catch the band cover fabric beneath with each stitch.
Step 3: Sew the small sunflower in the same manner.
Step 4: Sew berries in clusters of 3 to 5, stitching through the berry tail and into the band cover fabric.
Step 5: Weave in all remaining tails. If desired, use sewing thread and needle to add 3 or 4 reinforcing whip stitches through each flower center for additional security.
Size Customization Tips
For a narrower headband (standard 1-inch or 2.5 cm width): Reduce the band cover to 4 to 5 rows instead of 6 to 8. Reduce the foundation sc count to 50 if your band is shorter.
For a larger head or longer headband: Add additional sc stitches in Row 1 in increments of 6. Every 6 additional stitches adds approximately 1.3 inches or 3.3 cm of length.
For a smaller overall arrangement: Reduce the large sunflowers by eliminating Rnd 5 of the center disc (stopping at 24 sts). This produces flowers approximately 3 inches or 7.5 cm in diameter. Reduce petal count proportionally to 8 petals in both layers.
For a children’s size: Use a child-size headband (approximately 11 to 12 inches or 28 to 30 cm inner arc). Reduce Row 1 of the band cover to 48 sc. Use the small sunflower pattern for all flower motifs and reduce leaf count to 4.
Finishing and Blocking
Blocking the flowers: Mist each sunflower motif lightly with water and pin the petals flat in an open arrangement on a foam blocking board. Allow to dry completely, about 4 to 6 hours. This opens the petals and sets their shape.
Blocking the leaves: Pin each leaf to your blocking board with the center spine flat and the tip pinned to a point. Mist and dry.
Optional stiffening: Mix one part white school glue with one part water. Using a stiff-bristled paintbrush, paint the solution onto the right side of the flowers and leaves. Reshape petals and leaves while wet. Pin and dry completely. This gives a firm, sculptural result that holds its shape during wear.
Do not block the band cover while it is on the headband. Moisture may warp some plastic headbands.
Care Instructions
Hand wash in cool water with a small amount of gentle wool wash or dish soap. Do not wring. Press gently between two clean towels to remove excess water. Reshape petals and leaves by hand while damp. Lay flat to dry away from direct sunlight or heat.
Do not machine wash or tumble dry. This will distort the dimensional elements. If the piece becomes crushed during storage, mist lightly with water and reshape by hand. Store flat or loosely rolled, not folded, to preserve petal shape.
Final Thoughts on This Sunflower Garden Crochet Headpiece Pattern
This crochet headpiece pattern brings together simple techniques to create something truly special. The layered petals look intricate, but once you understand the front loop and back loop method, it clicks into place. Take your time with the assembly. That final sewing step is where the magic happens and everything comes together into a wearable piece of art.
I hope you enjoy making this sunflower crown as much as I enjoyed designing it. Thank you for choosing this pattern for your next crochet project.
If you make this headpiece, I would love to see it. Share your finished photos on Instagram or Facebook and tag me so I can celebrate your work with you.
Save this pattern to your Pinterest boards so you can find it when you are ready to start. And if you make one, drop a comment below. I love hearing how your projects turn out and seeing the color combinations you choose.
You Might Also Like
- Mint Green Heart Granny Square Baby Blanket Free Crochet Pattern
- Sage Green Cottagecore Heart Crochet Cardigan Pattern
- Lavender Purple Dreamy Lace Maxi Skirt Free Crochet Pattern
- Dusty Rose Diamond Lattice Vest Free Crochet Pattern
