
I’ve been looking for the perfect summer crop top pattern for ages. One that feels sophisticated enough for brunch but handmade enough to show off real skill. This sage green lace cable crop top is exactly what I had in mind.
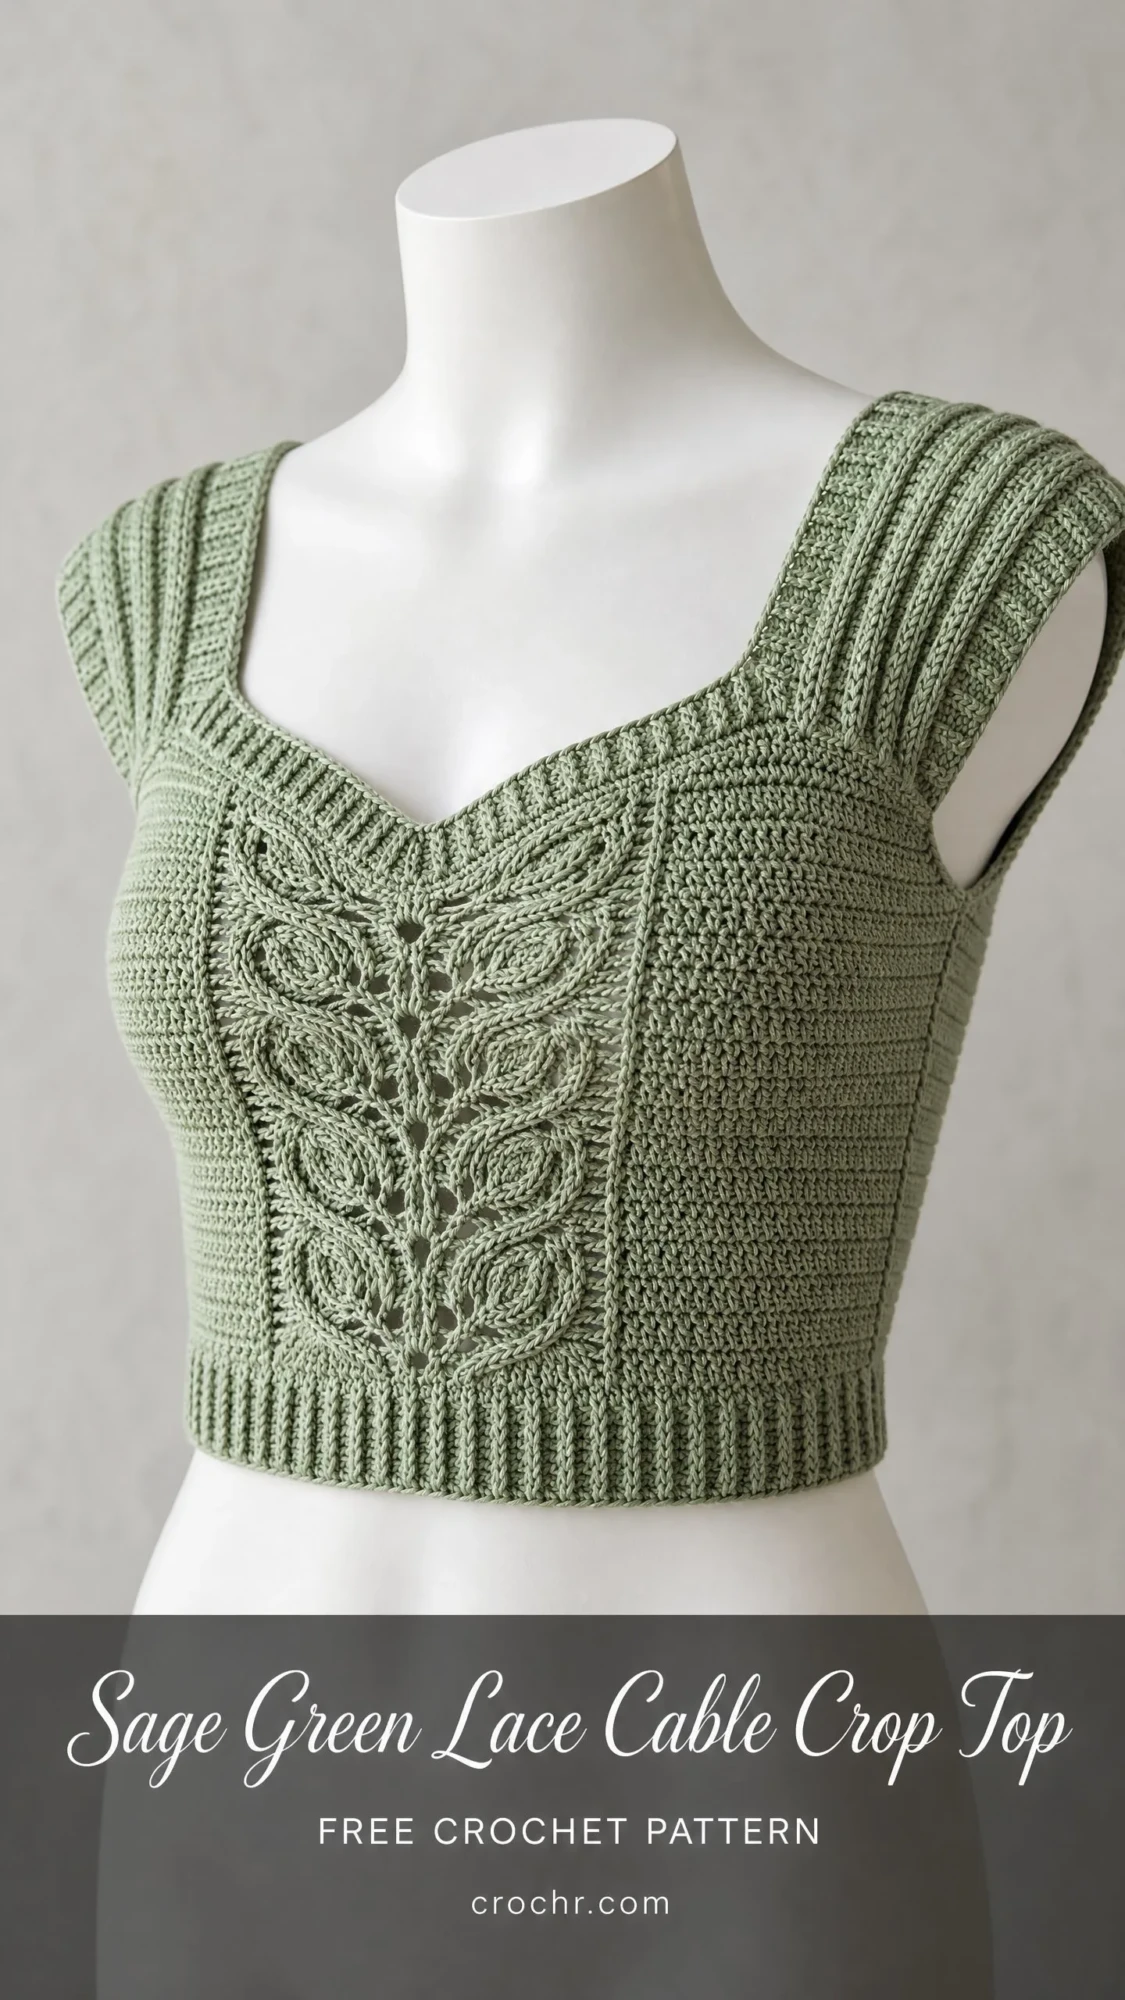
The central leaf motif caught my eye immediately. It’s botanical, feminine, and gives the whole piece an artisan quality you don’t often see in crochet garments. The sweetheart neckline and fitted silhouette make this feel more like a boutique find than a DIY project.
This is my favourite kind of crochet pattern to share. It challenges you just enough to feel proud of the finished piece while teaching techniques you’ll use in dozens of future projects. Let’s break it down together.
About This Lace Cable Crop Top Crochet Pattern
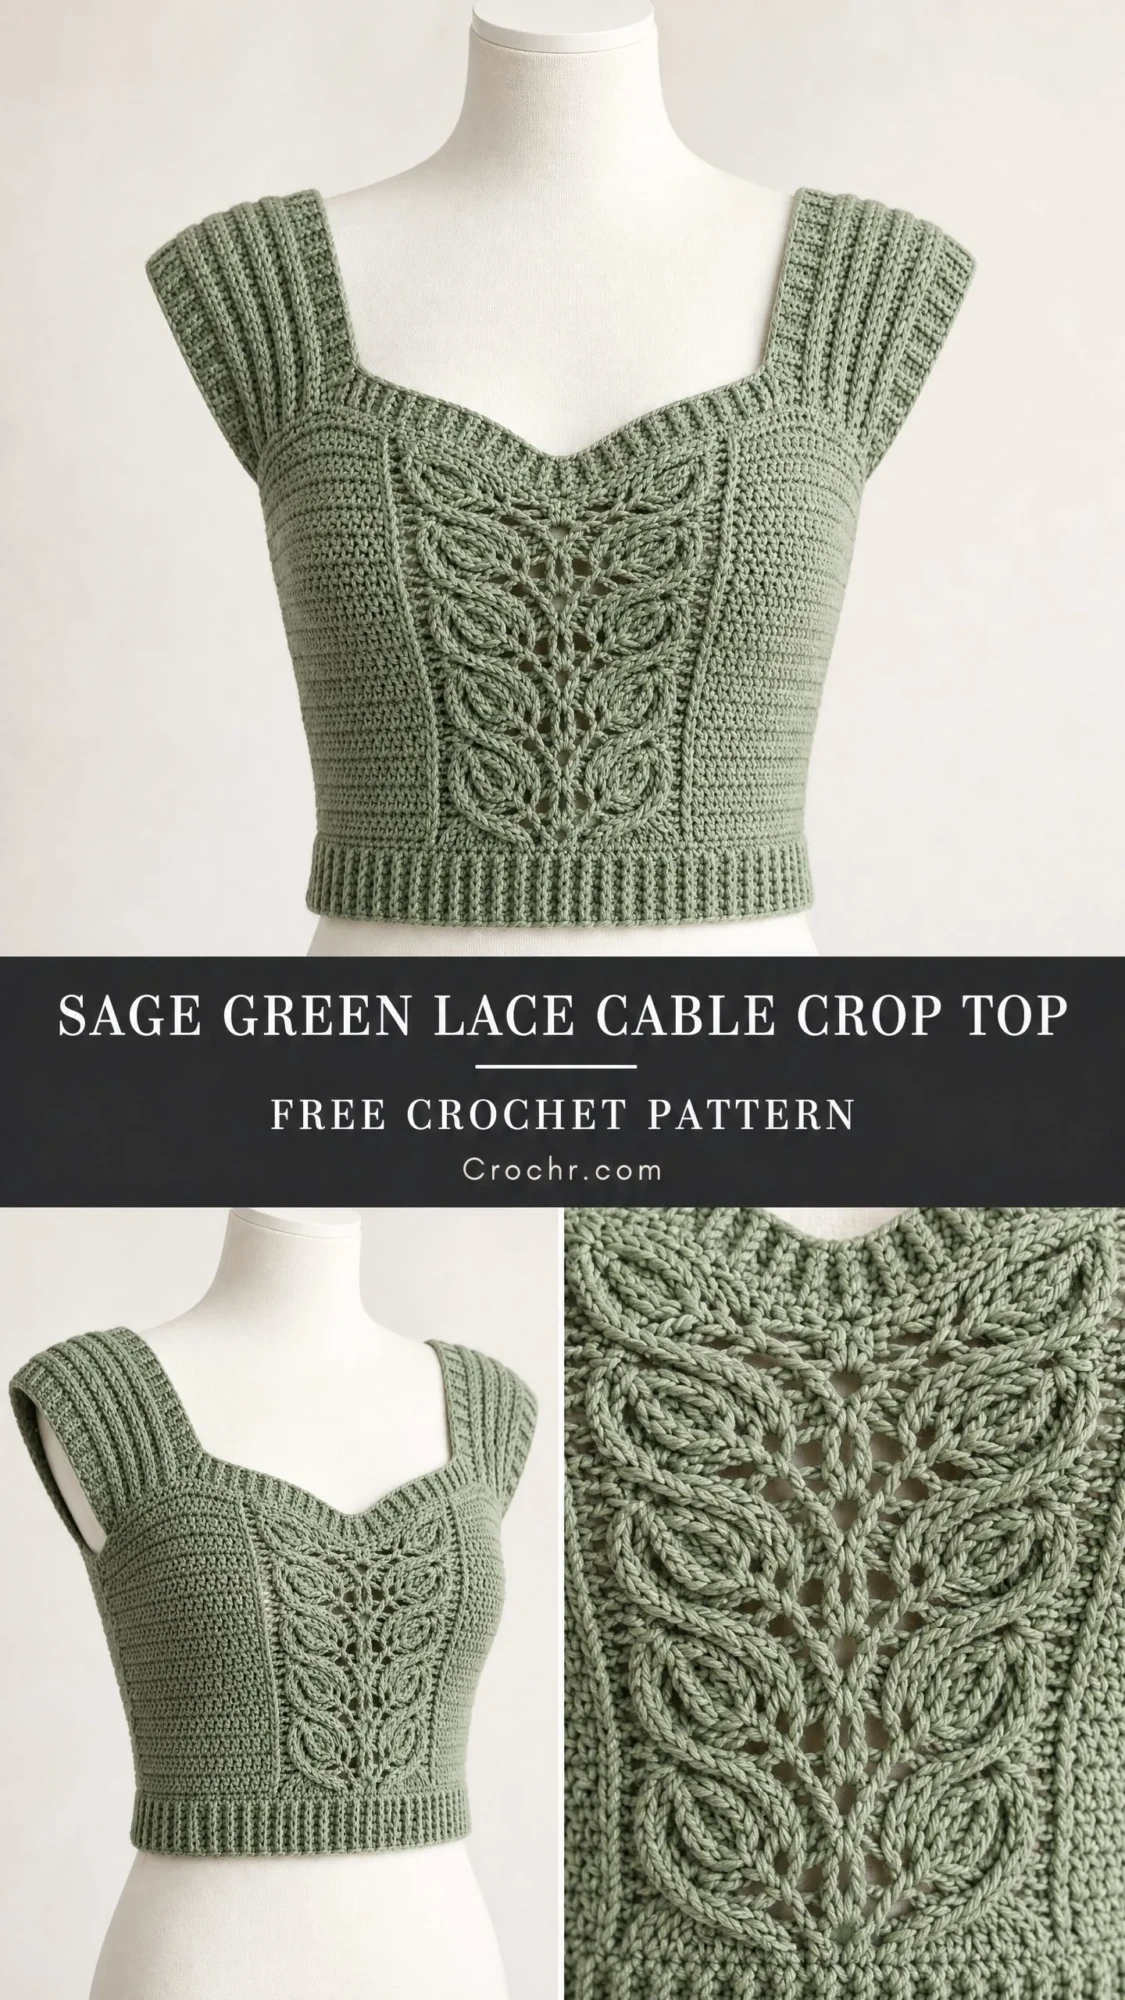
This fitted crop top features a stunning central leaf lace cable panel that runs vertically through the front bodice. The design includes a sweetheart neckline, cap sleeves formed through shoulder shaping, a ribbed hem band, and a solid textured back panel. You’ll work the top in two flat pieces, then seam them at the sides and shoulders before adding finishing touches around the armholes and neckline.
The construction method keeps things manageable even though the overall design looks complex. You work from the bottom up, starting with a ribbed hem band worked separately. Then you pick up stitches along the top edge of that band and build the body upward. The front panel showcases the decorative cable motif while the back stays simple in half double crochet throughout.
Skill level: Intermediate to Advanced. You’ll need comfort with post stitches, lace construction, garment shaping, and seaming. If you’ve made a few garments before and understand how front post double crochet (FPdc) works, you’re ready for this challenge.
Time estimate: Plan for 14 to 22 hours of work for the small/medium size. Add extra time for blocking and finishing.
Finished Measurements
This pattern includes six sizes to fit bust measurements from 30 inches up to 42 inches:
Size XS: Fits bust 30 to 32 inches, finished garment bust 31 inches
Size S: Fits bust 32 to 34 inches, finished garment bust 33 inches
Size M: Fits bust 34 to 36 inches, finished garment bust 35 inches
Size L: Fits bust 36 to 38 inches, finished garment bust 37 inches
Size XL: Fits bust 38 to 40 inches, finished garment bust 39 inches
Size 2XL: Fits bust 40 to 42 inches, finished garment bust 41 inches
Finished length from bottom hem to highest shoulder point measures 14 inches for all sizes. The front neckline dips to 12.5 inches from the hem. Cap sleeve openings measure 6 inches deep.
The garment has 1 to 2 inches of positive ease at the bust for a fitted but comfortable wear.
Materials Needed
Yarn: DK weight (CYCA 3), 100% cotton or cotton blend in sage green. You’ll need approximately 550 (550, 600, 650, 700, 750) yards depending on your size.
Recommended yarn options:
1. Paintbox Yarns Cotton DK in Grass Green or Sage Green. You’ll need 4 (4, 5, 5, 6, 6) skeins. This yarn offers excellent stitch definition for the cable work.
2. Drops Safran in Sage. The 70% cotton and 30% viscose blend adds a subtle sheen that enhances the leaf motif. You’ll need 4 (4, 4, 4, 5, 5) skeins.
3. Lion Brand 24/7 Cotton DK in Dusty Green. Widely available with consistent tension. You’ll need 3 (3, 4, 4, 4, 5) balls.
Important substitution note: Choose a cotton or cotton blend with good stitch definition and minimal stretch. Avoid acrylic or high-elasticity yarns. The cable motif and garment shaping depend on the yarn holding its structure.
Hooks:
Notions:
Gauge
Using US E-4 / 3.5 mm hook in half double crochet (hdc): 18 stitches x 14 rows = 4 inches / 10 cm blocked.
The center cable panel (22 stitches wide) measures approximately 4.75 inches wide after blocking.
Gauge matters here. This is a fitted garment, so please swatch. Block your swatch before measuring. Your finished top depends on hitting these numbers.
Abbreviations and Stitch Definitions
Let me walk you through every stitch you’ll encounter. I’m using US crochet terms throughout.
ch: Chain. Wrap yarn over hook, pull through loop on hook.
sl st: Slip stitch. Insert hook, yarn over, pull through stitch and loop on hook in one motion.
sc: Single crochet. Insert hook, pull up loop, yarn over, pull through both loops.
hdc: Half double crochet. Yarn over, insert hook, pull up loop (3 loops on hook), yarn over, pull through all 3 loops.
dc: Double crochet. Yarn over, insert hook, pull up loop, (yarn over, pull through 2 loops) twice.
tr: Treble crochet. Yarn over twice, insert hook, pull up loop, (yarn over, pull through 2 loops) three times.
FPdc: Front post double crochet. This creates the raised texture in the cable panel. Yarn over, insert hook from front to back to front around the post of the stitch below (not through the top loops), yarn over and pull up a loop, (yarn over and pull through 2 loops) twice. The stitch pops forward.
BPdc: Back post double crochet. Same as FPdc but insert hook from back to front to back. The stitch recedes.
FPtr: Front post treble crochet. Used for cable crossings. Yarn over twice, insert hook from front to back to front around the post of the stitch two rows below, yarn over and pull up a loop, (yarn over and pull through 2 loops) three times.
FPhdc: Front post half double crochet. For ribbing. Yarn over, insert hook front to back to front around post, yarn over, pull up loop, yarn over, pull through all 3 loops.
BPhdc: Back post half double crochet. For ribbing. Same as FPhdc but back to front to back.
hdc2tog: Half double crochet decrease. Yarn over, insert hook into next stitch, pull up a loop (3 loops), yarn over, insert hook into following stitch, pull up a loop (5 loops), yarn over and pull through all 5 loops. One stitch decreased.
sk: Skip
sp: Space
st(s): Stitch(es)
yo: Yarn over
RS: Right side
WS: Wrong side
pm: Place marker
Special Stitches for the Cable Panel
Leaf Petal Unit (LPU): This creates the botanical element in the cable. Work (dc2tog inserting hook into same stitch for both legs, but do not complete final pull-through) twice into the same stitch or space. Yarn over and pull through all 3 loops on hook. Chain 1 to lock.
Crossed Cable (CC): Skip next 2 stitches, FPtr into the stitch 2 stitches before the skipped stitches (working behind them), then go back and work FPtr into each of the 2 skipped stitches. This creates a right-leaning cable cross.
Ribbed Stitch Pattern:
Row 1: Chain a multiple of 2, hdc in 3rd chain from hook and each chain across.
All following rows: Ch 2 (does not count as stitch), turn, BPhdc in first stitch, (FPhdc, BPhdc) across, end FPhdc in last stitch.
Pattern Notes Before You Begin
1. The top is worked in two flat panels. Front panel has the cable motif. Back panel is plain hdc throughout.
2. Instructions are written for size S with other sizes in parentheses in order: XS, S, M, L, XL, 2XL.
3. The ribbed hem band is worked separately then stitches are picked up along the long edge.
4. The central cable lace panel stays 22 stitches wide throughout. Flanking stitches on either side change with shaping.
5. Turning chain rule: Ch 2 at the beginning of each row does NOT count as a stitch. Always work the first hdc into the first stitch at the base of the turning chain.
6. Right side faces you on odd-numbered rows.
7. Blocking is essential. The lace cable motif opens up beautifully after wet blocking.
8. For the sweetheart neckline, you’ll work each shoulder separately after the split row.
Step by Step Instructions
Hem Band (Make 2: One for Front, One for Back)
Using US D-3 / 3.25 mm hook, ch 10.
Row 1 (WS): Hdc in 3rd ch from hook and in each ch across. (8 hdc)
Row 2 (RS): Ch 2, turn. (FPhdc, BPhdc) 4 times. (8 sts)
Row 3: Ch 2, turn. (BPhdc, FPhdc) 4 times. (8 sts)
Repeat Rows 2 and 3 until the ribbed band measures:
End with a WS row. Fasten off and weave in ends. Leave flat for now. You’ll seam after the body is complete.
Quick check: Each band should be 8 stitches tall (about 2 inches wide) with visible vertical ribs and nice stretch.
Picking Up Stitches Along the Hem Band
With RS of hem band facing, using US E-4 / 3.5 mm hook, work sc evenly along the long top edge, picking up 1 sc per row end.
For the Front Panel: Pick up 67 (72, 77, 82, 87, 92) sc.
For the Back Panel: Pick up the same number: 67 (72, 77, 82, 87, 92) sc.
This picked-up row is your foundation. Do not count it as Row 1. After picking up, ch 2 and turn to begin Row 1 of the body.
At size S, your 72 stitches break down as: 25 stitches for left flank, 22 stitches for center panel, 25 stitches for right flank.
Front Panel Body Rows
Row 1 (RS, Setup Row): Ch 2, turn. Hdc in each of first 25 sts (left flank). Center panel: hdc in next 2 sts, FPdc around 3rd st of center 22, hdc in next 2 sts, (dc, ch 1, dc) in center st, hdc in next 2 sts, FPdc around next st, hdc in last 2 sts of panel. Hdc in each of last 25 sts (right flank). (72 sts)
Row 2 (WS): Ch 2, turn. Hdc in each st and ch-1 sp across all 72 sts. (72 sts)
Rows 3 through 8 form the first full cable panel repeat. Work cable motif on RS rows. WS rows are always: Ch 2, turn, hdc in each st across.
Row 3 (RS, Cable Row A): Ch 2, turn. Hdc in each of first 25 sts. Begin center panel: hdc in next 2 sts, FPdc around FPdc post from 2 rows below, ch 1, sk next st, (dc, ch 1, dc) in next st, ch 1, sk next st, LPU into center st of panel, ch 1, sk next st, (dc, ch 1, dc) in next st, ch 1, sk next st, FPdc around FPdc post from 2 rows below, hdc in last 2 sts of panel. Hdc in each of last 25 sts. (72 sts)
Row 4 (WS): Ch 2, turn. Hdc in each st across. (72 sts)
Row 5 (RS, Cable Row B): Ch 2, turn. Hdc in each of first 25 sts. Center panel: hdc 2 sts, FPdc around post, ch 1, sk 1, dc in next st, ch 1, FPtr around post 2 rows below, ch 1, dc in next st, ch 1, LPU in center, ch 1, dc in next, ch 1, FPtr crossing back, ch 1, dc in next, ch 1, sk 1, FPdc around post, hdc 2 sts. Hdc in each of last 25 sts. (72 sts)
Row 6 (WS): Ch 2, turn. Hdc across. (72 sts)
Row 7 (RS, Cable Row C): Ch 2, turn. Hdc in each of first 25 sts. Center panel: hdc 2, FPdc around post, ch 1, sk 1, (dc, ch 1, dc, ch 1, dc) in next sp, sk 1, FPdc around post, hdc 2, FPdc around post, sk 1, (dc, ch 1, dc, ch 1, dc) in next sp, sk 1, FPdc around post, hdc 2. Hdc in each of last 25 sts. (72 sts)
Row 8 (WS): Ch 2, turn. Hdc across. (72 sts)
Continue working this 6-row cable repeat throughout the body.
Waist Shaping (Decrease Rows)
Begin waist decreases at Row 3. Place markers at stitch 5 from each edge.
Work decrease rows on every 4th RS row for a total of 2 decrease rows.
Waist Decrease Row: Ch 2, turn. Hdc in first 3 sts, hdc2tog over next 2 sts, hdc to center panel, work center panel as established, hdc to 5 sts from end, hdc2tog over next 2 sts, hdc in last 3 sts. (2 sts decreased)
Work 2 straight rows after Row 11.
Checkpoint: After Row 13, front panel measures approximately 4 inches tall. Stitch count: 68 sts.
Bust Shaping (Increase Rows)
Begin bust increases at Row 15. Work increase rows on every 4th RS row for 2 increase rows.
Bust Increase Row: Ch 2, turn. Hdc in first 3 sts, 2 hdc in next st, hdc across to 4 sts before center panel, 2 hdc in next st, work center panel, hdc to 4 sts from end, 2 hdc in next st, hdc in last 3 sts. (4 sts increased)
Continue working straight from Row 20 through Row 27.
Checkpoint: After Row 27, front panel measures approximately 8.5 inches tall. Stitch count: 76 sts.
Armhole Shaping
Row 28 (RS): Sl st across first 6 (5, 6, 7, 8, 8, 9) sts. Ch 2, work in pattern across to last 6 sts, leave last 6 sts unworked. (64 sts)
Row 29 (WS): Ch 2, turn. Hdc2tog at beg, hdc across to last 2 sts, hdc2tog. (62 sts)
Row 30 (RS): Ch 2, turn. Hdc2tog at beg, work in pattern to last 2 sts, hdc2tog. (60 sts)
Row 31 (WS): Ch 2, turn. Hdc2tog, hdc across to last 2 sts, hdc2tog. (58 sts)
Row 32 (RS): Ch 2, turn. Hdc2tog, work in pattern to last 2 sts, hdc2tog. (56 sts)
Work straight from Row 33 through Row 36.
Checkpoint: After Row 36, panel measures approximately 11.5 inches tall. Armhole depth is about 3 inches so far. Stitch count: 56 sts.
Sweetheart Neckline and Shoulder Straps
At Row 37, split the work at the center. Your 56 stitches divide as: 17 sts left shoulder, 22 sts center (left open for neckline), 17 sts right shoulder.
Left Shoulder:
Row 37 (RS): Ch 2, turn. Work in pattern across first 17 sts. Turn. (17 sts)
Row 38 (WS): Ch 2, turn. Hdc in each st, hdc2tog at neckline edge. (16 sts)
Row 39 (RS): Ch 2, turn. Hdc2tog at neckline edge, work across. (15 sts)
Row 40 (WS): Ch 2, turn. Hdc across, hdc2tog at neckline edge. (14 sts)
Row 41 (RS): Ch 2, turn. Hdc2tog at neckline edge, hdc across. (13 sts)
Row 42 (WS): Ch 2, turn. Hdc across. (13 sts)
Row 43 (RS): Ch 2, turn. Hdc across. (13 sts)
Fasten off left shoulder.
Right Shoulder:
Skip center 22 sts. Rejoin yarn at stitch 40.
Row 37 (RS): Ch 2, hdc in each of 17 sts. (17 sts)
Row 38 (WS): Ch 2, turn. Hdc2tog at neckline edge, hdc across. (16 sts)
Row 39 (RS): Ch 2, turn. Hdc across to last 2 sts, hdc2tog. (15 sts)
Row 40 (WS): Ch 2, turn. Hdc2tog, hdc across. (14 sts)
Row 41 (RS): Ch 2, turn. Hdc across to last 2 sts, hdc2tog. (13 sts)
Row 42 (WS): Ch 2, turn. Hdc across. (13 sts)
Row 43 (RS): Ch 2, turn. Hdc across. (13 sts)
Fasten off right shoulder.
Checkpoint: Front panel complete. It measures approximately 14 inches from hem to shoulder tops. Each shoulder strap is 13 sts wide.
Back Panel
Work identically to the front for all shaping, but substitute plain hdc for the center 22 stitches throughout. No cable motif on the back.
Work hem band and pick up the same number of stitches. Work Rows 1 through 36 with the same stitch counts and shaping.
Back Neckline Shaping:
Row 37 (RS): Ch 2, turn. Hdc across all 56 sts. (56 sts)
Row 38 (WS): Ch 2, turn. Hdc across all 56 sts. (56 sts)
Row 39 (RS): Ch 2, turn. Hdc in first 13 sts. Fasten off center 30 sts. Rejoin yarn, hdc in last 13 sts.
This creates a straight back neckline. Work Rows 40 through 43 straight in hdc on each 13-st shoulder section separately. Fasten off.
Blocking and Finishing
Blocking: Wet both panels thoroughly. Gently squeeze out excess water (do not wring). Lay flat on blocking mat and pin to measurements. The lace cable motif will open up beautifully. Let dry completely before moving.
Shoulder Seams: With RS facing out, align front and back panels. Using mattress stitch or sl st seam, join the 13-st shoulder sections.
Side Seams: Seam from underarm down to hem on both sides, matching stitch rows.
Armhole Edging: Using smaller hook, work a round of sc evenly around each armhole opening. Join with sl st. Work 1 round of (FPhdc, BPhdc) ribbing. Fasten off.
Neckline Edging: Work a round of sc evenly around the entire neckline opening, following the sweetheart curve. Work carefully at the center dip to keep the shape. Join and fasten off.
Weave in all remaining ends. Give the finished top a light steam if needed.
Tips for Success with This Crochet Tutorial
Chart the cable panel first. Before you start, sketch out the 22-stitch center panel on graph paper. Mark where the FPdc columns sit and where the leaf units fall. This visual reference makes the RS rows much less intimidating.
Use lifelines. Run a contrasting thread through your stitches at the end of each cable repeat section. If you need to rip back, you’ll have a safety net.
Count obsessively. I know. But with shaped garments and cable panels, your stitch count is everything. Check at the end of every row until you trust the rhythm.
Block before seaming. Always. The pieces will be easier to align and your seams will look cleaner.
You Made It!
This sage green lace cable crop top is the kind of project that makes you proud every time you wear it. The leaf motif is a showstopper, and the sweetheart neckline adds such a feminine touch. I hope you love making it as much as I loved designing it.
Thank you so much for trusting me with your time and your yarn. I’d love to see what you create! Tag me on Instagram or share your finished top in my Facebook group. Your makes genuinely brighten my day.
If this pattern is calling to you, go ahead and pin it to your crochet board so you can find it when you’re ready. And if you do make it, please leave a comment below. I read every single one, and hearing from you makes all the difference.
You Might Also Like
- Forest Green Elegant Peplum Crochet Top Free Pattern
- Emerald Green Holiday Baby Romper Free Crochet Pattern
- Blush Pink Diamond Lattice Mermaid Gown Free Crochet Pattern
- Mint Green Dragon Amigurumi Plush Free Crochet Pattern
