
You know that one skein you’ve been saving? The gorgeous blush pink cotton that’s too beautiful to waste on something ordinary? This is the project that deserves it. Actually, this gown deserves about seventeen of those special skeins.
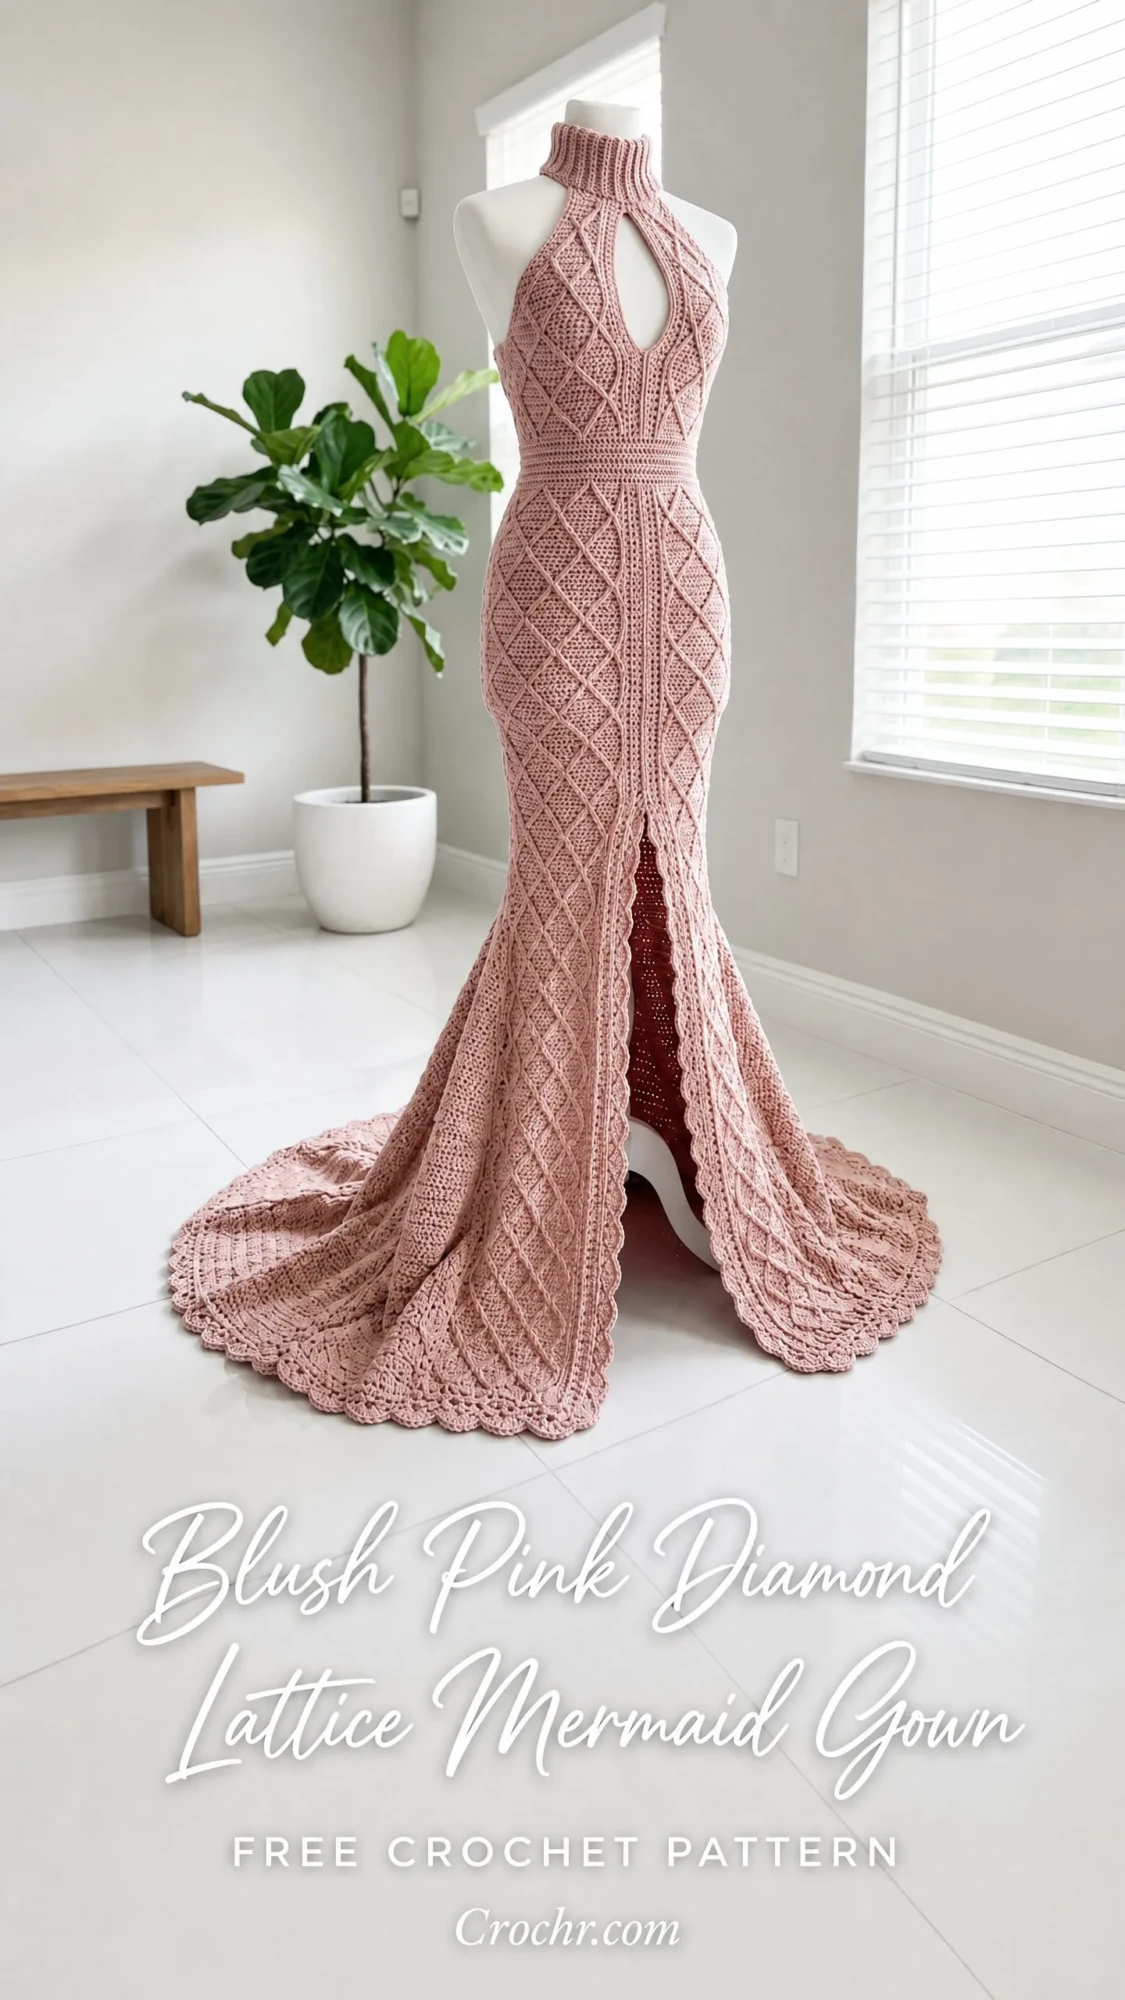
This mermaid silhouette gown features raised diamond cables that create a stunning sculptural texture you can see from across the room. The construction moves top down from a sleek turtleneck collar, opens into a dramatic keyhole cutout, hugs through a fitted bodice, then sweeps into a trumpet skirt with a front slit and trailing train.
I’ll be honest with you. This is an advanced project. We’re talking front post cables, garment shaping, short rows, and somewhere between 120 and 180 hours of dedicated work. But if you’ve made at least one fitted garment before and you’re ready for something spectacular, let’s do this together.
Why This Diamond Lattice Mermaid Gown Pattern Stands Out
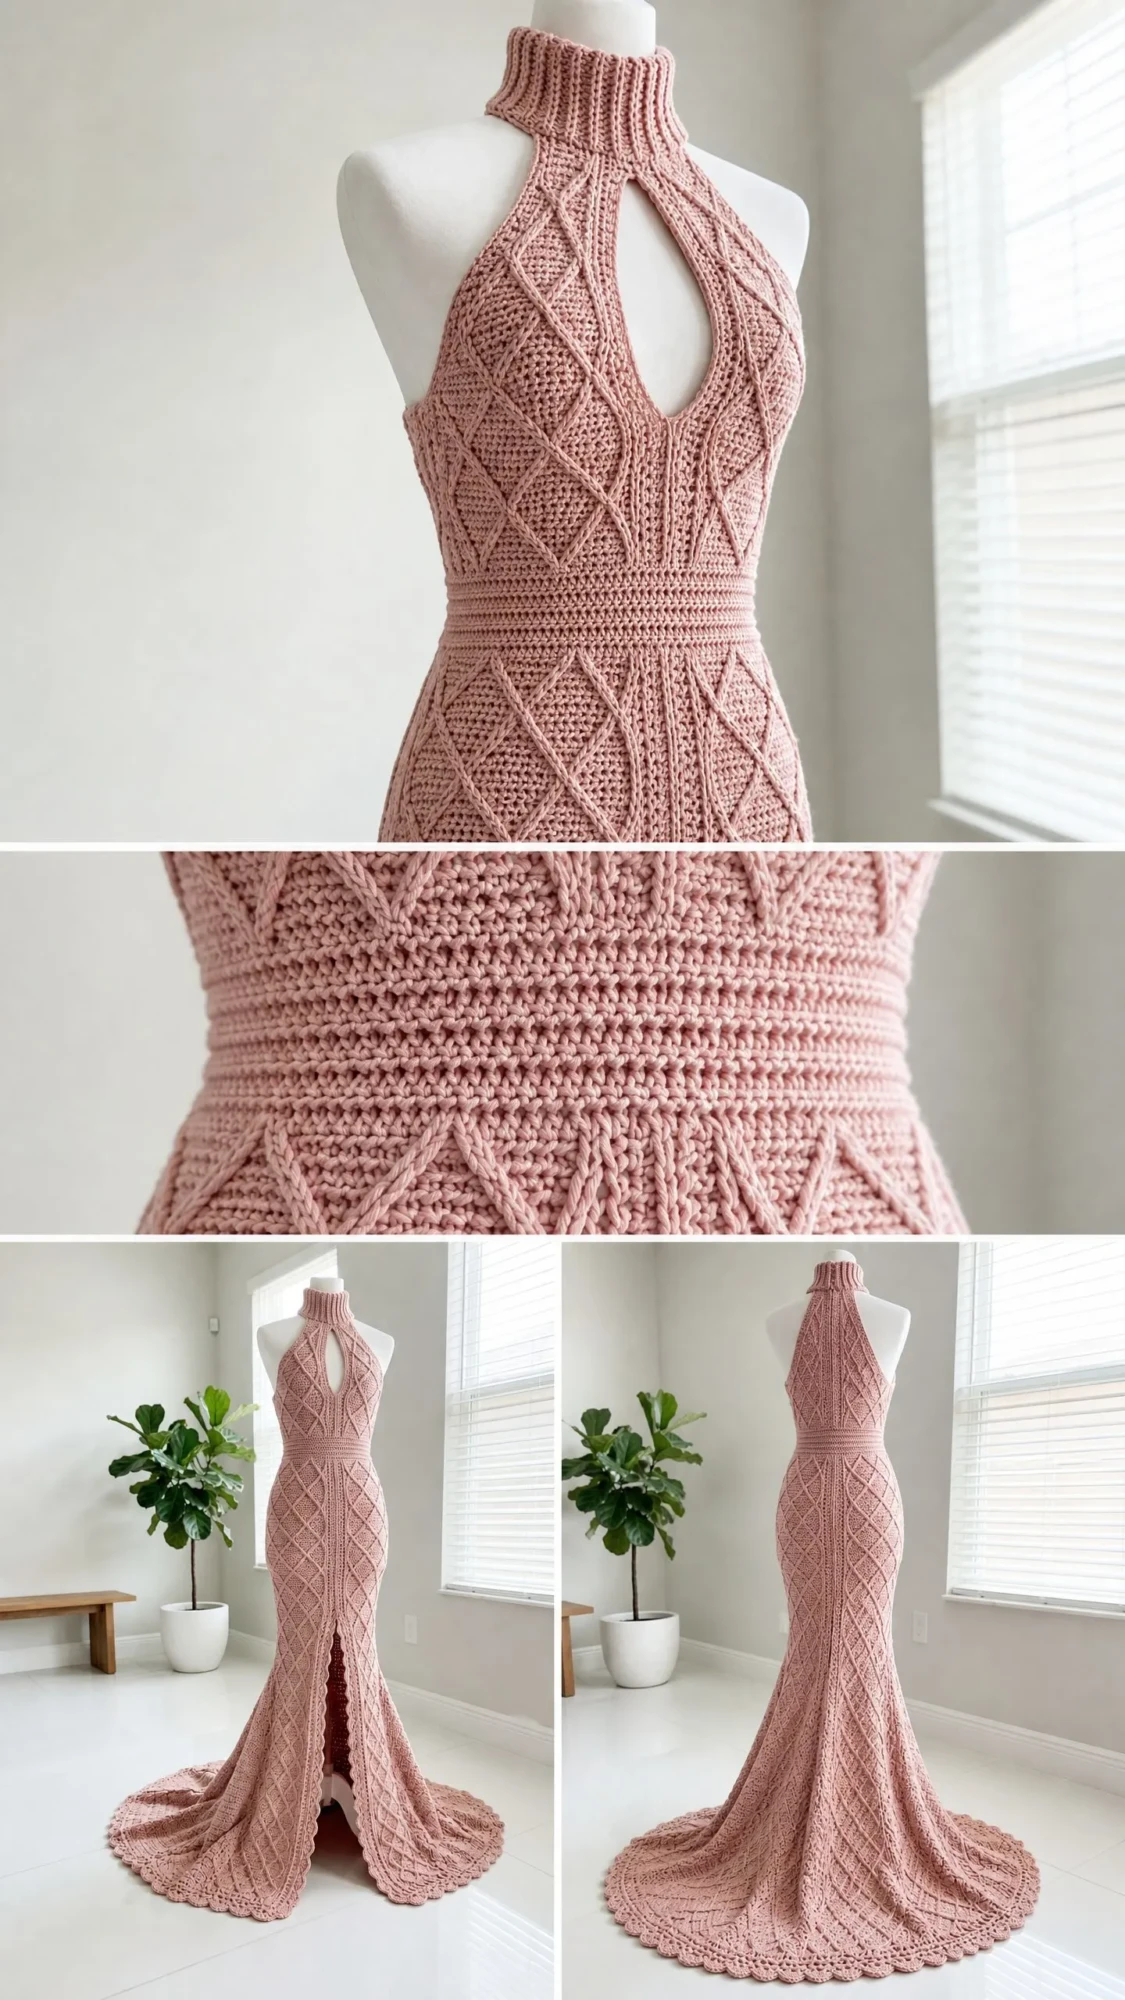
The magic of this crochet pattern lives in its texture. The diamond lattice stitch pattern creates a raised grid of diagonal lines that cross at 45 degree angles, forming those gorgeous diamond shapes you see covering the entire gown. Each diamond spans 8 stitches wide and 16 rounds tall. When worked in cotton yarn, those cables pop beautifully against the single crochet background.
What makes the silhouette so flattering? Strategic shaping. The bodice uses increases to accommodate the bust, then gradual decreases pull everything in at the waist. Below the waistband, the pattern opens back up with steady increases that create that signature trumpet flare. The front slit adds movement and drama while the train pools elegantly on the floor.
This isn’t a costume piece. This is a wearable gown with real structure and thoughtful construction. The separate ribbed waistband cinches at the smallest point. The keyhole cutout frames the neckline beautifully. Every detail has been considered.
Materials You’ll Need
Before you begin, gather everything on this list. Having all your supplies ready makes a long project like this much more enjoyable.
Yarn:
Worsted weight, 100 percent cotton or cotton blend in blush pink. You’ll need approximately 3,000 to 3,500 yards total. That’s 2,743 to 3,200 meters for my metric friends.
Recommended yarn options:
Hooks:
Notions:
A note about yarn choice: Stick with smooth cotton or cotton blend yarns. Fuzzy or hairy yarns will completely obscure your beautiful cable work. Cotton also blocks flat and holds the mermaid flare without bouncing back, which is essential for this silhouette.
Finished Measurements
This pattern is written for size Medium with these finished measurements:
Size customization guidance is provided at the end of the pattern.
Gauge (Please Don’t Skip This)
With G-6 / 4.0 mm hook and worsted weight cotton:
Here’s something really important. Your gauge swatch must be made in the diamond lattice stitch pattern, not plain single crochet. The post stitches pull the fabric in horizontally, which changes everything. Make your swatch, wash it, and block it before measuring. Even one stitch difference per 4 inches will dramatically change your bust and hip circumference. Please don’t skip this step.
Abbreviations and Stitch Definitions
Let me walk you through every stitch abbreviation you’ll encounter. I’ll define each one so there’s no confusion.
Basic Stitches:
Post Stitches:
Shaping:
Other Terms:
Special Stitches Explained
Diamond Lattice Pattern
This is the heart of the entire gown. The diamond lattice creates raised diagonal lines that cross to form diamond shapes. It’s worked over a multiple of 8 stitches plus 4.
The background fabric is single crochet with front post double crochet cables imposed on top in a diagonal crossing grid.
Right-leaning cable pass: Work FPdc around the post of a stitch 2 rows below. The diagonals travel 1 stitch to the right every 2 rows.
Left-leaning cable pass: Work FPdc around the post of a stitch 2 rows below traveling 1 stitch to the left every 2 rows.
At the crossing point: Where right-leaning and left-leaning cables meet, insert your hook around both post stitches simultaneously. This creates the raised diamond intersection.
Waistband Rib Stitch
Worked in rows over an even number of stitches. Every row: ch 1, work FPdc then BPdc across, turn. This creates a stretchy ribbed band that cinches at the waist.
Scallop Shell Edging
Worked along the hem in multiples of 6 stitches. Slip stitch into first stitch, ch 1, sc in same stitch, skip 2 stitches, work 5 dc in next stitch to form a shell, skip 2 stitches, sc in next stitch. Repeat across, ending with sc, then fasten off.
Pattern Notes Before You Begin
Read through these notes completely before starting. They’ll save you confusion later.
1. The gown is constructed top down. Begin at the halter collar, work down through the bodice panels, join at the underarm, then continue in joined rounds through the torso, hip flare, and trumpet skirt.
2. The halter collar and neckband are worked first as a flat piece, then folded and seamed at the back to form a turtleneck style collar.
3. The keyhole cutout is created by working the two halter strap panels separately, leaving a gap between them.
4. The waistband is a separate ribbed panel seamed around the waist.
5. The front slit begins approximately 30 inches from the waist. At that point, you’ll divide the work and continue flat on each half separately.
6. All rounds are joined rounds. At the end of each round, join with slip stitch to the first stitch, chain 1, then turn. Turning keeps the post stitch cable directions consistent.
7. Use your stitch markers liberally. Place a marker at each side seam position and each cable crossing point.
8. Cotton yarn makes this gown heavy. Support the work on a flat surface or your lap as you crochet to prevent gauge distortion.
9. Block aggressively. The finished gown must be wet blocked on a dress form or flat on mats pinned to finished measurements. Cotton won’t hold its shape until blocked.
Step By Step Instructions
Section 1: Collar
The collar is a flat ribbed rectangle that forms the turtleneck base. It’s worked lengthwise.
Foundation chain: Ch 17.
Row 1 (RS): Sc in 2nd ch from hook and in each ch across. Turn. (16 sc)
Row 2: Ch 1, work FPdc in next st, BPdc in next st, repeat 8 times total. Turn. (16 sts)
Rows 3 through 60: Repeat row 2. Turn after each row. (16 sts per row)
At the end of row 60, your collar strip measures approximately 12 inches long. Fold the strip in half lengthwise so the two long edges meet. With RS facing out, seam the long edge together using slip stitch through both layers. Don’t seam the short ends.
You now have a folded turtleneck collar tube approximately 2 inches tall and 12 inches in circumference. Set this aside.
Section 2: Halter Straps (Make 2)
Each strap connects the collar to the bust and frames the keyhole cutout.
With G-6 hook, attach yarn to one short end of the collar at the front center right position.
Foundation: Ch 1, work 8 sc evenly along the short front end of the collar for the right strap. Turn.
Rows 1 through 14: Ch 1, sc across. Turn. (8 sc)
Row 15 (shaping): Ch 1, inc in first st, sc to last st, inc in last st. Turn. (10 sc)
Rows 16 through 18: Ch 1, sc across. Turn. (10 sc)
Row 19 (shaping): Ch 1, inc in first st, sc to last st, inc in last st. Turn. (12 sc)
Rows 20 through 24: Ch 1, sc across. Turn. (12 sc)
Fasten off and set aside.
For the left strap, attach yarn to the short front end of the collar at the left of center front and repeat all rows above.
You now have two strap panels, each 12 stitches wide at the lower edge.
Section 3: Keyhole Cutout Finishing
Before joining the straps across the bust, work the keyhole edging. With E-4 hook, attach yarn at the inner lower corner of the right strap.
Round 1: Sc evenly along the inner edge of the right strap up to the collar (approximately 24 sc), work 3 sc across the base of the collar gap, then sc down the inner edge of the left strap (approximately 24 sc), sl st to join. (51 sc)
Round 2: Ch 1, sc around, working 3 sc into each corner stitch at the V point bottom to keep it flat, sl st to join. (approximately 55 sc, adjust for smooth flat lie)
Fasten off.
Keyhole loop: Attach yarn at the center V point at the base of the keyhole. Ch 10, sl st back to the same stitch to form a loop. Fasten off. Weave in ends.
Section 4: Bust Joining Round
Place both strap panels side by side with WS facing you. The right strap on the right, left strap on the left, keyhole gap in center.
Back Panel:
Attach yarn at the center back of the collar. Ch 1, work 8 sc across the back short end.
Rows 1 through 14: Ch 1, sc across. Turn. (8 sc)
Row 15: Ch 1, inc in first st, sc to last st, inc in last st. Turn. (10 sc)
Rows 16 through 18: Ch 1, sc across. Turn. (10 sc)
Row 19: Ch 1, inc in first st, sc to last st, inc in last st. Turn. (12 sc)
Rows 20 through 24: Ch 1, sc across. Turn. (12 sc)
Do not fasten off.
Joining Round: With G-6 hook, ch 1, work across the 12 sts of the back panel, ch 8 (underarm chain bridge right side), work across the 12 sts of the right strap beginning at the outer edge, work across the 12 sts of the left strap, ch 8 (underarm chain bridge left side), sl st to join into round. (52 sts total)
Round 1 (setup): Ch 1, sc in each st and ch around, sl st to join, turn. (52 sc)
Section 5: Upper Bodice
The bodice is worked in joined rounds from the bust down. The diamond lattice begins here.
Stitch count targets:
Bodice Increase Rounds:
Round 2: Ch 1, sc around, sl st to join, turn. (52 sc)
Round 3 (inc): Ch 1, work sc in next 12 sts then inc in next st, repeat 4 times. (56 sc)
Round 4: Ch 1, sc around, sl st to join, turn. (56 sc)
Round 5 (inc): Ch 1, work sc in next 13 sts then inc in next st, repeat 4 times. (60 sc)
Round 6: Ch 1, sc around, sl st to join, turn. (60 sc)
Round 7 (inc): Ch 1, work sc in next 14 sts then inc in next st, repeat 4 times. (64 sc)
Round 8: Ch 1, sc around, sl st to join, turn. (64 sc)
Round 9 (inc): Ch 1, work sc in next 15 sts then inc in next st, repeat 4 times. (68 sc)
Round 10: Ch 1, sc around, sl st to join, turn. (68 sc)
Round 11 (inc): Ch 1, work sc in next 16 sts then inc in next st, repeat 4 times. (72 sc)
Round 12: Ch 1, sc around, sl st to join, turn. (72 sc)
Checkpoint: After round 12, your bust circumference should measure approximately 18 inches and the piece should be approximately 5 inches tall from the collar base.
Diamond Lattice Setup
The diamond lattice creates a grid over 72 stitches, which gives you 9 full repeats of 8 stitches each.
Stitch placement for one 8 stitch repeat:
Every 2 rounds, the FPdc positions shift toward each other until they meet at round 8 (the diamond crossing point), then diverge for rounds 9 through 16.
Diamond Lattice Bodice (Rounds 13 through 44)
Round 13 (lattice setup): Ch 1, work sc 3, FPdc around sc 3 positions to the right 2 rows below, sc 3, FPdc around sc 7 positions to the right 2 rows below, repeat 9 times, sl st, turn. (72 sts)
Round 14: Ch 1, sc around, sl st, turn. (72 sc)
Round 15: Ch 1, work sc 2, FPdc around right-leaning cable post, sc 1, sc 1, FPdc around left-leaning cable post, sc 2, repeat 9 times, sl st, turn. (72 sts)
Round 16: Ch 1, sc around, sl st, turn. (72 sc)
Round 17: Ch 1, work sc 1, FPdc around right-leaning post, sc 3, FPdc around left-leaning post, sc 1, repeat 9 times, sl st, turn. (72 sts)
Round 18: Ch 1, sc around, sl st, turn. (72 sc)
Round 19 (crossing round): Ch 1, work FPdc crossing stitch over both right-leaning and left-leaning posts, sc 6, repeat 9 times, sl st, turn. (72 sts)
For the crossing stitch, insert your hook around both converging post stitches simultaneously as described in special stitches.
Round 20: Ch 1, sc around, sl st, turn. (72 sc)
Round 21 (diverging): Ch 1, work sc 1, FPdc right-leaning post moving right, sc 3, FPdc left-leaning post moving left, sc 1, repeat 9 times, sl st, turn. (72 sts)
Round 22: Ch 1, sc around, sl st, turn. (72 sc)
Round 23: Ch 1, work sc 2, FPdc right, sc 1, sc 1, FPdc left, sc 2, repeat 9 times, sl st, turn. (72 sts)
Round 24: Ch 1, sc around, sl st, turn. (72 sc)
Round 25: Ch 1, work sc 3, FPdc right, sc 0, FPdc left, sc 3, repeat 9 times, sl st, turn. (72 sts)
This completes the bottom of the first diamond.
Round 26: Ch 1, sc around, sl st, turn. (72 sc)
Round 27 (second diamond start): Repeat round 13. (72 sts)
Round 28: Ch 1, sc around, sl st, turn. (72 sc)
Rounds 29 through 44: Work rounds 15 through 28 of the lattice once more. (72 sts per round)
Checkpoint: After round 44, the bodice should measure approximately 14 inches from the collar base.
Section 6: Waist Shaping (Rounds 45 through 60)
Shape the waist through gradual decreases from 72 stitches to 56 stitches.
Round 45 (dec): Ch 1, work sc 7 then dec, repeat 8 times, sl st, turn. (64 sc)
Rounds 46 and 47: Ch 1, sc around, sl st, turn. (64 sc)
Maintain the diamond lattice pattern throughout waist shaping by spacing the FPdc diagonals evenly over the reduced stitch count.
Round 48 (dec): Ch 1, work sc 6 then dec, repeat 8 times, sl st, turn. (56 sc)
Rounds 49 through 52: Ch 1, work lattice pattern over 56 sts, sl st, turn. (56 sc per round)
Rounds 53 through 56: Ch 1, sc around, sl st, turn. (56 sc)
Round 57 (dec): Ch 1, work sc 5 then dec, repeat 8 times, sl st, turn. (48 sc)
Rounds 58 through 60: Ch 1, sc around, sl st, turn. (48 sc)
Checkpoint: The piece should measure approximately 20 inches from the collar base.
Section 7: Waistband
The waistband is a separate flat piece seamed around the waist.
With E-4 hook, ch 17.
Row 1: Sc in 2nd ch from hook and across. Turn. (16 sc)
Row 2: Ch 1, work FPdc then BPdc, repeat 8 times, turn. (16 sts)
Rows 3 through 56: Repeat row 2. (16 sts per row)
The waistband measures approximately 11 inches long and 3 inches tall. Wrap it around the waist section at the 48 stitch round. Pin in place, stretching gently to fit. Seam the short ends together with whip stitch where they overlap approximately 1 inch at center back. Attach the waistband to the gown with slip stitch through both layers at the top edge, then again at the bottom edge.
Section 8: Hip Shaping and Skirt (Rounds 61 through 120)
Re-attach yarn at center back at the bottom edge of the waistband with G-6 hook. Expand from 48 stitches to 80 stitches over 20 rounds.
Round 61: Ch 1, work sc 5 then inc, repeat 8 times, sl st, turn. (56 sc)
Round 62: Ch 1, sc around, sl st, turn. (56 sc)
Round 63 (inc): Ch 1, work sc 6 then inc, repeat 8 times, sl st, turn. (64 sc)
Round 64: Ch 1, sc around, sl st, turn. (64 sc)
Round 65 (inc): Ch 1, work sc 7 then inc, repeat 8 times, sl st, turn. (72 sc)
Round 66: Ch 1, sc around, sl st, turn. (72 sc)
Round 67 (inc): Ch 1, work sc 8 then inc, repeat 8 times, sl st, turn. (80 sc)
Rounds 68 through 72: Ch 1, work diamond lattice over 80 sts, sl st, turn. (80 sc per round)
Continue increasing every 6 rounds while maintaining the diamond lattice pattern through round 120.
Round 73 (inc): Work to 88 sc.
Round 79 (inc): Work to 96 sc.
Round 86 (inc): Work to 104 sc.
Round 93 (inc): Work to 112 sc.
Round 101 (inc): Work to 120 sc.
Round 111 (inc): Work to 128 sc.
Checkpoint: After round 120, the skirt hem should measure approximately 32 inches and the piece approximately 40 inches from the collar base.
Section 9: Lower Skirt and Trumpet Flare (Rounds 121 through 160)
Continue expanding to full trumpet circumference.
Round 121 (inc): Work to 136 sc.
Round 127 (inc): Work to 144 sc.
Round 133 (inc): Work to 152 sc.
Round 139 (inc): Work to 160 sc.
Round 146 (inc): Work to 168 sc.
Round 156 (inc): Work to 176 sc.
Work diamond lattice between each increase round.
Checkpoint: After round 160, the skirt hem should measure approximately 44 inches. Total length approximately 52 inches from collar base.
Section 10: Front Slit and Train
At the end of round 160, identify center front. Mark center front stitch. Each half of the circumference equals 88 stitches.
Left Train Panel Row 1 (RS): Ch 1, work diamond lattice across 88 sts, turn. (88 sts)
Continue working flat in diamond lattice pattern, turning each row. Work the right train panel separately in the same manner.
Complete the train with additional rows as needed to reach the full 68 inch total length, then finish both panels with scallop shell edging along all raw edges.
Finishing
Weave in all ends securely. Wet block the entire gown on a dress form or flat on blocking mats, pinning to finished measurements. Allow to dry completely before removing pins.
Attach the button or hook and eye closure at the collar back opening.
Give the gown one final steam press if needed, taking care not to flatten the cable texture.
Skill Level and Time Investment
This is an advanced crochet pattern requiring comfort with front post and back post double crochet, post stitch cables, working in the round, garment shaping with increases and short rows, and reading multi-stitch repeat charts. Complete at least one fitted garment before attempting this project.
Time estimate: Approximately 120 to 180 hours depending on your working speed. Budget roughly 30 hours for the bodice, 60 hours for the skirt, and 30 to 40 hours for the train, finishing, and collar.
You Did Something Amazing
If you made it through this entire gown, you created something truly extraordinary. This isn’t a quick weekend project. This is months of dedicated work, thousands of yards of yarn, and countless hours of careful attention to those beautiful diamond cables.
Thank you so much for choosing this pattern for such a significant project. I genuinely hope you love every single stitch of your finished gown.
I would absolutely love to see your finished piece. Share your photos on Instagram or Facebook and tag me so I can celebrate with you!
If you’re planning to make this stunning diamond lattice mermaid gown, save this pattern to your Pinterest boards so you can find it easily when you’re ready to start. And please drop a comment below once you’ve finished, or even just to share your progress. I can’t wait to see what you create!
You Might Also Like
- Ocean Blue Lattice Crochet High Tops Free Pattern
- Mermaid Tail Sparkle Baby Blanket Free Crochet Pattern
- Sunset Coral Textured Crochet Dress Free Pattern
- Sage Green Boho Pineapple Dress Free Crochet Pattern
