
This button-front cardigan dress combines a cozy single crochet body with sunflower granny squares running down the center front. You’ll use basic stitches throughout. The construction involves working flat pieces, seaming them together, and attaching a decorative granny square panel.
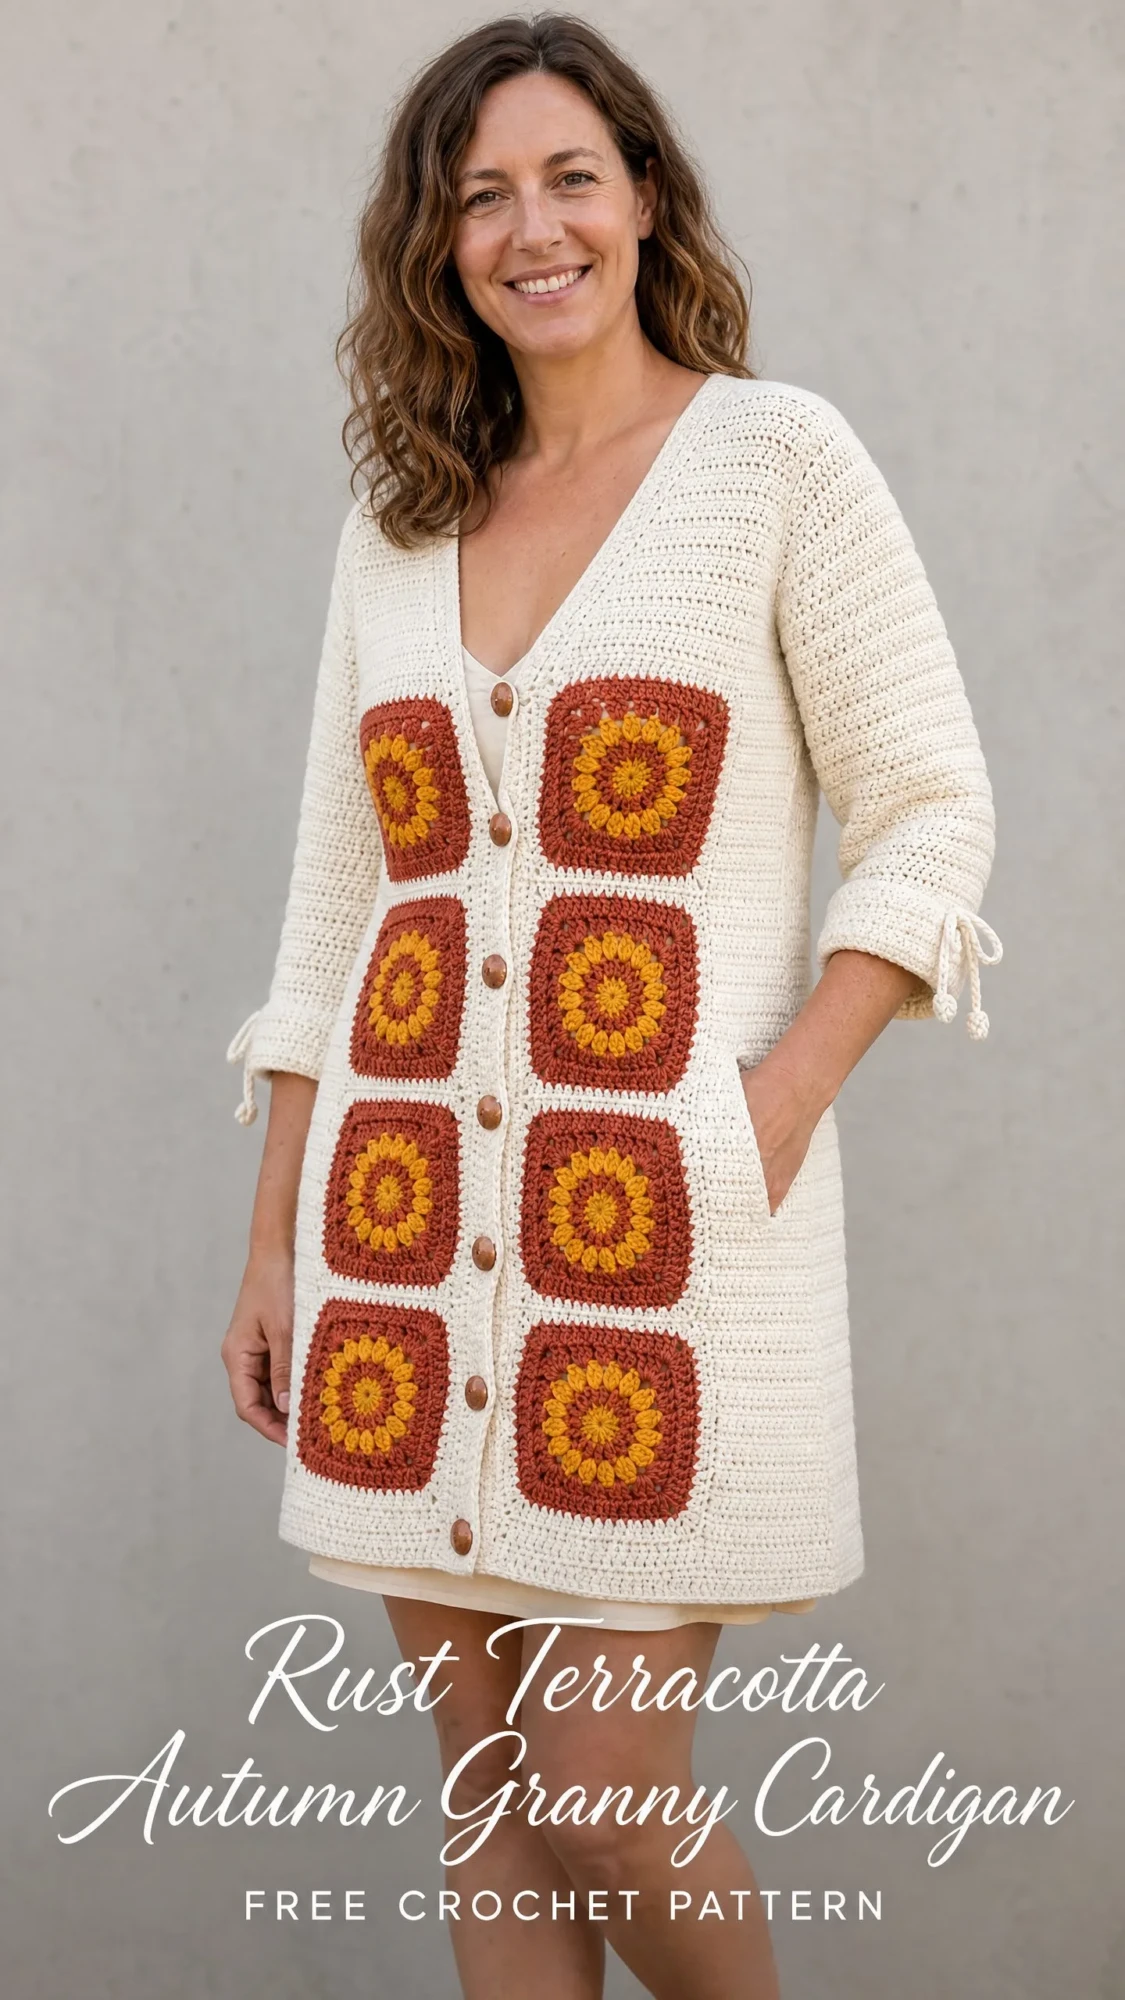
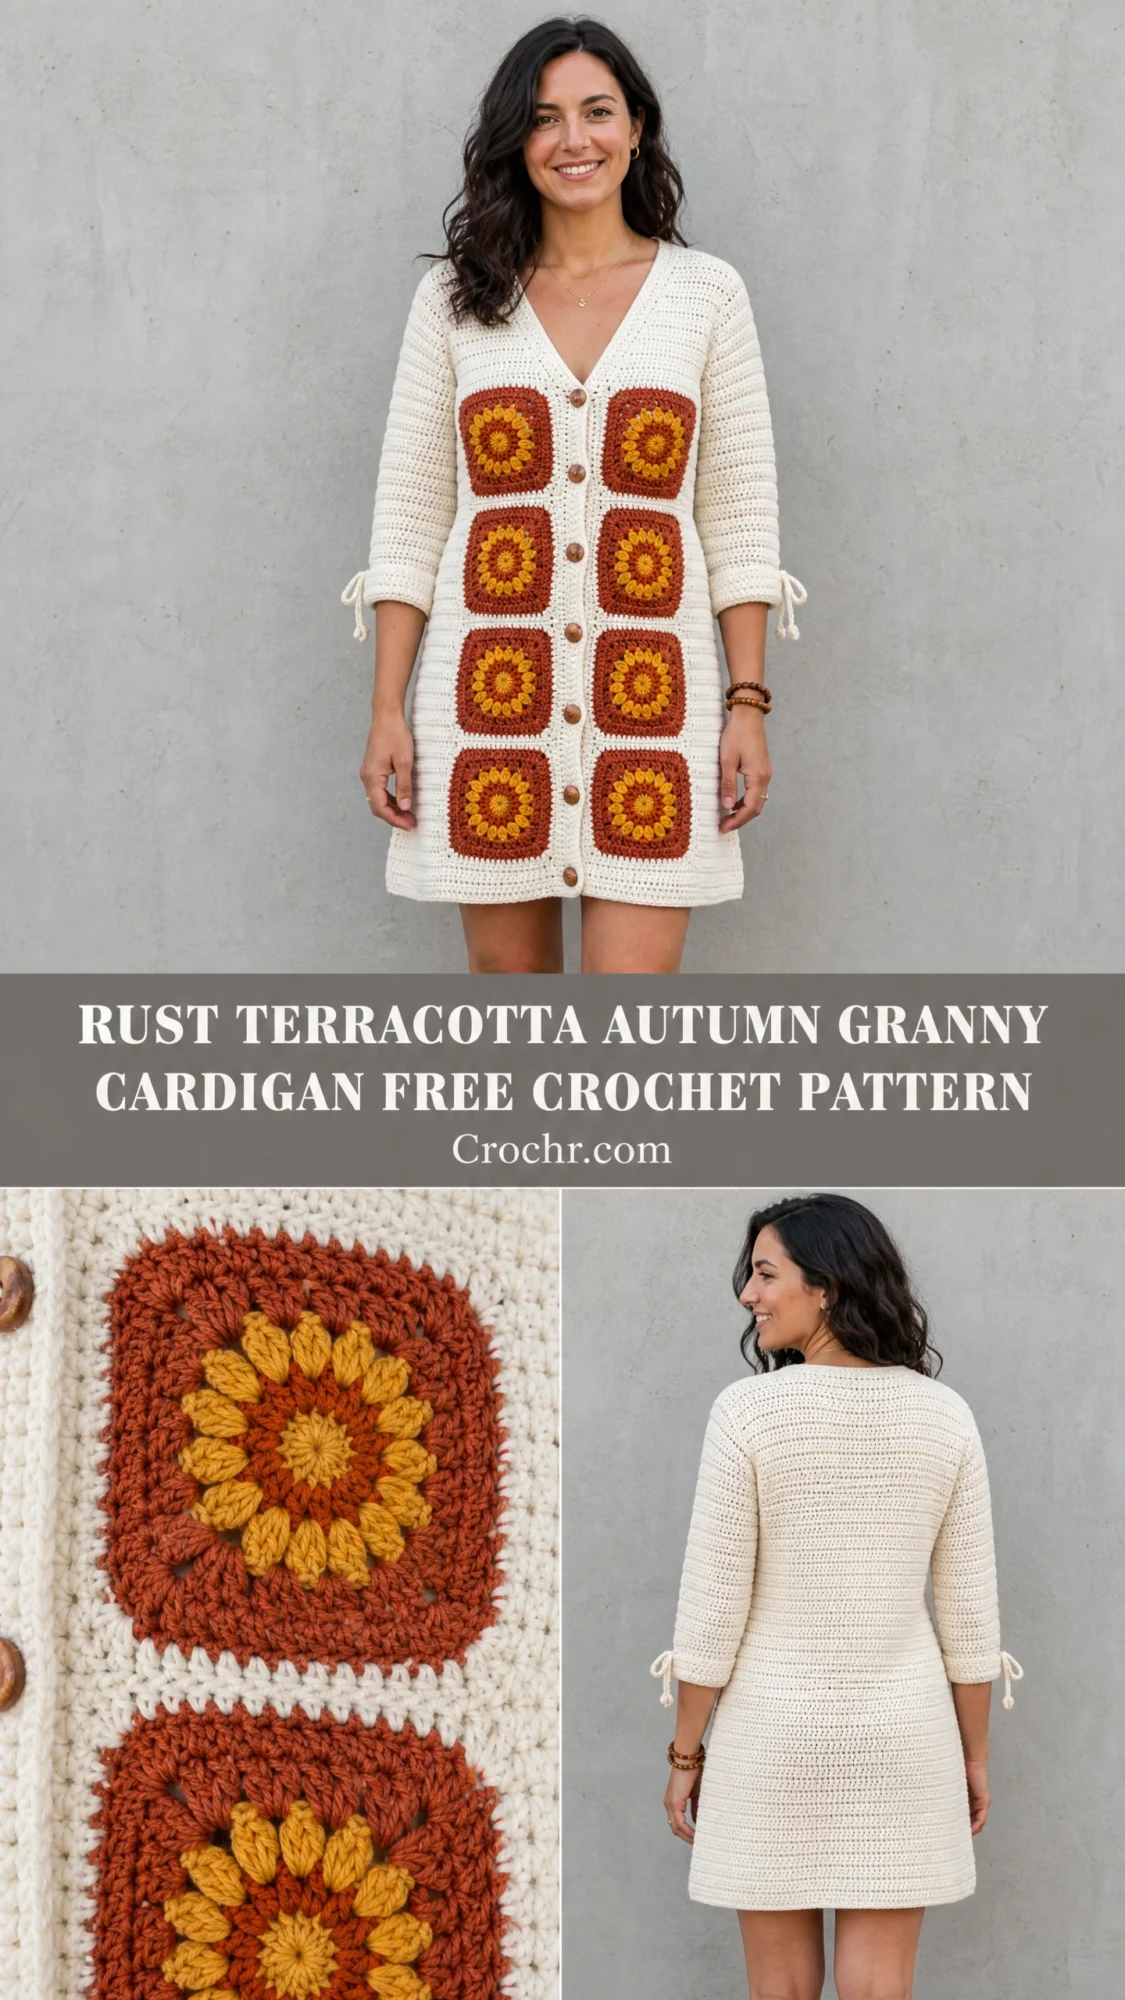
The finished garment features a flattering V-neckline, three-quarter sleeves with sweet tie cuffs, and wooden button closures. Those warm autumn tones of cream, burnt orange, and golden yellow create a retro-bohemian vibe that’s perfect for layering season.
I’ll walk you through every step of this intermediate-level project, from making your sunflower squares to the final button placement. Let’s get started.
Why You’ll Love This Rust Terracotta Autumn Granny Cardigan Crochet Pattern
This cardigan dress hits that sweet spot between statement piece and everyday wearable. The dense single crochet fabric creates a structured, polished look while the granny square panel adds handmade charm and visual interest right down the center front.
The construction might sound complicated at first glance, but I promise it breaks down into manageable pieces. You’ll work the granny squares first, then the body panels flat, then the sleeves. Everything gets seamed together at the end. Taking it one section at a time makes the whole project feel much more approachable.
Time estimate: Plan for 40 to 60 hours for an average intermediate crocheter working on a size Medium. This is definitely a project to savor over several weeks rather than rush through in a weekend.
Finished Measurements
This pattern is written for size Small/Medium (S/M) with notes for size Large/Extra-Large (L/XL) in parentheses where values differ.
This garment has 0 to 1 inch of ease at the bust for a fitted silhouette. The finished cardigan hits at approximately mid-thigh on someone 5 ft 5 in / 165 cm tall.
Materials Needed for This Crochet Tutorial
Yarn
Yarn Suggestions
Option 1: Lion Brand Pound of Love (100% acrylic, 1,020 yards per 16 oz skein). Color A in Fisherman gives excellent stitch definition and is machine-washable. Two skeins of Color A will cover the full body. Grab one skein each of Color B and Color C in coordinating autumn tones.
Option 2: Paintbox Yarns Simply DK used doubled (100% acrylic, 137 yards per 50 g ball). Double the yarn throughout to achieve worsted gauge. You’ll need approximately 10 balls of Color A, 3 balls of Color B, and 2 balls of Color C.
Option 3: WeCrochet Swish Worsted (100% superwash merino wool, 200 yards per 100 g skein). This gives a softer drape with slightly more stitch definition. You’ll need 7 skeins of Color A, 2 skeins of Color B, and 1 skein of Color C.
Any smooth worsted weight yarn (weight 4) that achieves gauge will work beautifully. Avoid heavily textured, fuzzy, or bouclé yarns since stitch definition matters here.
Hooks
Notions
Gauge (Don’t Skip This Step)
For body and sleeves (worked with J / 6 mm hook in single crochet): 16 sc x 18 rows = 4 in / 10 cm, blocked.
For granny squares (worked with I / 5.5 mm hook): Each completed 4-round granny square measures 4.5 in x 4.5 in / 11.5 cm x 11.5 cm, blocked.
Gauge is essential for this garment. Even a small deviation will significantly alter the fit. Work a 6 in / 15 cm swatch, block it, and measure before beginning. I know swatching feels tedious, but trust me on this one.
Abbreviations for This Step by Step Crochet Pattern
Let me define every stitch abbreviation you’ll encounter. If you’re newer to reading patterns, bookmark this section.
How to Work sc2tog (Single Crochet Decrease)
Insert hook into next stitch, yarn over, pull up loop (2 loops on hook). Without completing the stitch, insert hook into following stitch, yarn over, pull up loop (3 loops on hook). Yarn over, pull through all 3 loops. You’ve decreased by one stitch.
Special Stitch: Sunflower Granny Square
This is a 4-round granny square with a circular sunflower motif at the center, creating the radiating petal effect visible on the finished cardigan. Work in rounds without turning. Join each round with a slip stitch.
Round 1 (Color C, golden yellow): Make a magic ring (or ch 4, join with sl st to form ring). Ch 3 (counts as first dc), work 11 more dc into ring, join with sl st to top of beg ch-3. (12 dc)
Round 2 (Color C): Ch 1, sc in same st. Ch 2, sk 1 st, sc in next st, rep (ch 2, sk 1, sc in next st) around, ending with ch 2, join with sl st to first sc. (6 sc, 6 ch-2 sps) Fasten off Color C.
Round 3 (Color B, terracotta): Join Color B in any ch-2 sp. Ch 3 (counts as dc), work 4 dc into same ch-2 sp (petal cluster begun), ch 1. Work 5 dc into next ch-2 sp, ch 1. Rep (5 dc in ch-2 sp, ch 1) around all 6 ch-2 sps, join with sl st to top of beg ch-3. (6 petal clusters of 5 dc each, 6 ch-1 sps)
Round 4 (Color B): This round transforms the circle into a square with corner chains. Sl st across to first ch-1 sp between petals. In this sp work: sc, ch 3 (corner), sc. This creates the first corner. Work sc evenly across the top of the next petal cluster: sc in each of the 5 dc of next petal = 5 sc. Work (sc, ch 3, sc) in next ch-1 sp (corner). Work 5 sc across next petal. Rep (corner, 5 sc across petal) two more times to complete all 4 sides, join with sl st to first sc. (4 corners each with ch-3 sp, 7 sc on each side between corners) Fasten off Color B. Weave in ends.
Round 5 (Color A, cream, worked with J hook): Join Color A in any corner ch-3 sp. Ch 3 (counts as dc), work 2 dc in same corner sp, ch 2, 3 dc in same sp (first corner shell complete). Work dc in each sc across to next corner sp (7 dc). In corner sp work (3 dc, ch 2, 3 dc). Rep dc across side and corner shells around all 4 sides. Join with sl st to top of beg ch-3. Fasten off Color A. (Each side has 13 dc between corner ch-2 sps, 4 corner ch-2 sps)
After blocking, each square measures 4.5 in x 4.5 in / 11.5 cm x 11.5 cm.
Make 8 squares total.
Granny Square Panel Assembly
After blocking each square, join them into a 2-column x 4-row panel using the surface slip stitch join method with Color A.
How to join: Hold two squares with right sides facing each other. Using yarn needle or hook and Color A, slip stitch through both back loops of corresponding edge stitches across to join. This creates a neat, nearly invisible seam on the right side.
The finished panel measures approximately 9 in wide x 18 in tall / 23 cm wide x 45.5 cm tall. Set aside.
Back Panel Instructions
The back is a single rectangular piece worked from the hem upward with slight waist shaping.
Foundation: With Color A and J hook, ch 75 [83].
Working row: Sc in 2nd ch from hook and in each ch across. (74 sc) [82 sc]
Work even in sc (ch 1, turn, sc in each st across) for 10 rows total from foundation.
Checkpoint: After 10 rows, piece should measure approximately 2.25 in / 5.5 cm from hem.
Waist Shaping: Decrease Section
Row 11: Ch 1, turn. Sc2tog over first 2 sts, sc to last 2 sts, sc2tog. (72 sc) [80 sc]
Row 12: Ch 1, turn. Sc across. (72 sc) [80 sc]
Row 13: Ch 1, turn. Sc2tog, sc to last 2 sts, sc2tog. (70 sc) [78 sc]
Row 14: Ch 1, turn. Sc across. (70 sc) [78 sc]
Row 15: Ch 1, turn. Sc2tog, sc to last 2 sts, sc2tog. (68 sc) [76 sc]
Row 16: Ch 1, turn. Sc across. (68 sc) [76 sc]
Row 17: Ch 1, turn. Sc2tog, sc to last 2 sts, sc2tog. (66 sc) [74 sc]
Row 18: Ch 1, turn. Sc across. (66 sc) [74 sc]
Waist Shaping: Increase Section
Row 19: Ch 1, turn. 2 sc in first st, sc to last st, 2 sc in last st. (68 sc) [76 sc]
Row 20: Ch 1, turn. Sc across. (68 sc) [76 sc]
Row 21: Ch 1, turn. 2 sc in first st, sc to last st, 2 sc in last st. (70 sc) [78 sc]
Row 22: Ch 1, turn. Sc across. (70 sc) [78 sc]
Row 23: Ch 1, turn. 2 sc in first st, sc to last st, 2 sc in last st. (72 sc) [80 sc]
Row 24: Ch 1, turn. Sc across. (72 sc) [80 sc]
Row 25: Ch 1, turn. 2 sc in first st, sc to last st, 2 sc in last st. (74 sc) [82 sc]
Row 26 onwards: Ch 1, turn. Sc across even with no shaping. Continue until piece measures 24 in / 61 cm from foundation row hem edge. End on a WS row. (74 sc) [82 sc]
Armhole Shaping
Row 1 of armhole: Ch 1, turn. Sl st across first 5 sts, ch 1, sc in same st, sc to last 5 sts, leave last 5 sts unworked. (64 sc) [72 sc]
Row 2 of armhole: Ch 1, turn. Sc2tog, sc to last 2 sts, sc2tog. (62 sc) [70 sc]
Row 3 of armhole: Ch 1, turn. Sc across. (62 sc) [70 sc]
Row 4 of armhole: Ch 1, turn. Sc2tog, sc to last 2 sts, sc2tog. (60 sc) [68 sc]
Row 5 of armhole: Ch 1, turn. Sc across. (60 sc) [68 sc]
Row 6 of armhole: Ch 1, turn. Sc2tog, sc to last 2 sts, sc2tog. (58 sc) [66 sc]
Row 7 of armhole: Ch 1, turn. Sc across. (58 sc) [66 sc]
Work even on 58 sc [66 sc] until armhole measures 8 in / 20 cm from bind-off row. End on a WS row.
Shoulder and Back Neck Shaping
Mark center 20 sts [22 sts] for back neck.
Left shoulder: Ch 1, turn. Sc across first 19 sts [22 sts], leave remaining sts unworked. (19 sc) [22 sc]
Next row: Ch 1, turn. Sc2tog, sc across. (18 sc) [21 sc]
Next row: Ch 1, turn. Sc across. Fasten off. (18 sc) [21 sc]
Right shoulder: Join yarn at inner edge of right shoulder, leaving the 20 [22] center neck sts unworked for back neck.
Row 1: Ch 1, sc across 19 sts [22 sts] to outer edge. (19 sc) [22 sc]
Row 2: Ch 1, turn. Sc to last 2 sts, sc2tog. (18 sc) [21 sc]
Row 3: Ch 1, turn. Sc across. Fasten off. (18 sc) [21 sc]
Left Front Panel Instructions
The left front is worked from hem upward with waist shaping mirroring the back, then V-neck shaping and armhole shaping.
Foundation: With Color A and J hook, ch 38 [42].
Working row: Sc in 2nd ch from hook and in each ch across. (37 sc) [41 sc]
Work even in sc for 10 rows total from foundation.
Waist Shaping: Decrease Section
Row 11: Ch 1, turn. Sc2tog, sc across. (36 sc) [40 sc]
Row 12: Ch 1, turn. Sc across. (36 sc) [40 sc]
Row 13: Ch 1, turn. Sc2tog, sc across. (35 sc) [39 sc]
Row 14: Ch 1, turn. Sc across. (35 sc) [39 sc]
Row 15: Ch 1, turn. Sc2tog, sc across. (34 sc) [38 sc]
Row 16: Ch 1, turn. Sc across. (34 sc) [38 sc]
Row 17: Ch 1, turn. Sc2tog, sc across. (33 sc) [37 sc]
Row 18: Ch 1, turn. Sc across. (33 sc) [37 sc]
Waist Shaping: Increase Section
Row 19: Ch 1, turn. 2 sc in first st, sc across. (34 sc) [38 sc]
Row 20: Ch 1, turn. Sc across. (34 sc) [38 sc]
Row 21: Ch 1, turn. 2 sc in first st, sc across. (35 sc) [39 sc]
Row 22: Ch 1, turn. Sc across. (35 sc) [39 sc]
Row 23: Ch 1, turn. 2 sc in first st, sc across. (36 sc) [40 sc]
Row 24: Ch 1, turn. Sc across. (36 sc) [40 sc]
Row 25: Ch 1, turn. 2 sc in first st, sc across. (37 sc) [41 sc]
Row 26 onwards: Work even until piece measures 24 in / 61 cm from foundation. End on a WS row. (37 sc) [41 sc]
Armhole Shaping
Row 1 of armhole: Ch 1, turn. Sl st across first 5 sts, ch 1, sc in same st, sc across to end. (32 sc) [36 sc]
Row 2 of armhole: Ch 1, turn. Sc to last 2 sts, sc2tog. (31 sc) [35 sc]
Row 3 of armhole: Ch 1, turn. Sc across. (31 sc) [35 sc]
Row 4 of armhole: Ch 1, turn. Sc to last 2 sts, sc2tog. (30 sc) [34 sc]
Row 5 of armhole: Ch 1, turn. Sc across. (30 sc) [34 sc]
Row 6 of armhole: Ch 1, turn. Sc to last 2 sts, sc2tog. (29 sc) [33 sc]
Row 7 of armhole: Ch 1, turn. Sc across. (29 sc) [33 sc]
Work 2 more rows even. (29 sc) [33 sc]
V-Neck Shaping
Row 1 of V-neck: Ch 1, turn. Sc to last 2 sts at center front edge, sc2tog. (28 sc) [32 sc]
Row 2 of V-neck: Ch 1, turn. Sc across. (28 sc) [32 sc]
Row 3 of V-neck: Ch 1, turn. Sc to last 2 sts, sc2tog. (27 sc) [31 sc]
Row 4 of V-neck: Ch 1, turn. Sc across. (27 sc) [31 sc]
Row 5 of V-neck: Ch 1, turn. Sc to last 2 sts, sc2tog. (26 sc) [30 sc]
Row 6 of V-neck: Ch 1, turn. Sc across. (26 sc) [30 sc]
Row 7 of V-neck: Ch 1, turn. Sc to last 2 sts, sc2tog. (25 sc) [29 sc]
Row 8 of V-neck: Ch 1, turn. Sc across. (25 sc) [29 sc]
Row 9 of V-neck: Ch 1, turn. Sc to last 2 sts, sc2tog. (24 sc) [28 sc]
Row 10 of V-neck: Ch 1, turn. Sc across. (24 sc) [28 sc]
Row 11 of V-neck: Ch 1, turn. Sc to last 2 sts, sc2tog. (23 sc) [27 sc]
Row 12 of V-neck: Ch 1, turn. Sc across. (23 sc) [27 sc]
Work even on 23 sc [27 sc] until armhole matches back armhole depth of 8 in / 20 cm total. End on a WS row.
Shoulder: Work 18 sc [21 sc] for outer shoulder stitches. Fasten off. (18 sc) [21 sc]
Right Front Panel Instructions
Work exactly as Left Front Panel, but mirror all shaping:
All stitch counts are identical to Left Front Panel at every equivalent row. Shoulder is 18 sc [21 sc]. Fasten off.
Sleeves (Make 2)
Sleeves are worked from the cuff upward.
Foundation: With Color A and J hook, ch 29 [33].
Working row: Sc in 2nd ch from hook and in each ch across. (28 sc) [32 sc]
Work 6 rows even in sc from foundation.
Sleeve Increase Section
Row 7: Ch 1, turn. 2 sc in first st, sc to last st, 2 sc in last st. (30 sc) [34 sc]
Row 8: Ch 1, turn. Sc across. (30 sc) [34 sc]
Row 9: Ch 1, turn. Sc across. (30 sc) [34 sc]
Row 10: Ch 1, turn. 2 sc in first st, sc to last st, 2 sc in last st. (32 sc) [36 sc]
Continue this pattern (increase every 3rd row) until you have (44 sc) [48 sc].
Work even until sleeve measures 14 in / 35.5 cm from foundation. End on a WS row.
Sleeve Cap Shaping
Row 1: Ch 1, turn. Sl st across 4 sts, ch 1, sc in same st, sc to last 4 sts, leave last 4 sts unworked. (36 sc) [40 sc]
Row 2: Ch 1, turn. Sc2tog, sc to last 2 sts, sc2tog. (34 sc) [38 sc]
Row 3: Ch 1, turn. Sc across. (34 sc) [38 sc]
Continue decreasing every other row until you have (20 sc) [24 sc]. Fasten off.
Button Bands
Left Front Button Band (buttons sewn here)
With RS of Left Front facing, Color A, and I / 5.5 mm hook, join yarn at hem edge of center front.
Row 1: Work sc evenly up the entire center front edge, approximately 1 sc per row end. (Approximately 110 sc for S/M, 114 sc for L/XL)
Rows 2-4: Ch 1, turn. Sc in each sc across. Fasten off.
Right Front Button Band (buttonholes here)
Work the same as the left front button band, but add 9 evenly spaced buttonholes on Row 3. To make a buttonhole, ch 2, sk 2 sts.
Finishing Your Rust Terracotta Autumn Granny Cardigan
1. Block all pieces to measurements
2. Seam shoulders using mattress stitch or whip stitch
3. Set in sleeves, matching center of sleeve cap to shoulder seam
4. Seam sleeve underarms and side seams in one continuous line
5. Attach granny square panel to center front, centering it over the button bands
6. Add tie cuffs: Chain 30 with Color A, attach at each side edge of sleeve cuff
7. Sew 9 wooden buttons to left front band, aligned with buttonholes
Weave in all remaining ends. Give the finished garment a final light steam blocking to set everything in place.
Pattern Notes for Beginner Friendly Success
I really hope you enjoy making this rust terracotta autumn granny cardigan crochet pattern as much as I enjoyed putting it together for you. If you make one, I would absolutely love to see it! Tag me on Instagram or share a photo in my Facebook group.
Save this pattern to your Pinterest boards so you can find it when you’re ready to start. And if you have any questions or want to share your finished piece, drop a comment below. I always love hearing from you!
You Might Also Like
- Ocean Wave Peplum Dress Free Crochet Pattern
- Sage Green Cottagecore Heart Crochet Cardigan Pattern
- Sunset Peach and Coral Granny Square Blanket Free Crochet Pattern
- Dusty Rose Boho Circle Handle Bag Free Crochet Pattern
