
I’ve been looking for a dress pattern that captures that dreamy coastal aesthetic without sacrificing sophistication. This is my favourite discovery this season. The Ocean Wave Butterfly Crochet Dress combines intricate lace work, a flattering fitted silhouette, and a showstopping butterfly applique that makes every crocheter’s heart skip a beat.
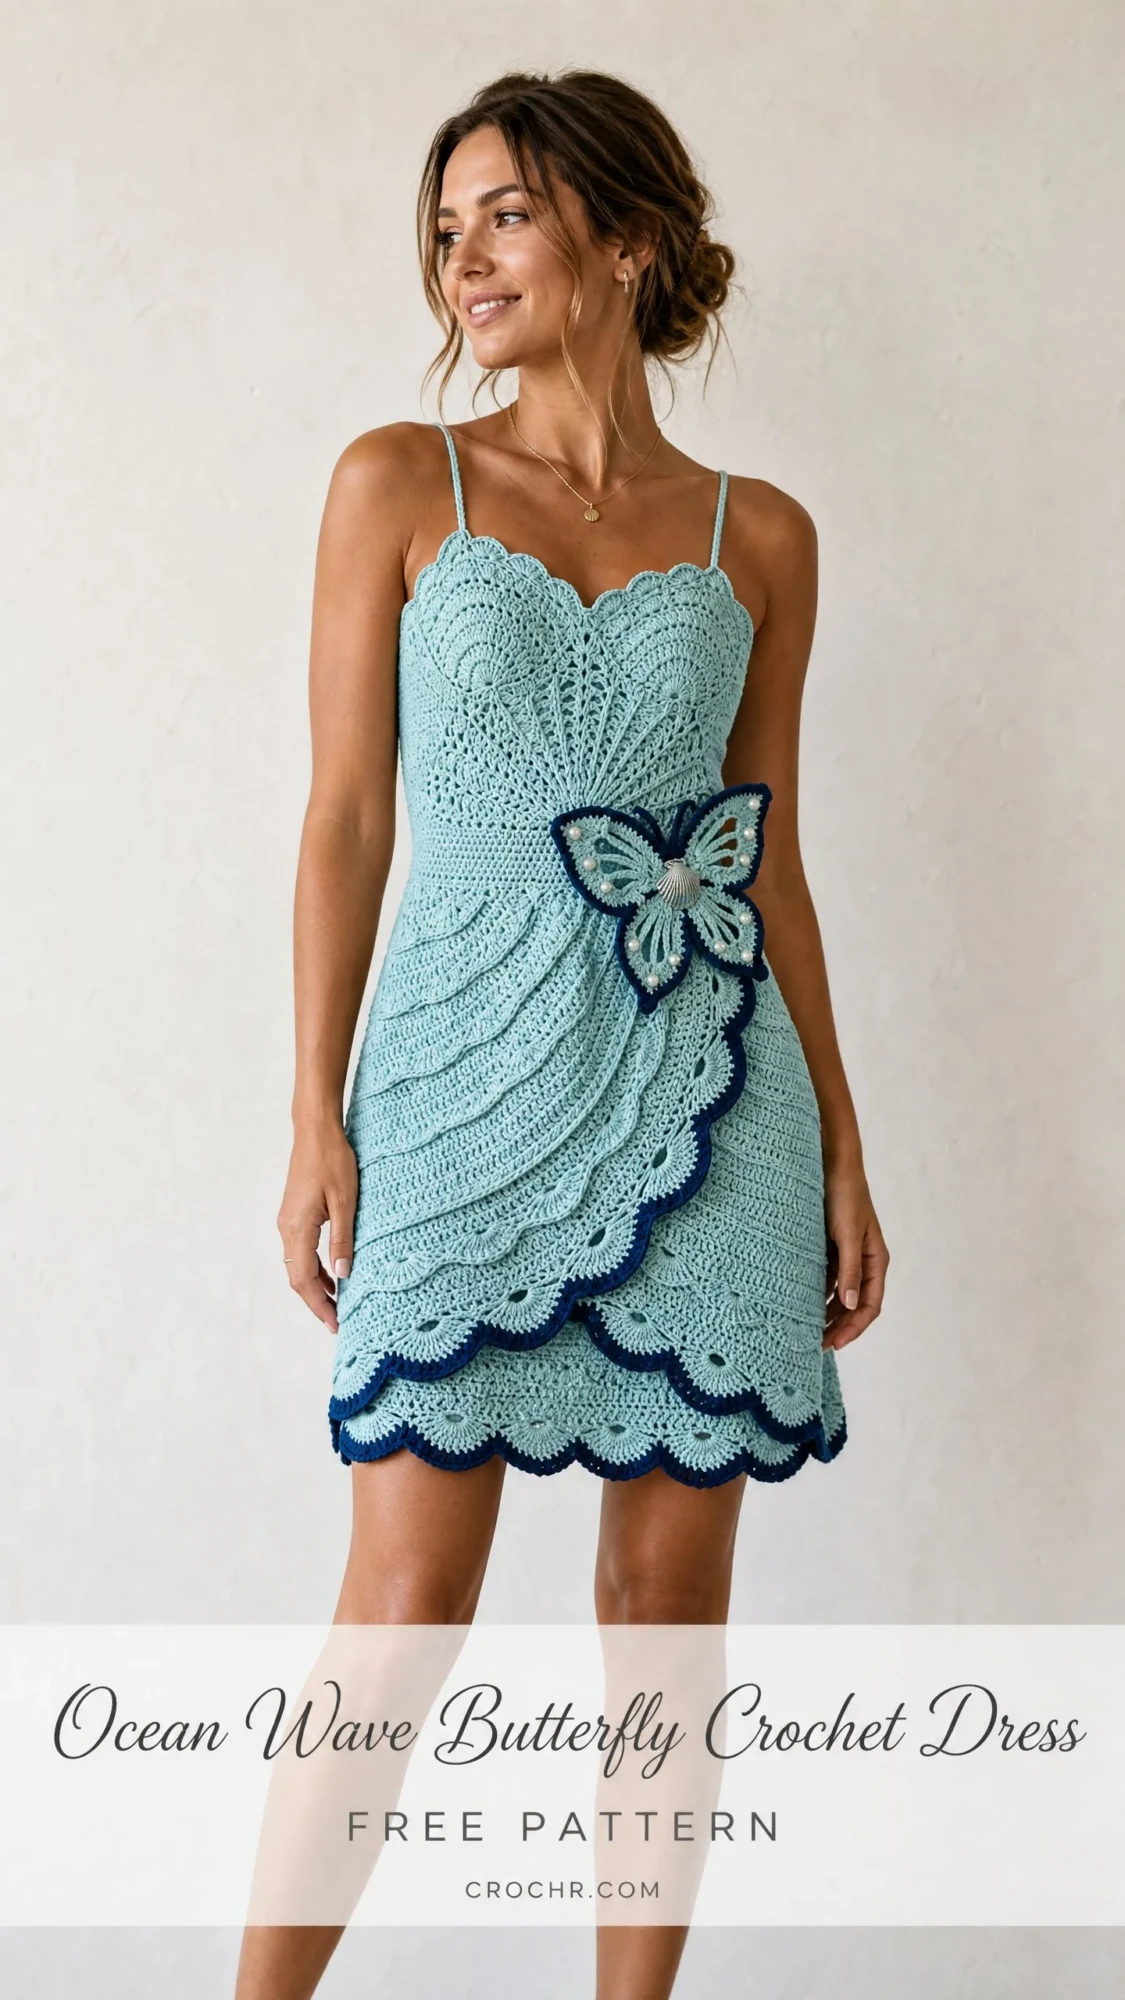
When I first saw this design, I knew it would become a wardrobe staple for beach vacations, garden parties, and those warm summer evenings that call for something special. The aqua colorway paired with navy accents gives it that perfect seaside vibe.
This is an advanced pattern, and I want to be upfront about that. But if you’ve been crocheting for a while and you’re ready to challenge yourself with something truly stunning, keep reading. I’ll walk you through every single detail.
About This Ocean Wave Butterfly Crochet Dress
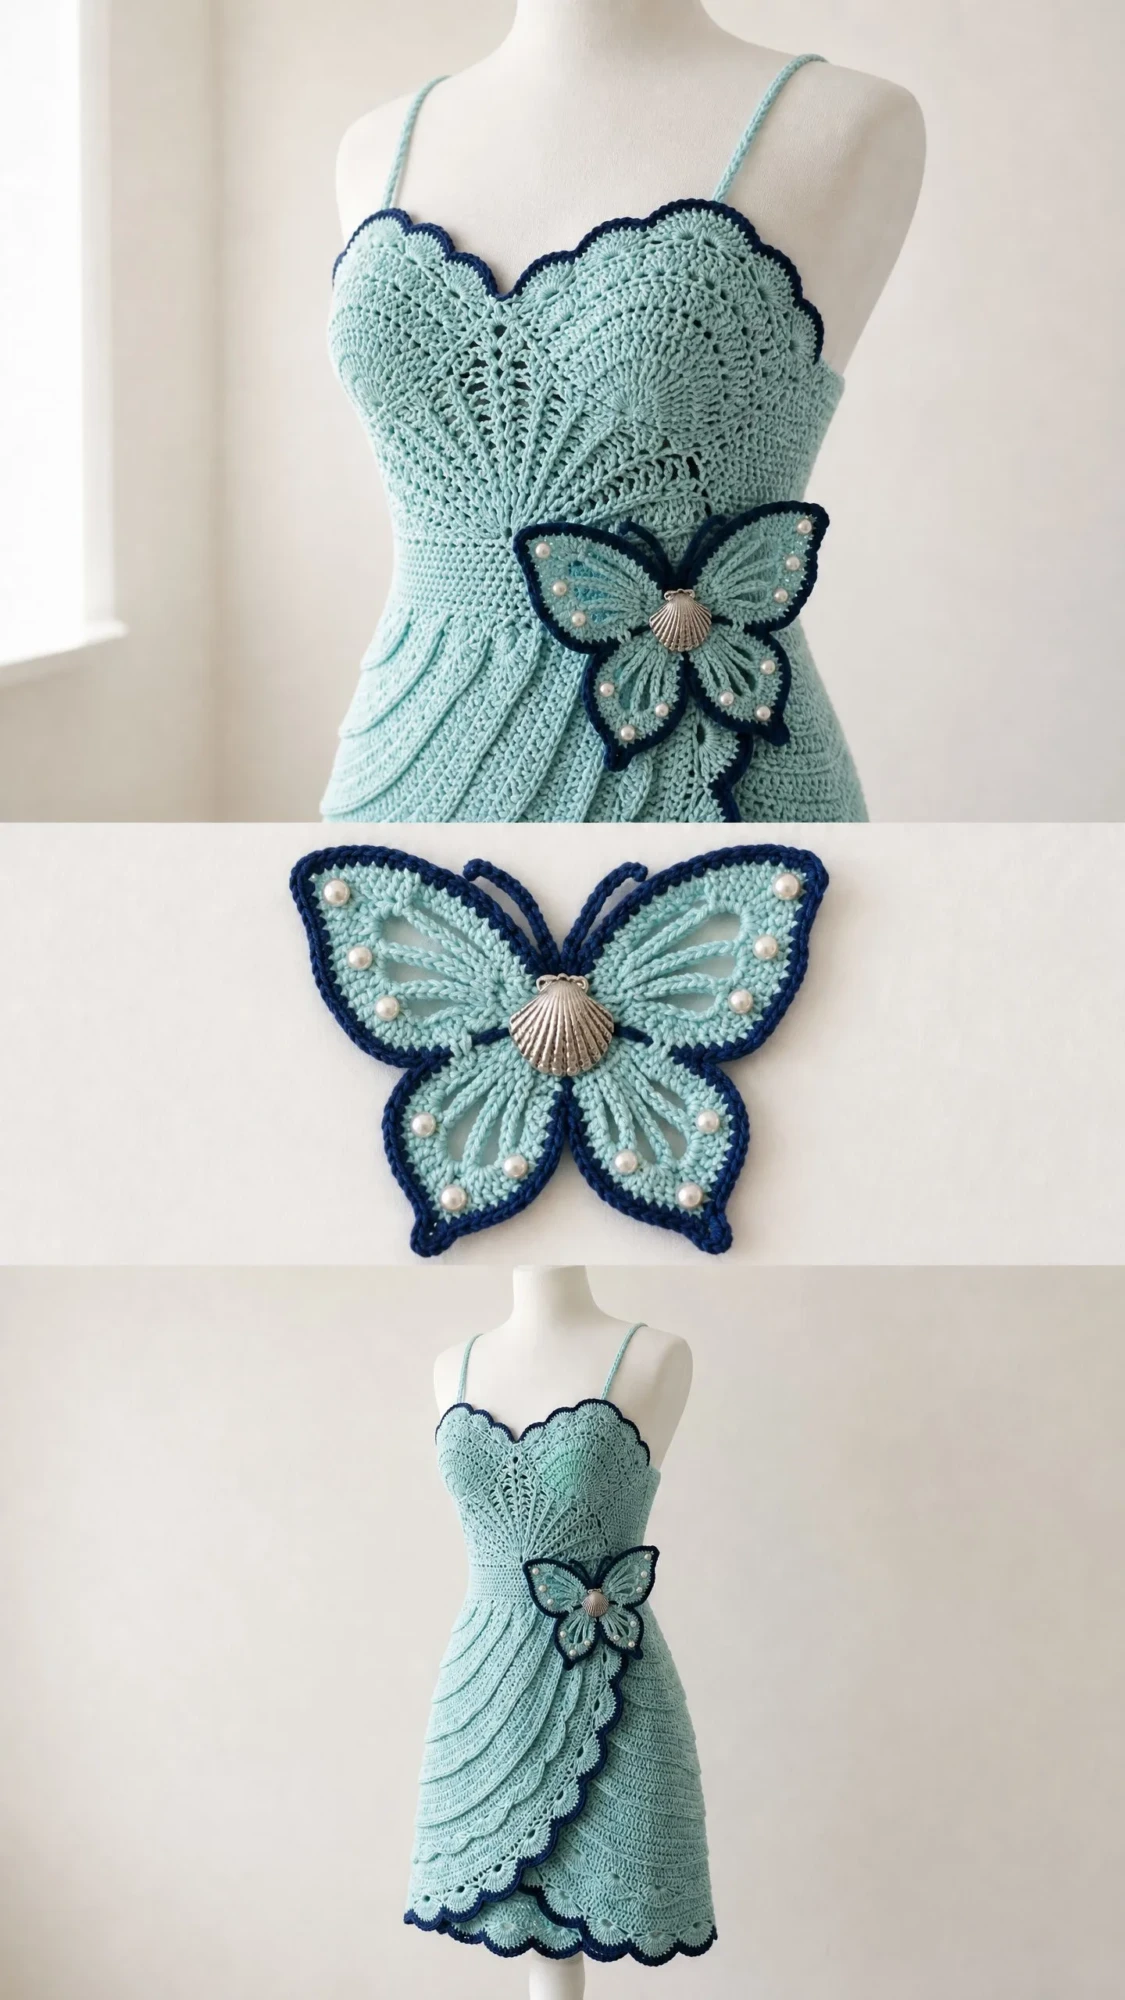
This fitted mini dress features a sweetheart neckline created through clever lace fan construction, delicate spaghetti straps, and a layered wave overlay skirt with navy scallop edging. The star of the show is the crochet butterfly applique complete with a shell button center and pearl bead embellishments.
The construction method involves working pieces separately and seaming them together. You’ll create a back bodice panel, a front bodice panel with lace sections, a skirt worked in the round, and a separate overlay layer that creates that beautiful cascading wave effect.
Skill level: Advanced. You should be comfortable working both in the round and in rows, following lace stitch patterns, executing precise shaping for a fitted bodice, and creating three dimensional applique work. If you’ve never worked with fine weight yarn or complex written instructions before, I’d suggest tackling a few intermediate projects first.
Time estimate: Plan for 60 to 80 hours of work. The butterfly applique and overlay skirt layers add significant time to this project, but the results are absolutely worth the investment.
Finished Measurements
This pattern is written for size Small/Medium (US 4-6) as the primary size, with Large/XL (US 8-12) adjustments noted throughout.
Size S/M:
For size L/XL: Add 8 stitches to the starting chain and adjust waist and hip increases proportionally as noted in the pattern.
Materials You’ll Need
Yarn:
Yarn suggestions that work beautifully:
1. Lion Brand 24/7 Cotton in Aqua (MC) and Navy (CCA). This mercerized cotton has excellent stitch definition and a subtle sheen that flatters lace stitches.
2. Paintbox Yarns Cotton DK (used at sport weight gauge) in Seafoam Blue and Midnight Blue. The smooth, consistent ply makes lace repeats look crisp.
3. Drops Safran Sport. A fine combed cotton with soft hand and good elasticity.
Substitution note: Any sport weight smooth cotton or cotton-acrylic blend will work. Avoid fuzzy fibers as they obscure the lace pattern. Avoid 100% acrylic for a dress worn against skin in warm weather. If substituting, purchase the stated yardage, not the stated number of skeins.
Hooks:
Notions:
Gauge (Critical for Fit!)
With MC and US E-4 / 3.5 mm hook:
Lace bodice gauge:
Gauge is absolutely critical for a fitted garment like this dress. Please swatch generously, at least 5 in / 13 cm square. Wash and block your swatch before measuring. Going up one hook size adds ease while going down one hook size reduces ease.
Abbreviations and Stitch Definitions
Let me walk you through every abbreviation you’ll encounter. I’ll give you the full name and a plain English explanation.
Special Stitches for This Crochet Pattern
Fan Stitch (used in bodice lace panel):
Work 5 double crochet (dc) all in the same stitch or chain space. This creates a fan or shell shape that sits on top of a foundation of chains and single crochets below it.
Scallop Edging (used at hem and overlay edges):
Into the same stitch, work (sc, hdc, 3 dc, hdc, sc). This creates one scallop unit. Skip 2 stitches between each scallop.
Wave Stitch (used for skirt body and back):
Each wave repeat is 11 stitches wide. The wave stitch does not change the total stitch count because the dc2tog at the valley balances the increase at the crest.
Picot (used in butterfly applique detail):
Ch 3, sl st in first ch of the ch-3. This creates a small decorative loop.
Crab Stitch, also called Reverse Single Crochet (used in butterfly outline):
Do not turn work at end of row. Working backward (right to left for right-handed crocheters), insert hook into the stitch to the RIGHT of current position, yarn over, pull up a loop, yarn over, pull through both loops. Repeat along edge. This creates a firm, corded edge.
Pattern Notes Before You Begin
1. Construction order: Back bodice panel, front bodice panel (with lace fan sections), side seaming of bodice, skirt worked in rows attached to bodice waist, overlay skirt wave layer worked separately and attached, spaghetti straps worked last, butterfly applique made separately and attached.
2. The bodice is worked flat in rows, then seamed at the sides. The skirt is worked in rows from the waist down.
3. The sweetheart neckline is created by working each cup of the bodice separately, then joining them.
4. Stitch counts appear in parentheses at the end of each row, like (84 sc). L/XL adjustments appear in brackets, like [96 sc].
5. Block all pieces before seaming. Lace opens beautifully with wet blocking.
6. Read each section fully before beginning that section. Trust me on this one.
Step by Step Instructions
Back Bodice Panel
Foundation chain: With MC and E-4 hook, ch 79. [Ch 87 for L/XL.]
Row 1 (WS): Sc in 2nd ch from hook and in each ch across. Turn. (78 sc) [86 sc]
Row 2 (RS): Ch 1, sc in each st across. Turn. (78 sc) [86 sc]
Row 3: Ch 1, sc in each st across. Turn. (78 sc) [86 sc]
Rows 4-6: Repeat Row 2. (78 sc) [86 sc]
Begin waist shaping with decrease rows:
Row 7: Ch 1, sc2tog, sc in each st across to last 2 sts, sc2tog. Turn. (76 sc) [84 sc]
Row 8: Ch 1, sc in each st across. Turn. (76 sc) [84 sc]
Row 9: Ch 1, sc2tog, sc in each st across to last 2 sts, sc2tog. Turn. (74 sc) [82 sc]
Row 10: Ch 1, sc in each st across. Turn. (74 sc) [82 sc]
Row 11: Ch 1, sc2tog, sc in each st across to last 2 sts, sc2tog. Turn. (72 sc) [80 sc]
Row 12: Ch 1, sc in each st across. Turn. (72 sc) [80 sc]
Row 13: Ch 1, sc2tog, sc in each st across to last 2 sts, sc2tog. Turn. (70 sc) [78 sc]
Row 14: Ch 1, sc in each st across. Turn. (70 sc) [78 sc]
Begin waist increase rows:
Row 15: Ch 1, 2 sc in first st, sc in each st across to last st, 2 sc in last st. Turn. (72 sc) [80 sc]
Row 16: Ch 1, sc in each st across. Turn. (72 sc) [80 sc]
Row 17: Ch 1, 2 sc in first st, sc in each st across to last st, 2 sc in last st. Turn. (74 sc) [82 sc]
Row 18: Ch 1, sc in each st across. Turn. (74 sc) [82 sc]
Row 19: Ch 1, 2 sc in first st, sc in each st across to last st, 2 sc in last st. Turn. (76 sc) [84 sc]
Row 20: Ch 1, sc in each st across. Turn. (76 sc) [84 sc]
Checkpoint: After Row 20, the back bodice panel should measure approximately 4 in / 10 cm tall and 17 in / 43 cm wide. The waist curve should be visible.
Continue hip flare:
Row 21: Ch 1, 2 sc in first st, sc to last st, 2 sc in last st. Turn. (78 sc) [86 sc]
Row 22: Ch 1, sc in each st across. Turn. (78 sc) [86 sc]
Row 23: Ch 1, 2 sc in first st, sc to last st, 2 sc in last st. Turn. (80 sc) [88 sc]
Row 24: Ch 1, sc in each st across. Turn. (80 sc) [88 sc]
The back bodice is complete. Place on a separate holder or fasten off. Mark the top (foundation chain) edge as the armhole/shoulder edge and the last row as the waist. Set aside.
Front Bodice Panel: Left Cup
The front bodice is worked in two halves (left cup and right cup) which are then joined. The fan lace pattern creates the sweetheart shape.
With MC and E-4 hook, ch 41. [Ch 45 for L/XL.]
Row 1 (WS): Sc in 2nd ch from hook and in each ch across. Turn. (40 sc) [44 sc]
Row 2 (RS, begin lace setup): Ch 1, sc in first 4 sts, [ch 2, sk 2 sts, sc in next st] 10 times [11 times for L/XL], sc in last 3 sts. Turn. (14 sc, 10 ch-2 sp) [15 sc, 11 ch-2 sp]
Row 3 (WS): Ch 3 (counts as dc), dc in first ch-2 sp, [ch 1, 5 dc in next ch-2 sp] 9 times [10 times], ch 1, 2 dc in last ch-2 sp, dc in last sc. Turn. (47 dc, 10 ch-1 sp) [52 dc, 11 ch-1 sp]
Row 4 (RS): Ch 1, sc in first dc, [sc in ch-1 sp, ch 2, sc in center of 5-dc fan] 10 times [11 times], sc in last ch-1 sp, sc in top of t-ch. Turn. (22 sc, 10 ch-2 sp) [24 sc, 11 ch-2 sp]
Row 5 (WS): Ch 3, [5 dc in next ch-2 sp, ch 1] 10 times [11 times], dc in last sc. Turn. (52 dc, 10 ch-1 sp) [57 dc, 11 ch-1 sp]
Row 6 (RS): Ch 1, sc in first dc, [ch 2, sc in center dc of fan, sc in ch-1 sp] 10 times [11 times], ch 2, sc in top of t-ch. Turn. (22 sc, 11 ch-2 sp) [24 sc, 12 ch-2 sp]
Rows 7-14: Repeat Rows 3-6 twice more. This builds the lace body of the cup.
After Row 14, begin cup shaping while maintaining the lace pattern:
Row 15 (decrease for cup curve): Work lace row as established, but work sc2tog at beg and end of row, omitting the first and last ch-2 sp. (20 sc, 9 ch-2 sp) [22 sc, 10 ch-2 sp]
Row 16: Work fan row over 9 [10] ch-2 sps. (47 dc, 9 ch-1 sp) [52 dc, 10 ch-1 sp]
Row 17: Work lace row. (20 sc, 9 ch-2 sp) [22 sc, 10 ch-2 sp]
Row 18 (decrease): Work sc2tog at beg and end. (18 sc, 8 ch-2 sp) [20 sc, 9 ch-2 sp]
Row 19: Work fan row over 8 [9] ch-2 sps. (42 dc, 8 ch-1 sp) [47 dc, 9 ch-1 sp]
Row 20 (sweetheart peak): Work sc to center, then turn leaving remaining sts unworked. (9 sc) [10 sc]
Fasten off, leaving a long tail for seaming. Mark the center top edge with a stitch marker. This is the deepest point of the sweetheart V.
Front Bodice Panel: Right Cup
Work same as Left Cup through Row 19. Then:
Row 20: Skip center sts, rejoin MC in last 9 [10] sts of row, ch 1, sc across. (9 sc) [10 sc]
Fasten off with long tail.
Join the two cups: With WS together of the two cup peak points, sl st the center edges together using the long tails, creating the sweetheart center dip. Two or three sl sts are sufficient. Knot securely and weave in ends.
Front Bodice Panel: Waist Shaping
With RS facing, join MC at bottom right corner of joined cups. Work across the full bottom edge, picking up 1 sc per row end and 1 sc per foundation chain st, to achieve 78 sc [86 sc] across the full width.
Row 1: Ch 1, sc in each st across. Turn. (78 sc) [86 sc]
Rows 2-4: Ch 1, sc in each st across. Turn. (78 sc) [86 sc]
Row 5 (waist decrease): Ch 1, sc2tog, sc to last 2 sts, sc2tog. Turn. (76 sc) [84 sc]
Row 6: Ch 1, sc in each st. Turn. (76 sc) [84 sc]
Row 7: Ch 1, sc2tog, sc to last 2 sts, sc2tog. Turn. (74 sc) [82 sc]
Row 8: Ch 1, sc in each st. Turn. (74 sc) [82 sc]
Row 9 (waist increase): Ch 1, 2 sc in first st, sc to last st, 2 sc in last st. Turn. (76 sc) [84 sc]
Row 10: Ch 1, sc in each st. Turn. (76 sc) [84 sc]
Row 11: Ch 1, 2 sc in first st, sc to last st, 2 sc in last st. Turn. (78 sc) [82 sc]
Row 12: Ch 1, sc in each st. Turn. (78 sc) [82 sc]
Fasten off.
Checkpoint: Front bodice panel, measured from cup peak to waist edge, should be approximately 7 in / 18 cm.
Joining Bodice Panels
Hold front and back bodice panels with RS together. Seam side edges together using sl st seam or mattress stitch on WS, joining from waist up to the top edge (armhole level). Leave 3 in / 7.5 cm unseamed at the top of each side for armhole opening.
Work one round of sc around each armhole opening to stabilize: join MC at underarm seam, work sc evenly around, sl st to join. (approximately 36 sc per armhole) [40 sc per armhole]
Fasten off and weave in ends.
Skirt
The skirt is worked in the round from the waist down. The dress waist at this stage measures 156 sts total around [172 sts total].
Join MC at the right side seam of waist. Ch 1.
Round 1: Sc in each st around. Sl st to first sc to join. (156 sc) [172 sc]
Round 2: Keep 156 sts and use a 12-st wave repeat. 156 divided by 12 = 13 repeats.
Corrected Wave Stitch Repeat for Skirt (12-st repeat):
[dc in next 5 sts, 2 dc in next st, dc in next 4 sts, dc2tog] = 12 sts in, 12 sts out. Repeat 13 times across/around. Total sts remain 156 per round.
Round 3 (Wave Round A): Ch 3 (counts as dc), [dc in next 4 sts, 2 dc in next st, dc in next 4 sts, dc2tog] 13 times, sl st to top of t-ch. (156 dc) [172 dc for L/XL]
Note for L/XL: 172 sts divided by 12 = 14.33 (does not divide evenly). For L/XL, work 1 additional dec at the end of the round to bring to 168 sts, which divides by 12 into 14 repeats.
Round 4 (between waves): Ch 1, sc in each st around, sl st to join. (156 sc) [168 sc for L/XL after adjustment]
Rounds 5-6: Repeat Rounds 3-4. (156 sc) [168 sc]
Rounds 7-8: Repeat Rounds 3-4. (156 sc) [168 sc]
Round 9: Ch 1, work sc inc round: [sc in next 12 sts, 2 sc in next st] 12 times. (168 sc) [180 sc]
Round 10: Ch 1, sc in each st around, sl st to join. (168 sc) [180 sc]
Rounds 11-12 (Wave Rounds): Ch 3, [dc in next 4 sts, 2 dc in next st, dc in next 5 sts, dc2tog] 12 times [work 15 times for 180 sts], sl st to t-ch. (168 dc) [180 dc]
Round 13: Ch 1, sc in each st around, sl st to join. (168 sc) [180 sc]
Rounds 14-18: Repeat Rounds 11-13 for 2 more wave sequences. (168 sc) [180 sc]
Round 19 (hip flare increase): Ch 1, [sc in next 13 sts, 2 sc in next st] 12 times. (180 sc) [192 sc]
Round 20: Ch 1, sc in each st around, sl st to join. (180 sc) [192 sc]
Rounds 21-22 (Wave Rounds with 180 sts): 180 divided by 12 = 15 repeats. Work ch 3, [dc in next 4 sts, 2 dc in next st, dc in next 5 sts, dc2tog] 15 times [16 times for 192], sl st to t-ch. (180 dc) [192 dc]
Round 23: Ch 1, sc in each st around, sl st to join. (180 sc) [192 sc]
Rounds 24-30: Repeat Rounds 21-23 twice more. (180 sc) [192 sc]
Round 31 (final hem inc): Ch 1, [sc in next 14 sts, 2 sc in next st] 12 times. (192 sc) [204 sc]
Round 32: Ch 1, sc in each st around, sl st to join. (192 sc) [204 sc]
Rounds 33-36 (Wave Rounds): 192 divided by 12 = 16 repeats. Work ch 3, [dc in next 4 sts, 2 dc in next st, dc in next 5 sts, dc2tog] 16 times [17 times for 204], sl st to t-ch. (192 dc) [204 dc]
Round 37: Ch 1, sc in each st around, sl st to join. (192 sc) [204 sc]
Hem Scallop Edging in CCA (Navy):
Drop MC. Join CCA.
Round 38: With CCA, ch 1, sc in each st around, sl st to join. (192 sc) [204 sc]
Round 39 (scallop): Ch 1, [sk 2 sts, (sc, hdc, 3 dc, hdc, sc) in next st, sk 2 sts, sl st in next st] 32 times [34 times]. Sl st to first sc to join.
Each scallop unit uses 6 sts. 192 divided by 6 = 32 scallops. 204 divided by 6 = 34 scallops.
Fasten off CCA. Weave in ends.
Checkpoint: Total dress length from shoulder should be approximately 30 to 34 in / 76 to 86 cm.
Overlay Skirt Wave Layer
The overlay is a separate rectangular panel worked flat, then gathered and attached to the left side of the front skirt, cascading to the right.
Foundation: With MC and E-4 hook, ch 157. [Ch 169 for L/XL.]
Row 1 (WS): Sc in 2nd ch from hook and in each ch across. Turn. (156 sc) [168 sc]
Row 2 (RS, Wave Row A): Ch 3, [dc in next 4 sts, 2 dc in next st, dc in next 4 sts, dc2tog] 13 times [14 times], dc in last st. Turn. (156 dc) [168 dc]
Row 3 (Wave Row B): Ch 1, sc in each st across. Turn. (156 sc) [168 sc]
Rows 4-5: Repeat Rows 2-3. (156 sc) [168 sc]
Row 6: Repeat Row 2. (156 dc) [168 dc]
Row 7: Ch 1, sc in each st across. (156 sc) [168 sc]
Rows 8-15: Repeat Rows 2-3 four more times. (156 sc) [168 sc]
Row 16 (fan lace transition row): Ch 3, [dc in next 4 sts, 2 dc in next st, dc in next 4 sts, dc2tog] 13 times, dc in last st. Turn. (156 dc) [168 dc]
Row 17: Ch 1, sc in each st across. Turn. (156 sc) [168 sc]
Rows 18-19: Repeat Rows 16-17. (156 sc) [168 sc]
Row 20 (final wave before fan hem edge): Ch 3, [dc in next 4 sts, 2 dc in next st, dc in next 4 sts, dc2tog] 13 times, dc in last st. Turn. (156 dc) [168 dc]
Row 21: Ch 1, sc in each st across. Turn. (156 sc) [168 sc]
Navy scallop edging on overlay hem:
Join CCA along the bottom foundation chain edge.
Row 1 of edging: With CCA, ch 1, sc in each ch across. (156 sc) [168 sc]
Row 2 (scallop): Ch 1, [sk 2 sts, (sc, hdc, 3 dc, hdc, sc) in next st, sk 2 sts, sl st in next st] 26 times [28 times]. (26 scallops) [28 scallops]
Fasten off CCA.
Attaching the overlay: The long top edge of the overlay is the gathering edge. With a tapestry needle and doubled MC yarn, work a running stitch along the top of the overlay, then pull to gather. Gather the overlay to match the front skirt width (approximately 17.3 in / 44 cm), distributing gathers evenly.
Pin the gathered overlay to the front skirt, aligning the top edge with the waist, the left edge to the left side seam, and the right edge cascading to the right center front. The overlay covers roughly three-quarters of the front skirt. Whipstitch the gathered overlay top edge to the waist of the skirt using MC. Secure the right (cascade) edge with 2 to 3 anchor stitches at mid-skirt level.
Checkpoint: The overlay should give the appearance of diagonal layered waves cascading from the left side seam across the front to the right. The navy scallop hem should fall approximately 1 in / 2.5 cm above the dress’s main hem edge.
Spaghetti Straps (make 2)
With MC and E-4 hook, ch 55. [Ch 60 for L/XL. Adjust length to body measurements.]
Row 1: Sc in 2nd ch from hook and in each ch across. Turn. (54 sc) [59 sc]
Row 2: Ch 1, sc in BLO of each st across. Turn. (54 sc) [59 sc]
Rows 3-4: Repeat Row 2. Fasten off leaving long tail. (54 sc) [59 sc]
Fold strap in half lengthwise (WS together) and sl st or whipstitch the long edge closed using the long tail, creating a narrow tube. The strap should measure approximately 0.25 in / 6 mm wide and 12 in / 30 cm long. Adjust chain count to achieve your desired strap length: every 4 chains = approximately 1 in / 2.5 cm.
Attach straps: Sew the front ends of both straps to the inside of the front bodice top edge at the two outermost fan peaks (approximately 2 in / 5 cm in from each side edge). Sew the back ends to the inside top edge of the back bodice, approximately 2 in / 5 cm in from each side edge. Try on and adjust strap length before finishing attachment.
Butterfly Applique
The butterfly is worked in pieces: two large upper wings, two smaller lower wings, and a body. Switch to D-3 / 3.25 mm hook for all applique pieces.
Upper Wing (make 2, one in MC, one in CCB):
Ch 4, sl st to form ring.
Round 1: Ch 1, 8 sc in ring, sl st to join. (8 sc)
Continue building the wing shape following the established wave and fan motifs from the dress. Work increases at the outer curves and picot
You Might Also Like
- Blush Pink Octopus Toilet Paper Cozy Free Crochet Pattern
- Sage Green Boho Backpack Free Crochet Pattern
- Berry Pink Granny Square Purse Free Crochet Pattern
- Midnight Black Crescent Bag with Silver Hardware Free Crochet Pattern
