Crochet amigurumi looks intimidating, right? All those tiny stitches, complicated shaping, and detailed finishing. But here’s the truth: this adorable octopus toilet paper cozy is genuinely one of the easiest amigurumi projects you’ll ever make. If you can single crochet and work in the round, you can absolutely make this. The dome shape comes from simple increases and decreases you probably already know. Those cute curly tentacles? Just chains with extra stitches worked into them. That’s it. Whether you’ve never touched chenille yarn before or you’ve been crocheting for decades, this pattern breaks everything down step by step. No mystery, no stress, just a ridiculously cute bathroom accessory that looks way more impressive than it actually is to make.
Why This Octopus Toilet Paper Cozy Pattern Works So Well
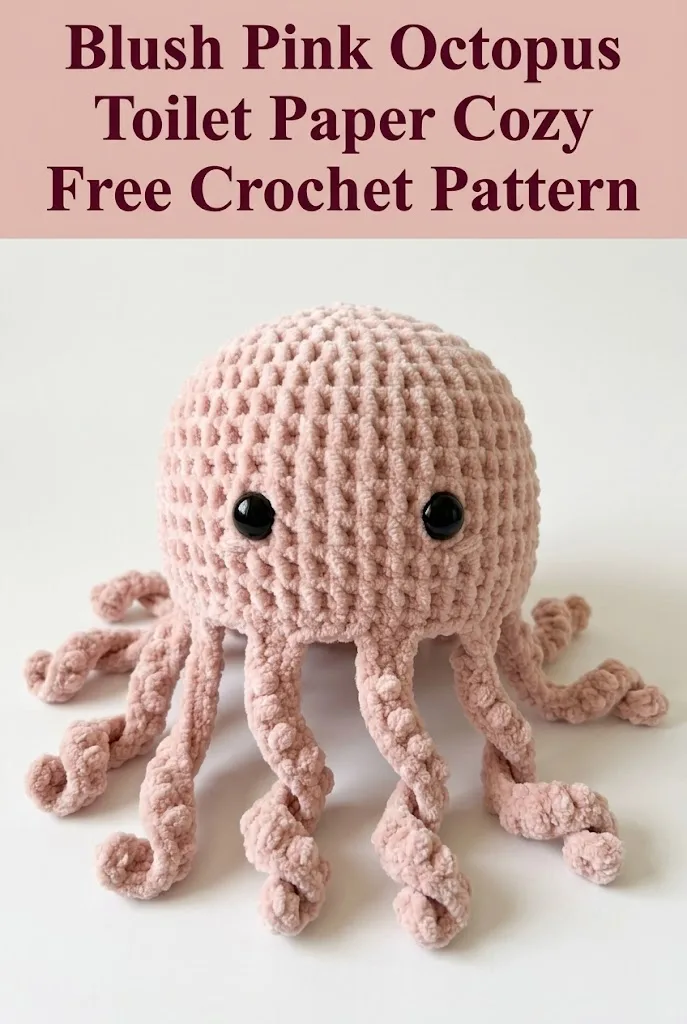
This project combines function with pure whimsy in the best possible way. The finished octopus sits perfectly over a standard toilet paper roll, hiding it while adding personality to your bathroom. The chunky chenille yarn creates that squishy, plush texture you see in the photo, and it works up incredibly fast because of the larger hook size.
I love that this design uses only single crochet (sc) throughout the entire body. No complicated stitch combinations, no counting multiple yarn overs. Just straightforward stitches worked in continuous rounds. The tentacles use a simple technique of working multiple stitches into each chain, which creates that natural spiral curl without any extra effort on your part.
The finished cozy measures approximately 7 inches tall for the body dome and 6 to 8 inches long for each tentacle. It fits snugly over a standard toilet paper roll and stays in place without any additional closures or buttons.
Materials You Will Need
Yarn:
Hook:
Notions:
Gauge:
Working in single crochet with this yarn and hook, approximately 8 stitches and 8 rows equals 4 inches. Gauge is not critical for this project, but your finished size may vary if your tension is very different.
Abbreviations and Stitch Definitions
Let me walk you through every stitch you’ll use in this pattern. Even if you know these already, a quick refresher never hurts.
ch = chain. Wrap yarn over hook, pull through loop on hook. This is your foundation stitch.
sc = single crochet. Insert hook into stitch, yarn over, pull up a loop (two loops on hook), yarn over, pull through both loops. You’ll use this for the entire body.
inc = increase. Work two single crochet stitches into the same stitch. This makes your circle grow larger.
dec = invisible decrease. Insert hook through the front loops only of the next two stitches, yarn over, pull through both front loops, yarn over, pull through both loops on hook. This creates a cleaner decrease than the traditional method.
sl st = slip stitch. Insert hook into stitch, yarn over, pull through stitch and loop on hook in one motion. Used for joining.
FO = fasten off. Cut yarn and pull tail through final loop to secure.
Skill Level
This pattern is beginner friendly with basic amigurumi experience. If you’ve made a simple ball or sphere before, you’re ready for this. If you haven’t, this is actually a great first amigurumi project because the shape is forgiving and chenille yarn hides small mistakes beautifully.
Pattern Notes Before You Begin
This octopus is worked in continuous rounds without joining. This means you’ll spiral upward rather than joining each round with a slip stitch. Place a stitch marker in the first stitch of each round and move it up as you work. This keeps you from losing your place.
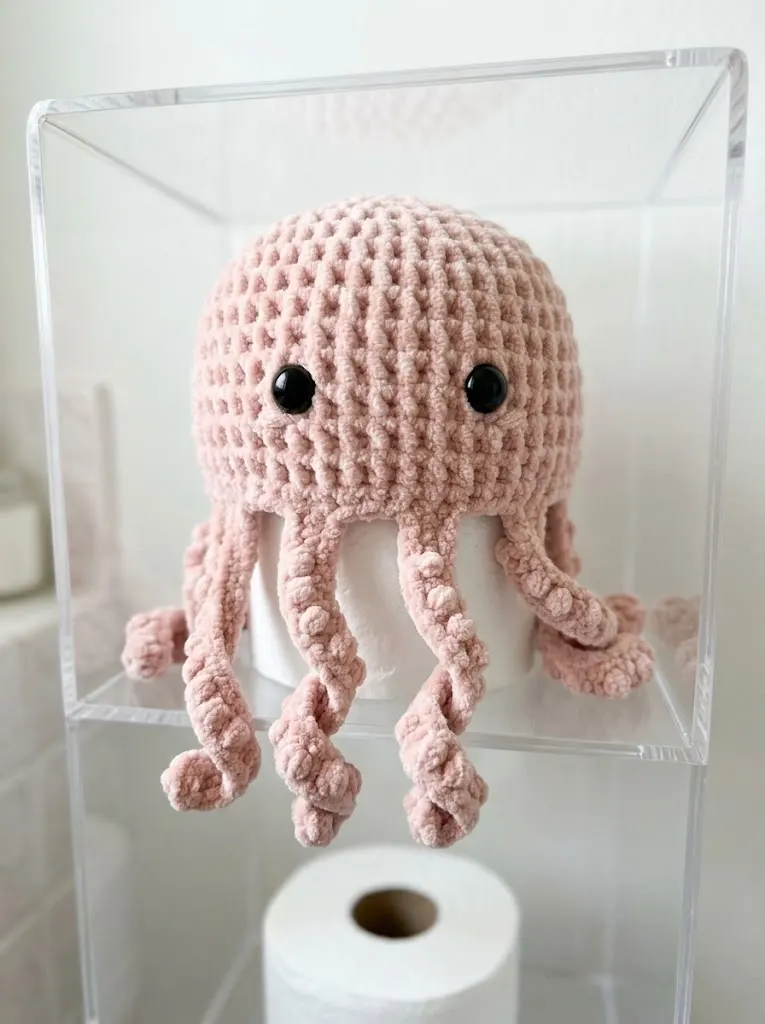
The body is worked from the top of the dome downward. You’ll start with a magic ring, increase to the widest point, work even for several rounds, then leave the bottom completely open to slip over the toilet paper roll.
The tentacles are worked separately and attached at the end. I recommend making all eight tentacles before attaching so you can space them evenly.
Chenille yarn can be tricky to see your stitches in at first. Work in good lighting and don’t be afraid to feel your way through the stitches with your fingers. It gets easier after the first few rounds.
Octopus Body Pattern
Round 1: Create a magic ring. Work 6 sc into the ring. Pull ring closed tightly. Place stitch marker in first stitch. (6 sts)
Round 2: Inc in each stitch around. (12 sts)
Round 3: *Sc 1, inc* repeat around. (18 sts)
Round 4: *Sc 2, inc* repeat around. (24 sts)
Round 5: *Sc 3, inc* repeat around. (30 sts)
Round 6: *Sc 4, inc* repeat around. (36 sts)
Round 7: *Sc 5, inc* repeat around. (42 sts)
Round 8: *Sc 6, inc* repeat around. (48 sts)
At this point, your circle should be approximately 6 inches across. This is the widest part of your dome.
Rounds 9 through 16: Sc in each stitch around. (48 sts) Work these 8 rounds even without any increases or decreases. This creates the straight sides of your dome.
Insert safety eyes between Rounds 12 and 13, spacing them approximately 8 to 10 stitches apart. Push the post through the yarn from the outside, then secure with the washer on the inside. Make sure they’re placed before you go much further, as it gets harder to reach inside the dome later.
Round 17: Sc in each stitch around. (48 sts)
Round 18: Sl st into the next stitch to join. FO, leaving a long tail for weaving.
Do not close the bottom. The opening should be large enough to fit over a standard toilet paper roll. If your opening seems too small, you may need to go up a hook size and remake the body. The roll should slip in and out easily.
Add a small amount of fiberfill to the very top of the dome to give it a nice rounded shape. You don’t need much, just enough to prevent the top from looking deflated. The toilet paper roll will provide structure for the rest of the body.
Curly Tentacle Pattern (Make 8)
Each tentacle is made separately using a simple technique that creates natural spirals. This is easier than it looks, I promise.
Chain 30.
Starting in the second chain from the hook, work 3 sc into each chain across to the end. (87 sts)
FO, leaving a tail for attaching.
That’s it. The extra stitches worked into each chain cause the tentacle to curl up on itself naturally. You don’t have to twist or shape anything. It just happens.
Repeat this process until you have all 8 tentacles completed.
Tip for beginners: Chenille yarn can split easily. Take your time pushing your hook through the center of each chain rather than catching just part of the strand.
Assembly and Finishing
Now comes the fun part: bringing your octopus to life.
Attaching the tentacles:
Turn your octopus body so you’re looking at the open bottom edge. You’ll attach all 8 tentacles evenly spaced around this edge.
Divide your 48 stitches into 8 equal sections of 6 stitches each. Mark these spots with stitch markers or scrap yarn if it helps you visualize the placement.
Thread the tail of one tentacle onto your yarn needle. Attach it to the inside edge of the body opening using a whip stitch or by sewing through several stitches to secure. Weave the end in well so it doesn’t come loose with handling.
Repeat for all 8 tentacles, spacing them evenly around the opening.
Weaving in ends:
Use your yarn needle to weave all remaining tails into the body of the work. With chenille yarn, you can usually hide ends by weaving through 4 or 5 stitches, then trimming close to the fabric. The fuzzy texture hides cut ends well.
Tips for Working With Chenille Yarn
This yarn creates the most beautiful finished texture, but it can be frustrating if you’re not used to it. Here are some things that help:
Work in bright natural light. The fuzzy strands can make it hard to see individual stitches, especially in darker colors.
Use a stitch marker religiously. Losing your place in continuous rounds is much easier with this yarn.
Don’t pull too tightly. Chenille has some stretch, and overly tight stitches can distort your fabric.
If you make a mistake, try not to rip back. This yarn doesn’t frog cleanly and can get fuzzy or pill when unraveled. If you must rip back, cut the yarn and start fresh rather than trying to reuse unraveled yarn.
Count your stitches at the end of every round, at least for the first few rounds. Once you have the rhythm, you can relax a bit.
Customization Ideas for Your Crochet Octopus Pattern
Color variations: This pattern works beautifully in any color. Try ocean blue, sunny yellow, or even variegated yarn for a playful look. Making a matching set in different colors would be adorable for a bathroom with multiple rolls visible.
Different yarn weights: You can make this pattern in worsted weight yarn with a 5.0mm hook for a smaller version, or try jumbo yarn for an even bigger, squishier octopus.
Face options: If this cozy is for a child’s bathroom, consider using embroidered eyes instead of safety eyes. Simply use black yarn to stitch French knots or satin stitch circles where the eyes would go.
Add a bow: A small crocheted bow or ribbon tied between two tentacles adds extra personality.
Care Instructions
Because this sits over toilet paper and isn’t washed regularly, spot cleaning is usually sufficient. If you need to wash it fully, remove it from the roll first. Hand wash in cool water with mild detergent, squeeze gently without wringing, and lay flat to dry. Chenille yarn can be delicate in the wash, so avoid machine washing if possible.
Thank you so much for choosing this pattern for your next project. I genuinely hope you love making this little octopus as much as I enjoyed designing it. There’s something wonderfully satisfying about a project that looks impressive but is secretly simple, and this one delivers on both counts.
If you make this cozy, I would absolutely love to see it. Tag me on Instagram or share a photo in my Facebook group. Seeing your finished projects is honestly the best part of sharing patterns.
If you loved this pattern, go ahead and pin it to your Pinterest boards so you can find it later. And please drop a comment below if you make one. I’d love to hear what color you chose or who you’re gifting it to. Happy crocheting!
