
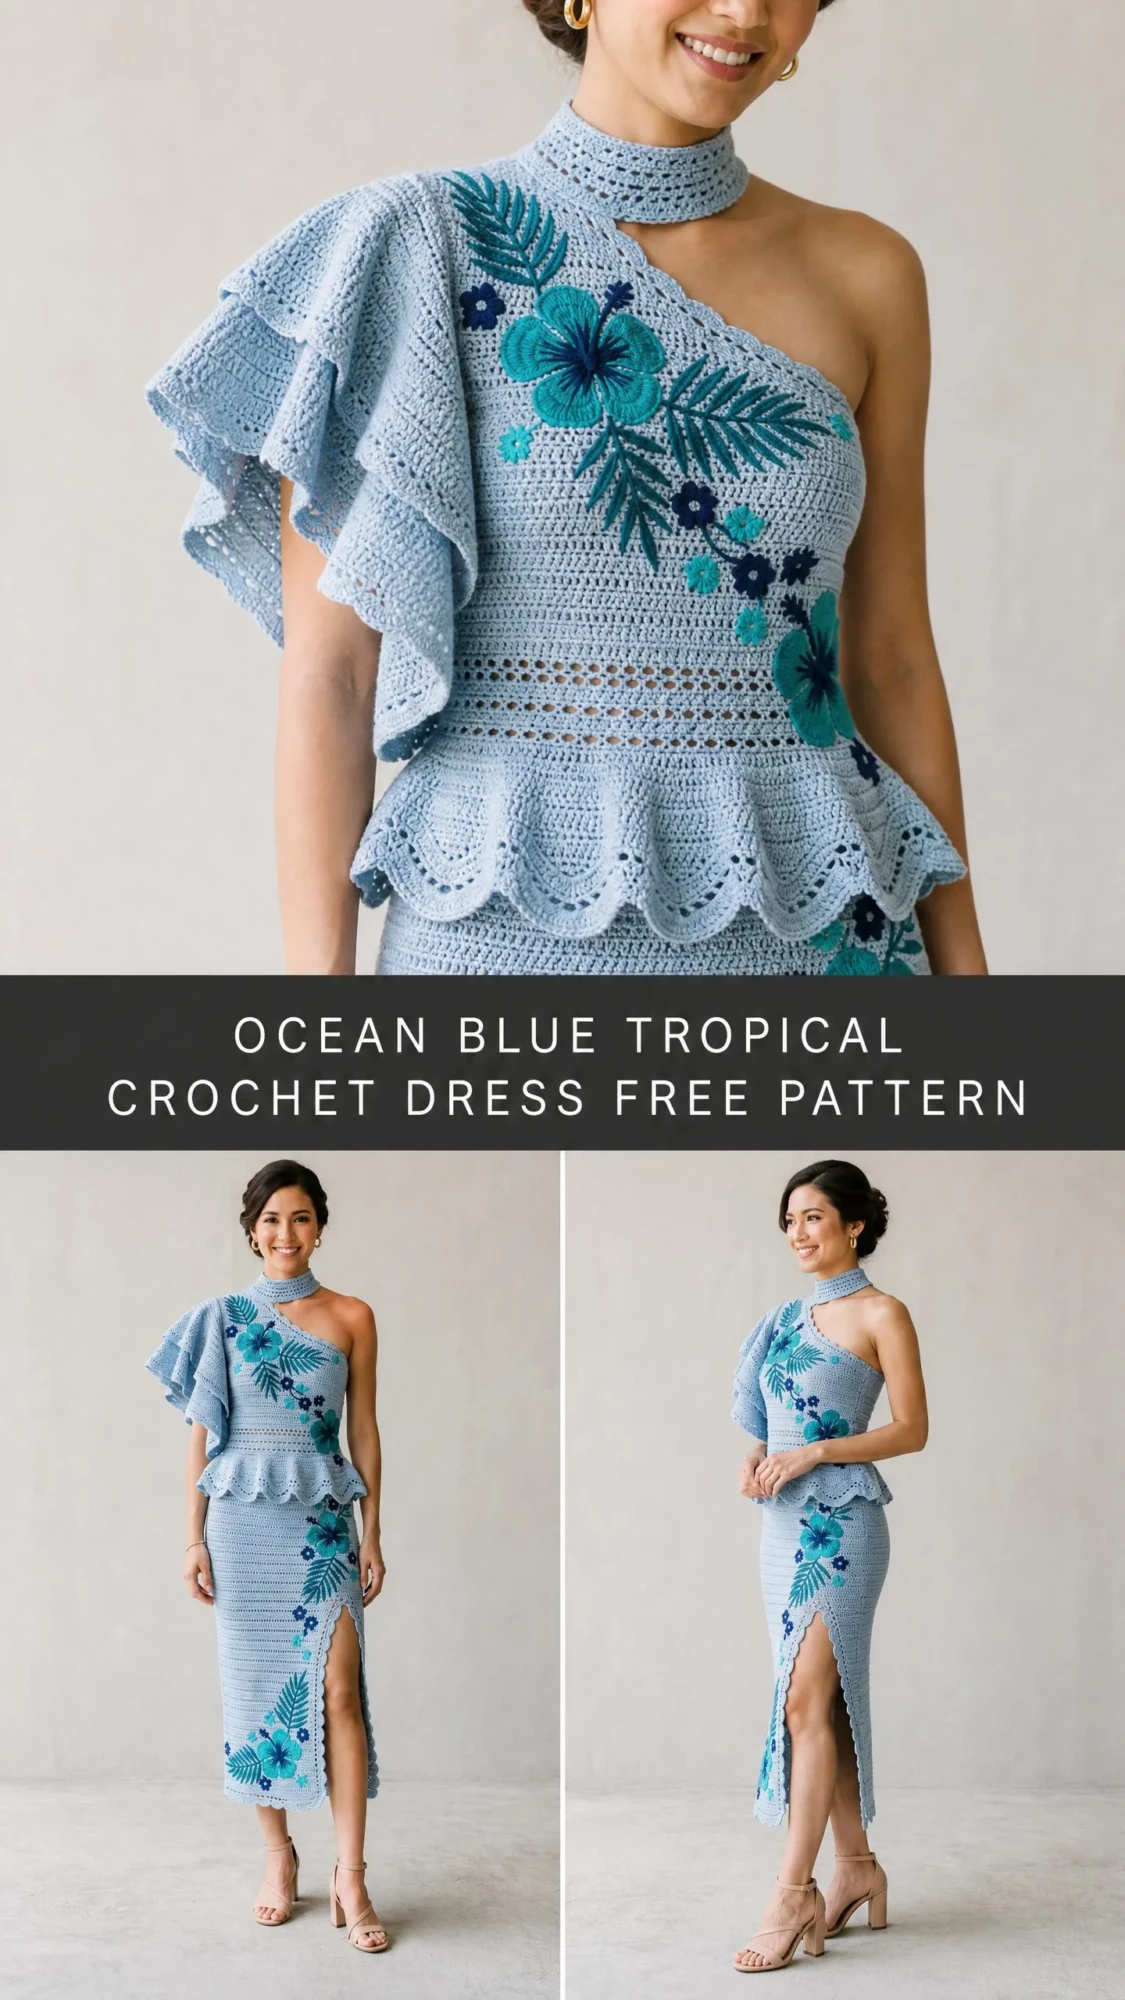
This is a fitted one-shoulder midi dress with a peplum bodice, ruffle sleeve, choker collar, and surface crochet tropical florals. It uses single crochet, double crochet, and treble crochet throughout. The construction is advanced but fully achievable if you work through each section methodically.
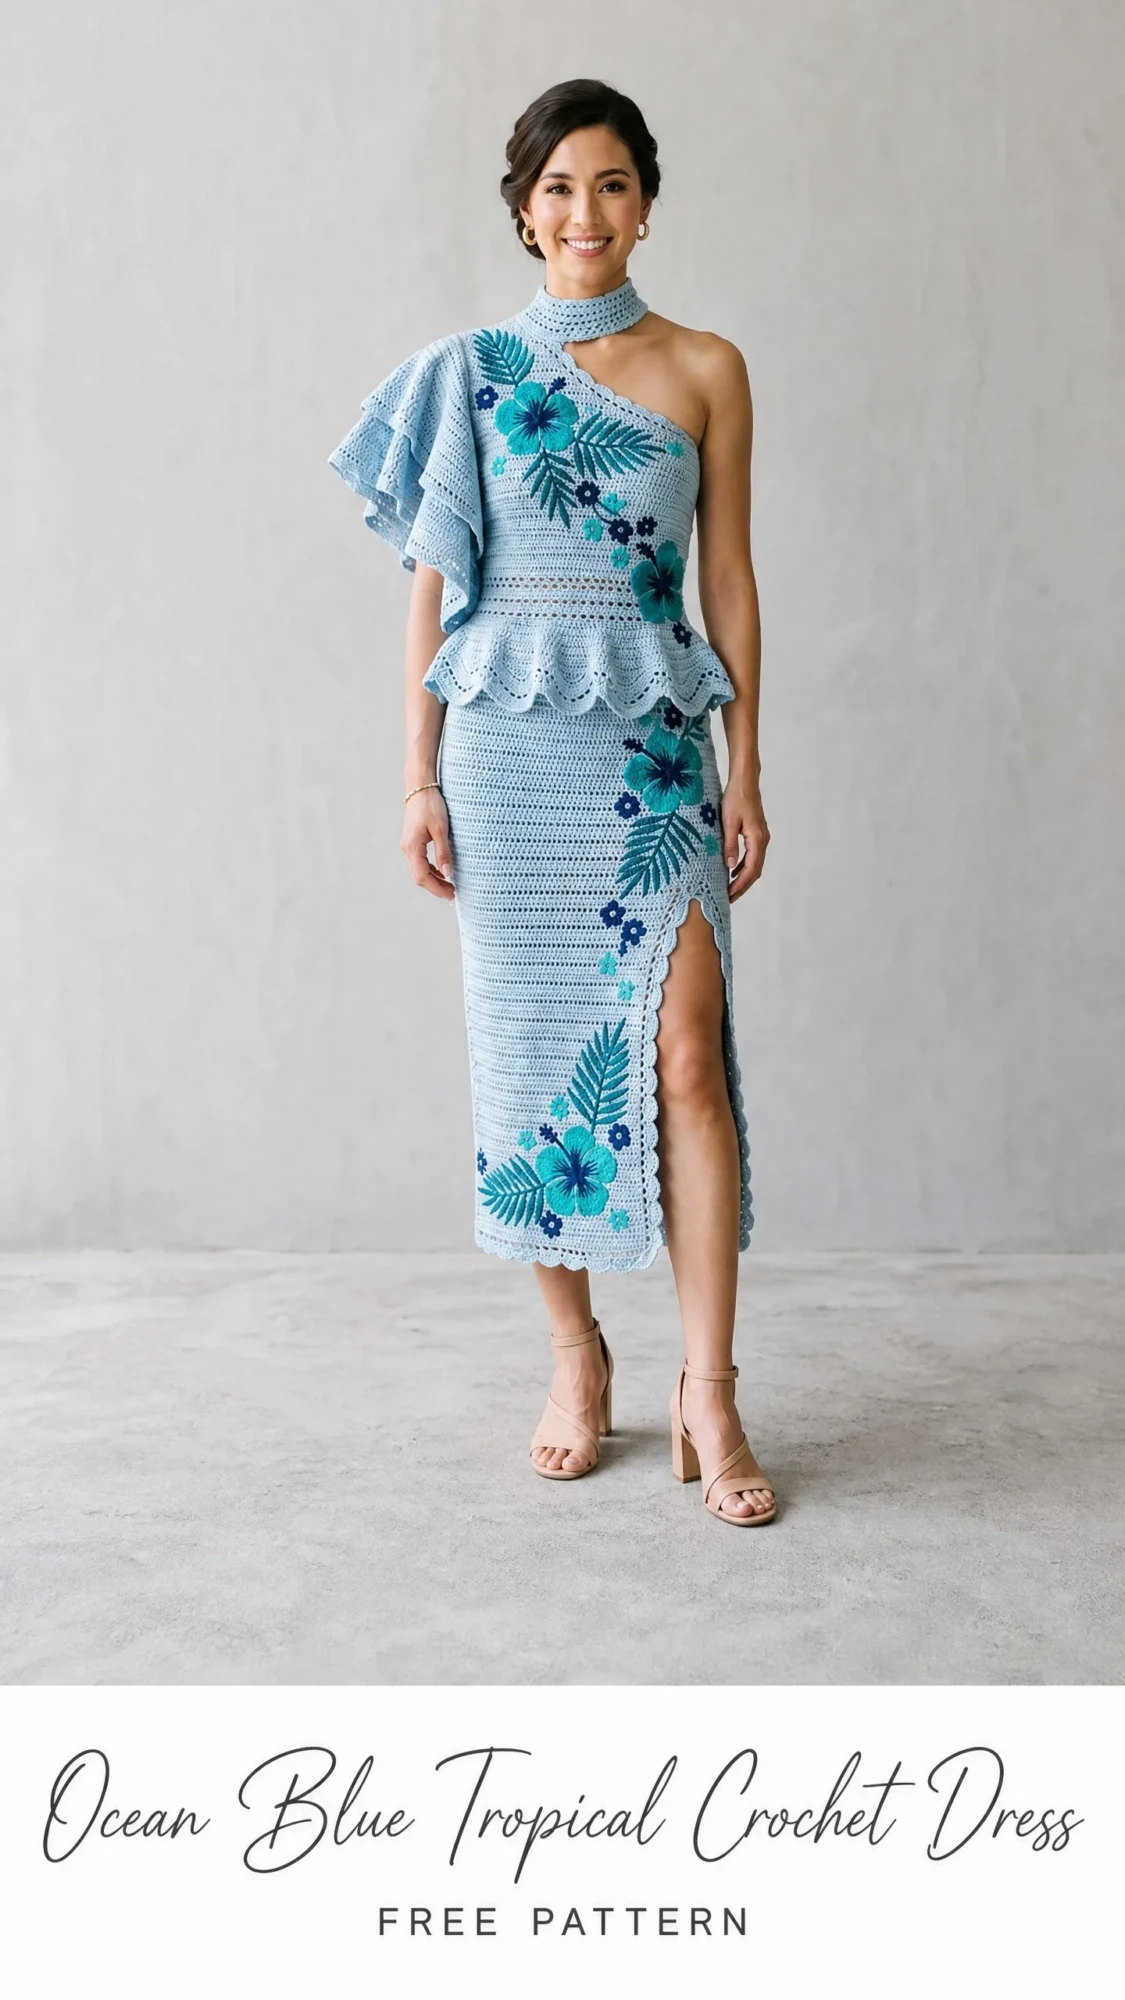
I designed this piece to capture that effortless resort elegance you see in vacation photos. The diagonal cascade of hibiscus flowers and fern fronds creates movement even when standing still. Everything from the scalloped hems to the layered ruffle sleeve comes together into something truly showstopping.
Let me walk you through every single step. You will need patience, attention to detail, and approximately 80 to 120 hours of dedicated work. But when you slip this dress on for the first time? Worth every stitch.
Why This Crochet Dress Pattern Stands Out
The Ocean Blue Tropical Crochet Dress combines multiple advanced techniques into one cohesive garment. You will work flat panels, joined rounds, shaping for a fitted silhouette, layered ruffles, and surface crochet embellishment. The result is a body-conscious midi dress with resort-ready style.
The asymmetric design features one covered shoulder with a strap and one open shoulder adorned with a dramatic layered ruffle. A choker-style collar adds sophistication at the neckline. The peplum creates that flattering waist definition, while the fitted skirt features a front slit with delicate picot edging.
The real magic happens with the tropical motifs. Hibiscus flowers in varying shades of teal and turquoise cascade diagonally across the body. Fern fronds worked in surface crochet add dimension and visual flow. This embellishment technique alone accounts for 15 to 20 hours of work, but the payoff is extraordinary.
Skill Level and Time Commitment
Skill Level: Advanced
This pattern requires comfort with working both in the round and flat. You will read stitch counts across multiple construction zones, shape a fitted bodice and skirt simultaneously, execute an asymmetric ruffle, and apply surface crochet motifs. If you are new to garment construction, complete at least two fitted garment projects before attempting this design.
Time Estimate: Approximately 80 to 120 hours depending on your working speed.
Finished Measurements
This pattern is written for size Small/Medium (US 4 to 8).
The dress uses negative ease at the waist, approximately 2 to 3 inches of negative ease, for a body-conscious silhouette.
Materials Needed
Yarn
Main Color (MC): Light sky blue / powder blue
Approximately 2,400 yards / 2,195 meters of DK weight (CYCA 3) smooth cotton or cotton-blend yarn
Color A (CA): Teal / medium turquoise
Approximately 180 yards / 165 meters
Color B (CB): Dark teal / deep blue-green
Approximately 120 yards / 110 meters
Color C (CC): Navy blue
Approximately 80 yards / 73 meters
Color D (CD): Light aqua
Approximately 60 yards / 55 meters
Yarn Suggestions
Option 1: Paintbox Yarns Simply DK (100% cotton, 137 yards per 50 g skein). Choose "Dolphin Blue" for MC, "Spearmint" for CA, "Seafoam" for CB, "Midnight Blue" for CC, and "Baby Blue" for CD.
Option 2: Lion Brand 24/7 Cotton in DK (100% mercerized cotton, 186 yards per 100 g ball). The mercerized finish gives a slight sheen appropriate for an occasion dress.
Option 3: Scheepjes Catona (100% mercerized cotton, 62 yards per 25 g ball). Use this for the surface crochet embellishment colors only.
Substitution note: Choose any smooth DK-weight cotton or cotton-blend with at least 50% cotton content. Avoid fuzzy or hairy fibers, which will obscure the surface motifs. Mercerized cotton is strongly preferred for drape and sheen.
Hooks
Notions
Gauge
Using MC and US E-4 (3.5 mm) hook:
Gauge is measured in single crochet worked flat after blocking.
Motif gauge: Each hibiscus motif measures approximately 2 inches / 5 cm across after blocking.
Take time to check gauge. A difference of even one stitch per 4 inches will alter the finished bust measurement by up to 2 inches across the full circumference.
Abbreviations (US Terms)
Special Stitches and Techniques
Scallop Edging
Skip 2 sts, work 5 dc in next st, skip 2 sts, sl st in next st. Repeat across. This creates the shell scallop border seen along the peplum hem and skirt hem.
Picot Trim
Work 1 sc, ch 3, sl st into first ch of ch-3. This creates a small decorative picot point used along the skirt slit edge.
Surface Slip Stitch (for motif outlines)
With RS facing, hold yarn behind fabric. Insert hook through fabric from front to back, draw up a loop, insert hook into next position, draw new loop through fabric and through loop on hook. This creates a raised line on the RS.
Hibiscus Motif
Center ring: Ch 5, join with sl st to form ring.
Rnd 1: Ch 1, work 10 sc into ring, join with sl st. (10 sc)
Rnd 2 (petals): [Ch 4, work 3 tr into same ch-4 sp base, ch 4, sl st in next sc] 5 times. (5 petals)
Rnd 3 (petal detail): Sl st into first ch-4 sp of any petal, ch 1, sc in same sp, hdc in tr, dc in tr, hdc in tr, sc in ch-4 sp. Repeat for each petal. Join. Fasten off.
Each motif measures approximately 2 inches / 5 cm across.
Fern Leaf (surface crochet)
Work a foundation chain of the desired length along the fabric using CB. Then work back along the chain: [ch 4, sl st into chain at base of ch-4, advance 2 sts along main chain, sl st, ch 4, sl st into main chain] repeated for the full length, alternating sides, to form a feathered fern frond.
Ruffle Stitch
Row 1 (base): Work sc across.
Row 2 (ruffle expansion): Work 2 dc in every sc across (doubling the stitch count).
Row 3 (ruffle expansion 2): Work 2 dc in every dc across (doubling again).
Row 4: Work sc across, decreasing evenly back to the attachment width.
This creates a full, layered ruffle.
Construction Notes
Read these carefully before you begin. Understanding the build order will save you from confusion later.
Construction Order:
1. Choker collar worked flat
2. Bodice front worked flat from collar down
3. Bodice back worked flat
4. Skirt worked as a separate tube (recommended method)
5. Skirt seamed to bodice
6. Peplum ruffle added to bodice lower edge, covering the seam
7. One-shoulder ruffle sleeve added at left armhole
8. Scallop hem edging applied
9. Surface crochet floral and leaf motifs applied
10. Hibiscus motifs sewn in place
11. Finishing and blocking
The bodice is asymmetric. The right shoulder is covered by a strap, and the left shoulder is open. The ruffle sleeve attaches at the left arm position only.
The skirt is worked in rounds with a right-front slit created by working flat for the last 6 inches / 15 cm.
Surface crochet motifs are placed diagonally from upper right bodice to lower left skirt hem.
Step-by-Step Instructions
Section 1: Choker Collar
Using MC and smaller hook (D-3 / 3.25 mm), ch 81.
Row 1: Sc in 2nd ch from hook and in each ch across. Turn. (80 sc)
Row 2: Ch 1, sc in each sc across. Turn. (80 sc)
Row 3: Ch 1, sc in each sc across. Turn. (80 sc)
Row 4: Ch 1, sc in BLO of each sc across. Turn. (80 sc)
Row 5: Ch 1, sc in each sc across. Turn. (80 sc)
Row 6: Ch 1, sc in each sc across. Do not turn. (80 sc)
Fold collar so that Row 1 and Row 6 meet. Sl st through matching stitches of Row 6 and the foundation chain to seam the collar into a band. Fasten off, leaving a long tail for attachment to bodice.
Checkpoint: Collar band measures approximately 14.5 inches / 37 cm around by 1 inch / 2.5 cm tall. It should fit snugly around the base of the neck with approximately 0.5 inch / 1.2 cm of ease.
Section 2: Bodice Front
The bodice front is worked flat in sc from the collar edge downward. The right shoulder has a strap worked separately, and the left shoulder is open.
Bodice Right Strap
Using MC and larger hook (E-4 / 3.5 mm), ch 10.
Row 1: Sc in 2nd ch from hook and in each ch across. Turn. (9 sc)
Rows 2 to 30: Ch 1, sc in each sc across. Turn. (9 sc)
This strap measures approximately 4.5 inches / 11.5 cm long. Set aside.
Bodice Front Main Panel
Using MC and E-4 hook, ch 95.
Row 1 (RS): Sc in 2nd ch from hook and in each ch across. Turn. (94 sc)
Row 2: Ch 1, sc in each sc across. Turn. (94 sc)
Row 3: Ch 1, sc in each sc across. Turn. (94 sc)
Begin waist shaping:
Rows 4 to 6: Ch 1, sc in each sc across. Turn. (94 sc)
Row 7 (decrease row): Ch 1, sc2tog, sc in each sc to last 2 sts, sc2tog. Turn. (92 sc)
Row 8: Ch 1, sc in each sc across. Turn. (92 sc)
Row 9: Ch 1, sc in each sc across. Turn. (92 sc)
Row 10 (decrease row): Ch 1, sc2tog, sc in each sc to last 2 sts, sc2tog. Turn. (90 sc)
Row 11: Ch 1, sc in each sc across. Turn. (90 sc)
Row 12: Ch 1, sc in each sc across. Turn. (90 sc)
Row 13 (decrease row): Ch 1, sc2tog, sc in each sc to last 2 sts, sc2tog. Turn. (88 sc)
Row 14: Ch 1, sc in each sc across. Turn. (88 sc)
Row 15: Ch 1, sc in each sc across. Turn. (88 sc)
Row 16 (decrease row): Ch 1, sc2tog, sc in each sc to last 2 sts, sc2tog. Turn. (86 sc)
Row 17: Ch 1, sc in each sc across. Turn. (86 sc)
Row 18: Ch 1, sc in each sc across. Turn. (86 sc)
Row 19 (decrease row): Ch 1, sc2tog, sc in each sc to last 2 sts, sc2tog. Turn. (84 sc)
Row 20: Ch 1, sc in each sc across. Turn. (84 sc)
Row 21: Ch 1, sc in each sc across. Turn. (84 sc)
Waist minimum reached. Begin hip increases.
Row 22 (increase row): Ch 1, 2 sc in first st, sc in each sc to last st, 2 sc in last st. Turn. (86 sc)
Row 23: Ch 1, sc in each sc across. Turn. (86 sc)
Row 24: Ch 1, sc in each sc across. Turn. (86 sc)
Row 25 (increase row): Ch 1, 2 sc in first st, sc in each sc to last st, 2 sc in last st. Turn. (88 sc)
Row 26: Ch 1, sc in each sc across. Turn. (88 sc)
Rows 27 to 40: Ch 1, sc in each sc across. Turn. (88 sc)
Checkpoint: After Row 40, the panel should measure approximately 6 inches / 15 cm tall and approximately 16 inches / 40.5 cm wide.
Seam the right strap to the upper right edge of the bodice front (top 9 stitches, right side). Seam the collar to the top edge, centering it across the neck opening. The left shoulder remains open.
Section 3: Bodice Back
Using MC and E-4 hook, ch 95.
Row 1 (RS): Sc in 2nd ch from hook and in each ch across. Turn. (94 sc)
Rows 2 to 3: Ch 1, sc in each sc across. Turn. (94 sc)
Row 4 (decrease): Ch 1, sc2tog, sc to last 2 sts, sc2tog. Turn. (92 sc)
Row 5: Ch 1, sc in each sc across. Turn. (92 sc)
Row 6: Ch 1, sc in each sc across. Turn. (92 sc)
Row 7 (decrease): Ch 1, sc2tog, sc to last 2 sts, sc2tog. Turn. (90 sc)
Row 8: Ch 1, sc in each sc across. Turn. (90 sc)
Row 9: Ch 1, sc in each sc across. Turn. (90 sc)
Row 10 (decrease): Ch 1, sc2tog, sc to last 2 sts, sc2tog. Turn. (88 sc)
Row 11: Ch 1, sc in each sc across. Turn. (88 sc)
Row 12: Ch 1, sc in each sc across. Turn. (88 sc)
Row 13 (decrease): Ch 1, sc2tog, sc to last 2 sts, sc2tog. Turn. (86 sc)
Row 14: Ch 1, sc in each sc across. Turn. (86 sc)
Row 15: Ch 1, sc in each sc across. Turn. (86 sc)
Row 16 (decrease): Ch 1, sc2tog, sc to last 2 sts, sc2tog. Turn. (84 sc)
Row 17: Ch 1, sc in each sc across. Turn. (84 sc)
Row 18: Ch 1, sc in each sc across. Turn. (84 sc)
Row 19 (decrease): Ch 1, sc2tog, sc to last 2 sts, sc2tog. Turn. (82 sc)
Row 20: Ch 1, sc in each sc across. Turn. (82 sc)
Row 21: Ch 1, sc in each sc across. Turn. (82 sc)
Begin hip increases on back.
Row 22 (increase): Ch 1, 2 sc in first st, sc to last st, 2 sc in last st. Turn. (84 sc)
Row 23: Ch 1, sc in each sc across. Turn. (84 sc)
Row 24: Ch 1, sc in each sc across. Turn. (84 sc)
Row 25 (increase): Ch 1, 2 sc in first st, sc to last st, 2 sc in last st. Turn. (86 sc)
Row 26: Ch 1, sc in each sc across. Turn. (86 sc)
Row 27: Ch 1, sc in each sc across. Turn. (86 sc)
Row 28 (increase): Ch 1, 2 sc in first st, sc to last st, 2 sc in last st. Turn. (88 sc)
Rows 29 to 40: Ch 1, sc in each sc across. Turn. (88 sc)
Join bodice front and back at side seams using a flat slip stitch seam or mattress stitch. When joined, the bodice forms a tube with openings at top (neck/shoulder) and bottom (waist/peplum).
Checkpoint: Joined bodice tube should measure approximately 32 inches / 81 cm around at the widest point. Total bodice height is approximately 6 inches / 15 cm.
Section 4: Skirt
The skirt is worked as a separate tube, then seamed to the bodice at the waist.
Using MC and E-4 hook, ch 176. Join with sl st, being careful not to twist.
Rnd 1: Ch 1, sc in each ch around. Join. (176 sc)
Rnds 2 to 10: Ch 1, sc in each sc around. Join. (176 sc)
Begin skirt waist taper.
Rnd 11 (decrease): Ch 1, [sc in next 21 sts, sc2tog] 8 times. Join. (168 sc)
Rnds 12 to 16: Ch 1, sc in each sc around. Join. (168 sc)
Rnd 17 (decrease): Ch 1, [sc in next 19 sts, sc2tog] 8 times. Join. (160 sc)
Rnds 18 to 22: Ch 1, sc in each sc around. Join. (160 sc)
Begin hip release.
Rnd 23 (increase): Ch 1, [sc in next 19 sts, 2 sc in next st] 8 times. Join. (168 sc)
Rnds 24 to 28: Ch 1, sc in each sc around. Join. (168 sc)
Rnd 29 (increase): Ch 1, [sc in next 20 sts, 2 sc in next st] 8 times. Join. (176 sc)
Rnds 30 to 34: Ch 1, sc in each sc around. Join. (176 sc)
Rnd 35 (increase): Ch 1, [sc in next 21 sts, 2 sc in next st] 8 times. Join. (184 sc)
Rnds 36 to 40: Ch 1, sc in each sc around. Join. (184 sc)
Rnd 41 (increase): Ch 1, [sc in next 22 sts, 2 sc in next st] 8 times. Join. (192 sc)
Rnds 42 to 50: Ch 1, sc in each sc around. Join. (192 sc)
Checkpoint: At Rnd 50, the skirt should measure approximately 7.5 inches / 19 cm from the cast-on edge.
Rnds 51 to 100: Ch 1, sc in each sc around. Join. (192 sc)
Rnds 101 to 130: Ch 1, sc in each sc around. Join. (192 sc)
Begin Slit Shaping
At Rnd 131, stop working in the round. Mark the front center st with a stitch marker.
Rnd 131 (last full round): Ch 1, sc in each sc around to 2 sts before the marked front-center st. Join. (192 sc)
Row 132 (flat, back panel): Ch 1, turn work. Sc across 96 sts (back half). Turn. (96 sc)
Rows 133 to 234: Ch 1, sc in each sc across. Turn. (96 sc)
Return to front panel. Join MC at the left edge of the front slit opening.
Row 132F (flat, front panel): Ch 1, sc across 96 sts of front half. Turn. (96 sc)
Rows 133F to 234F: Ch 1, sc in each sc across. Turn. (96 sc)
Checkpoint: Total skirt length should be approximately 36 inches / 91.5 cm from waist to hem.
Section 5: Peplum
The peplum is worked in joined rounds at the base of the bodice.
Setup round: With RS facing, join MC at the right side seam. Ch 1, sc evenly around the lower edge of the joined bodice. (176 sc) Join with sl st.
Rnd 1: Ch 1, sc in each st around. Join. (176 sc)
Rnd 2 (increase): Ch 1, [sc in next 2 sts, 2 sc in next st] around. (234 sc)
Rnd 3: Ch 1, sc in each st around. Join. (234 sc)
Rnd 4: Ch 1, sc in each st around. Join. (234 sc)
Rnd 5 (increase): Ch 1, [sc in next 3 sts, 2 sc in next st] around. (292 sc)
Rnd 6: Ch 1, sc in each st around. Join. (292 sc)
Rnd 7: Ch 1, sc in each st around. Join. (292 sc)
Rnd 8 (increase): Ch 1, [sc in next 4 sts, 2 sc in next st] around. (350 sc)
Rnd 9: Ch 1, sc in each st around. Join. (350 sc)
Rnd 10: Ch 1, sc in each st around. Join. (350 sc)
Scallop Rnd: Sl st in first st. [Skip 2 sts, 5 dc in next st, skip 2 sts, sl st in next st] repeat around. Fasten off.
Peplum measures approximately 4 inches / 10 cm deep.
Section 6: One-Shoulder Ruffle Sleeve
Ruffle Base Layer
Using MC and E-4 hook, ch 45.
Row 1: Sc in 2nd ch from hook and in each ch across. Turn. (44 sc)
Row 2 (expansion): Ch 2, 2 dc in each sc across. Turn. (88 dc)
Row 3 (expansion): Ch 2, 2 dc in each dc across. Turn. (176 dc)
Row 4 (shaping return): Ch 1, [sc in next 2 dc, sc2tog] across. Turn. (132 sc)
Row 5: Ch 1, sc in each sc across. Turn. (132 sc)
Fasten off, leaving long tail for attachment.
Ruffle Second Layer
Using MC and E-4 hook, ch 33.
Row 1: Sc in 2nd ch from hook and in each ch across. Turn. (32 sc)
Row 2 (expansion): Ch 2, 2 dc in each sc across. Turn. (64 dc)
Row 3 (expansion): Ch 2, 2 dc in each dc across. Turn. (128 dc)
Row 4 (return): Ch 1, [sc in next 2 dc, sc2tog] across. Turn. (96 sc)
Row 5: Ch 1, sc in each sc across. Turn. (96 sc)
Fasten off.
Layer the second ruffle on top of the first, aligning their foundation edges. Whipstitch both foundation edges together. Attach to the left shoulder opening, centering across the approximately 7 inches / 18 cm span.
Section 7: Hem Edging
Hem Scallop
Along the bottom edge of each panel, with RS facing, join MC.
Scallop row: [Sl st in next st, skip 2 sts, 5 dc in next st, skip 2 sts] repeat across. Fasten off.
Slit Edge Trim
Along each slit edge, with RS facing, join MC.
Work picot trim up the full slit length: [Sc in edge st, ch 3, sl st in first ch of ch-3] repeat evenly. Fasten off.
Section 8: Assembly
Seam the skirt to the bodice lower edge with a sl st seam worked on the WS. Position the peplum over this seam on the outside, concealing the join. Tack the peplum to the bodice/skirt seam at 1-inch intervals.
Seam the right shoulder strap to the bodice back upper edge. Sew collar to the neck opening edge using whipstitch.
Tack the ruffle sleeve foundation edge to both the bodice front and back at the left shoulder for stability.
Section 9: Surface Crochet Floral Trail
The embellishment cascades diagonally from the upper right bodice across the front, down the skirt to the lower left hem.
Work hibiscus motifs separately using CA, CB, CC, and CD, then sew in place. Work fern fronds directly onto the fabric using the surface slip stitch technique with CB.
Place the largest cluster near the right shoulder strap. Create a flowing diagonal trail with decreasing density toward the lower left hem. Add a secondary cluster near the slit opening.
Finishing and Blocking
Weave in all ends securely. Block the entire dress on blocking mats using T-pins, stretching gently to finished measurements. Allow to dry completely before wearing.
If desired, install the optional invisible zipper in the left side seam of the skirt for easier dressing.
Tips for Customizing Size
To adjust for larger sizes, add stitches to your foundation chains in multiples of 6 for the scallop edging to work correctly. Increase the number of decrease and increase rows proportionally. Remember that every 22 stitches equals approximately 4 inches at gauge.
For a looser fit, reduce the negative ease by adding 10 to 20 stitches to the bodice and skirt circumferences.
You Did It!
Thank you so much for choosing this crochet dress pattern for your next ambitious project. This is the kind of piece that stops people in their tracks, and you absolutely have the skills to bring it to life. I cannot wait to see your finished dress. Tag me on Instagram or share in my Facebook group so I can celebrate with you!
If you loved this pattern, go ahead and save it to your Pinterest boards so you can find it when you are ready to start. And please drop a comment below if you make this dress. I would love to hear about your color choices and see how your tropical florals turn out!
You Might Also Like
- Sunset Orange Daisy Zipper Bag Free Crochet Pattern
- Berry Pink Granny Square Purse Free Crochet Pattern
- Blush Pink Octopus Toilet Paper Cozy Free Crochet Pattern
- Midnight Black Crescent Bag with Silver Hardware Free Crochet Pattern
