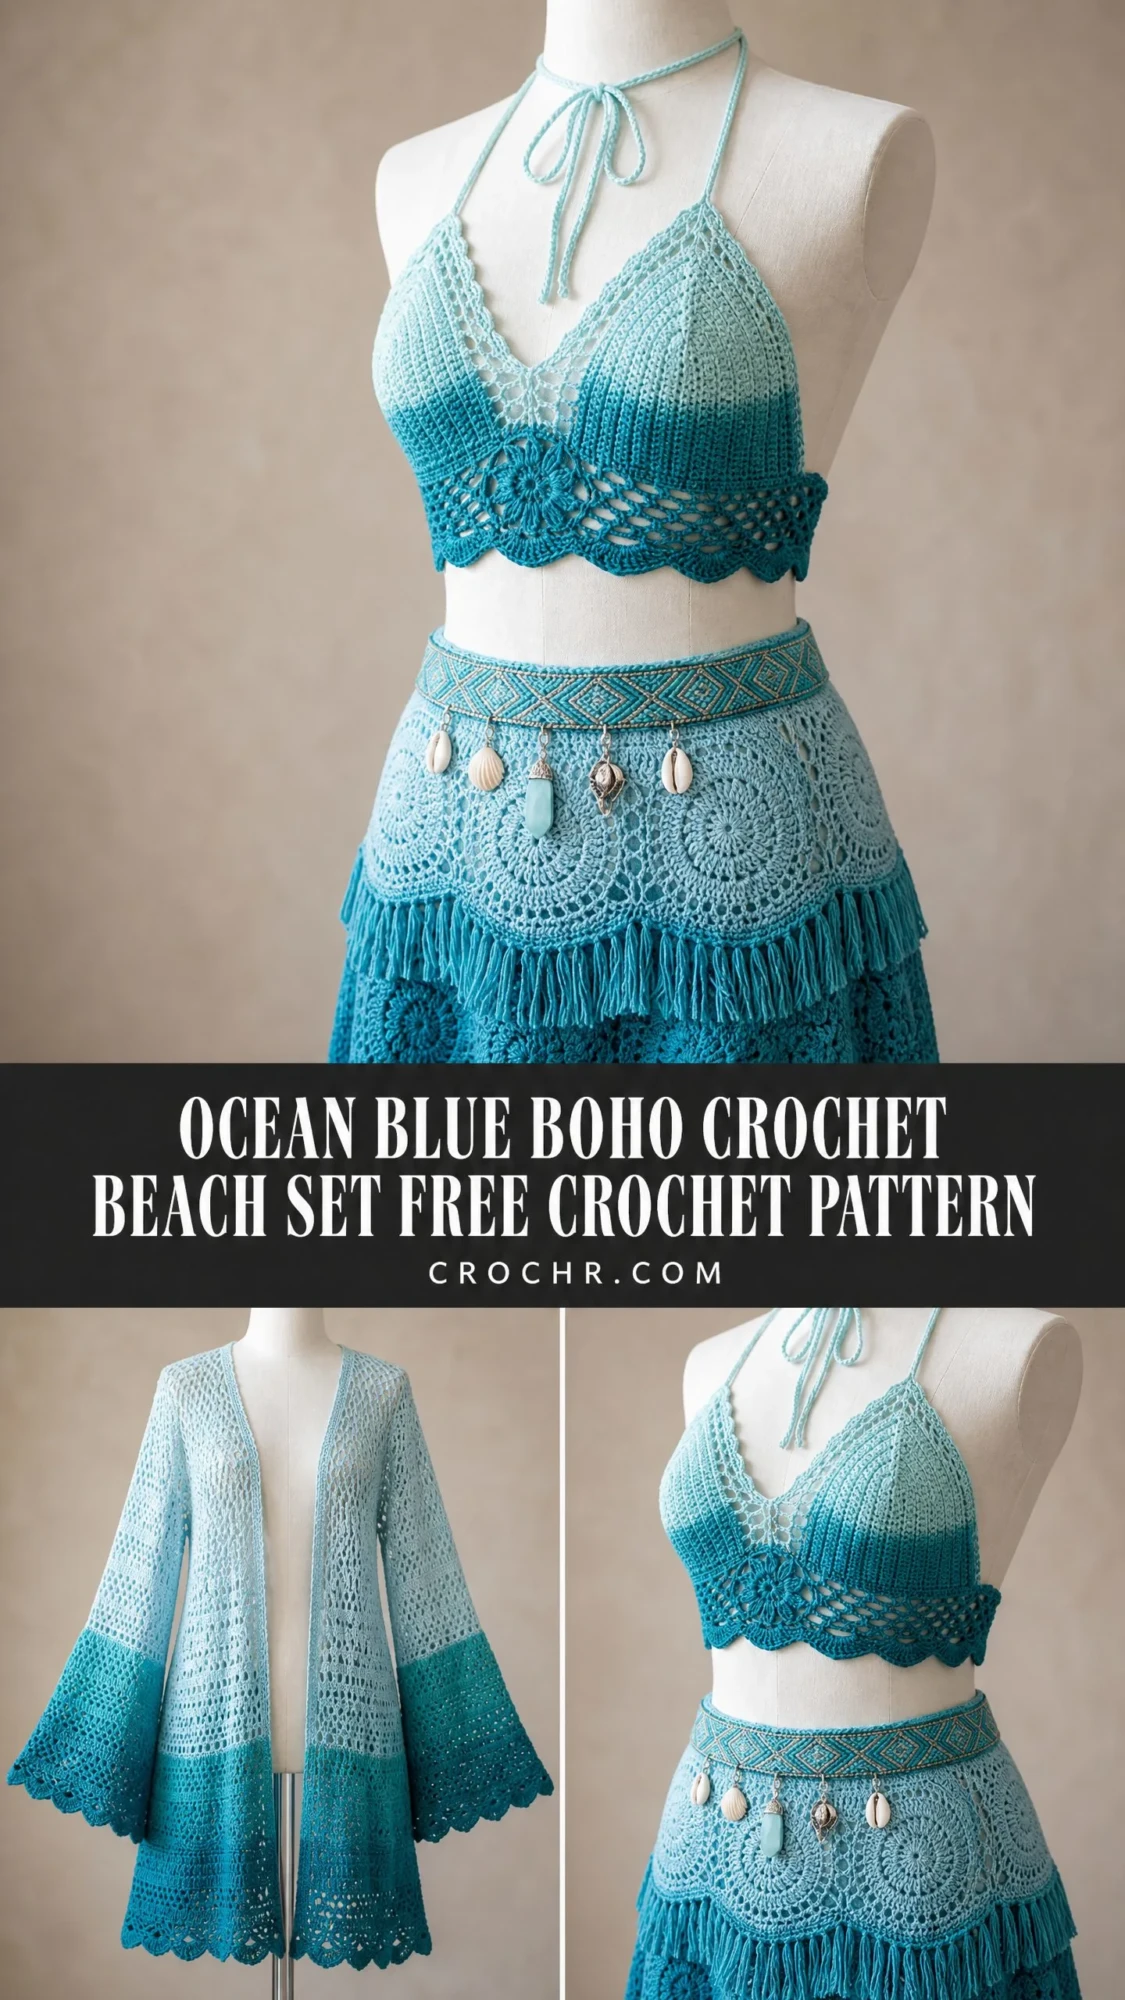
I’ve been looking for the perfect beach cover-up set for what feels like forever. Something that captures that effortless boho vibe, works beautifully in ocean-inspired colors, and actually looks like a cohesive outfit rather than random pieces thrown together. This Ocean Blue Boho Crochet Beach Set is exactly what I had in mind, and I’m thrilled to share it with you today.
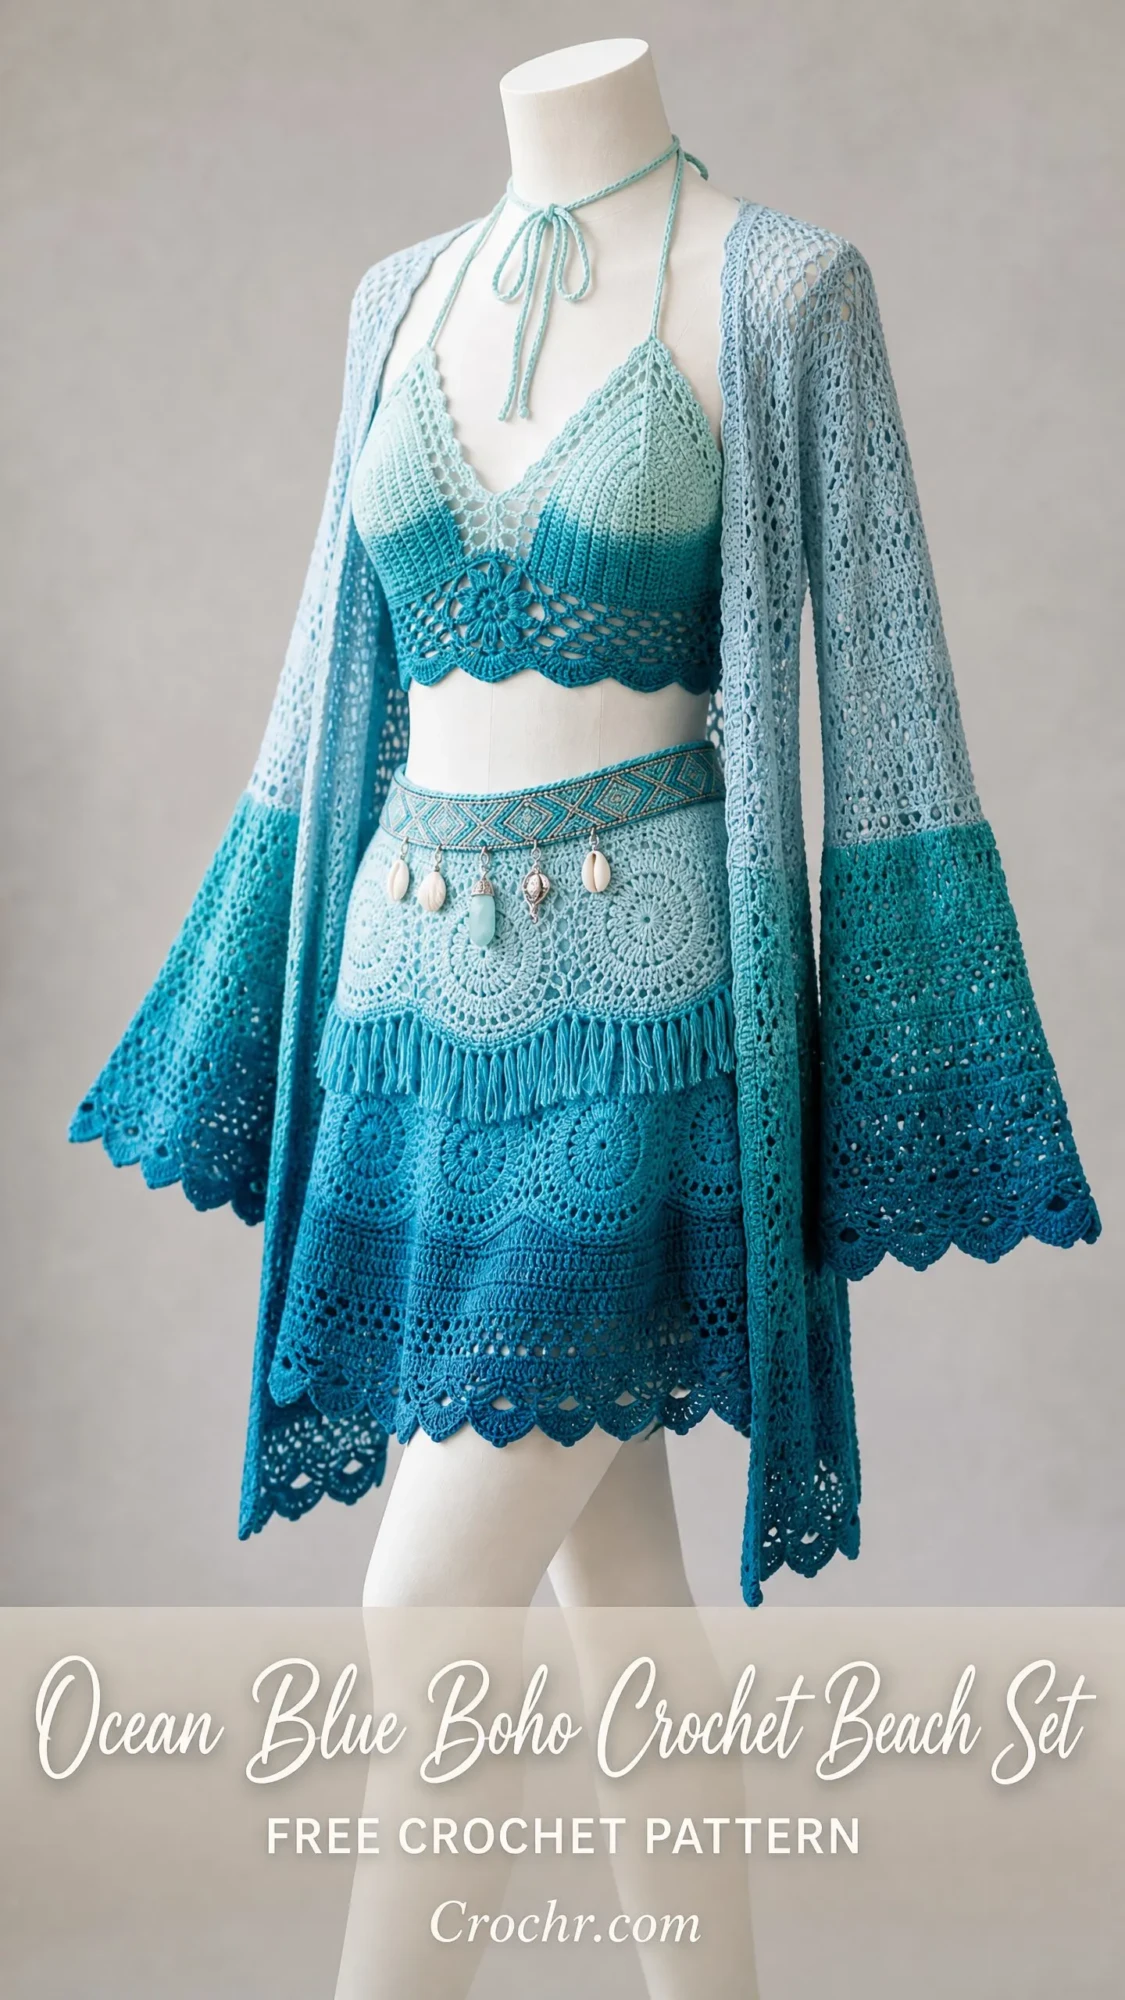
This stunning three-piece set includes a halter bralette top, a tiered mini skirt, and a flowing open-front duster cardigan. The gorgeous ombre color progression moves from soft mint through sky blue to deep teal, creating that dreamy ocean gradient effect that’s absolutely perfect for beach days, summer festivals, or vacation getaways.
Fair warning: this is an advanced pattern that requires some serious commitment. We’re talking 60 to 90 hours of work across all three pieces. But trust me, the result is worth every single stitch.
About This Ocean Blue Boho Beach Set Pattern
This coordinating set features some beautiful design elements that really make it special. You’ll work with mandala-style circle motifs, shell stitch borders, open mesh lace panels, and delicate fringe trim. The optional cowrie shell embellishments on a woven belt accent add that extra touch of beachy bohemian style.
The construction varies across the three pieces. The bralette uses standard cup shaping worked flat from the top point downward, then joined for the underbust band. The skirt combines flat circle motifs for the hip yoke with tiered ruffle sections worked in the round. The cardigan is worked in one piece from the top down, with sleeves picked up from the armhole.
Skill Level: Advanced. You should be comfortable working in the round, joining motifs, working shell stitches and mesh lace simultaneously, managing multiple yarn colors in a gradient, and constructing separate garments that coordinate as a set. I recommend having at least two to three completed garment projects under your belt before attempting this set.
Finished Measurements
This pattern is written for size Small/Medium, which fits US sizes 4 to 8, bust 34 to 36 inches (86 to 91 cm), waist 26 to 28 inches (66 to 71 cm), and hips 36 to 38 inches (91 to 97 cm).
Bralette finished measurements:
Skirt finished measurements:
Duster cardigan finished measurements:
Materials Needed
Yarn:
All three colors are used across all three pieces. The ombre transitions from Color A at the top of each piece to Color B in the middle section and Color C at the lower sections and hems.
Hooks:
Notions:
Yarn Suggestions
Suggestion 1: Paintbox Yarns Simply DK Cotton (100% cotton, 142 yards / 130 m per 50g ball). Colors: Spearmint (Color A), Dolphin Blue (Color B), Marine Blue (Color C). This yarn is widely available, affordable, and has excellent stitch definition for the lace and motif work.
Suggestion 2: Lion Brand 24/7 Cotton DK (100% mercerized cotton, 186 yards / 170 m per 100g skein). Colors: Mint (Color A), Aqua (Color B), Teal (Color C). Mercerized cotton gives a slight sheen that enhances the beachy look of this set.
Suggestion 3: Scheepjes Catona (100% mercerized cotton, 62 yards / 57 m per 25g ball in a sport weight that behaves as DK at the larger gauge). This option gives exceptional color availability for achieving a precise ombre. Use colors Crystalline (Color A), Cyan (Color B), and Topaz (Color C).
Substitution note: Any DK weight (CYCA 3) smooth cotton or cotton-blend yarn will work. Avoid fuzzy, textured, or mohair-blend yarns as they will obscure the lace patterns. If substituting a slightly heavier DK, swatch carefully and adjust hook size down to maintain gauge. Do not substitute with acrylic for beach or swimwear cover-up use as cotton has superior moisture management and drape.
Gauge
Using F-5 / 3.75 mm hook and Color B:
Gauge is critical for this garment. Swatch both single crochet fabric and one complete motif. Block your swatch before measuring. A gauge that is off by even half a stitch per inch will result in a garment that does not fit correctly.
Abbreviations (US Terms)
Before we dive into the pattern, let me break down all the stitch abbreviations you’ll encounter:
Special Stitches for This Crochet Pattern
Mandala Motif: This is a flat circle worked in continuous rounds. The stitch count increases by 6 stitches every round to maintain flatness. Begin with MR, work 6 sc into MR, tighten. Round 2: 2 sc in each st around (12 sc). Round 3: (sc, inc) 6 times (18 sc). Continue the mathematical spiral of a flat circle by adding 6 stitches every round in an offset pattern.
Shell Border: Insert hook in designated stitch, work 5 dc all in the same stitch. This creates a fan or shell shape. Skip 2 stitches on each side of the shell as instructed.
V-Stitch: Work (dc, ch 2, dc) all into the same stitch or chain space. V-stitches form the basis of the open mesh lace panels in the cardigan.
Joining Motifs: Motifs are joined on the final round using sl st joins. When you reach the corresponding picot of an adjacent motif, substitute the ch 3 of your picot with ch 1, sl st into the matching picot of the adjacent motif, ch 1, sl st in the joining ch of the current motif. This creates a flat, barely visible join.
Picot Edging: Ch 3, sl st in the first ch of the ch-3 just made. Work 1 picot between each shell or at the tip of each shell for the scallop hem finish.
Fringe Trim: Cut strands of Color C 10 inches / 25.5 cm long (2 strands per fringe knot). Fold 2 strands together, insert folded end through edge stitch from RS to WS, pull tails through the loop and tighten. Space fringe every 2 stitches along the designated fringe row. Trim to 3.5 inches / 9 cm after attachment.
Pattern Notes Before You Begin
All three pieces are worked separately then combined as a set.
The ombre effect is created by transitioning between colors at designated rounds or rows. Do not cut yarn at color transitions unless instructed. Carry the unused yarn loosely up the inside of the work for smooth floats within a few rows. Cut and rejoin if the float would span more than 6 rows.
When working in the round with no turning chain for sc rounds, the beginning of the round may shift slightly. Use a stitch marker in the first stitch of every round and move it up as you go to track your round beginnings.
All foundation chains should be worked with one hook size larger than the working hook to prevent tight foundations.
All stitch counts at the end of rows and rounds are given in parentheses.
Piece 1: Bralette Instructions
Left Cup
The left cup is worked flat, starting from the shoulder strap tie and working downward to the underbust edge.
Using E-4 / 3.5 mm hook and Color A, ch 4. Join with sl st to form a small ring. Alternatively, begin with a ch 3 and work into the 3rd ch from hook.
Row 1 (RS): Ch 3 (counts as dc), 2 dc in ring. Turn. (3 dc)
Row 2: Ch 3, dc in same st as turning ch, dc in next st, 2 dc in last st. Turn. (5 dc)
Row 3: Ch 3, dc in same st, dc in each of next 3 sts, 2 dc in last st. Turn. (7 dc)
Row 4: Ch 3, dc in same st, dc in each of next 5 sts, 2 dc in last st. Turn. (9 dc)
Row 5: Ch 3, dc in same st, dc in each of next 7 sts, 2 dc in last st. Turn. (11 dc)
Row 6: Ch 1, sc in first st, hdc in next st, dc in each of next 7 sts, hdc in next st, sc in last st. Turn. (11 sts)
Row 7: Ch 1, sc in first st, hdc in next st, dc in each of next 7 sts, hdc in next st, sc in last st. Do not turn. This row establishes the cup bottom edge. Turn. (11 sts)
Change to Color B at end of Row 7.
Row 8: Ch 3, dc in same st (inc), dc in each of next 9 sts, 2 dc in last st. Turn. (13 dc)
Row 9: Ch 3, dc in same st, dc in each of next 11 sts, 2 dc in last st. Turn. (15 dc)
Row 10: Ch 3, dc in same st, dc in each of next 13 sts, 2 dc in last st. Turn. (17 dc)
Row 11: Ch 1, sc in each st across. Turn. (17 sc)
Row 12: Ch 1, sc in first st, (ch 2, sk 1 st, sc in next st) 8 times. Turn. (9 sc, 8 ch-2-sps)
Row 13: Ch 1, sc in first sc, (2 sc in ch-2-sp, sc in next sc) 8 times. Turn. (25 sc)
Row 14: Ch 3 (counts as dc), dc in each of next 2 sts, (shell in next st, sk 2 sts, sc in next st, sk 2 sts) 3 times, shell in next st, dc in each of last 3 sts. Turn. (4 shells, 3 sc, 6 dc)
Stitch count check: 4 shells at 5 dc each = 20 dc, plus 3 sc between shells, plus 6 edge dc = 29 working stitches in row. This produces the fan and shell texture row at the underbust curve.
Row 15: Ch 1, sc in first dc, sc in each of next 2 dc, sc in each dc of shell (5 sc per shell), sc in each sc between shells, sc in each of last 3 dc. Turn. (29 sc)
Row 16: Ch 1, sc in each st across. Turn. (29 sc)
This is the bottom edge of the left cup. Do not fasten off. Place a stitch marker in the last stitch. Set aside.
Right Cup
Work exactly as Left Cup through Row 16. Do not fasten off.
Join Cups and Work Underbust Band
With RS facing, place Right Cup and Left Cup together at their inner vertical edges (the edges formed by the turning chains at the center front).
Using Color B and F-5 / 3.75 mm hook, begin working across the bottom edge of the Right Cup:
Round 1 (joining round): Starting at the right side edge of the right cup bottom, sc across 29 sts of Right Cup bottom edge, sc 2 sts evenly along the inner joining seam, sc across 29 sts of Left Cup bottom edge, sc 2 sts evenly along the outer left edge, sl st to join to first sc. Do not turn. Continue working in the round. (62 sc)
At this join round, ensure the cups are oriented so RS faces outward and the fabric curves naturally to form a bra shape.
Round 2: Ch 1, sc in each st around, sl st to join. (62 sc)
Round 3: Ch 1, sc in each st around, sl st to join. (62 sc)
Round 4: Change to Color B/C blend by holding one strand of Color B and one of Color C together for a transition effect, or transition cleanly to Color C. Ch 1, (sc in next 4 sts, sk 1 st) 12 times, sc in last 2 sts, sl st to join. (50 sc)
This slight decrease shapes the underbust band to follow the natural curve under the bust.
Round 5: Ch 1, sc in each st around, sl st to join. (50 sc)
Round 6: Ch 1, sc in each st around, sl st to join. (50 sc)
Round 7: Ch 1, sc in BLO of each st around, sl st to join. (50 sc)
This creates a visible ridge that defines the lower edge of the underbust band.
Round 8: Ch 3 (counts as dc), (sk 2 sts, shell in next st, sk 2 sts, dc in next st) 8 times, sk 2 sts, shell in next st, sk 1 st, sl st to top of beg ch-3 to join. (8 shells, 9 dc-equivalent posts including beg ch-3)
Stitch count check: 8 shells at 5 dc = 40 dc, plus 8 single dc posts, plus 1 beginning ch-3 post = 49 stitches consumed. With 50 stitches available and 1 final sk, this works out to 50 stitches used.
Round 9: Sl st into top of first shell dc, sl st into next 2 dc of shell, ch 1, sc in center dc of shell (this is stitch 3 of 5 dc shell), (ch 3, sc in center of next shell) 8 times, ch 3, sl st to first sc to join. (9 sc, 9 ch-3-sps)
Round 10: Sl st into first ch-3-sp, ch 3, 4 dc in same sp, sc in next sc, (shell in next ch-3-sp, sc in next sc) 8 times, sl st to top of beg ch-3. (9 shells, 9 sc)
Round 11 (Picot edging round): Sl st into top of first shell, work (sc in center dc of shell, picot, sc in same center dc) across tops of all 9 shells, sl st into first sc between shells, sl st along to next shell center. Work picot at tip of each shell all the way around, sl st to join. Fasten off.
Checkpoint: After completing the underbust band, the bralette should measure approximately 7 inches / 18 cm from the top triangle point to the shell edging at the bottom band. The band alone should measure approximately 3.5 inches / 9 cm wide when flat.
Bralette Halter Ties
Using E-4 / 3.5 mm hook and Color A, make two ties as follows:
Tie 1 (neck tie): At the top point of either cup, join Color A and ch 80 (approximately 18 inches / 45.7 cm). Sl st back down the chain to create a sturdy corded tie. Fasten off. Repeat for the other cup, leaving both neck ties long enough to tie at the nape of the neck. The two neck ties meet at the back of the neck and tie in a bow.
Tie 2 (back band ties): At the outer edge of each underbust band side, join Color A and ch 60 (approximately 14 inches / 35.5 cm). Sl st back down chain. Fasten off. These ties wrap around the back and tie at center back. Alternatively, sew a small hook-and-eye closure at center back for a cleaner finish.
Bralette Embellishment Border (optional)
Using Color B and E-4 / 3.5 mm hook, join at any stitch along the top outer cup edge. Work one round of reverse single crochet (crab stitch) around each cup outer edge for a neat, rolled border that resists stretching.
Crab stitch: Insert hook in stitch to the RIGHT (instead of left), pull up loop, yarn over and draw through both loops. Move to next stitch to the right and repeat. This creates a twisted cord-like edge.
Size Customization for Bralette
For a larger cup (C/D cup): Add 2 more increase rows (Rows 17 and 18) to the cup construction before joining:
Row 17: Ch 3, dc in same st, dc in each of next 27 sts, 2 dc in last st. (31 dc)
Row 18: Ch 1, sc in each st across. (31 sc)
For a larger band (L/XL, 38 to 40 inch bust): After joining cups, work Round 1 with sc in each of 31 sts per cup plus 4 joining sts on each side = 70 sc. Proceed with the remaining band rounds at 70 sc and adjust the shell round by working (sk 2 sts, shell in next st, sk 2 sts, dc in next st) 10 times for a Round 8 total of 70 stitches.
Piece 2: Tiered Mini Skirt Instructions
The skirt is constructed in three main sections:
Mandala Circle Motif (make 5 for hip yoke)
Each motif is worked in Color B transitioning to Color C. Make all 5 motifs and join as instructed before attaching to the waistband.
Using F-5 / 3.75 mm hook and Color B, make a magic ring.
Round 1: Ch 3 (counts as dc), 11 dc in ring, sl st to top of beg ch-3 to join. Tighten ring. (12 dc)
Round 2: Ch 3, dc in same st, 2 dc in each remaining st, sl st to top of beg ch-3 to join. (24 dc)
Round 3: Ch 3, dc in same st, dc in next st, (2 dc in next st, dc in next st) 11 times, sl st to beg ch-3. (36 dc)
Round 4: Ch 3, dc in same st, dc in each of next 2 sts, (2 dc in next st, dc in each of next 2 sts) 11 times, sl st to beg ch-3. (48 dc)
Round 5: Ch 4 (counts as dc plus ch 1), sk 1 st, (dc in next st, ch 1, sk 1 st) 23 times, sl st to 3rd ch of beg ch-4 to join. (24 dc, 24 ch-1-sps)
Round 6: Ch 1, sc in first ch-1-sp, ch 3, (sc in next ch-1-sp, ch 3) 23 times, sl st to first sc to join. (24 sc, 24 ch-3-sps)
Round 7: Sl st to center of first ch-3-sp, ch 3, 4 dc in same ch-3-sp (first shell), sk sc, (shell in next ch-3-sp, sk sc) 11 times, shell in last 12th ch-3-sp, sl st to top of beg ch-3. (12 shells = 60 dc total)
There are 24 ch-3-sps and 24 sc in Round 6. Shells go in alternating ch-3-sps (every other one), skipping the sc between.
Round 8: Change to Color C. Sl st to center dc of first shell, ch 1, sc in center dc of shell, ch 4, (sc in center dc of next shell, ch 4) 11 times, sl st to first sc to join. (12 sc, 12 ch-4-sps)
Round 9: Sl st into first ch-4-sp, (ch 3, 6 dc, ch 3, sl st) in same ch-4-sp (large shell petal), sl st into next sc, (sl st into next ch-4-sp, ch 3, 6 dc, ch 3, sl st in same sp, sl st in next sc) 11 times. (12 large shell petals)
Round 10: Working behind the petal round, sl st into Round 8 sc between petals (insert hook between the petal and the Round 8 sc). In each gap between petals: ch 5, sc in next gap between petals, ch 5. Work all 12 gaps with ch-5 arches. Sl st to first sc at the beginning of this bridging round. (12 ch-5-sps)
Round 11: Sl st into first ch-5-sp, ch 3, 4 dc in same sp, ch 2, sc in next ch-5-sp, ch 2, (5 dc in next ch-5-sp, ch 2, sc in next ch-5-sp, ch 2) 5 times, sl st to beg ch-3. (6 shells, 6 sc, 12 ch-2-sps)
Round 12 (final motif round with joining picots): Sl st to center dc of first shell, ch 1, sc in center dc, (ch 3, sc in center dc of next shell) 5 times, ch 3, sl st to first sc. This creates 6 ch-3 picot connections for joining adjacent motifs. (6 ch-3 joining points)
The completed motif should measure approximately 6 inches / 15 cm in diameter after blocking.
Joining the 5 Motifs
Lay out 5 motifs in a strip (they will wrap around the hip). Join motif 2 to motif 1 at two adjacent picot points on Round 12, using the sl st joining method described in Special Stitches. Join motifs 3, 4, and 5 in the same manner. Then join motif 5 to motif 1 at the remaining free side picots to form a ring of 5 motifs.
The joined motif ring should measure approximately 30 inches / 76 cm in circumference at the outer edge and approximately 6 inches / 15 cm in height.
Waistband
Using E-4 / 3.5 mm hook and Color A, ch 11.
Row 1: Sc in 2nd ch from hook and each ch across. Turn. (10 sc)
Row 2: Ch 1, sc in BLO of each st across. Turn. (10 sc)
Repeat Row 2 until the waistband strip measures 28 inches / 71 cm (or desired waist measurement). Seam the short ends together with a flat seam to form a ring. The waistband should stretch to approximately 32 inches / 81 cm.
Work one round of sc along the lower edge of the waistband (the long edge that will face down toward the hips): with RS facing, join Color B to any st along the lower edge of the waistband and work approximately 126 sc evenly around the lower edge. (126 sc)
126 is divisible by the 6-stitch shell pattern unit (6 x 21 = 126). Adjust up or down by 6 stitches if your waistband came out slightly different to maintain divisibility.
Join the motif ring to the waistband lower edge:
With Color B and F-5 / 3.75 mm hook, RS facing, hold the motif ring up against the wrong side of the waistband lower edge. Whipstitch or sl st join through the top edge of the motif ring and through the 126 sc of the waistband lower edge, spacing evenly. The motif ring hangs below the waistband.
Skirt Body Tier 1
The first tier is worked from the bottom edge of the joined motif ring, working outward and downward to add length.
With Color C and F-5 / 3.75 mm hook, with RS facing, join yarn to the outer lower edge of the motif ring. Work 1 sc in every visible stitch or space along the outer lower perimeter of the motif ring. Aim for 150 sc evenly distributed. If your count differs by a few stitches, adjust to the nearest multiple of 6. (150 sc)
Round 1 of Tier 1: Ch 1, sc in each st around, sl st to join. (150 sc)
Round 2: Ch 3, (sk 2 sts, shell in next st, sk 2 sts, dc in next st) 25 times, sl st to top of beg ch-3. (25 shells, 25 dc posts including beg ch-3)
Round 3: Ch 1, sc in top of first dc post, ch 3, sc in center dc of next shell, ch 3, (sc in next dc post, ch 3, sc in center dc of next shell, ch 3) 24 times, sl st to first sc. (50 sc, 50 ch-3-sps)
Round 4: Sl st into first ch-3-sp, ch 3, 4 dc in same sp, sc in next sc, (shell in next ch-3-sp, sc in next sc) 49 times, sl st to beg ch-3. (50 shells, 50 sc)
Round 5: Ch 1, sc in center dc of each shell and sc in each sc around: (sc in center dc of shell, sc in sc) 50 times = 100 sc. Sl st to join. (100 sc)
Round 6: Ch 1, sc in each st around. Sl st to join. (100 sc)
Fringe Row: Do not work fringe as a crochet round. After completing Round 6, attach fringe to every other stitch around the edge using the Fringe Trim method described in Special Stitches. Use Color C. (50 fringe knots, each containing 2 strands, trimmed to 3.5 inches / 9 cm)
Skirt Body Tier 2
After attaching fringe, with Color C and G-6 / 4.0 mm hook, join to Round 6 edge (the same round where fringe is attached) in the stitch between two fringe knots.
Round 1 of Tier 2: Ch 1, (sc in fringe attachment stitch, 2 sc in space between fringe knots) 50 times, sl st to join. (150 sc)
Round 2: Ch 4 (counts as dc plus ch 1), sk 1 st, (dc in next st, ch 1, sk 1 st) 74 times, dc in next st, sl st to 3rd ch of beg ch-4. (75 dc, 75 ch-1-sps)
Round 3: Sl st into first ch-1-sp, ch 3, dc in same sp, ch 1, (2 dc in next ch-1-sp, ch 1) 74 times, sl st to beg ch-3. (150 dc in pairs, 75 ch-1-sps)
Round 4: Ch 1, sc in each dc and sc in each ch-1-sp around: 150 dc plus 75 ch-1-sps = 225 sts. Sl st to join. (225 sc)
This is the expansion round that creates the A-line flare.
Round 5: Ch 3, (sk 2 sts, shell in next st, sk 2 sts, dc in next st) around, adjusting as needed to end evenly. Sl st to join.
Continue with shell and picot edging rounds to complete the hem, following the same shell border technique used throughout the pattern.
Finishing Your Beach Set
Blocking
Block all three pieces before wearing. Wet blocking works best for cotton yarn. Soak each piece in lukewarm water for 15
