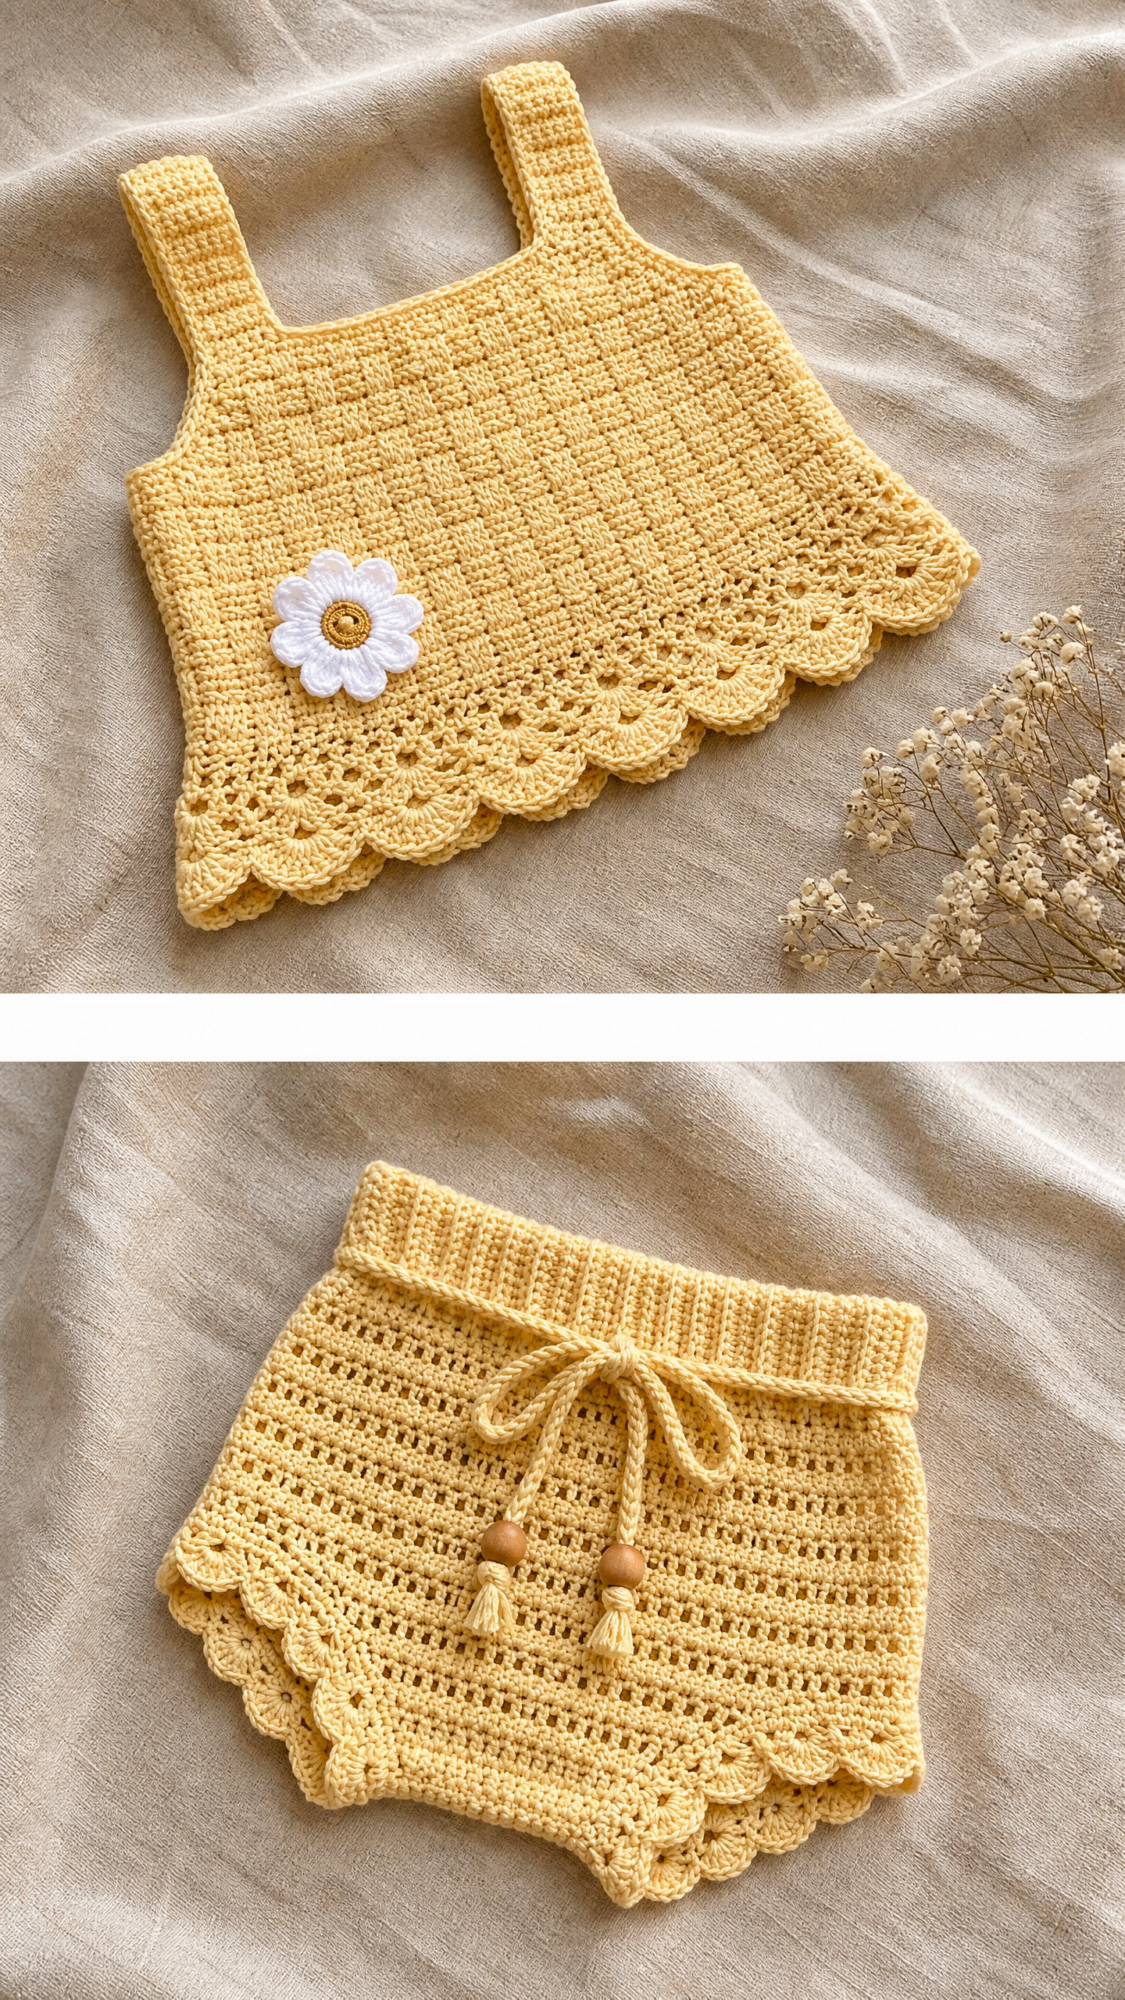
You know that gorgeous skein of DK cotton you’ve been saving for the perfect project? The one in that soft buttery yellow that catches the light just right? This is the pattern for it. Dig into your stash because this matching tank top and bloomer set is calling your name.
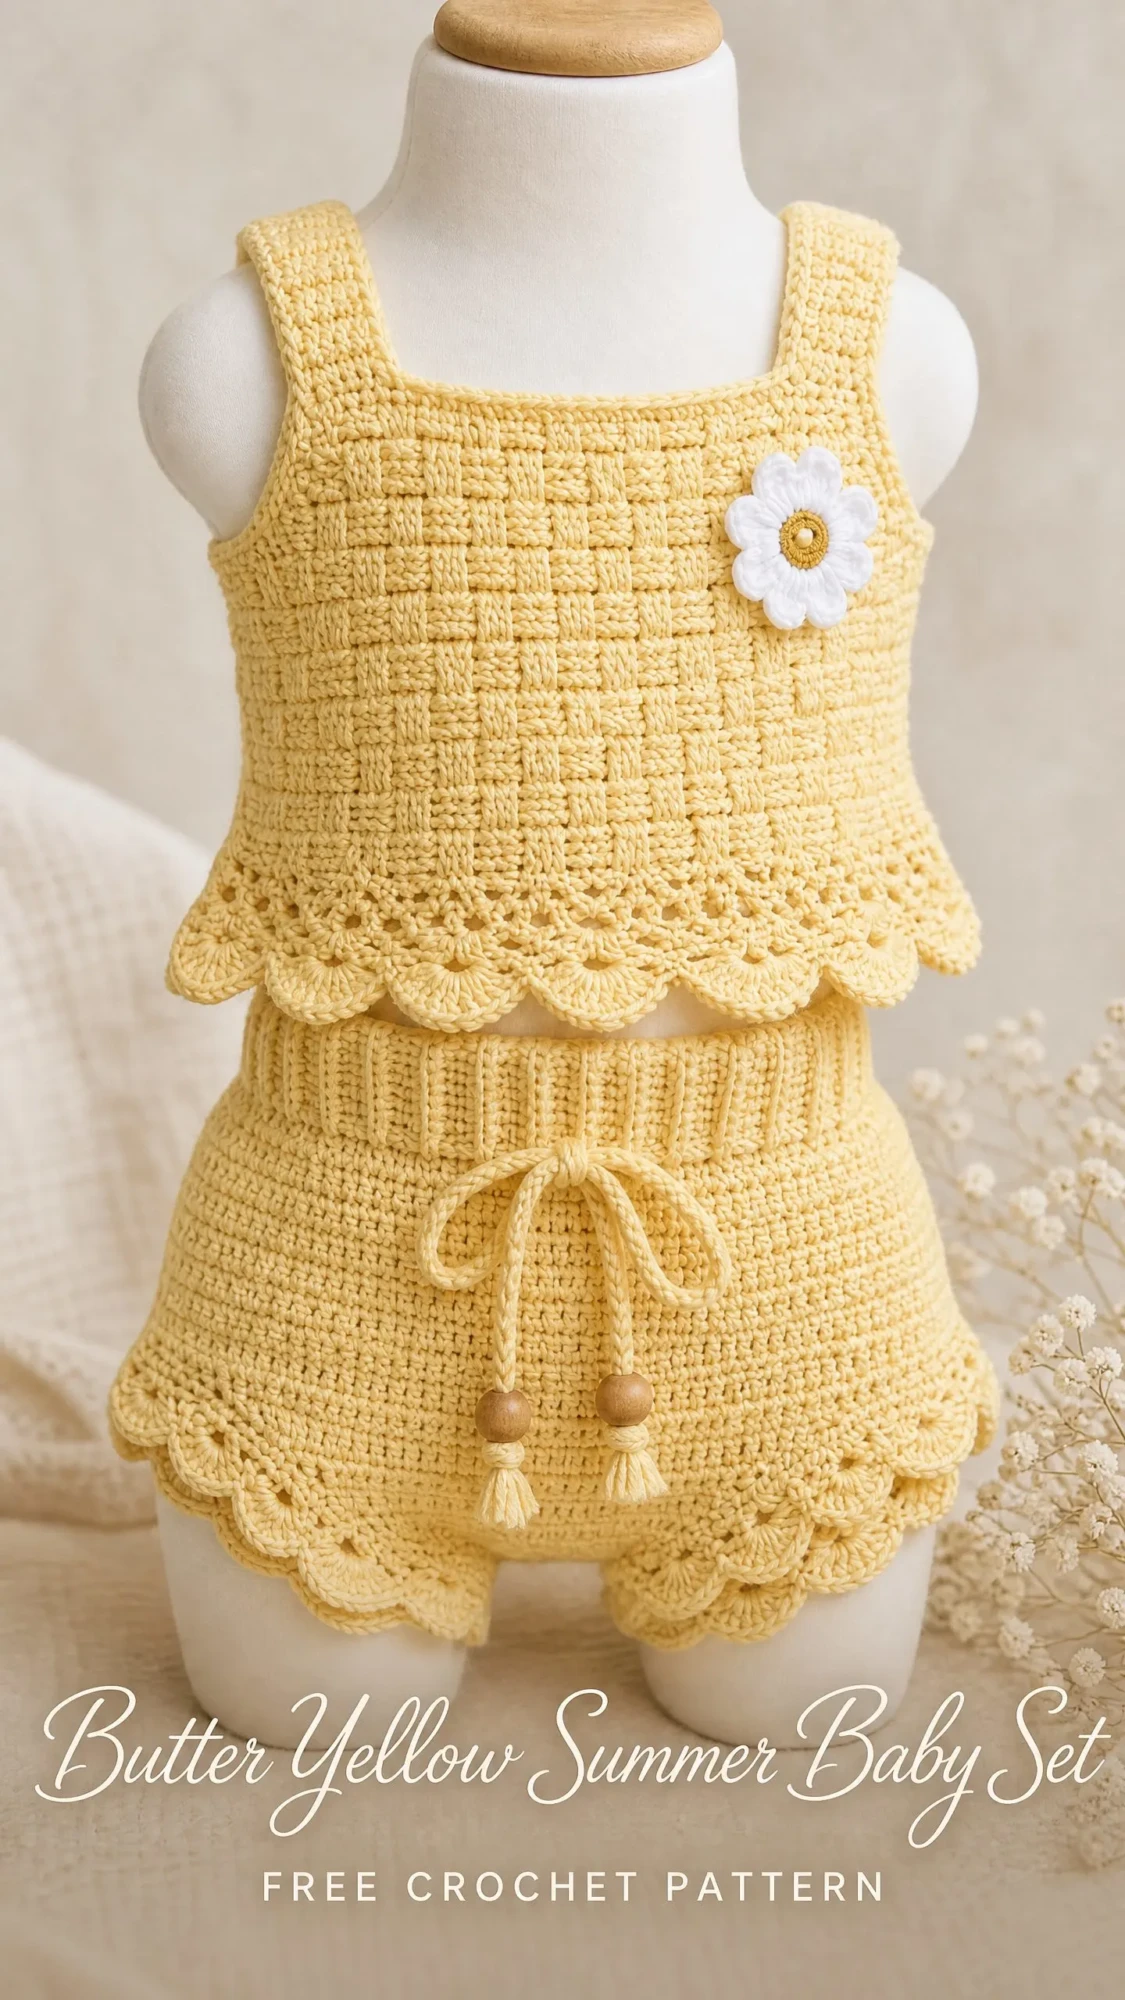
The construction here is actually really clever. Both pieces are worked flat in panels using a basket stitch that creates the most satisfying waffle texture. Then you seam everything together and add those dreamy scalloped lace borders. The ribbed waistband on the bloomers is worked separately and attached at the end, which sounds fancier than it is.
I’ll be honest with you. This is an intermediate level pattern. You’ll need to be comfortable with front post and back post double crochet stitches, working in the back loop only, and seaming. But if you’ve made a few projects and want to level up your skills, this is a beautiful way to do it. The finished set makes an incredible baby shower gift or photo shoot outfit.
About This Crochet Pattern
This butter yellow summer baby set crochet pattern creates a coordinated two piece outfit sized for babies and toddlers from 3 months up to 18 months. The sleeveless tank top features wide square straps, a textured body, and a flared scalloped hem with a sweet crocheted daisy applique. The matching bloomers have that same gorgeous texture, a stretchy ribbed waistband with a drawstring tie, wooden bead accents, and coordinating scalloped leg openings.
The waffle texture comes from alternating blocks of post stitches that create a woven look. It’s one of those patterns where you get into a rhythm and the rows just fly by. Both pieces are worked flat as front and back panels, then seamed at the sides. This makes the construction straightforward and gives you clean professional looking seams.
Finished Measurements
Size 3 to 6 months:
Size 6 to 12 months:
Size 12 to 18 months:
Instructions are written for size 3 to 6 months. Changes for larger sizes appear in parentheses throughout as (6 to 12 months, 12 to 18 months). When only one number appears, it applies to all sizes.
Materials Needed
Yarn:
Recommended Yarn Options:
Choose a DK weight yarn (also called light worsted or 8 ply) that is soft against baby skin. Cotton gives excellent stitch definition for the waffle texture and breathes beautifully for summer. Avoid fuzzy or fluffy fibers since they’ll hide that gorgeous texture.
Hooks:
Notions:
Gauge
This is important for a fitted garment. Please check your gauge before starting.
Using larger hook (E-4, 3.5 mm):
18 stitches x 20 rows = 4 inches (10 cm) in basket stitch pattern
Using smaller hook (D-3, 3.25 mm):
22 stitches x 24 rows = 4 inches (10 cm) in single crochet ribbing worked in back loop only
If your gauge is off, adjust your hook size. Too many stitches per inch means you need a larger hook. Too few stitches means you need a smaller hook.
Abbreviations Used
Let me walk you through all the abbreviations you’ll encounter. I’ll explain each one as we go, but here’s your quick reference list.
Special Stitches for This Crochet Tutorial
Front Post Double Crochet (FPDC)
This stitch creates texture by working around the post (the vertical bar) of a stitch from the previous row instead of into the top loops.
Yarn over, insert your hook from front to back to front around the post of the indicated stitch in the row below. Yarn over and pull up a loop. Then yarn over and pull through 2 loops, yarn over and pull through remaining 2 loops. The stitch leans toward the front of your fabric.
Back Post Double Crochet (BPDC)
Same concept as FPDC but from the opposite direction.
Yarn over, insert your hook from back to front to back around the post of the indicated stitch. Yarn over and pull up a loop. Yarn over and pull through 2 loops, yarn over and pull through remaining 2 loops. This stitch recedes toward the back of your fabric.
Basket Stitch Pattern
This creates that beautiful waffle texture you see in the photos. It’s worked over a multiple of 4 stitches.
Row 1 (RS): Ch 3 (counts as first dc), dc in each st across. Turn.
Row 2: Ch 2 (does not count as st), FPDC around each of next 2 sts, BPDC around each of next 2 sts; rep from across to last st, dc in last st. Turn.
Row 3: Ch 2, BPDC around each of next 2 sts, FPDC around each of next 2 sts; rep from across to last st, dc in last st. Turn.
Rows 2 and 3 form the pattern. Always work the last stitch of every row as a plain dc.
Scallop Border
This creates those pretty shell edges along all the hems.
First work a foundation round of sc evenly around the hem edge.
Then: Skip 2 sc, work 5 dc in next sc, skip 2 sc, slip stitch in next sc; repeat from around. Join with slip stitch.
Each scallop uses 6 stitches total. Make sure your stitch count is a multiple of 6 before starting the border.
SC2TOG (Single Crochet Decrease)
Insert hook in next stitch, yarn over, pull up a loop. Insert hook in following stitch, yarn over, pull up a loop. Yarn over, draw through all 3 loops on hook. You’ve decreased by 1 stitch.
Step by Step Instructions
Part 1: Tank Top
Tank Top Front Panel
Foundation Chain: Using larger hook and Color A, ch 33 (37, 41).
Row 1 (RS): Dc in 4th ch from hook (counts as first dc), dc in each ch across. Turn. (31, 35, 39 dc)
Row 2: Ch 2 (does not count as st throughout), FPDC around next 2 sts, BPDC around next 2 sts, FPDC around next 2 sts; rep from across to last st, dc in last st. Turn. (31, 35, 39 sts)
Row 3: Ch 2, BPDC around next 2 sts, FPDC around next 2 sts, BPDC around next 2 sts; rep from across to last st, dc in last st. Turn. (31, 35, 39 sts)
Rows 4 to 23 (4 to 27, 4 to 31): Rep Rows 2 and 3 alternately, 10 (12, 14) more times. After the last row you will have worked 23 (27, 31) total rows of basket stitch. (31, 35, 39 sts)
At this point, your front panel should measure approximately 4.5 inches (5.5 inches, 6.5 inches) tall.
Lace Row (Row 24, 28, or 32): Ch 3, sk first st, dc in next st, ch 1, sk 1 st, dc in next st; rep from across. Turn. (16, 18, 20 dc plus 15, 17, 19 ch-1 spaces)
Row 25 (29, 33): Ch 3, dc in first ch-sp, dc in next dc, dc in next ch-sp, dc in next dc; rep from across, dc in top of t-ch. Turn. (33, 37, 41 dc)
Adjust Row: Ch 1, sc evenly across adjusting to 36 (36, 42) sc to achieve a multiple of 6 for the scallop.
For size 3 to 6 months: Work 1 sc in each of 32 sts, then work 2 sc in each of 2 evenly spaced sts. (36 sc)
For size 6 to 12 months: Work 1 sc in each of 36 sts. (36 sc)
For size 12 to 18 months: Work 1 sc in each of 40 sts, then work 2 sc in 1 evenly spaced st. (42 sc)
Do not fasten off.
Scallop Border: Sk 2 sc, 5 dc in next sc, sk 2 sc, sl st in next sc; rep from across. (6, 6, 7 scallops)
Fasten off and weave in ends.
Strap Shaping
Return to the top edge of the front panel. With RS facing, using larger hook, join Color A in the first stitch of Row 1 (the top edge, opposite the scallop hem).
Left Strap:
Row 1: Ch 2, work basket stitch over first 7 (8, 9) sts only. Turn. (7, 8, 9 sts)
Rows 2 to 12 (2 to 14, 2 to 16): Continue in basket stitch for 11 (13, 15) more rows. (7, 8, 9 sts)
Fasten off.
Right Strap:
Skip center 17 (19, 21) sts of the top edge. Join Color A in next st.
Row 1: Ch 2, work basket stitch over remaining 7 (8, 9) sts. Turn. (7, 8, 9 sts)
Rows 2 to 12 (2 to 14, 2 to 16): Continue in basket stitch for 11 (13, 15) more rows. (7, 8, 9 sts)
Fasten off.
Tank Top Back Panel
Work exactly as Front Panel through all body rows, lace row, adjust row, and scallop border. Work Left and Right Straps exactly as Front Panel straps. Fasten off and weave in ends.
Assembling the Top
Hold Front and Back panels with wrong sides together (right sides facing outward). Using yarn needle and Color A, whipstitch or mattress stitch the side seams from bottom hem to underarm on both sides.
Join the Left Front strap to Left Back strap by seaming the short top edges together with 3 to 4 whipstitches. Repeat for Right strap.
The armhole opening should measure approximately 2 inches for all sizes.
Neckline Finish: Join Color A at any point along the neckline opening. Using smaller hook, work 1 round of sc evenly around the entire neckline opening. Join with sl st. Fasten off.
Armhole Finish: Work 1 round of sc evenly around each armhole opening. Join with sl st. Fasten off.
Part 2: Bloomers
Bloomers Back Panel
Foundation Chain: Using larger hook and Color A, ch 37 (41, 45).
Row 1 (RS): Dc in 4th ch from hook (counts as first dc), dc in each ch across. Turn. (35, 39, 43 dc)
Row 2: Ch 2, FPDC around next 2 sts, BPDC around next 2 sts, FPDC around next 2 sts; rep from across to last st, dc in last st. Turn. (35, 39, 43 sts)
Row 3: Ch 2, BPDC around next 2 sts, FPDC around next 2 sts, BPDC around next 2 sts; rep from across to last st, dc in last st. Turn. (35, 39, 43 sts)
Rows 4 to 19 (4 to 23, 4 to 27): Rep Rows 2 and 3 alternately 8 (10, 12) more times. (35, 39, 43 sts)
Lace Row (Row 20, 24, or 28): Ch 3, sk first st, dc in next st, ch 1, sk 1 st, dc in next st; rep from across. Turn.
Row 21 (25, 29): Ch 3, dc in first ch-sp, dc in next dc, dc in next ch-sp, dc in next dc; rep from across, dc in top of t-ch. Turn.
Adjust Row: Ch 1, sc evenly across adjusting to 36 (42, 42) sc.
Size 3 to 6 months: Work 1 sc in each of 35 sts, then work 2 sc in 1 st. (36 sc)
Size 6 to 12 months: Work 1 sc in each of 39 sts, then 2 sc in each of 3 evenly spaced sts. (42 sc)
Size 12 to 18 months: Work 1 sc in each of 43 sts, then work sc2tog over 2 sts at center to reduce by 1. (42 sc)
Scallop Border: Sk 2 sc, 5 dc in next sc, sk 2 sc, sl st in next sc; rep from across. (6, 7, 7 scallops)
Fasten off and weave in ends.
Bloomers Front Panel
Work exactly as Bloomers Back Panel through all rows and scallop border.
Crotch Shaping
For each panel, return to the top edge (opposite scallop hem), RS facing. Join Color A at the top right edge.
Row 1: Ch 1, sc across all sts. Turn. (35, 39, 43 sc)
Row 2: Ch 1, sc2tog, sc across to last 2 sts, sc2tog. Turn. (33, 37, 41 sc)
Row 3: Ch 1, sc2tog, sc across to last 2 sts, sc2tog. Turn. (31, 35, 39 sc)
Row 4: Ch 1, sc2tog, sc across to last 2 sts, sc2tog. Turn. (29, 33, 37 sc)
Work these 3 shaping rows on both front and back panels.
Ribbed Waistband
The waistband is worked separately as a long strip, then seamed into a tube.
Using smaller hook and Color A, ch 13.
Row 1: Sc in 2nd ch from hook, sc in each ch across. Turn. (12 sc)
Row 2: Ch 1, BLO sc in each st across. Turn. (12 sc)
Repeat Row 2 for:
Size 3 to 6 months: 70 total rows
Size 6 to 12 months: 80 total rows
Size 12 to 18 months: 90 total rows
Seam the short ends together with slip stitch to form a ring.
Eyelet Row for Drawstring
With RS facing, using larger hook, join Color A at the seam of the waistband tube. Work along the top edge:
Round 1: Ch 1, sc evenly around the top edge, working 1 sc per row end. Adjust to an even number. Join with sl st.
Round 2: Ch 3, sk 1 sc, dc in next sc, ch 1, sk 1 sc; rep from around. Join with sl st in 2nd ch of beginning ch-3.
Round 3: Ch 1, sc in each dc and each ch-sp around. Join with sl st. Fasten off.
Drawstring
Using larger hook and Color A, ch 100. Sl st in 2nd ch from hook, sl st in each ch across. Fasten off leaving a 6 inch tail.
Thread drawstring through eyelet holes. Thread 1 wooden bead onto each end and knot securely.
Assembling the Bloomers
Step 1: With wrong sides together, seam the side seams of front and back panels on both sides from hem upward.
Step 2: Seam the curved crotch edges together from center bottom through the inner leg of each side to create leg openings.
Step 3: Attach the ribbed waistband tube to the top edge of the bloomers body by whipstitching the lower edge of the waistband to the top edge all the way around.
Leg Openings Finish: Using smaller hook, join Color A at any point around one leg opening. Work 1 round of sc evenly around. Join with sl st. Fasten off. Repeat for second leg opening.
Part 3: Daisy Applique
Using smaller hook and Color C, make a magic ring. Ch 1, work 6 sc into ring. Join with sl st to first sc. (6 sc)
Cut Color C, join Color B to any sc.
Petal Round: Ch 5, sl st in 2nd ch from hook, sc in next ch, hdc in next ch, dc in last ch, sl st in next sc of center ring; rep from 5 more times. (6 petals)
Fasten off leaving a 12 inch tail. Use tail to sew daisy to the front of the top at center right chest.
Blocking and Finishing
Wet blocking is strongly recommended for cotton yarn. Submerge pieces in cool water and gently squeeze out excess. Lay flat, pin to measurements, and dry completely. This opens up the lace scallops beautifully.
For acrylic yarn, use steam blocking. Pin pieces flat and hold a steam iron about 1 inch above the surface. Never press directly onto the crochet.
Weave in all ends securely by traveling in two directions through the fabric. Apply a small drop of fabric glue inside the wooden beads if needed to prevent slipping.
Care Instructions
Hand wash in cool water with gentle baby safe soap. Roll in a towel to remove water and lay flat to dry. If your yarn is machine washable, use a delicate cycle in a mesh bag. Never tumble dry.
Size Customization Tips
To size down for newborn (approximately 12 inch chest): Reduce the starting chain for the top by 8 stitches (ch 25) and for bloomers by 8 stitches (ch 29). Reduce total rows by 4 per section and strap width to 5 stitches.
To size up for 2T (approximately 20 inch chest): Increase the starting chain for the top by 8 stitches (ch 41) and for bloomers by 8 stitches (ch 45). Add 4 to 6 rows per section.
The basket stitch repeat is 4 stitches, so always add or subtract in multiples of 4 when adjusting width.
Final Thoughts
Thank you so much for choosing this pattern for your next project. I really hope you love making this sweet summer set as much as I loved designing it. The finished outfit photographs beautifully and makes the most thoughtful handmade gift for a new baby.
If you make this butter yellow summer baby set, I would absolutely love to see it. Tag me on Instagram or share a photo in my Facebook group. Seeing your finished projects truly makes my day.
Save this pattern to your Pinterest boards so you can find it when you’re ready to start stitching. And please drop a comment below if you make this set. I’d love to hear how it turned out for you and whose lucky little one gets to wear it.
