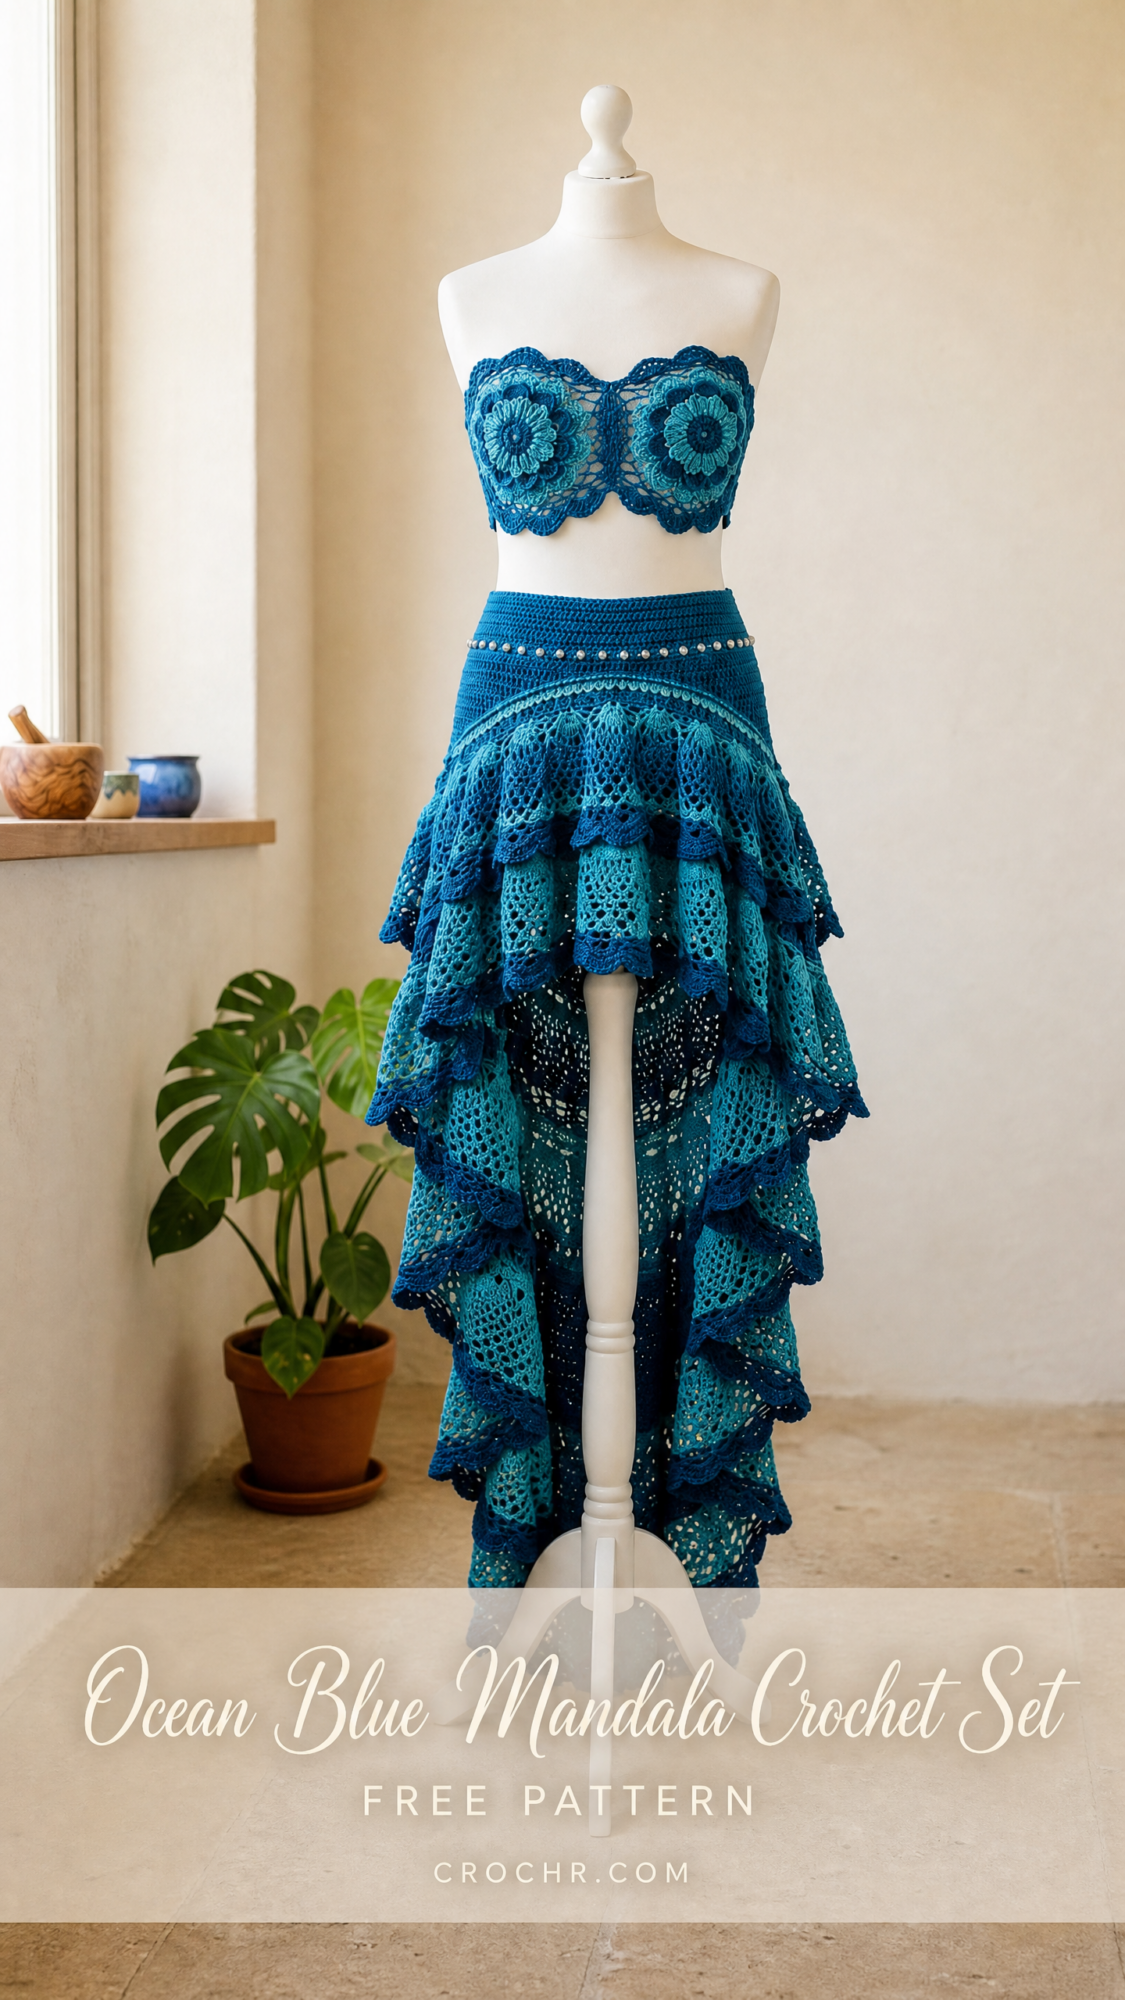
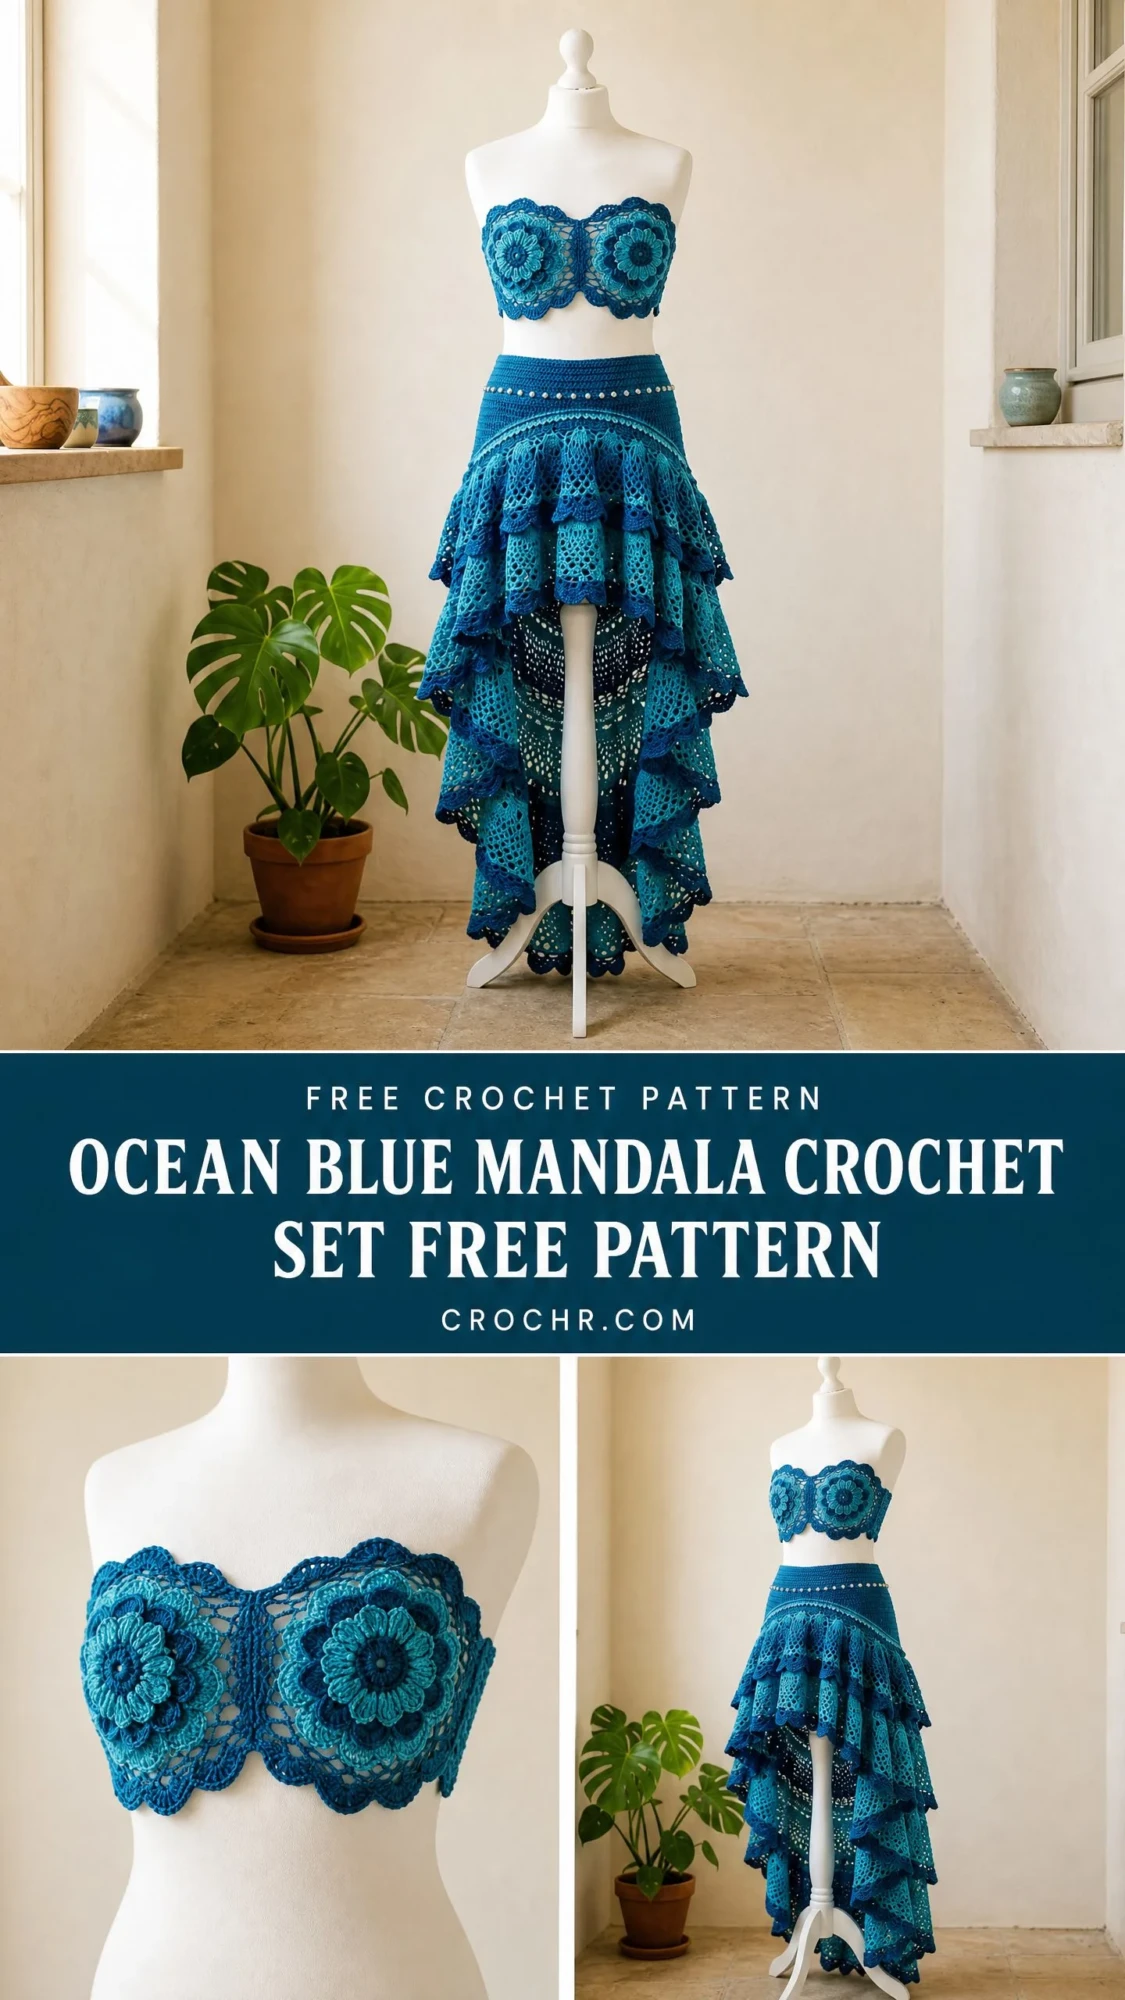
Looking for a stunning handmade piece that works double duty as a beach coverup or festival statement? This two-piece crochet set delivers both. The bandeau top features gorgeous mandala flower cups that catch the light beautifully, while the tiered high-low skirt creates dramatic movement with every step.
The construction uses classic techniques you probably already know. Single crochet, double crochet, shells, and picots combine to create something that looks far more complicated than it actually is. If you can work in the round and follow a pattern, you can absolutely make this set.
This makes an incredible gift for the confident friend who loves unique handmade pieces. It also works beautifully as a personal reward project. Yes, it takes time. About 55 to 75 hours total. But that time investment shows in every intricate detail.
About This Ocean Blue Mandala Crochet Pattern
This advanced crochet pattern creates a coordinated two-piece set in stunning ocean blue tones. The bandeau top features two mandala motifs that form shaped cups, joined with a structured lace band. The skirt starts with a fitted waistband, then cascades into layered ruffles with a dramatic high-low hemline.
The finished measurements fit a size Medium. The bandeau top measures 30 inches (76 cm) around unstretched and 6 inches (15 cm) tall at center front. The tiered skirt has a 30-inch (76 cm) waist unstretched, with a 14-inch (35.5 cm) front length and a 36-inch (91.5 cm) back length.
Size customization tips appear at the end of the original pattern for adjusting fit.
Materials You Will Need
Yarn: Fingering weight cotton or cotton-blend yarn in three shades. You will need approximately 400 yards (366 m) of each color for a total of 1,200 yards (1,097 m).
Recommended yarn options:
Crochet Hooks:
Notions:
Gauge
Getting gauge right is critical for proper fit on this garment.
Using US B-1 / 2.25 mm hook and Color B:
Mandala motif gauge: One completed mandala cup motif through Round 6 = 4 inches (10 cm) in diameter
Ruffle tier gauge: One lace repeat of 10 stitches = approximately 1.75 inches (4.5 cm) wide
Always make a gauge swatch before beginning. Adjust hook size as needed.
Abbreviations and Special Stitches
Let me walk you through every abbreviation you will encounter. Understanding these before you start will make the pattern much easier to follow.
Standard Abbreviations:
Special Stitches:
Shell Stitch: Work 5 double crochet in the same stitch or space. This creates a fan-shaped cluster used throughout the ruffle tiers.
Picot: Chain 3, slip stitch in first chain made. This creates a small decorative bump used along scalloped edging.
Bobble (3-dc bobble): Yarn over, insert hook in stitch, yarn over and pull up a loop, yarn over, draw through 2 loops on hook. Repeat 2 more times in same stitch (4 loops on hook). Yarn over, draw through all 4 loops. These add texture to the waistband detail row.
Mandala Shell Increase: Work (dc, ch 1, dc) in same stitch or space. This creates a V-stitch used in the mandala outer rounds.
Joined Half Double Crochet (jhdc): Used for seamless joins in rounds. Work hdc in each stitch to last stitch. In last stitch, work hdc but do not finish. Drop loop, insert hook in top of first hdc of round, pick up dropped loop and pull through.
Scallop Edging: Slip stitch in first stitch, chain 1. (Sc in next 2 sts, hdc in next st, 3 dc in next st, hdc in next st, sc in next 2 sts, sl st in next st) across or around.
Pattern Notes Before You Begin
The set is worked in two separate pieces: the bandeau top and the tiered skirt.
The bandeau top is constructed from two mandala cup motifs worked in the round. The cups are joined and surrounded by a band of structured lace worked back and forth in rows. The top finishes with scallop edging along both edges.
The skirt is worked from the top down. It begins with a structured waistband in the round. Ruffle tiers are added downward, each worked in the round and increased progressively for volume. The high-low effect comes from working front and back sections separately in later tiers. The back tiers continue longer than the front.
All rounds join with a slip stitch to the beginning stitch unless noted otherwise.
When changing colors, complete the last stitch of the old color until 2 loops remain on hook, then draw the new color through.
Stitch counts appear in parentheses at the end of each row or round.
Part One: Bandeau Top
Mandala Cup Motif (Make 2)
Work with Color C and B-1 hook unless noted.
Rnd 1: MR, ch 3 (counts as first dc), work 11 dc in ring, sl st to top of ch-3 to join. (12 dc)
Rnd 2: Ch 3, dc in same st, 2 dc in each st around, sl st to top of ch-3. (24 dc)
Rnd 3: Ch 3, dc in same st, dc in next st, (2 dc in next st, dc in next st) around, sl st to top of ch-3. (36 dc)
Rnd 4: Join Color B. Ch 4 (counts as dc plus ch 1), sk 1 st, (dc in next st, ch 1, sk 1 st) around, sl st to 3rd ch of ch-4 to join. (18 dc, 18 ch-1 sps)
Rnd 5: Sl st into first ch-1 sp, ch 3, 4 dc in same sp (shell made), (shell in next ch-1 sp) around, sl st to top of ch-3 to join. (18 shells, 90 dc total)
Rnd 6: Ch 1, sc in same st, (ch 2, sk 4 dc, sc in sp between shells, ch 2, sk 4 dc, sc in top of next shell center dc) around, adjusting to maintain pattern. Work (sc, ch 2, sc) spacing as follows: sc in first dc of shell, ch 3, sc in last dc of shell, ch 1, sl st between shells to form scallop outline. Total sts after Rnd 6: 36 sc and 36 ch-sps around outer edge, giving a total working edge of 72 loops.
Checkpoint: Each completed cup motif should measure approximately 4 inches (10 cm) in diameter and be slightly concave when held in the hand due to the tension of the inner rounds.
Joining the Two Cup Motifs
Hold both motifs with RS facing. Using Color A and B-1 hook, sl st through corresponding edge stitches of both motifs at their meeting point, joining for approximately 2 inches (5 cm), which is approximately 11 stitches, at center. This creates the center bridge between the cups.
Bandeau Body Band
The body band is worked back and forth in rows, beginning from the lower edge of the joined cups and extending down to form the bottom portion of the top.
Join Color B to the lower right edge of the joined cup assembly with RS facing.
Row 1 (RS): Ch 1, sc evenly across the lower edge of both cups and joining bridge, placing 1 sc per stitch and 1 sc per ch-sp. Total across: 80 sc. (80 sc)
Row 2 (WS): Ch 3 (t-ch, counts as first dc), turn. Dc in next st, (ch 1, sk 1 st, dc in next st) across. End with dc in last st. (40 dc, 39 ch-1 sps)
Row 3 (RS): Ch 1, turn. Sc in first dc, sc in ch-1 sp, (sc in next dc, sc in ch-1 sp) across, sc in top of t-ch. (80 sc)
Row 4 (WS): Ch 3, turn. Dc in first 2 sts, (ch 2, sk 2, dc in next 4 sts) 12 times, ch 2, sk 2, dc in last 2 sts. (42 dc, 13 ch-2 sps, total positions = 80)
Row 5 (RS): Ch 1, turn. Sc in each dc and 2 sc in each ch-2 sp across. (68 sc) Note: This intentional slight decrease provides waist shaping on the bandeau.
Row 6 (WS): Ch 1, turn. Sc in each st across. (68 sc)
Row 7 (RS): Ch 3, turn. Dc in each st across. (68 dc counting t-ch as first dc)
Row 8 (WS): Ch 1, turn. Sc in each st across. End sc in top of t-ch. (68 sc)
Join Color A.
Row 9 (RS, Color A): Ch 1, turn. Work scallop edging across lower edge: sc in first 2 sts, hdc in next st, 3 dc in next st, hdc in next st, sc in next 2 sts, sl st in next st. Repeat from beginning of scallop across. Work 7 full repeats, then sc remaining 5 sts. Fasten off Color A.
Upper Edge Scallop
With RS facing, join Color A to upper right edge of cup assembly.
Rnd 1: Ch 1, work sc evenly around entire upper edge of the cups, including the bridge. Place 1 sc per stitch, 1 sc per ch-sp. Aim for a total divisible by 9 for scallop fit. Work 72 sc around. Join with sl st. (72 sc)
Rnd 2: Work scallop edging: (sc in 2 sts, hdc in 1 st, 3 dc in 1 st, hdc in 1 st, sc in 2 sts, sl st in 1 st) 8 times around. Join with sl st. Fasten off. (72 sts worked)
Checkpoint: After completing the bandeau, the piece should measure approximately 6 inches (15 cm) tall at center front from lower scallop to upper scallop, and approximately 30 inches (76 cm) around the circumference at the bottom band when lightly stretched.
Part Two: Tiered High-Low Skirt
Waistband
Work with Color B and B-1 hook.
Foundation: Ch 166, being careful not to twist. Sl st to first ch to join in round.
Rnd 1: Ch 1, sc in each ch around. Join. (166 sc)
Rnd 2: Ch 1, sc in BLO of each st around. Join. (166 sc)
Rnds 3 through 6: Ch 1, sc in each st around. Join. (166 sc each round)
Rnd 7 (bobble detail): Ch 1, sc in first 4 sts, (bobble in next st, sc in next 4 sts) around, ending with sc in last st if needed. Work 33 repeats then sc in last st. (33 bobbles, 133 sc) Total: 166 sts.
Rnd 8: Ch 1, sc in each st around (work sc in top of each bobble). Join. (166 sc)
Rnds 9 through 12: Ch 1, sc in each st around. Join. (166 sc each round)
Rnd 12 is the fold line. Fold the waistband in half toward the inside (WS) along Rnd 2 (the BLO row). The elastic casing will be formed after the skirt is complete.
Skirt Body: Yoke Section
The yoke connects waistband to ruffles and includes a V-shape detail visible at center front and center back. Work from Rnd 13 downward.
Rnd 13: Join Color A. Ch 1, sc in each st around. Join. (166 sc)
Rnd 14: Ch 3, dc in each st around. Join to top of ch-3. (166 dc)
Rnd 15: Ch 1, sc in each st around. Join. (166 sc)
Rnd 16: Join Color B. Ch 1, sc in each st around. Join. (166 sc)
Rnd 17: Ch 3, (dc in next 4 sts, ch 1, sk 1 st) 33 times, dc in last st. Join. (133 dc, 33 ch-1 sps) Total: 166 working positions.
Rnd 18: Ch 1, sc in each dc and sc in each ch-1 sp around. Join. (166 sc)
Yoke Shaping: V Detail
Work now divides into two halves (front and back) to form the V-shaped diagonal line seen in the side view. Each half has 83 sts. The V detail is worked by placing decreases at center front and center back, then filling in with short rows.
Place marker at center front (st 1) and center back (st 84).
Rnd 19: Ch 1, sc2tog over first 2 sts (center front decrease), sc in each st to 1 st before center back marker, sc2tog (center back decrease), sc in each rem st to end. Join. (164 sc)
Rnd 20: Ch 1, sc2tog at center front, sc across to 1 st before center back marker, sc2tog, sc to end. Join. (162 sc)
Rnd 21: Ch 1, sc2tog at center front, sc across to 1 st before center back marker, sc2tog, sc to end. Join. (160 sc)
Rnd 22: Ch 1, sc in each st around (no decrease). Join. (160 sc)
Rnd 23: Ch 3, (dc in next 3 sts, ch 2, sk 2 sts) 32 times. Join to ch-3. (96 dc + 32 ch-2 sps, 32 repeats)
Rnd 24: Ch 1, sc in each dc and 2 sc in each ch-2 sp around. Join. (160 sc)
Checkpoint: After the yoke, the skirt should measure approximately 5 inches (12.5 cm) from the top of the waistband to the current working edge.
Tier 1 Ruffle (Worked in the Round)
Switch to C-2 / 2.75 mm hook for all ruffle tiers.
Rnd 25: Join Color B. Ch 1, (sc in next 3 sts, 2 sc in next st) around. (200 sc)
Rnd 26: Ch 3, dc in same st, (ch 1, sk 1, 2 dc in next st) around. (200 dc, 100 ch-1 sps)
Rnd 27 (Tier 1 shell row): Ch 3, 4 dc in same ch-1 sp (shell in sp), (shell in next ch-1 sp) around. Join to top of ch-3. (100 shells, 500 dc total)
Rnd 28 (Color A, edging): Join Color A. Ch 1, sc in top of first shell center (3rd dc of shell), (ch 2, sc in top of next shell) around. Join. (100 sc, 100 ch-2 sps)
Rnd 29 (picot edging): Ch 1, (sc in sc, 2 sc in ch-2 sp, picot, sc in ch-2 sp) around. Join. Fasten off Color A. (400 sc)
Tier 2 Ruffle
Work Tier 2 from Rnd 25 base (the 200-sc round), joining below the Tier 1 shells. Insert hook into the stitches of Rnd 25 itself to begin Tier 2 from a lower attachment point. This creates the layered ruffle appearance.
Join Color C to any st of Rnd 25.
Rnd T2-1: Ch 1, (sc in next 2 sts, 2 sc in next st) around. (200 sc)
Rnd T2-2: Ch 3, (dc in next st, 2 dc in next st) around. (300 dc)
Rnd T2-3: Ch 3, dc in same st, ch 1, sk 2, (2 dc in next st, ch 1, sk 2) around. (200 dc, 100 ch-1 sps)
Rnd T2-4: (Shell of 5 dc in each ch-1 sp) around. Join. (500 dc)
Rnd T2-5: Join Color A. Ch 1, sc in center of each shell (3rd dc), (ch 3, sc in center of next shell) around. Join. (100 sc, 100 ch-3 sps)
Rnd T2-6: Ch 1, (sc in sc, 3 sc in ch-3 sp, picot) around. Join. Fasten off Color A. (400 sc)
Checkpoint: After Tier 2, the skirt from waistband to current ruffle bottom should measure approximately 14 inches (35.5 cm) at the front (shorter side). The ruffles should be layered and full.
High-Low Separation
From this point, the front of the skirt stops at Tier 2 (no additional tiers at center front). The back continues with Tiers 3 and 4, creating the high-low effect.
The division point: On Rnd 25 (the 200-sc round), the front half = sts 1 through 100, the back half = sts 101 through 200.
Tier 3 Ruffle (Back Only)
Join Color B to st 101 of Rnd 25 (first st of back half).
Work back and forth in rows (not in the round) to create the back-only extension across 100 back stitches.
Row T3-1 (RS): Ch 1, (sc in next 3 sts, 2 sc in next st) across 100 sts. (125 sc)
Row T3-2 (WS): Ch 3, turn. (dc in next 2 sts, ch 1, sk 1) across. Work 41 repeats + 2 dc. (84 dc + 41 ch-1 sps, total 125 positions)
Row T3-3 (RS): Ch 1, turn. Sc in each dc and sc in each ch-1 sp across. (125 sc)
Row T3-4 (WS): Ch 3, turn. 4 dc in same st (first shell), (sk 4 sts, shell in next st) across. (25 shells, 125 dc)
Row T3-5 (RS): Join Color A. Ch 1. Turn. Sc in top of each shell center, (ch 2, sc between shells) across. (25 sc, 24 ch-2 sps)
Row T3-6 (WS): Ch 1, turn. (sc in sc, 2 sc in ch-2 sp, picot) across, end sc in last sc. Fasten off Color A. (73 sc)
Tier 4 Ruffle (Back Only, Longest Layer)
Join Color C to Row T3-1’s base (attach to Rnd 25, st 101, same as Tier 3 start, but work below Tier 3 to form an underlayer that falls longer).
Work in rows across the 100 back stitches.
Row T4-1 (RS): Join Color C to lower edge of Tier 3 at the base row. Ch 1, (sc in next 2 sts, 2 sc in next st) across 100 sts. (133 sc)
Row T4-2 (WS): Ch 3, turn. (dc in next 3 sts, 2 dc in next st) across. (166 dc)
Row T4-3 (RS): Ch 1, turn. Sc in each st across. (166 sc)
Row T4-4 (WS): Ch 3, turn. (dc in next 2 sts, ch 2, sk 2) across. 41 repeats + final 2 dc. (86 dc + 41 ch-2 sps)
Row T4-5 (RS): Ch 1, turn. Sc in each dc, 2 sc in each ch-2 sp. (168 sc)
Row T4-6 (WS): Ch 3, turn. (sk 2, shell of 5 dc in next st, sk 2, sl st in next st) across. (28 shells, 140 dc, 28 sl sts)
Row T4-7 (RS): Join Color A. Ch 1, turn. (Sc in sl st, ch 3, sc in center of shell, ch 3) across, end sc in last sl st. (57 sc, 56 ch-3 sps)
Row T4-8 (WS): Ch 1, turn. (Sc in sc, 3 sc in ch-3 sp, picot, 3 sc in ch-3 sp) across, end sc. Fasten off Color A. (393 sc)
Checkpoint: The back of the skirt at Tier 4 should hang approximately 36 inches (91.5 cm) from the waistband top. The front ends after Tier 2 at approximately 14 inches (35.5 cm).
Final Lower Edging (All Tiers)
Using Color A and B-1 hook, work 1 round or row of slip stitch followed by picot edging along all raw lower edges of all four tiers to unify the finish.
For each tier lower edge, with RS facing, join Color A. Ch 1. Work (sc in each st, picot every 4th sc) across or around. Fasten off.
Finishing Your Ocean Blue Mandala Set
Waistband Elastic Casing
Fold the waistband along the BLO ridge (Rnd 2). With a tapestry needle and Color B yarn, whip stitch the folded edge to the inside of the skirt, leaving a 2-inch (5 cm) opening. Cut elastic to your waist measurement plus 1 inch (2.5 cm) overlap. Thread elastic through casing using a safety pin. Overlap elastic ends by 1 inch (2.5 cm) and sew securely. Close the casing opening.
Bead Embellishment
Using sewing needle and thread, attach pearl or crystal beads one at a time to Rnd 7 (bobble row) of the waistband. Place 1 bead between every other bobble on the outer-facing side. Use approximately 16 to 20 beads on the visible front section. Knot securely on the wrong side after each bead.
Blocking
Wet block both pieces. Submerge each piece in cool water for 10 minutes. Gently squeeze out excess water without wringing. Lay flat on blocking mats. Pin the mandala cups to their finished 4-inch (10 cm) circular diameter. Pin the bandeau band to 30 inches (76 cm) circumference. Pin the skirt waistband to 30 inches (76 cm) and allow ruffles to drape naturally. Let dry completely before wearing.
Tips for Success with This Crochet Tutorial
Take your time with the mandala cups. These set the tone for the entire top. If your first cup does not measure 4 inches across, adjust your hook size before making the second one.
Use stitch markers generously. Mark the beginning of each round, the center front and back on the skirt, and any division points. This prevents counting errors and makes it easier to track your place.
The high-low effect requires attention. When you reach the separation point, double check that you are working on the correct half of the skirt. The back tiers continue while the front stops.
Block before adding beads. The blocking process can shift bead placement if you add them too early.
Thank you so much for choosing this pattern for your next project. I truly hope you love making this gorgeous ocean blue set as much as I loved designing it. The finished piece is such a showstopper.
If you make this crochet pattern, I would absolutely love to see it. Tag me on Instagram or share a photo in my Facebook group. Nothing makes my day like seeing your beautiful finished projects.
Save this pattern to your Pinterest boards so you can find it when you are ready to start. And please drop a comment below if you give it a try. I read every single one and love hearing how your projects turn out!
