THIS is one of those projects that will absolutely stop people in their tracks. I’m talking jaw-dropping, "you MADE that?!" reactions every single time you wear it. Yes, this dress takes time. We’re looking at 120 to 160 hours of work. But here’s the thing: every single hour is worth it.
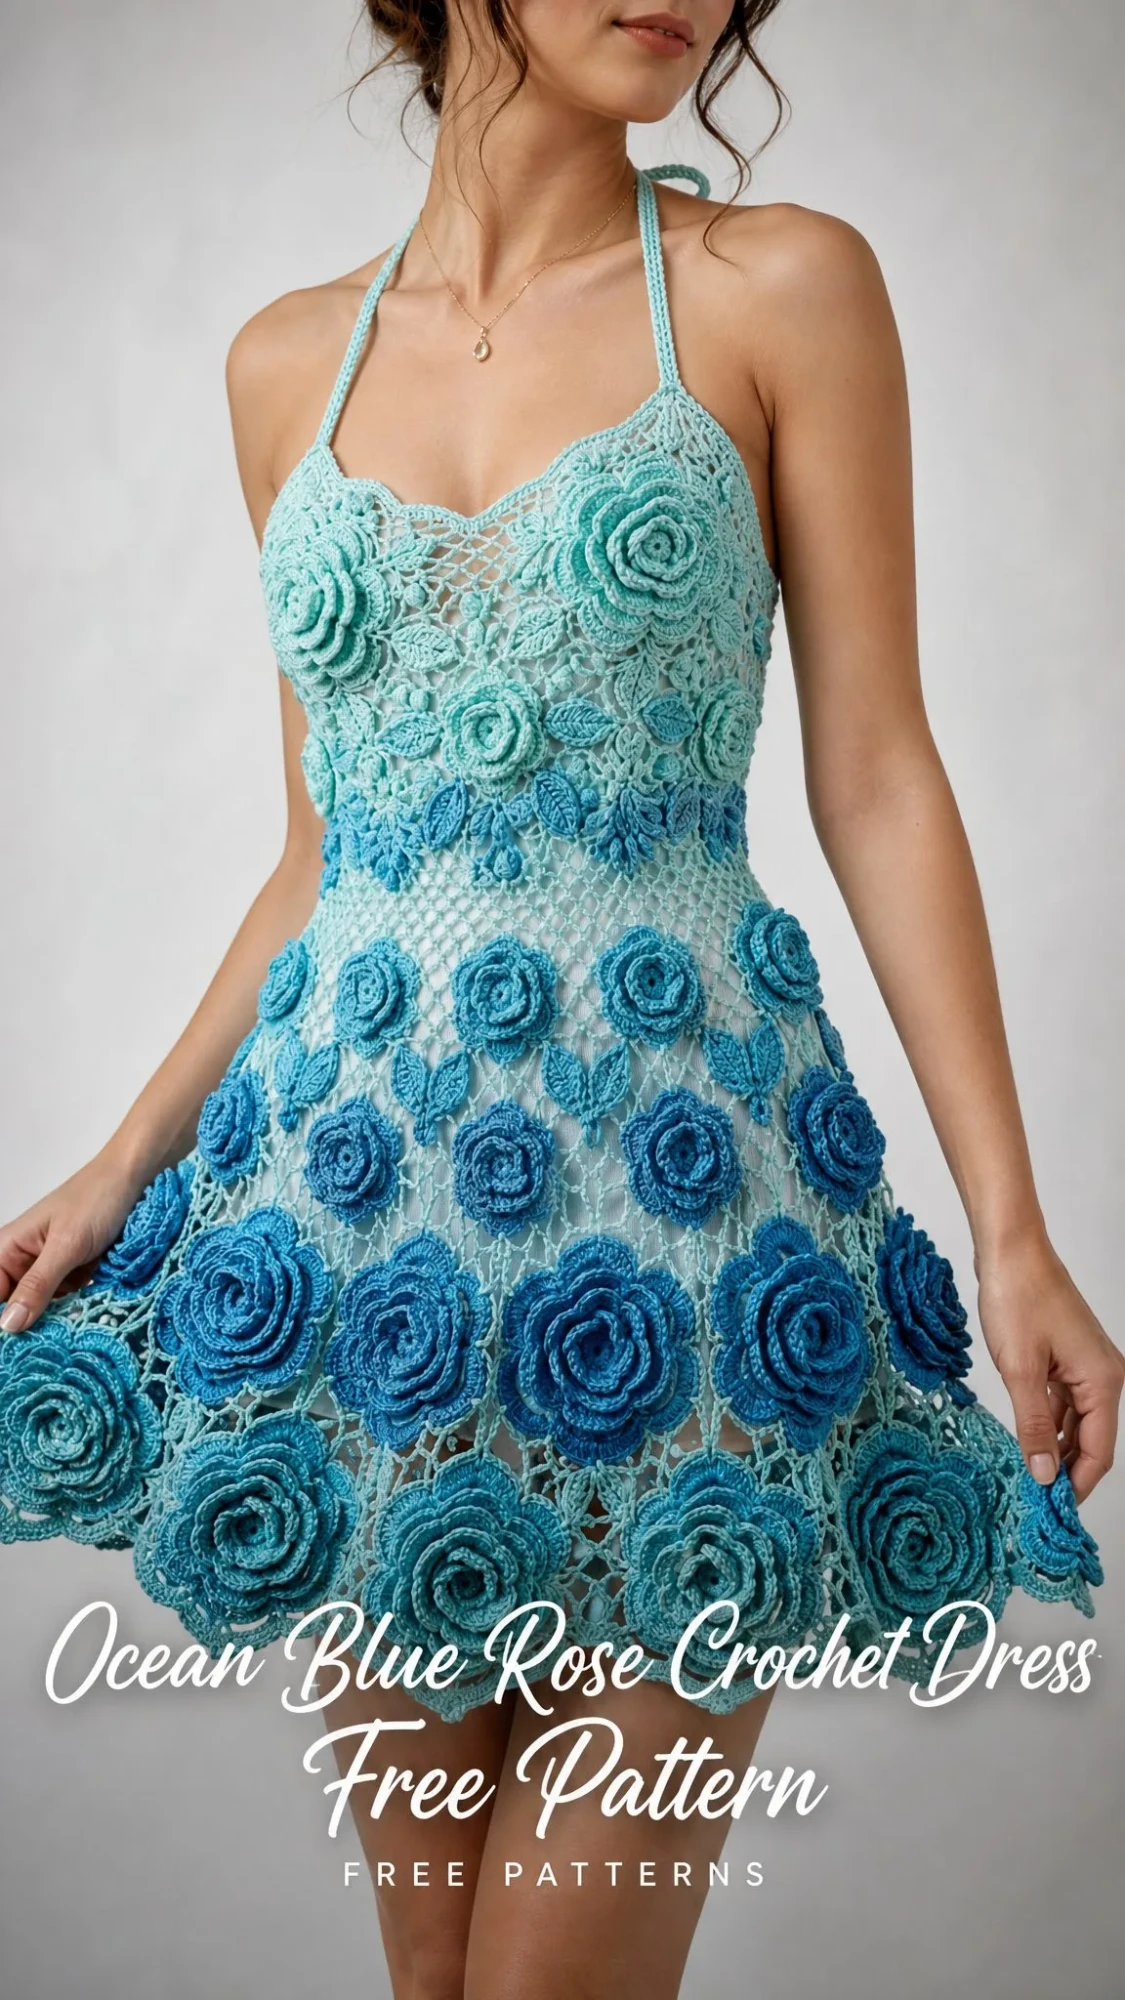
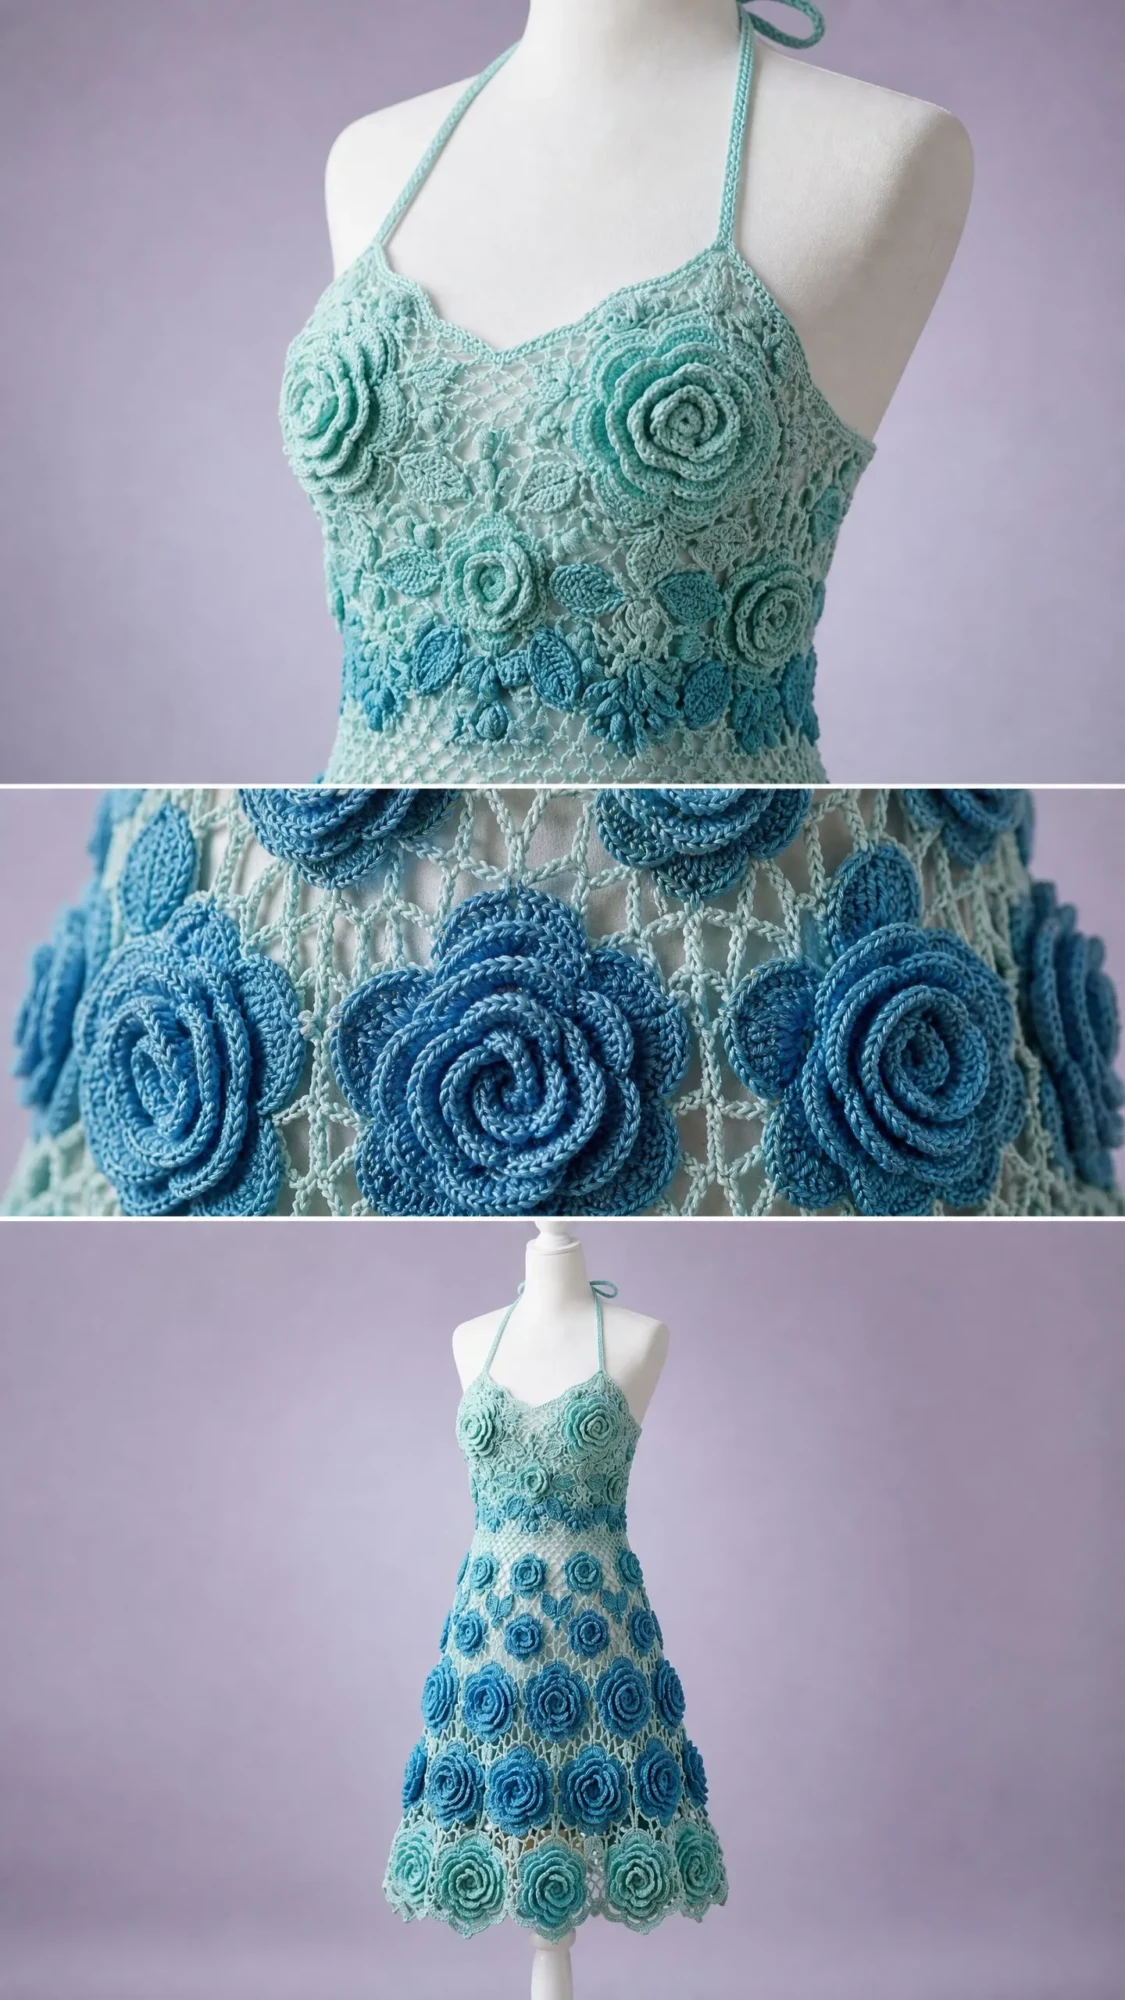
This Ocean Blue Rose Crochet Dress is the kind of showstopper that belongs in a gallery. The gradient flows from soft mint at the neckline through aqua and teal, then back to mint at the hem. Three-dimensional roses cascade down the entire dress, getting larger as they travel toward the hemline. It’s pure wearable art.
If you’ve been looking for a project to truly challenge your skills and create something museum-worthy, this is it. The Irish crochet lace technique combined with the fitted bodice construction and those stunning freestanding roses will keep your hands busy and your mind engaged for weeks. Let’s dive in.
About This Ocean Blue Rose Crochet Dress Pattern
This mini dress uses Irish crochet lace technique combined with freestanding three-dimensional roses applied to a net-stitch foundation. The bodice features a fitted sweetheart neckline with halter ties that cross at the back and tie at the nape of the neck. The skirt flares from the natural waist into an A-line silhouette that ends above the knee.
The construction method is top-down and worked in the round after joining the bodice cups. You’ll work each cup of the sweetheart neckline separately as a flat piece, shape the curves individually, then join them at center front before continuing to the skirt.
The color gradient creates a beautiful ombre effect. Mint starts at the top, transitions through light aqua, moves into medium teal, then deep teal blue dominates the skirt before returning to mint at the scalloped hem border. The roses follow a similar distribution pattern.
Skill Level: Advanced. This pattern requires proficiency in working in the round, Irish crochet lace netting, constructing three-dimensional crochet roses, shaping a fitted bodice with increases and decreases, working a sweetheart neckline curve, and executing a smooth color gradient. If you’re a beginner or intermediate crocheter, I recommend completing several smaller lace and motif projects before attempting this dress.
Finished Measurements
This dress is drafted for a US Size 4 (Small), fitting:
Materials Needed for This Crochet Dress Tutorial
Yarn: 100% mercerized cotton, sport weight (CYCA 2), approximately 2,200 yards / 2,012 meters total divided across four gradient colors:
Color A is used at top and hem. Color B is the upper transition. Color D is the dominant skirt color. Color C bridges the mid-skirt area.
Hooks:
Notions:
Yarn Suggestions
Suggestion 1: Paintbox Yarns Cotton DK (used at tension for sport gauge). 100% cotton, machine washable, excellent stitch definition, available in a wide gradient-friendly color range. Approximately 273 yards per 100g skein. Purchase 2 skeins Color A, 2 skeins Color B, 3 skeins Color C, 3 skeins Color D.
Suggestion 2: Lion Brand 24/7 Cotton in sport weight tension. 100% combed cotton, soft hand, holds shape after blocking, available in solids that blend cleanly in gradient sequences. Approximately 186 yards per 100g skein. Purchase 2 skeins Color A, 2 skeins Color B, 4 skeins Color C, 4 skeins Color D.
Suggestion 3: Scheepjes Catona (25g ball, 62 yards) or Scheepjes Cahlista (50g ball, 85 yards). 100% Egyptian mercerized cotton, extraordinary color range ideal for custom gradient blending, excellent sheen for the lace net texture.
Substitution note: Any sport weight (CYCA 2) 100% cotton or cotton-blend yarn that matches the gauge will work. Avoid fuzzy or hairy fibers. This pattern depends on stitch visibility for the lace net and crisp rose petals. Always work a gauge swatch before beginning.
Gauge
Using D-3 hook and sport weight cotton:
Net lace gauge using D-3 hook:
Rose gauge:
Gauge is critical for fit. Adjust hook size as needed to match.
Abbreviations and Stitch Definitions
Special Stitches and Techniques
Braided Halter Cord
Make two lengths of twisted cord by cutting 6 strands of Color A each 90 inches / 229 cm long. Hold all 6 strands together, anchor one end, and twist tightly in one direction until the cord wants to fold back on itself. Fold in half and allow it to twist together. Knot both ends. Each finished cord should be approximately 40 inches / 102 cm long. These serve as the halter straps.
Net Lace Stitch (worked in rounds)
The net lace is worked on a multiple of 6 stitches plus any adjustment for joining.
Round setup: Sc in first ch-sp, (ch 5, sk next ch-sp or indicated sts, sc in next ch-sp) around, ch 5, join with sl st to first sc.
Each subsequent net round: Sl st across to center of first ch-5 sp, sc in same sp, (ch 5, sc in next ch-5 sp) around, ch 2, dc in first sc to form final sp of round.
Ending with ch 2, dc instead of ch 5 and joining counts as the last ch-5 space and keeps the round even. Work the first sc of the next round into the sp formed by that dc.
Scallop Border
Worked along the hemline after skirt is complete.
Join yarn in any ch-5 sp. (Sl st, ch 3, 4 dc, ch 3, sl st) in same sp. Sl st in next sc. Repeat from first parenthesis in each ch-5 sp around. Join with sl st to first sl st.
Small Rose (approximately 1.5 inches / 3.8 cm)
Using C-2 hook and designated color.
Foundation chain: Ch 36.
Row 1: Sc in 2nd ch from hook and in each ch across. (35 sc)
Row 2: Ch 1, turn. (Sc, hdc, 3 dc, hdc, sc) in next 5 sts. This forms one petal. Repeat 6 more times total for 7 petals. Fasten off leaving a 12-inch / 30 cm tail.
Assembly: Starting from one end, roll the rose strip tightly on itself, gathering at the base. Use the tail to whipstitch through all layers at the base several times to secure. The outermost petals will fan out naturally.
Leaf (optional, make 2 per rose): Ch 9. Sc in 2nd ch from hook, hdc in next, dc in next 3, hdc in next, sc in next, sl st in last. Fasten off.
Medium Rose (approximately 2 inches / 5 cm)
Using C-2 hook and designated color.
Foundation chain: Ch 50.
Row 1: Sc in 2nd ch from hook and in each ch across. (49 sc)
Row 2: Ch 1, turn. (Sc, hdc, 3 dc, hdc, sc) in next 5 sts. This creates one petal. Repeat 8 more times total for 9 petals. Some stitches may be worked together at joins between petals. Fasten off leaving a 12-inch / 30 cm tail.
Assembly: Roll and secure as for small rose.
Large Rose (approximately 2.75 inches / 7 cm)
Using C-2 hook and designated color.
Foundation chain: Ch 72.
Row 1: Sc in 2nd ch from hook and in each ch across. (71 sc)
Row 2: Ch 1, turn. (Sc, hdc, 2 dc, tr, 2 dc, hdc, sc) in next 7 sts. This creates a larger petal. Repeat 9 more times total for 10 petals. Last petal uses remaining 11 sts: sc, hdc, 2 dc, tr, 2 dc, hdc, sc, sc. Fasten off leaving a 12-inch / 30 cm tail.
Assembly: Roll and secure as for small rose but slightly looser to allow petals to open wider.
Step by Step Instructions
Bodice: Right Cup
Using D-3 hook and Color A, ch 22.
Row 1 (WS): Sc in 2nd ch from hook and in each ch across. Ch 1, turn. (21 sc)
Row 2 (RS): Sc in each sc across. Ch 1, turn. (21 sc)
Row 3: Sc2tog over first 2 sts, sc to last 2 sts, sc2tog. Ch 1, turn. (19 sc)
Row 4: Sc in each sc across. Ch 1, turn. (19 sc)
Row 5: Sc2tog, sc to last 2 sts, sc2tog. Ch 1, turn. (17 sc)
Row 6: Sc in each sc across. Ch 1, turn. (17 sc)
Row 7: Sc2tog, sc to last 2 sts, sc2tog. Ch 1, turn. (15 sc)
Row 8: Sc in each sc across. Ch 1, turn. (15 sc)
Row 9: Sc2tog, sc to last 2 sts, sc2tog. Ch 1, turn. (13 sc)
Row 10: Sc in each sc across. Ch 1, turn. (13 sc)
Row 11: Sc2tog, sc to last 2 sts, sc2tog. Ch 1, turn. (11 sc)
Row 12: Sc in each sc across. Ch 1, turn. (11 sc)
Row 13: Sc2tog, sc to last 2 sts, sc2tog. Ch 1, turn. (9 sc)
Row 14: Sc in each sc across. Do not turn. Do not fasten off. (9 sc)
This completes the right cup. Place stitches on holder or leave on hook.
Bodice: Left Cup
Using D-3 hook and Color A, ch 22.
Row 1 (WS): Sc in 2nd ch from hook and in each ch across. Ch 1, turn. (21 sc)
Rows 2 through 14: Work exactly as Rows 2 through 14 of Right Cup. (9 sc at end of Row 14)
Fasten off left cup leaving a 6-inch tail for weaving.
Joining the Cups and Working the Bodice Band
With RS of both cups facing up, and right cup still on hook, ch 4. This bridge chain spans the center dip of the sweetheart neckline between the two cups.
With RS facing, sc across all 9 sts of left cup. Ch 1, turn. (9 sc + 4 ch + 9 sc = 22 working positions)
Joining Row (WS): Sc in each of 9 sc of left cup, sc in each of 4 ch, sc in each of 9 sc of right cup. Ch 1, turn. (22 sc)
You now work on the joined piece in rows to create the bodice band that will wrap around to the underarm.
Bodice Band Row 1 (RS): Sc in each sc across. Ch 1, turn. (22 sc)
Bodice Band Row 2: Sc in each sc across. Ch 1, turn. (22 sc)
Bodice Band Row 3: Inc in first st, sc to last st, inc in last st. Ch 1, turn. (24 sc)
Bodice Band Row 4: Sc in each sc across. Ch 1, turn. (24 sc)
Bodice Band Row 5: Inc in first st, sc to last st, inc in last st. Ch 1, turn. (26 sc)
Bodice Band Row 6: Sc in each sc across. Ch 1, turn. (26 sc)
Bodice Band Row 7: Inc in first st, sc to last st, inc in last st. Ch 1, turn. (28 sc)
Bodice Band Row 8: Sc in each sc across. Ch 1, turn. (28 sc)
Bodice Band Row 9: Inc in first st, sc to last st, inc in last st. Ch 1, turn. (30 sc)
Bodice Band Row 10: Sc in each sc across. Ch 1, turn. (30 sc)
Bodice Band Row 11: Inc in first st, sc to last st, inc in last st. Ch 1, turn. (32 sc)
Bodice Band Row 12: Sc in each sc across. Ch 1, turn. (32 sc)
Bodice Band Row 13: Inc in first st, sc to last st, inc in last st. Ch 1, turn. (34 sc)
Bodice Band Row 14: Sc in each sc across. Do not turn. (34 sc)
CHECKPOINT: After completing both cups and the bodice band, the total piece from cup tops to bottom of band should measure approximately 7 inches / 18 cm tall. The bottom edge of the joined band should measure approximately 7 inches / 17.8 cm wide (34 sc at approximately 20 sc per 4 inches).
Joining for Working in the Round at Underarm
You will now join the front bodice band to a chain that creates the back width, then work in the round.
With RS facing and working along the bottom edge of the bodice band, do not fasten off. Ch 56. This chain creates the back of the dress from underarm to underarm, accounting for the open-back halter design. Join with sl st to first sc of the bodice band bottom edge, being careful not to twist the chain. (34 sc front + 56 ch back = 90 total working positions)
Round 1: Sc in each of 34 sc of front band, sc in each of 56 ch of back chain. Join with sl st to first sc. (90 sc)
Round 2: Ch 1, sc in each sc around. Join with sl st to first sc. (90 sc)
Round 3: Ch 1, sc in each of first 10 sc, sc2tog, sc in next 33 sc, sc2tog, sc in next 10 sc, sc2tog, sc in next 31 sc, sc2tog. Join with sl st to first sc. (86 sc)
Round 4: Ch 1, sc in each sc around. Join with sl st to first sc. (86 sc)
Round 5: Ch 1, sc in each of first 9 sc, sc2tog, sc in next 31 sc, sc2tog, sc in next 9 sc, sc2tog, sc in next 29 sc, sc2tog. Join with sl st to first sc. (82 sc)
Round 6: Ch 1, sc in each sc around. Join with sl st to first sc. (82 sc)
Round 7: Ch 1, sc in each of first 8 sc, sc2tog, sc in next 29 sc, sc2tog, sc in next 8 sc, sc2tog, sc in next 27 sc, sc2tog. Join with sl st to first sc. (78 sc)
Round 8: Ch 1, sc in each sc around. Join with sl st to first sc. (78 sc)
This is the waist shaping. The piece now tapers to approximately 78 sc at the waist.
Round 9: Ch 1, sc in each sc around. Join with sl st to first sc. (78 sc)
Round 10: Ch 1, sc in each sc around. Join with sl st to first sc. (78 sc)
Transition to Net Lace
Switch to E-4 hook. The 78 sc adapt perfectly to a net repeat of 6 (78 divided by 6 = 13 repeats exactly).
Net Setup Round: Ch 1, sc in first sc, (ch 5, sk 5 sc, sc in next sc) 12 times, ch 5, sk last 5 sc, join with ch 2, dc in first sc to form final sp. (13 ch-5 sps)
Net Round 1: Sc in joining sp (formed by dc), (ch 5, sc in next ch-5 sp) 12 times, ch 2, dc in first sc. (13 ch-5 sps)
Net Round 2: Sc in joining sp, (ch 5, sc in next ch-5 sp) 12 times, ch 2, dc in first sc. (13 ch-5 sps)
Net Round 3: Sc in joining sp, (ch 5, sc in next ch-5 sp) 12 times, ch 2, dc in first sc. (13 ch-5 sps)
Net Round 4: Sc in joining sp, (ch 5, sc in next ch-5 sp) 12 times, ch 2, dc in first sc. (13 ch-5 sps)
Skirt Flare: Increase Rounds
Increases in net lace are accomplished by working ch-7 arches at increase points, then splitting those arches into two ch-5 spaces in the following round.
Increase Round 1: Sc in joining sp, (ch 5, sc in next ch-5 sp) 5 times, ch 7, sc in next ch-5 sp, (ch 5, sc in next ch-5 sp) 5 times, ch 7, sc in next ch-5 sp, ch 2, dc in first sc. (13 ch-5 sps + 2 ch-7 sps = 15 total arch sps)
Split Round 1: Sc in joining sp, (ch 5, sc in next ch-5 sp) 5 times, ch 5, sc in center of ch-7 arch, ch 5, sc in next sc, (ch 5, sc in next ch-5 sp) 5 times, ch 5, sc in center of ch-7 arch, ch 5, sc in next sc, ch 2, dc in first sc. (15 ch-5 sps)
Work 3 plain net rounds on 15 ch-5 sps:
Plain Net Round A: Sc in joining sp, (ch 5, sc in next ch-5 sp) 14 times, ch 2, dc in first sc. (15 ch-5 sps)
Plain Net Round B: Repeat Plain Net Round A. (15 ch-5 sps)
Plain Net Round C: Repeat Plain Net Round A. (15 ch-5 sps)
Increase Round 2: Sc in joining sp, (ch 5, sc in next ch-5 sp) 6 times, ch 7, sc in next ch-5 sp, (ch 5, sc in next ch-5 sp) 6 times, ch 7, sc in next ch-5 sp, ch 2, dc in first sc. (15 ch-5 sps + 2 ch-7 sps = 17 total arch sps)
Split Round 2: Sc in joining sp, (ch 5, sc in next ch-5 sp) 6 times, ch 5, sc in center of ch-7 arch, ch 5, sc in next sc, (ch 5, sc in next ch-5 sp) 6 times, ch 5, sc in center of ch-7 arch, ch 5, sc in next sc, ch 2, dc in first sc. (17 ch-5 sps)
Work 3 plain net rounds on 17 ch-5 sps:
Plain Net Round D: Sc in joining sp, (ch 5, sc in next ch-5 sp) 16 times, ch 2, dc in first sc. (17 ch-5 sps)
Plain Net Round E: Repeat Plain Net Round D. (17 ch-5 sps)
Plain Net Round F: Repeat Plain Net Round D. (17 ch-5 sps)
Increase Round 3: Sc in joining sp, (ch 5, sc in next ch-5 sp) 7 times, ch 7, sc in next ch-5 sp, (ch 5, sc in next ch-5 sp) 7 times, ch 7, sc in next ch-5 sp, ch 2, dc in first sc. (17 ch-5 sps + 2 ch-7 sps = 19 total arch sps)
Split Round 3: Sc in joining sp, (ch 5, sc in next ch-5 sp) 7 times, ch 5, sc in center of ch-7 arch, ch 5, sc in next sc, (ch 5, sc in next ch-5 sp) 7 times, ch 5, sc in center of ch-7 arch, ch 5, sc in next sc, ch 2, dc in first sc. (19 ch-5 sps)
Work 3 plain net rounds on 19 ch-5 sps:
Plain Net Round G: Sc in joining sp, (ch 5, sc in next ch-5 sp) 18 times, ch 2, dc in first sc. (19 ch-5 sps)
Plain Net Round H: Repeat Plain Net Round G. (19 ch-5 sps)
Plain Net Round I: Repeat Plain Net Round G. (19 ch-5 sps)
Increase Round 4: Sc in joining sp, (ch 5, sc in next ch-5 sp) 8 times, ch 7, sc in next ch-5 sp, (ch 5, sc in next ch-5 sp) 8 times, ch 7, sc in next ch-5 sp, ch 2, dc in first sc. (19 ch-5 sps + 2 ch-7 sps = 21 total arch sps)
Split Round 4: Sc in joining sp, (ch 5, sc in next ch-5 sp) 8 times, ch 5, sc in center of ch-7 arch, ch 5, sc in next sc, (ch 5, sc in next ch-5 sp) 8 times, ch 5, sc in center of ch-7 arch, ch 5, sc in next sc, ch 2, dc in first sc. (21 ch-5 sps)
Work 4 plain net rounds on 21 ch-5 sps:
Plain Net Round J: Sc in joining sp, (ch 5, sc in next ch-5 sp) 20 times, ch 2, dc in first sc. (21 ch-5 sps)
Plain Net Round K: Repeat Plain Net Round J. (21 ch-5 sps)
Plain Net Round L: Repeat Plain Net Round J. (21 ch-5 sps)
Plain Net Round M: Repeat Plain Net Round J. (21 ch-5 sps)
Increase Round 5: Sc in joining sp, (ch 5, sc in next ch-5 sp) 9 times, ch 7, sc in next ch-5 sp, (ch 5, sc in next ch-5 sp) 9 times, ch 7, sc in next ch-5 sp, ch 2, dc in first sc. (21 ch-5 sps + 2 ch-7 sps = 23 total arch sps)
Split Round 5: Sc in joining sp, (ch 5, sc in next ch-5 sp) 9 times, ch 5, sc in center of ch-7 arch, ch 5, sc in next sc, (ch 5, sc in next ch-5 sp) 9 times, ch 5, sc in center of ch-7 arch, ch 5, sc in next sc, ch 2, dc in first sc. (23 ch-5 sps)
Work 4 plain net rounds on 23 ch-5 sps:
Plain Net Round N: Sc in joining sp, (ch 5, sc in next ch-5 sp) 22 times, ch 2, dc in first sc. (23 ch-5 sps)
Plain Net Round O: Repeat Plain Net Round N. (23 ch-5 sps)
Plain Net Round P: Repeat Plain Net Round N. (23 ch-5 sps)
Plain Net Round Q: Repeat Plain Net Round N. (23 ch-5 sps)
CHECKPOINT: After Increase Round 5 and its plain rounds, the skirt should measure approximately 17 inches / 43 cm from the underarm join round, with 23 ch-5 sps around.
Scallop Hem Border
Change to Color A and D-3 hook.
Join Color A with sl st to any ch-5 sp.
Scallop Round: (Sl st, ch 3, 4 dc, ch 3, sl st) in same ch-5 sp, sl st in next sc. Repeat (sl st, ch 3, 4 dc, ch 3, sl st) in next ch-5 sp, sl st in next sc around. Join with sl st to first sl st. (23 scallops)
Fasten off. Weave in end.
Color Change Sequence for Skirt
Begin skirt net lace with Color B (Light Aqua). After Net Setup Round through Plain Net Round C (7 rounds total), use Color B. Change to Color C at Increase Round 2. Work through Plain Net Round F in Color C. Change to Color D at Increase Round 3. Work through Plain Net Round Q in Color D. Change to Color A for Scallop Hem Border only.
Halter Straps
Make 2 braided cords as described in Special Stitches.
Thread one cord through the top left edge of the left cup, starting from the outside of the bodice at the top peak of the cup. Bring cord up and over the shoulder to the back. The second cord does the same from the top right edge of the right cup. Both cords cross at the upper back forming an X or run parallel and tie at the nape of the neck. Knot ends together or leave long tails for tying.
For a cleaner finish, work a row of sc along the upper edge of each cup and incorporate the cord directly by sewing it securely with tapestry needle and matching thread through multiple points along the edge, ending in a long tie at the top.
Rose Construction and Placement Guide
Construct roses in the following quantities and colors:
Small roses (1.5 inch / 3.8 cm): Make 8 in Color A, 6 in Color B. Total: 14 small roses.
Medium roses (2 inch / 5 cm): Make 10 in Color C, 8 in Color D. Total: 18 medium roses.
Large roses (2.75 inch / 7 cm): Make 12 in Color D, 6 in Color C, 4 in Color A. Total: 22 large roses.
Grand total: 54 roses.
Placement Guide
Bodice (above waist): Place 6 small Color A roses evenly distributed across the sweetheart neckline area, 3 per cup, nestled among the lace stitches. Place 4 small Color B roses just below these along the waist band.
Upper skirt (Color B and C net rounds): Place 8 medium Color C roses evenly spaced around the circumference in two staggered rows.
Mid skirt (Color D rounds): Place 10 medium Color D roses in staggered rows.
Lower skirt (Color D and C rounds): Place 12 large Color D roses in a row near the lower skirt, then 6 large Color C roses above them. Finally, place 4 large Color A roses along the hem border for the return to mint.
Block all pieces before attaching roses. Pin roses in place first to check spacing, then sew on using the yarn tails and a tapestry needle after final blocking is complete.
Pattern Notes to Remember
1. The dress is constructed top-down: bodice halves worked flat, joined at underarms, then worked in the round to the hem.
2. Do
