Last summer, my best friend called me in a panic three weeks before her outdoor bridal shower. She wanted something bohemian, romantic, and absolutely unique. Something no one else would be wearing. I stayed up way too late that night sketching ideas, and this sage green tiered dress was born from those midnight scribbles.
What started as a favor turned into one of my favorite designs ever. The moment I finished blocking the final tier and saw those pineapple lace details catch the light, I knew this pattern had to be shared. It took me back to why I fell in love with crochet in the first place.
This dress combines everything I adore about fiber arts. Delicate lace work that looks impressive but follows a logical rhythm. A fitted silhouette that actually flatters. And those dreamy ruffled tiers that move beautifully when you walk. Fair warning though, this is not a weekend project. But if you are ready to challenge yourself and create something truly stunning, let me walk you through every single step.
About This Sage Green Boho Tiered Crochet Dress Pattern
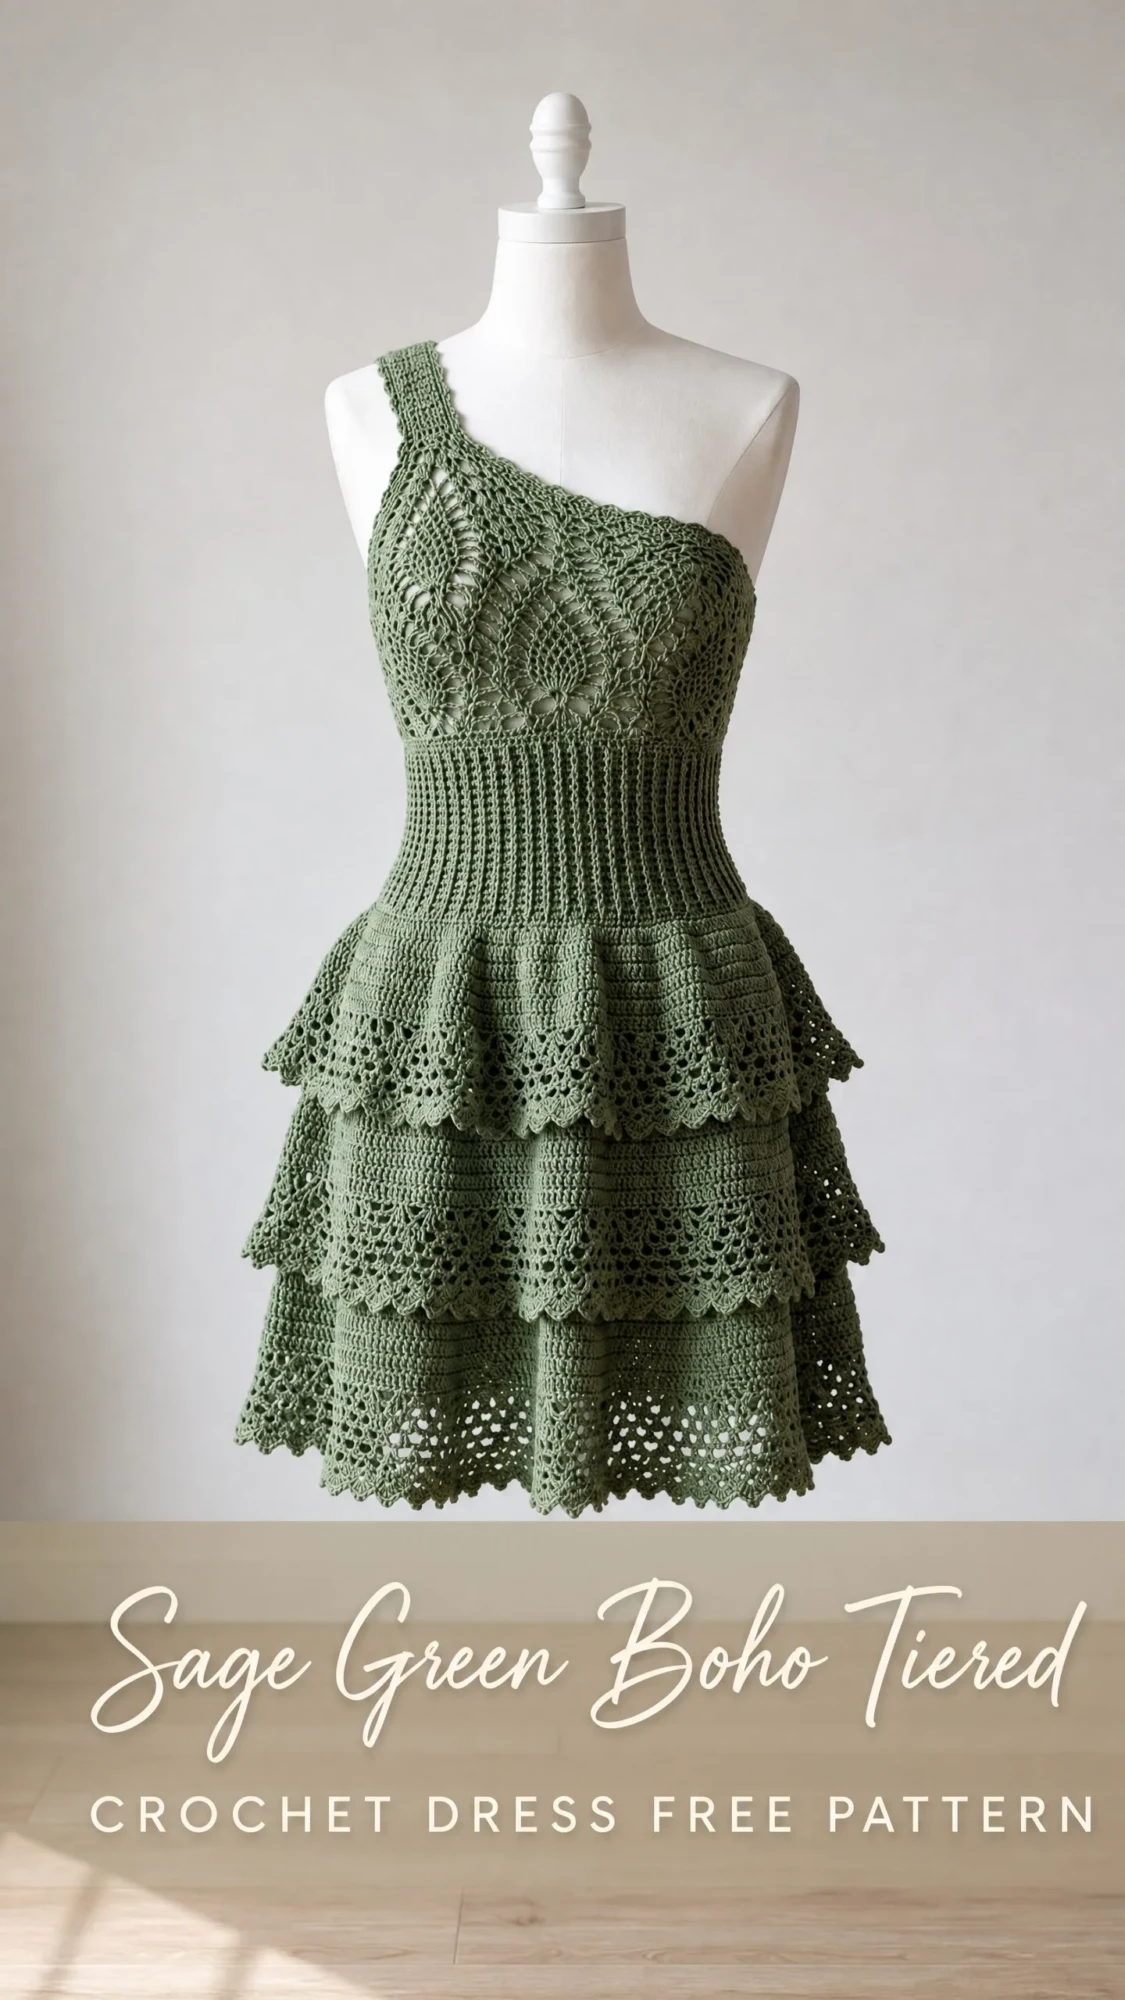
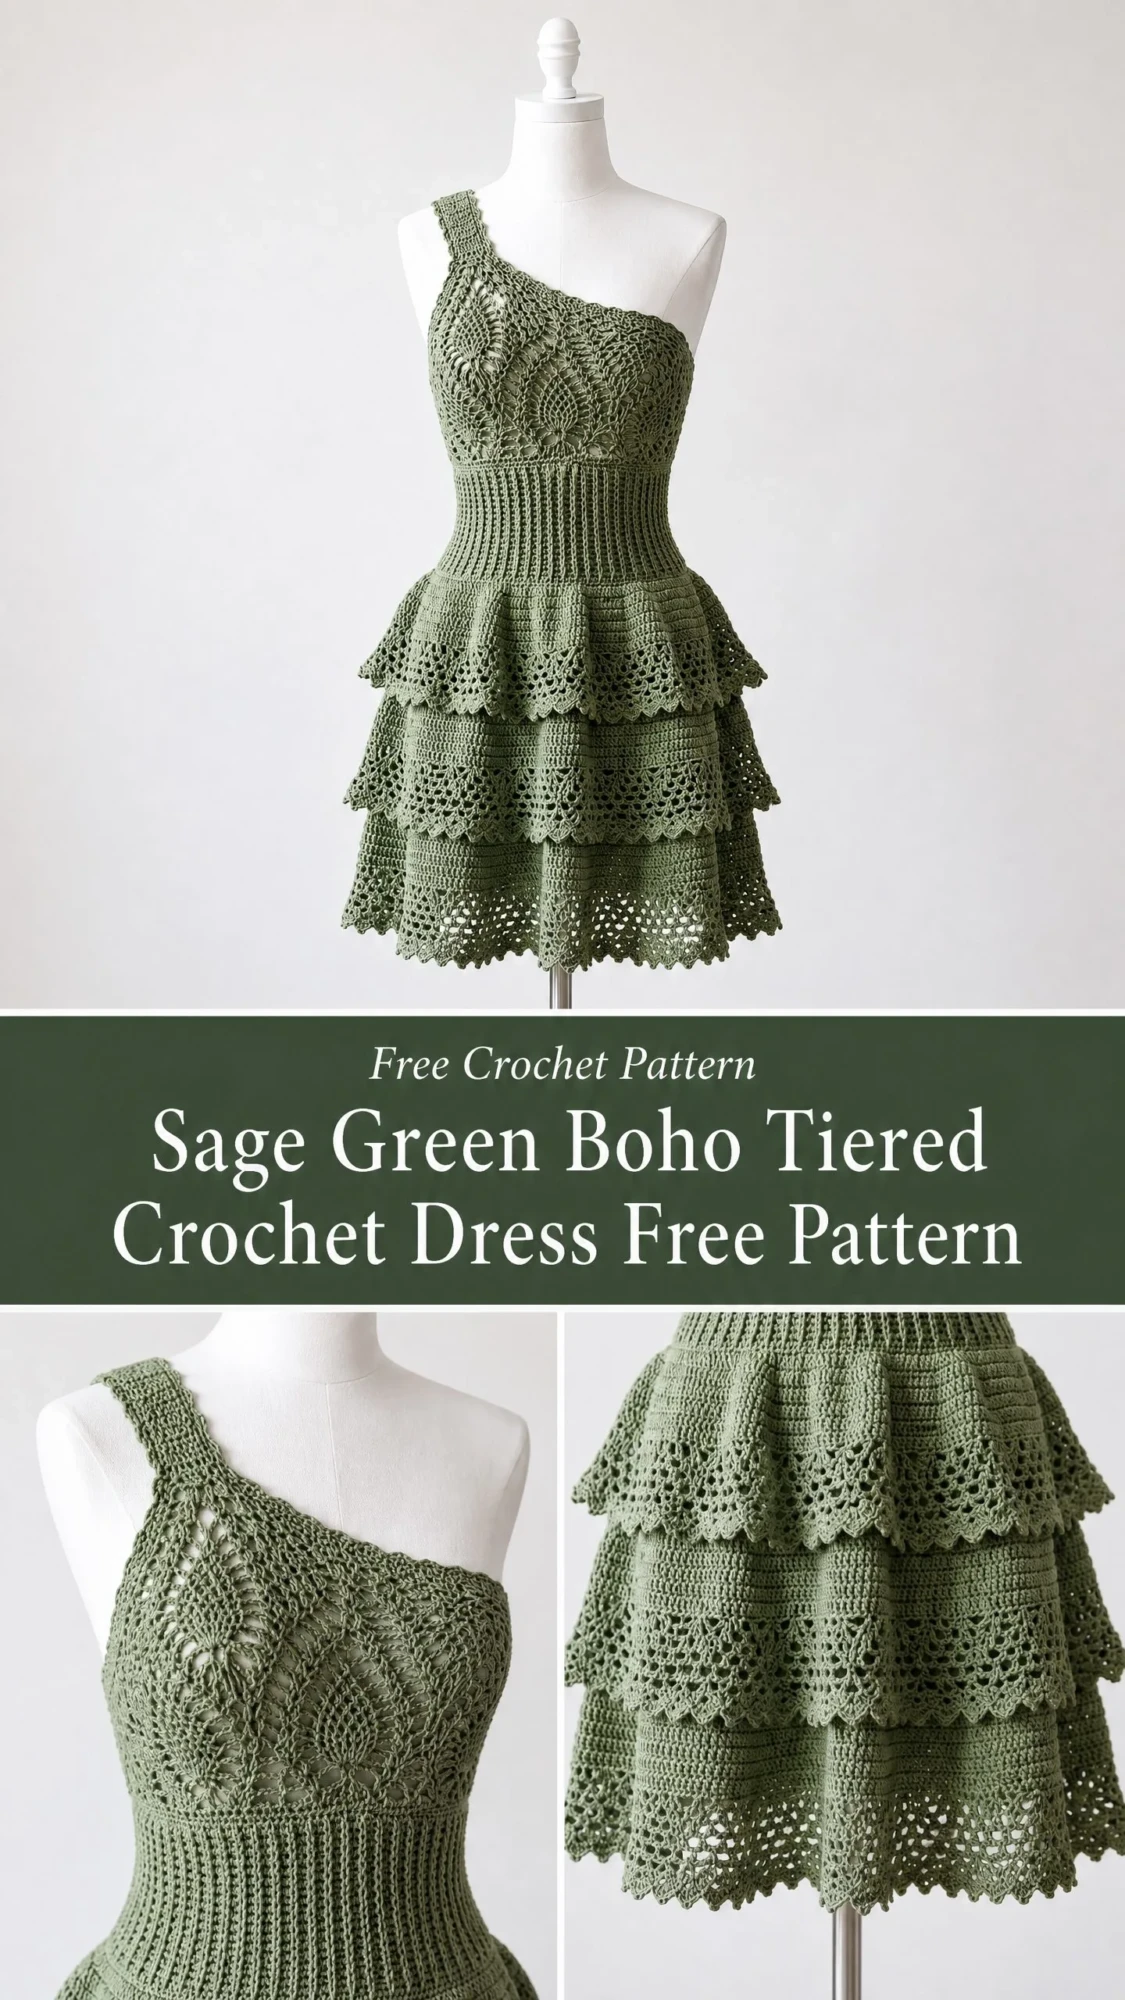
This one shoulder mini dress features a fitted bodice with a gorgeous pineapple lace motif at the bust, a stretchy ribbed waistband, and three progressively wider tiered skirt layers. Each tier ends with delicate picot-scallop trim that gives the hem that romantic, vintage feel you see in high-end boutiques.
The construction works from the top down, combining flat sections for the bodice panels with joined rounds for the skirt. The diagonal shoulder strap is crocheted separately and seamed on at the end. This approach gives you maximum control over fit and allows you to block each section before joining.
I will be honest with you. This is an intermediate to advanced level project. You should feel comfortable working in the round, reading lace patterns, executing decreases for shaping, and handling multiple construction techniques. If you have never tried pineapple stitch before, I would recommend practicing on a small swatch first. Once you get the rhythm, it becomes almost meditative.
The finished dress fits a women’s size Small/Medium (US 4-8) with a 32 to 34 inch bust and 26 to 28 inch waist. I have included customization notes at the end for adjusting the size.
Materials You Will Need
Gathering the right supplies before you start makes the whole process smoother. Here is everything you need for this crochet dress pattern.
Yarn:
Worsted weight cotton or cotton blend yarn, approximately 1,400 to 1,600 yards total. A smooth, mercerized cotton gives the crispest stitch definition for the lace sections. You want sage green throughout, which is that beautiful muted grey-toned medium green.
Recommended yarn options:
Hooks:
Additional supplies:
Gauge Information
Gauge matters enormously for a fitted garment like this. Please do not skip this step.
Using G-6 / 4.0 mm hook:
In pineapple lace pattern:
In BLO ribbing with F-5 / 3.75 mm hook:
A difference of even half a stitch per inch will alter the finished bust measurement by over an inch across the full circumference. Take the time to swatch in both stitch patterns before beginning.
Finished Measurements
Abbreviations and Stitch Definitions
Let me break down every stitch and abbreviation you will encounter in this pattern. I am defining these in US crochet terms throughout.
Special Stitches for This Crochet Tutorial
These special techniques create the beautiful details in this dress. Take your time learning them before you start the main project.
Pineapple Base Shell:
In the designated stitch or space, work (dc, ch 1) 4 times, then dc once more. This creates 5 double crochets separated by chain-1 spaces, forming the wide base of the pineapple motif. This stitch spans 9 working stitches when accounting for the chain spaces.
Pineapple Decrease Row:
Work sc in first ch-1 sp of shell. Then (ch 3, sc in next ch-1 sp) across all ch-1 spaces of the shell. This converts a 5-dc shell into a series of ch-3 arches, narrowing the pineapple as it rises.
Picot:
Ch 3, sl st in the first ch of the ch-3 just made. This creates a small decorative knot that adds texture to edgings.
Picot-Scallop Edging:
Into designated space: work (sc, ch 2, 3 dc, picot, 3 dc, ch 2, sc). Skip 2 stitches between each scallop.
BLO Ribbing:
Work sc in the back loop only of every stitch. This creates a stretchy, ridged texture that mimics knit ribbing.
Shell Stitch:
Work 5 dc in a single stitch or space. Skip 2 stitches before and after each shell unless otherwise noted.
V-Stitch:
Work (dc, ch 2, dc) in the same stitch or space.
3-dc Cluster:
Yarn over, insert hook in st, yarn over, pull up loop, yarn over, pull through 2 loops (2 loops remain on hook). Repeat 2 more times in same stitch. Yarn over, pull through all 4 loops on hook. Counts as 1 stitch.
Step by Step Pattern Instructions
Section 1: Front Bust Pineapple Panel
The front bust panel is worked flat in rows. It spans approximately half the total bodice circumference and measures approximately 16 inches wide and 6 inches tall.
Foundation Chain: Ch 72.
Row 1 (RS): Dc in 4th ch from hook (counts as 2 dc). Dc in each ch across. Turn. (70 dc)
Row 2 (WS): Ch 1. Sc in each st across. Turn. (70 sc)
Row 3 (RS): Ch 3 (counts as dc). Dc in next 6 sts. [Sk 2 sts, work Pineapple Base Shell in next st, sk 2 sts, dc in next st] 4 times working across the center 56 stitches, then dc in rem 6 sts, dc in top of t-ch. Turn. (70 sts and ch-sps)
Each Pineapple Base Shell plus the single dc separator uses 14 stitches. The 4 pineapple units are centered across the middle 56 stitches, leaving 7 stitches on each side as plain dc borders.
Row 4 (WS): Ch 1. Sc in first dc. Sc in each dc across border sts. In each pineapple shell: sc in first ch-1 sp, (ch 3, sc in next ch-1 sp) 4 times. Sc in dc separator between pineapples. Sc in each dc across opposite border. Sc in top of t-ch. Turn.
Row 5 (RS): Ch 3 (counts as dc). Dc in next 6 sts. [Sk sc, work 4 dc in first arch of pineapple, (sc, ch 3, sc) in next arch, 4 dc in next arch, (sc, ch 3, sc) in next arch, 4 dc in next arch, sk sc, dc in separator sc] rep across 4 pineapples. Dc in last 6 sts. Dc in top of t-ch. Turn.
Rows 6 through 12: Continue the pineapple motif in the established pattern, working sc into dc groups of previous rows and (ch 3, sc) into arch spaces, progressively narrowing each pineapple. Each odd row works from RS. Each even row works from WS. By Row 12, each pineapple is reduced to a single ch-3 arch at the tip.
Row 13: Ch 1. Sc in each st and 1 sc in each ch-sp across, working sc2tog at the top of each pineapple tip to close the pineapple. (70 sc)
Row 14: Ch 3 (counts as dc). Dc in each st across. Turn. (70 dc)
Row 15: Ch 1. Sc in each st across. Do not turn. Do not fasten off.
Checkpoint: Your piece should measure approximately 16 inches wide and 6 inches tall. The 4 pineapple motifs should be clearly visible with crisp definition.
Section 2: Back Bodice Panel
Work same as Section 1, Rows 1 through 15, but omit the pineapple motif. Replace pineapple rows with plain dc rows and sc rows alternating, maintaining the same 70-stitch count throughout.
After Row 15, do not fasten off.
Section 3: Joining Front and Back into a Round
With RS facing, place front panel and back panel with bottom edges aligned. Join yarn at right side seam of front panel’s Row 15 edge.
Round 1 (joining round): Working along the bottom edge of Row 15 of the front panel, sl st into each st across (70 sts). Work 2 sc up the right side edge of the bodice (seam). Sl st into each st across the bottom edge of Row 15 of the back panel (70 sts). Work 2 sc up the left side edge of the bodice (seam). Join with sl st to first sl st. (144 sts)
The side seams are sewn with mattress stitch or slip stitch seam before this round is worked. Alternatively, you may work the bodice in the round from the start if you prefer seamless construction.
Section 4: Waistband (Ribbed Section)
Switch to F-5 / 3.75 mm hook. This tighter hook creates the fitted ribbed waistband appearance.
Round 1: Ch 1 (does not count as st). Working in BLO, sc in each st around. Join with sl st to first sc. (144 sc)
Rounds 2 through 4: Repeat Round 1. Working in BLO, sc in each st around. Join. (144 sc each round)
Round 5 (decrease round): Ch 1. [Sc BLO in next 16 sts, sc2tog BLO] 8 times around. Join. (136 sc)
Rounds 6 through 8: Ch 1. Sc BLO in each st around. Join. (136 sc)
Round 9 (decrease round): Ch 1. [Sc BLO in next 15 sts, sc2tog BLO] 8 times around. Join. (128 sc)
Rounds 10 through 12: Ch 1. Sc BLO in each st around. Join. (128 sc)
Round 13 (decrease round): Ch 1. [Sc BLO in next 14 sts, sc2tog BLO] 8 times around. Join. (120 sc)
Rounds 14 through 16: Ch 1. Sc BLO in each st around. Join. (120 sc)
Switch back to G-6 / 4.0 mm hook for all remaining sections.
Checkpoint: The waistband should measure approximately 3 inches from the bottom of the bodice join. The waist circumference at the narrowest point should be approximately 24 inches.
Section 5: Tier 1 Setup and Skirt Hip Flare
This section transitions from the waistband to the first skirt tier with substantial increases for the flare.
Round 1 (hip increase round): Ch 3 (counts as dc). Dc in same st (inc). [Dc in next 2 sts, 2 dc in next st] 39 times around. Dc in last st. Join with sl st to top of beg ch-3. (160 dc)
Round 2: Ch 3 (counts as dc). Dc in each st around. Join. (160 dc)
Round 3 (increase round): Ch 3. Dc in same st. [Dc in next 3 sts, 2 dc in next st] 39 times. Dc in last st. Join. (199 dc)
Round 4: Ch 3. Dc in each st around. Join. (199 dc)
Round 5 (increase to 210): Ch 3. Dc in same st. [Dc in next 18 sts, 2 dc in next st] 11 times. Dc in rem sts. Join. (210 dc)
Round 6: Ch 3. Dc in each st around. Join. (210 dc)
Section 6: Tier 1 Lace Body
Round 1 (lace setup): Ch 4 (counts as dc plus ch-1 sp). Sk 1 st. [Dc in next st, ch 1, sk 1 st] around. Join with sl st to 3rd ch of beg ch-4. (105 dc and 105 ch-1 sps)
Round 2: Ch 5 (counts as dc plus ch-2 sp). [Sk 1 ch-sp, dc in next dc, ch 2] around. Join to 3rd ch of beg ch-5. (105 dc and 105 ch-2 sps)
Round 3: Ch 3. 2 dc in first ch-2 sp. [Sc in next dc, 5 dc in next ch-2 sp] 52 times. Sc in last dc. 2 dc in starting sp (to complete the shell). Join. (53 shells)
Round 4: Ch 1. Sc in first dc (top of shell). [Ch 3, sk 4 dc, sc in sc between shells, ch 3, sk 0, sc in center dc of next shell] around. Join.
Round 5: Ch 3. [4 dc in ch-3 sp, sc in sc, 4 dc in next ch-3 sp, sc in sc] around. Join.
Round 6: Ch 1. Sc in first sc. [Ch 5, sc in next sc] around. Join. (210 working positions)
Tier 1 Picot-Scallop Edging:
Round 7 (edging): Ch 1. Working into the ch-5 arches: [sc in arch, ch 2, 3 dc in arch, picot, 3 dc in arch, ch 2, sc in arch] 35 times around. Join.
Do not fasten off. Proceed to Tier 2 pickup.
Checkpoint: Tier 1 should measure approximately 4 inches from the hip flare join to the picot-scallop hem with 35 complete scallops.
Section 7: Tier 2 Pickup and Lace Body
Tier 2 is worked as a separate piece and joined to the dress.
Tier 2 Foundation: Ch 253. Join with sl st to first ch to form a ring (being careful not to twist). (252 ch forming a ring)
Tier 2, Round 1: Ch 3 (counts as dc). Dc in each ch around. Join. (252 dc)
Tier 2, Round 2: Ch 5. [Sk 1 st, dc in next st, ch 2] 125 times. Sk 1 st. Join to 3rd ch of beg ch-5. (126 dc and 126 ch-2 sps)
Tier 2, Round 3: Ch 3. 2 dc in first ch-2 sp. [Sc in next dc, 5 dc in next ch-2 sp] 62 times. Sc in last dc. 2 dc in starting sp. Join. (252 positions)
Tier 2, Round 4: Ch 1. Sc in dc. [Ch 3, sc in sc, ch 3, sc in center dc of shell] 62 times. Ch 3, sc in last sc. Join. (252 positions)
Tier 2, Round 5: Ch 3. [4 dc in ch-3 sp, sc in sc, 4 dc in ch-3 sp, sc in sc] around. Join.
Tier 2, Round 6: Ch 1. [Sc in sc, ch 5] 63 times. Join. (252 positions)
Tier 2 Picot-Scallop Edging:
Tier 2, Round 7: Ch 1. [Sc in arch, ch 2, 3 dc in arch, picot, 3 dc in arch, ch 2, sc in arch] 42 times around. Join. Fasten off. (42 scallops)
Attaching Tier 2: Align the top edge of Tier 2 approximately 1 to 1.5 inches above the top of Tier 1. Pin in place and use a slip stitch join through both layers.
Section 8: Tier 3 Pickup and Lace Body
Tier 3 Foundation: Ch 295. Join to first ch with sl st (do not twist). (294 ch in ring)
Tier 3, Round 1: Ch 3. Dc in each ch around. Join. (294 dc)
Tier 3, Round 2: Ch 5. [Sk 1 st, dc in next st, ch 2] 146 times. Sk 1 st. Join to 3rd ch of beg ch-5. (147 dc and 147 ch-2 sps)
Tier 3, Round 3: Ch 3. 2 dc in first ch-2 sp. [Sc in next dc, 5 dc in next ch-2 sp] 72 times. Sc in last dc. 2 dc in starting sp. Join. (294 positions)
Tier 3, Round 4: Ch 1. [Sc in dc, ch 3, sc in sc, ch 3] 72 times. Sc in last dc. Join. (294 positions)
Tier 3, Round 5: Ch 3. [4 dc in ch-3 sp, sc in sc, 4 dc in ch-3 sp, sc in sc] around. Join.
Tier 3, Round 6: Ch 1. [Sc in sc, ch 5] 49 times. Join.
Tier 3 Picot-Scallop Edging:
Tier 3, Round 7: Ch 1. [Sc in arch, ch 2, 3 dc in arch, picot, 3 dc in arch, ch 2, sc in arch] 49 times around. Join. Fasten off. (49 scallops)
Attaching Tier 3: Attach approximately 0.5 to 1 inch below Tier 2’s attachment point.
Section 9: One Shoulder Strap
The strap is a narrow flat strip worked in sc, approximately 13 stitches wide and 14 inches long.
Foundation Chain: Ch 14.
Row 1: Sc in 2nd ch from hook. Sc in each ch across. Turn. (13 sc)
Rows 2 through desired length: Ch 1. Sc in each st across. Turn. (13 sc)
Continue until the strap measures 14 inches or the exact length needed to bridge from the front top edge to the back top edge across the wearer’s shoulder. Fasten off.
Strap attachment: Pin the strap to the front top left corner of the bodice and to the back top left corner. Seam in place with mattress stitch or sl st seam.
Neckline and Armhole Edging (optional): With G-6 hook and RS facing, join yarn at the top right corner of the front bodice. Work 1 round of sc evenly around the entire neckline and armhole opening. Join with sl st. Fasten off.
Blocking and Finishing
Proper blocking transforms this dress from handmade to professional quality.
Wet block each tier separately before joining if possible. Soak in lukewarm water for 15 to 20 minutes. Gently squeeze out excess water without wringing. Lay flat on blocking mats and pin the picot-scallop edging to emphasize the points. Allow to dry completely before unpinning.
Weave in all ends securely using your tapestry needle, working the tails through several stitches on the wrong side.
If you want extra waistband support, thread the optional elastic through the inside of the ribbed section and secure at both ends.
Size Customization Tips
To increase the bust size by 2 inches: add 8 stitches to each of the front and back foundation chains (ch 80 instead of 72), and add the same 16 stitches to all subsequent rounds proportionally.
For a larger waist, work fewer decrease rounds in the waistband section or decrease by a smaller amount per round.
For longer tiers, add additional lace rounds before the picot-scallop edging.
Time Estimate
Plan for approximately 40 to 60 hours of work depending on your experience level and working speed. This is definitely a project to savor rather than rush.
Thank you so much for choosing this pattern for your next crochet adventure. I truly hope you love making this dress as much as I loved designing it. The finished piece is absolutely worth every hour you put in.
If you make this sage green boho tiered crochet dress, save this pattern to your Pinterest boards so you can find it again easily. And please leave a comment below to share how yours turned out. I would love to see your beautiful creations!
