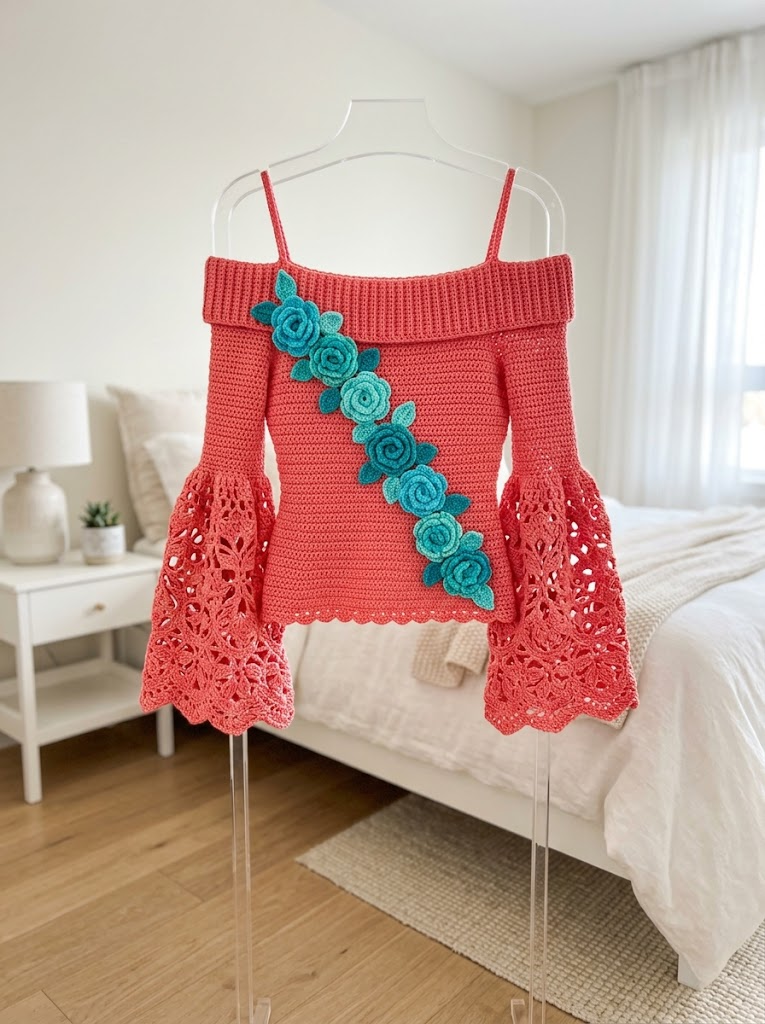
This gorgeous coral off-shoulder top with dramatic bell sleeves might look like it belongs on a runway, but I promise you can absolutely make this yourself. The combination of solid crochet fabric, delicate lace bell sleeves, and those stunning teal roses creates a statement piece that will turn heads everywhere you go.

I designed this top for confident beginners and intermediate crocheters who want to level up their garment-making skills. If you can work basic stitches and follow a pattern, you have everything you need. The construction is surprisingly straightforward once you break it down into sections.
Let me walk you through every single step of this crochet bell sleeve top pattern.
Why This Coral Reef Floral Bell Top Pattern Works
The magic of this design comes from combining simple techniques in unexpected ways. The body uses basic stitches that create a smooth, flattering fabric. The bell sleeves use an open lacework pattern that looks complex but repeats predictably. And those dimensional roses? They are worked separately and sewn on at the end.
You are not trying to do everything at once. You are building a beautiful top piece by piece.
Materials You Will Need
Yarn:
- Main Color (Coral): Approximately 800 to 1000 yards of DK weight yarn (light worsted also works). Look for a smooth cotton or cotton blend for drape and breathability.
- Contrast Color (Teal): Approximately 150 yards for the roses and leaves. Same weight as main color.
Hook:
- 4.0mm (G/6) crochet hook for the body
- 3.5mm (E/4) crochet hook for the roses (optional, for tighter petals)
Notions:
- Tapestry needle for weaving ends
- Stitch markers (at least 6)
- Measuring tape
- Scissors
- Pins for blocking and placement
Gauge:
18 stitches and 20 rows = 4 inches in single crochet with 4.0mm hook
Always, always check your gauge. This top needs to fit your body. A gauge swatch saves you from heartbreak later.
Skill Level and Techniques Used
Skill Level: Confident Beginner to Intermediate
Stitches and Techniques:
- Chain (ch): Wrap yarn over hook, pull through loop. This creates your foundation.
- Single Crochet (sc): Insert hook, yarn over, pull up loop, yarn over, pull through both loops. Creates a tight, dense fabric.
- Half Double Crochet (hdc): Yarn over, insert hook, pull up loop (3 loops on hook), yarn over, pull through all 3. Slightly taller than sc.
- Double Crochet (dc): Yarn over, insert hook, pull up loop, yarn over, pull through 2 loops, yarn over, pull through remaining 2. The workhorse stitch for the lace sections.
- Treble Crochet (tr): Yarn over twice, insert hook, pull up loop, (yarn over, pull through 2 loops) three times. Used in the lace bell sleeves.
- Slip Stitch (sl st): Insert hook, yarn over, pull through stitch and loop on hook. Used for joining and shaping.
- Chain Space (ch-sp): The hole created by chain stitches in a previous row. You work into this space, not into the chains themselves.
Size Information
This pattern is written for size Small with notes for adjusting.
Finished Measurements (Size Small):
- Bust: 34 inches (stretches to 36)
- Length from underarm: 14 inches
- Sleeve length from shoulder: 18 inches
To Adjust Size:
- Add or subtract stitches in multiples of 4 for the body
- Each repeat of 4 stitches adds approximately 1 inch to width
Abbreviations Quick Reference
| Abbreviation | Full Name | What It Means |
|————–|———–|—————|
| ch | chain | foundation stitch |
| sc | single crochet | short, tight stitch |
| hdc | half double crochet | medium height |
| dc | double crochet | standard tall stitch |
| tr | treble crochet | extra tall stitch |
| sl st | slip stitch | flat joining stitch |
| st(s) | stitch(es) | where you put your hook |
| sk | skip | miss that stitch |
| rep | repeat | do it again |
| RS | right side | the pretty side |
| WS | wrong side | the back side |
The Pattern: Step by Step Instructions
Part 1: Front Body Panel
The body is worked flat in rows, then joined at the sides.
Foundation: Ch 78 (or multiple of 4 plus 2 for your size).
Row 1 (RS): Sc in 2nd ch from hook and in each ch across. (77 sts)
Row 2: Ch 1, turn. Sc in each st across. (77 sts)
Rows 3 through 60: Repeat Row 2.
Your panel should measure approximately 17 inches wide and 12 inches tall. This creates the front of your top from underarm to hem.
Hem Border:
Row 61: Ch 1, turn. Working in back loops only (blo), sc in each st across. (77 sts)
Row 62: Ch 1, turn. *Sc in next 3 sts, skip 1 st, 5 dc in next st (shell made), skip 1 st.* Repeat from * across, ending with sc in last 2 sts.
This creates the scalloped edge you see at the bottom.
Fasten off. Weave in ends.
Part 2: Back Body Panel
Work exactly as Front Body Panel, Rows 1 through 62.
You now have two matching rectangles.
Part 3: Joining Body and Creating Armholes
Lay front and back panels with right sides facing. Using your tapestry needle and matching yarn, whip stitch or mattress stitch the side seams.
Important: Leave the top 4 inches open on each side for armholes. Mark this with stitch markers before sewing.
Your body tube is now complete.
Part 4: Off-Shoulder Neckline Band
This ribbed band creates the structured off-shoulder look.
Foundation: Ch 12.
Row 1: Sc in 2nd ch from hook and in each ch across. (11 sts)
Row 2: Ch 1, turn. Working in back loops only, sc in each st across. (11 sts)
Rows 3 through 140: Repeat Row 2.
This creates a stretchy ribbed band approximately 28 inches long. Adjust length to fit around your shoulders comfortably.
Joining: Sl st the short ends together to form a circle.
Attaching to Body:
With RS facing, pin the neckband evenly around the top edge of your body tube. The band should sit about 1 inch below the actual top edge. Whip stitch in place, easing fullness as needed.
Part 5: Shoulder Straps (Make 2)
Foundation: Ch 80 (adjust for your preferred strap length).
Row 1: Sc in 2nd ch from hook and in each ch across. (79 sts)
Row 2: Ch 1, turn. Sc in each st across. (79 sts)
Row 3: Repeat Row 2.
Fasten off, leaving a long tail for sewing.
Attach straps to inside of neckband at front and back, spacing them about 6 inches apart.
Part 6: Bell Sleeves (Make 2)
Here is where the drama happens. These sleeves start fitted at the upper arm and flare dramatically into lace.
Upper Sleeve (Solid Section):
Foundation: Ch 44. Join with sl st to first ch to form ring, being careful not to twist.
Round 1: Ch 1, sc in each ch around. Join with sl st to first sc. (44 sts)
Rounds 2 through 10: Ch 1, sc in each st around. Join. (44 sts)
Transition Round 11: Ch 3 (counts as dc), dc in each st around. Join with sl st to top of ch-3. (44 dc)
Lace Bell Section:
Round 12: Ch 5 (counts as dc plus ch-2), skip 1 st, *dc in next st, ch 2, skip 1 st.* Repeat from * around. Join with sl st to 3rd ch of beginning ch-5. (22 dc, 22 ch-2 spaces)
Round 13: Sl st into ch-2 space. Ch 3, 2 dc in same space, ch 2, *3 dc in next ch-2 space, ch 2.* Repeat from * around. Join. (22 shells)
Round 14: Sl st to center dc of shell. Ch 3, 2 dc in same st, ch 1, dc in ch-2 space, ch 1, *3 dc in center dc of next shell, ch 1, dc in ch-2 space, ch 1.* Repeat from * around. Join.
Rounds 15 through 20: Continue increasing the shell pattern, adding one dc to each shell every other round and increasing chain spaces to ch-2, then ch-3.
Round 21 (Floral Lace Round): Ch 4, tr in same st, ch 3, skip 2 sts, *sc in next st, ch 5, skip 3 sts, (2 tr, ch 3, 2 tr) in next st (petal made), ch 5, skip 3 sts.* Repeat from * around, adjusting as needed to end evenly. Join.
Rounds 22 through 25: Continue the petal pattern, working sc in the sc of the previous round and petals in the ch-3 spaces.
Final Scallop Round: *Sc in sc, ch 3, 7 dc in ch-3 space of petal, ch 3.* Repeat from * around. Join. Fasten off.
The sleeve should flare to approximately 20 inches at the widest point.
Attaching Sleeves:
Pin the solid upper portion of each sleeve around the armhole opening. Whip stitch securely in place.
Part 7: Dimensional Roses (Make 5 to 7)
These roses are worked in a spiral and rolled to create the three-dimensional effect.
Foundation: Ch 50.
Row 1: Sc in 2nd ch from hook, *ch 3, skip 2 ch, sc in next ch.* Repeat from * across. (16 ch-3 loops)
Row 2: Ch 1, turn. *5 dc in ch-3 loop, sl st in sc.* Repeat from * across.
Rolling: Starting at one end, roll the strip tightly. The petals will fan out naturally. Secure the bottom with a few stitches through all layers.
Make 5 to 7 roses in teal, varying the starting chain length for different sizes.
Part 8: Leaves (Make 8 to 12)
Foundation: Ch 10.
Row 1: Sl st in 2nd ch from hook, sc in next ch, hdc in next ch, dc in next 2 ch, hdc in next ch, sc in next ch, sl st in next ch. Ch 1, working down opposite side of foundation ch, sl st, sc, hdc, dc, dc, hdc, sc, sl st.
Fasten off, leaving a tail for sewing.
Part 9: Assembly and Finishing
Blocking:
Wet block or steam block your completed top. Lay flat and pin to measurements. Let dry completely. This evens out your stitches and helps the lace sleeves open up beautifully.
Rose Placement:
Arrange roses and leaves diagonally across the front bodice, starting from the left shoulder area and cascading down toward the right hip. Pin in place. Step back and adjust until you love it. Sew securely with matching thread.
Final Touches:
Weave in all remaining ends. Give everything one final steam.
Styling Your Coral Reef Floral Bell Top
This top pairs beautifully with high-waisted jeans, a flowing maxi skirt, or tailored shorts. The off-shoulder neckline is romantic and flattering. Those bell sleeves make every gesture feel dramatic.
For a wedding or special event, add delicate jewelry and let this top be the star. For everyday wear, keep accessories minimal and let the craftsmanship speak.
Tips for Success with This Crochet Pattern
Tension consistency matters. If your stitches feel too tight, go up a hook size. Too loose, go down.
Count every row. Use stitch markers at the beginning of each row if you lose track easily.
Try it on as you go. Before joining side seams, hold the panels up to your body. Adjustments are easier now than later.
The roses take practice. Make one test rose before committing to your final teal yarn. Rolling them takes a light touch.
Blocking is not optional for this project. The lace sleeves need blocking to look their best.
You Made Something Beautiful
Thank you so much for trusting me with your time and yarn. This coral reef floral bell top crochet pattern challenged you and you rose to meet it. That is something to be genuinely proud of.
I would absolutely love to see your finished top. Tag me on Instagram or share in my Facebook group. Seeing your creations brings me so much joy, and you might just inspire another crafter to try something new.
Now go wear your masterpiece. You earned it.
Happy hooking!
