
Last spring, my sister called me in a mild panic. Her best friend’s baby shower was three weeks away, and she wanted to give something handmade. Something special. Something that would make the new mom tear up a little. I stayed up way too late that night sketching ideas, and this dress is what came out of that caffeine-fueled brainstorming session.
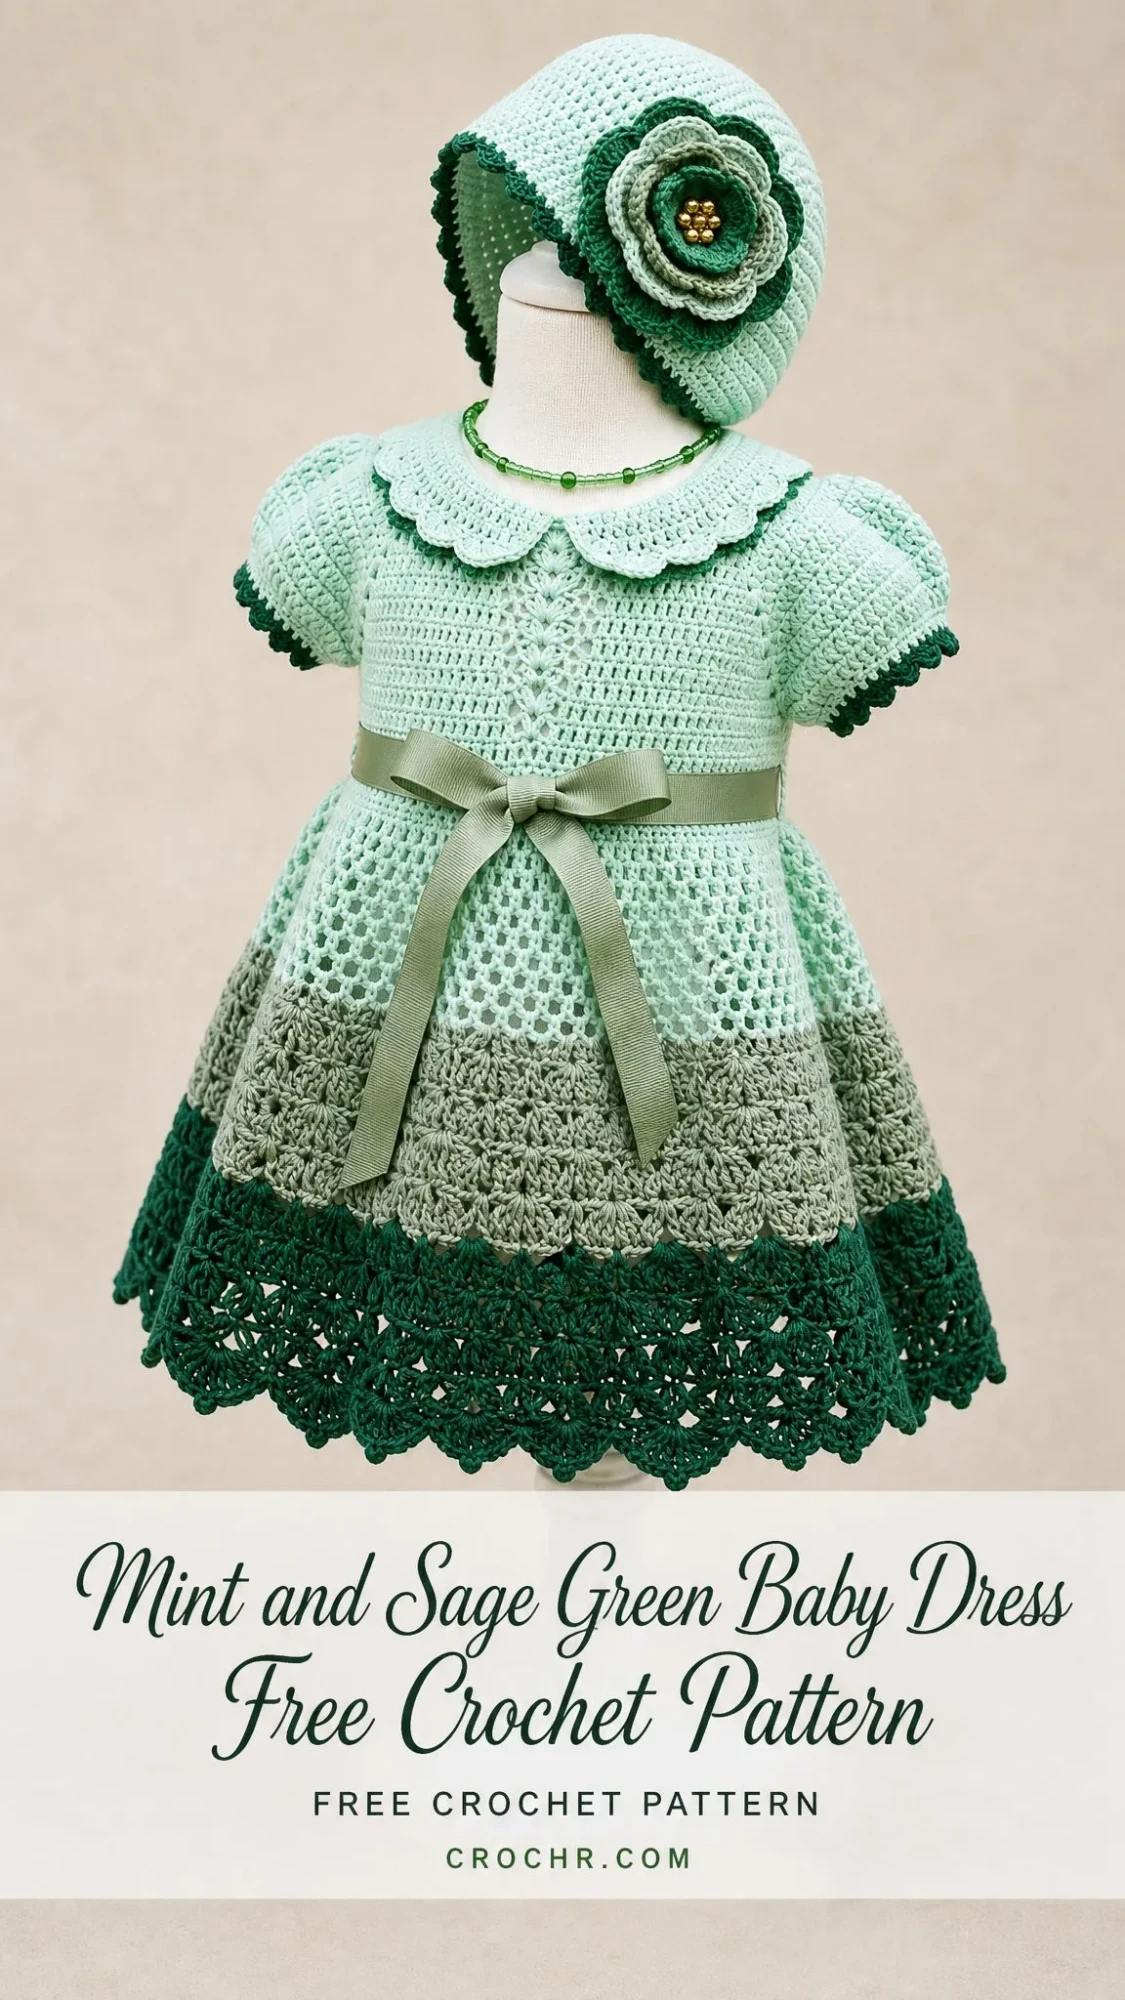
I wanted to create a true heirloom piece. The kind of outfit that gets carefully folded in tissue paper and saved for the next generation. The mint and sage color combination felt fresh but classic, and adding that deep forest green border gave it just the right amount of contrast to make all those delicate stitch patterns really pop.
My sister hand-delivered the finished set, and yes, there were tears. Good ones. The kind that make all those hours of hooking totally worth it. Now I get to share this pattern with you, and I genuinely hope it brings you the same joy it brought us.
About This Baby Dress Crochet Pattern
This gorgeous baby dress set includes a fitted dress with a flared lace skirt, a matching bonnet with a crocheted rose embellishment, and a sweet peter pan collar. The dress is worked from the top down, starting at the neckline and flowing all the way to that stunning shell-stitch hem border.
The construction uses raglan shaping for the yoke, which means you increase at four points to create the bodice and sleeve openings at the same time. If you have never tried raglan before, do not worry. I will walk you through every single increase.
The skirt section is where this pattern really shines. You will work an open mesh stitch that creates a delicate, airy fabric, followed by a textured rose cluster band, and finally that dramatic deep lace border at the hem. A satin ribbon threaded through the waistline and tied into a bow adds the perfect finishing touch.
Skill Level
This pattern is rated intermediate. You should feel comfortable working in the round, reading stitch repeats, joining new colors, and keeping track of stitch counts as you go.
If you have completed a basic baby hat and at least one garment project, you can absolutely handle this. If you are a total beginner, I would suggest practicing a simpler baby dress first to build your confidence. The multiple stitch patterns and simultaneous shaping can feel overwhelming if you are still getting comfortable with basic techniques.
Time Estimate
Plan for approximately 15 to 22 hours for the complete set, including the dress, bonnet, and collar. The lace border at the hem is the most time-intensive section, so save that for when you can really focus and enjoy the process.
Finished Measurements
This pattern fits a baby approximately 3 to 6 months old.
Materials Needed for This Crochet Baby Dress
Yarn
You will need DK weight yarn (also called CYCA 3 or Light) in three coordinating shades:
Yarn suggestions that work beautifully:
1. Lion Brand Pound of Love (100% premium acrylic, 1020 yards per 16 oz skein): Excellent stitch definition for lace details, machine washable, widely available in pastel greens.
2. Paintbox Yarns Simply DK (100% premium acrylic, 137 yards per 50g ball): Great color consistency across dye lots, very affordable, holds its shape well after washing.
3. Drops Safran (70% cotton, 30% polyester, 175 yards per 50g ball): A cotton-blend option for warmer climates or sensitive skin. The slightly heavier drape will enhance the lace skirt panels.
Important: Avoid fuzzy or highly textured yarns. The beautiful stitch detail in the lace panels and shell borders will get lost. Stick with smooth yarn for the best results.
Hooks
Notions
Gauge
With your E-4 (3.5 mm) hook and Color A:
20 stitches and 22 rows = 4 inches (10 cm) in single crochet
One mesh repeat (chain 1, skip 1, double crochet) over 10 stitches = approximately 2 inches (5 cm)
Gauge matters for this garment. A difference of even one stitch per inch will affect the chest circumference by over an inch. That is a significant fit difference on a baby. Work a swatch at least 5 x 5 inches, block it flat, and measure before starting the dress. I know swatching is not the exciting part, but trust me on this one.
Abbreviations and Stitch Definitions
Let me walk you through every stitch and abbreviation you will encounter. I am defining these in US crochet terms.
Special Stitches for This Baby Dress Pattern
Shell Stitch
Work 5 double crochets into the same stitch or space. This creates a lovely fan shape. Each shell counts as one stitch unit when reading repeat instructions.
V-Stitch (V-st)
Work (dc, ch 1, dc) into the same stitch or space. This creates a neat V shape and is used in the mesh panel of the skirt.
Picot
Ch 3, sl st into the first of those 3 chains. This creates a small decorative knot on the edge. It looks fancier than it is, I promise.
3-Double-Crochet Cluster (3dc-cl)
Here is how to work this stitch step by step:
1. Yarn over, insert hook into the indicated stitch, yarn over and pull up a loop, yarn over and draw through 2 loops. You now have 2 loops on your hook.
2. Repeat step 1 two more times in the same stitch. You now have 4 loops on your hook.
3. Yarn over and draw through all 4 loops.
The cluster counts as one stitch.
Rose Cluster Stitch
This special stitch creates a puffed petal effect for the decorative band:
1. Yarn over twice, insert hook into the indicated stitch.
2. Yarn over and pull up a loop (4 loops on hook).
3. Yarn over and draw through 2 loops (3 loops on hook).
4. Yarn over and draw through 2 loops (2 loops on hook).
5. Do NOT complete the treble. Leave 2 loops on your hook.
6. Yarn over twice, insert hook into the same stitch and repeat steps 2 through 4.
7. Yarn over and draw through all 3 loops on hook.
Work 5 of these clusters in a ring of chains for the full rose motif.
Scallop Edge
Skip 2 stitches, work 5 dc in the next stitch (shell), skip 2 stitches, slip stitch in the next stitch. Each scallop uses 6 stitches.
Pattern Notes Before You Begin
Read through these notes carefully. They will save you confusion later.
1. The dress is worked top-down in joined rounds with turning where indicated.
2. The yoke is worked flat in rows first to create the center-back button opening, then joined for the skirt section.
3. Place stitch markers at the four raglan points (two underarm positions and two shoulder positions). Move them up each round.
4. Color A (Mint) is your primary color for the yoke, bodice, mesh panel of the skirt, and bonnet body.
5. Color B (Sage) is used for the rose-cluster band in the skirt and accent edging on the collar and bonnet.
6. Color C (Deep Forest Green) is used for the shell-stitch row at the tops of the sleeves and skirt, the deep lace border at the hem, and the edging on the collar and bonnet brim.
7. When instructions say "join" at the end of rounds, this means slip stitch into the top of the beginning chain or first stitch of the round.
8. All rounds and rows begin after the turning chain unless otherwise noted.
Step-by-Step Crochet Pattern Instructions
Dress: Yoke and Bodice
Foundation:
With Color A and E-4 (3.5 mm) hook, ch 75.
Row 1 (WS): Sc in second ch from hook and in each ch across, turn. (74 sc)
Row 2 (RS, Raglan Setup Row): Ch 3 (counts as dc throughout), dc in next 6 sts, pm in next st (raglan point 1), 2 dc in next st, dc in next st, 2 dc in next st, pm in next st (raglan point 2), dc in next 16 sts, pm in next st (raglan point 3), 2 dc in next st, dc in next st, 2 dc in next st, pm in next st (raglan point 4), dc in next 6 sts, dc in last st, turn. (78 dc)
After Row 2, your section breakdown looks like this:
Row 3: Ch 3, dc in each st to first marker, 2 dc in marked st, dc in next st, 2 dc in next st, dc to next marker, 2 dc in marked st, dc in next st, 2 dc in next st, dc to next marker, 2 dc in marked st, dc in next st, 2 dc in next st, dc to next marker, 2 dc in marked st, dc in next st, 2 dc in next st, dc to end, turn. (86 dc)
Row 4: Rep Row 3. (94 dc)
Row 5: Rep Row 3. (102 dc)
Row 6: Rep Row 3. (110 dc)
Row 7: Rep Row 3. (118 dc)
After Row 7, your stitch distribution should be:
Confirm this count before moving on.
Row 8 (Sleeve Separation Row): Ch 3, dc in next 11 sts (left back), ch 4 (underarm bridge), sk all 17 sleeve sts, dc in next 30 sts (front including raglan bridges), ch 4 (underarm bridge), sk all 17 sleeve sts, dc in next 12 sts (right back), turn. (54 dc + 8 ch = 62 working sts)
Row 9 (Join to Work in Rounds):
Ch 3, dc in next 11 sts, dc in 4 ch of underarm bridge, dc in next 30 sts, dc in 4 ch of second underarm bridge, dc in next 11 sts. Do not turn. Join to top of ch-3 with sl st to form a ring. (62 dc)
You are now working in joined rounds. The center-back opening remains open for buttons.
Round 10: Ch 3, dc in each st around, join. (62 dc)
Round 11: Ch 3, dc in each st around, join. (62 dc)
Round 12 (Ribbon Channel Round): Ch 4 (counts as dc + ch 1), sk 1 st, (dc in next st, ch 1, sk 1 st) around, join to 3rd ch of beg ch-4. (31 dc + 31 ch-1-sp = 62 stitch units)
This is where you will thread your satin ribbon later.
Round 13: Ch 3, (dc in ch-1 sp, dc in dc) around, dc in last ch-1 sp, join. (62 dc)
Checkpoint: After Round 13, the bodice should measure approximately 3.5 to 4 inches from the neckline foundation. The chest circumference should measure approximately 16 inches.
Dress: Skirt
Round 14 (Increase Round): Ch 3, (dc in next 2 sts, 2 dc in next st) around, adjusting last repeat as needed to reach exactly 82 dc, join. (82 dc)
Round 15: Ch 3, dc in each st around, join. (82 dc)
Round 16 (Mesh Section Begins): Ch 4 (counts as dc + ch 1), sk 1 st, (dc in next st, ch 1, sk 1 st) around, join to 3rd ch of beg ch-4. (41 dc + 41 ch-1-sp = 82 stitch units)
Round 17: Ch 4, (dc in ch-1 sp, ch 1, dc in dc, ch 1) around, ending dc in last ch-1 sp, ch 1, join. (82 stitch units)
Round 18: Rep Round 17. (82 stitch units)
Round 19: Ch 3, (dc in ch-1 sp, dc in dc) around, join. (82 dc)
Round 20 (Increase Round): Ch 3, (dc in next 3 sts, 2 dc in next st) around, adjusting last repeat as needed to reach exactly 102 dc, join. (102 dc)
Round 21: Ch 4 (counts as dc + ch 1), sk 1 st, (dc in next st, ch 1, sk 1 st) around, join to 3rd ch. (51 dc + 51 ch-1-sp = 102 stitch units)
Round 22: Ch 4, (dc in ch-1 sp, ch 1, dc in dc, ch 1) around, ending dc in last ch-1 sp, ch 1, join. (102 stitch units)
Round 23: Rep Round 22. (102 stitch units)
Round 24: Ch 3, (dc in ch-1 sp, dc in dc) around, join. (102 dc)
Checkpoint: After Round 24, the skirt from the waist down should measure approximately 4.5 inches. The hem circumference should be approximately 20 inches.
Skirt Rose Cluster Band (Color B)
Fasten off Color A at the end of Round 24. Join Color B with a sl st in any stitch.
Round 25 (Cluster Round): Sc in first st of Round 24, ch 5, sl st in first ch of that ch-5 to form a ring. Into that ring work: (3dc-cl, ch 3) 5 times, sl st to close the ring, ch 3, sk 3 sts of Round 24, sc in next st of Round 24. Repeat from the beginning of rose instruction.
You will work approximately 17 roses evenly around the 102-stitch circumference, placing one rose every 6 stitches. (102 divided by 6 = 17 roses)
Round 26 (Color B): Ch 1, sc in each sc and ch-sp around, working approximately 3 sc per ch-3 space and 1 sc per sc connector. Adjust to reach exactly 102 sc. Join. (102 sc)
Fasten off Color B.
Skirt Shell Section (Color C)
Join Color C with sl st in any stitch of Round 26.
Round 27: Ch 3, dc in next 4 sts (first half-shell at join), sk 2 sts, sc in next st, sk 2 sts, (5 dc in next st, sk 2 sts, sc in next st, sk 2 sts) around, join to top of beg ch-3. (17 shells)
Round 28: Ch 1, sc in first st (top of shell), (ch 3, sc in next sc connector, ch 3, sc in top of next shell) around, join. (34 ch-3 arches + 34 sc)
Round 29: Sl st to first ch-3 sp, ch 3, 2 dc in same sp, sc in next sc, (3 dc in next ch-3 sp, sc in next sc, 3 dc in next ch-3 sp, sc in next sc) around, join.
Fasten off Color C.
Checkpoint: After Round 29, the skirt from the waist should measure approximately 7.5 to 8 inches. The hem circumference should be approximately 24 inches.
Skirt Hem Lace Border (Color C)
Rejoin Color C in any sc between shells.
Round 30 (Foundation Arch Row): Ch 6, sk 4 sts, sc in next st, (ch 5, sk 4 sts, sc in next st) around, ending ch 5, join to first ch of beg ch-6.
You need a stitch count divisible by 5 for this round. Target 85 stitches (17 repeats) or 90 stitches (18 repeats). Adjust from Round 29 as needed.
Working with 85 stitches (17 arches):
Round 31 (Shell into Arches): Sl st into first ch-5 arch, ch 3, 4 dc in same arch (half-shell), sc in next sc between arches, (5 dc in next ch-5 arch, sc in next sc between arches) around, join. (17 shells)
Round 32 (Picot Points): Ch 1, sc in top of shell (3rd dc of shell), (ch 3, sl st in first ch to form picot, sc in same st, ch 5, sc in top of next shell) around, joining after last ch-5. (17 picots, 17 arches)
Round 33 (Final Arch Fill): Sl st into ch-5 arch, (sc, hdc, 5 dc, hdc, sc) in each ch-5 arch around, join. (17 large shells)
Round 34 (Scallop Hem Finish): Ch 1, working along the outside edges of the large shells: sc in first sc, (ch 3, sk 1 st, sc in next st) across each shell and joining arch, forming a picot-edged finish. Join and fasten off.
Sleeves
The sleeves are worked in rounds using the held stitches.
With RS facing, join Color A at the underarm ch-4 bridge.
Round 1: Ch 3, dc in next 3 ch of underarm bridge, dc in each of the 17 held sleeve sts, join. (21 dc)
Round 2: Ch 3, dc in each st around, join. (21 dc)
Round 3: Ch 3, dc in each st around, join. (21 dc)
Join Color C.
Round 4 (Sleeve Edging): Ch 1, (sc in next 5 sts, sc2tog) 3 times. (18 sc)
Round 5 (Scallop Edging): Ch 1, sc in first st, sk 2 sts, 5 dc in next st, sk 2 sts, (sc in next st, sk 2 sts, 5 dc in next st, sk 2 sts) around. Join and fasten off. (3 scallops)
Repeat for second sleeve.
Collar (Peter Pan Style)
Worked flat with D-3 (3.25 mm) hook and Color A.
Foundation: With Color A and D-3 hook, ch 65.
Row 1: Sc in second ch from hook and each ch across, turn. (64 sc)
Row 2: Ch 1, sc in first 8 sts, hdc in next 48 sts, sc in last 8 sts, turn. (64 sts)
Row 3: Ch 3 (counts as dc), dc in next 2 sts, (2 dc in next st, dc in next 3 sts) 14 times, dc to end, turn. (78 dc)
Row 4 (Scallop Edge, Color C): Join Color C at start of Row 3, ch 1, sc in first st, sk 2 sts, 5 dc in next st, sk 2 sts, (sc in next st, sk 2 sts, 5 dc in next st, sk 2 sts) across. (13 scallops)
Inner Neck Edge: With Color B and D-3 hook, work 1 row of sc along the foundation chain edge of the collar, then work 1 row of reverse sc (crab stitch) for a neat rolled edge.
Sew the collar to the neckline, positioning the two front ends so they meet at center front and curve gently over the shoulders.
Back Opening and Button Bands
With Color A and D-3 hook, work 1 column of sc along each side of the center-back opening, picking up approximately 1 sc per row edge. On the left back band (as worn), work 3 button loops evenly spaced by replacing 3 sc with (ch 3, sk 1 sc) at the appropriate positions. Sew 3 buttons onto the right back band to correspond.
Bonnet
With Color A and E-4 hook.
Round 1: Magic ring, ch 3 (counts as dc), 11 dc in ring, join to top of ch-3. (12 dc)
Round 2: Ch 3, dc in same st, 2 dc in each st around, join. (24 dc)
Round 3: Ch 3, dc in next st, (2 dc in next st, dc in next st) around, join. (36 dc)
Round 4: Ch 3, dc in next 2 sts, (2 dc in next st, dc in next 2 sts) around, join. (48 dc)
Round 5: Ch 3, dc in next 3 sts, (2 dc in next st, dc in next 3 sts) around, join. (60 dc)
Rounds 6 through 9: Ch 3, dc in each st around, join. (60 dc)
Checkpoint: After Round 9, the bonnet crown should measure approximately 5.5 to 6 inches across the flat top.
Turn the bonnet so the opening faces you. Count 30 stitches for the brim section (front half).
Row 1 of Brim: Join Color A in first of the 30 front sts, ch 3, dc in each of the 30 sts, turn. (30 dc)
Row 2 of Brim: Ch 3, 2 dc in next st, (dc in next 2 sts, 2 dc in next st) across to last st, dc in last st, turn. (40 dc)
Row 3 of Brim: Ch 3, dc in each st across, turn. (40 dc)
Row 4 of Brim: Ch 3, 2 dc in next st, (dc in next 3 sts, 2 dc in next st) 8 times, dc in each remaining st, turn. (48 dc)
Row 5 of Brim (Color C, Scallop Edge): Join Color C, ch 1, sc in first st, sk 2 sts, 5 dc in next st, sk 2 sts, (sc in next st, sk 2 sts, 5 dc in next st, sk 2 sts) across. (8 scallops)
Bonnet Back Edging: With Color C, work 1 round of sc along the back half of the bonnet opening (the 30 non-brim stitches), then work two ch-40 ties by joining Color C at each back corner and chaining 40, then fastening off.
Bonnet Rose Embellishment
With Color C and D-3 hook:
Foundation: Ch 36.
Row 1: 3 dc in 4th ch from hook, (sk 2 ch, sl st in next ch, sk 2 ch, 5 dc in next ch) 5 times, sk 2 ch, sl st in next ch, turn.
Row 2: Ch 3, 4 dc in first sl st space, (sl st in center of next 5-dc group, 5 dc in next sl st) 5 times, sl st in final sp.
Gently roll this strip into a spiral with Row 1 on the inside. Slip stitch through the base to secure it into a rose shape. The rose should measure approximately 1.5 to 2 inches across. Sew it securely to the left side of the bonnet brim.
Optional Leaves: Ch 8, sc in second ch from hook, hdc in next ch, dc in next 3 ch, hdc in next ch, sc in last ch. Fasten off and sew around the base of the rose. Make 3 to 4 leaves.
Finishing and Assembly
1. Weave in all ends on the wrong side using your yarn needle.
2. Sew the collar to the neckline with whip stitch using Color A, placing the collar so it is centered at the front neckline and laying flat.
3. Thread the satin ribbon through the ch-1 spaces of Round 12 (the ribbon channel). Begin and end at the center front. Tie into a bow.
4. Sew 3 buttons to the right back band at positions corresponding to the button loops on the left back band.
5. Sew the bonnet rose securely to the left side of the brim using the Color C yarn end.
6. Block the dress by dampening with clean water, gently shaping on a flat padded surface, and pinning the hem to open up the lace details.
Tips for Success with This Crochet Tutorial
Count your stitches frequently. With so many increases and stitch pattern changes, it is easy to lose track. I count at the end of every round during the yoke section.
Use locking stitch markers. They are easier to move than the split-ring kind, especially when you are working quickly.
Block your finished piece. The lace border at the hem looks ten times more impressive after blocking. It opens up all those lovely arches and makes the shells really pop.
Take breaks. This is a detailed project. Your eyes and hands will thank you for stepping away periodically.
A Note About the Optional Necklace
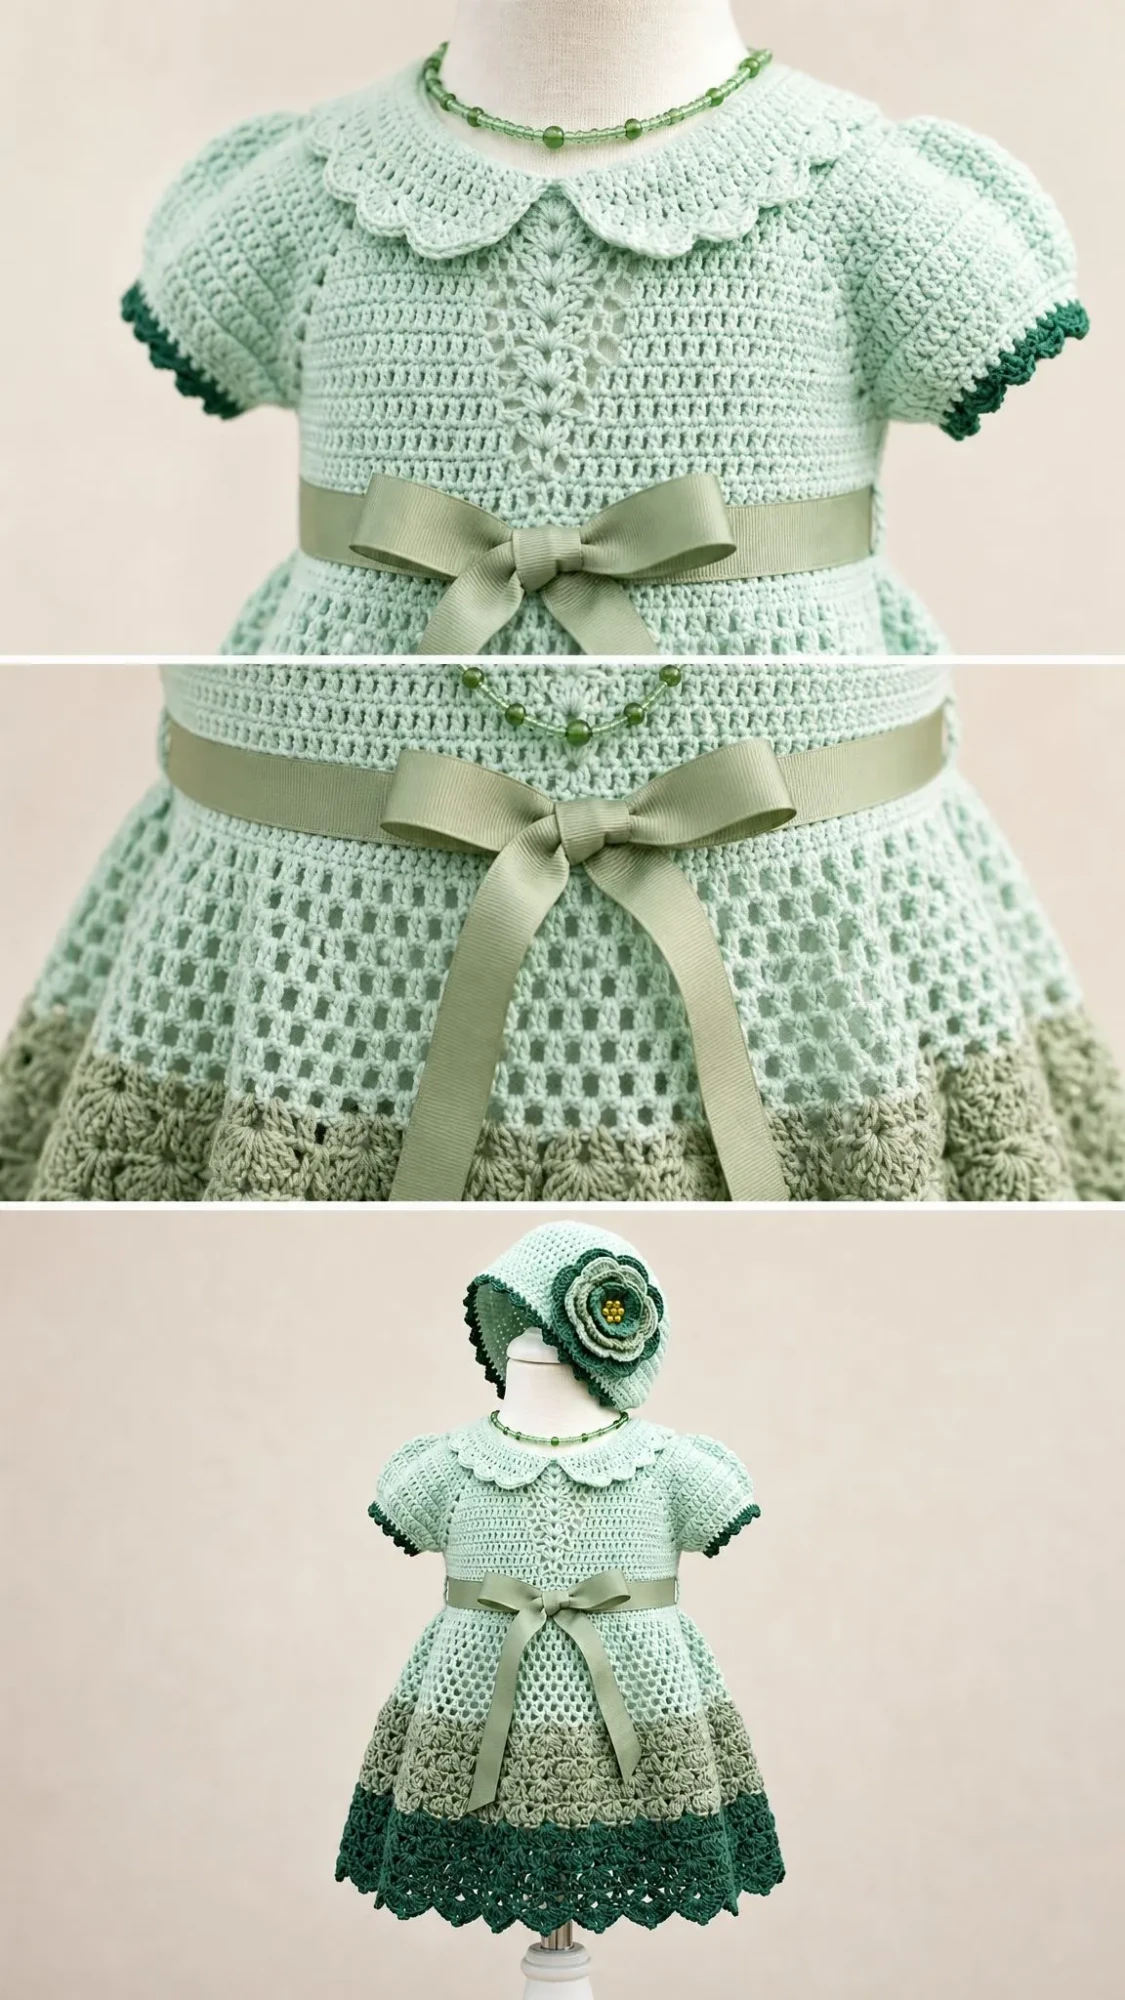
The images show a simple beaded necklace of green seed beads. This is purely decorative and intended for display or photography only. Never place a necklace on an infant without direct adult supervision. If you choose to make one, use approximately 30 green seed beads (size 6/0) on 18 inches of thin elastic or nylon thread.
Thank you so much for choosing this pattern for your next project. I really hope you enjoy making this sweet little dress set as much as I enjoyed designing it. If you finish one, I would absolutely love to see it. Tag me on Instagram or share a photo in my Facebook group.
And if you want to come back to this pattern later, go ahead and pin it to your favorite Pinterest board. That way it will be waiting for you whenever you are ready to start. If you have any questions or just want to share your progress, drop a comment below. I always love hearing from you!
You Might Also Like
- Dusty Rose Granny Square Tote Free Crochet Pattern
- Ocean Blue Mandala Crochet Set Free Pattern
- Dusty Rose Pink Crochet Backpack Free Pattern
- Sage Green Botanical Lace Sundress Free Pattern
