
I’ve been looking for the perfect heirloom-quality dress pattern for little ones, and this one has become my absolute favorite. The combination of a fitted bodice with that gorgeous shell stitch skirt creates something truly special. This is the kind of dress that gets passed down through generations.
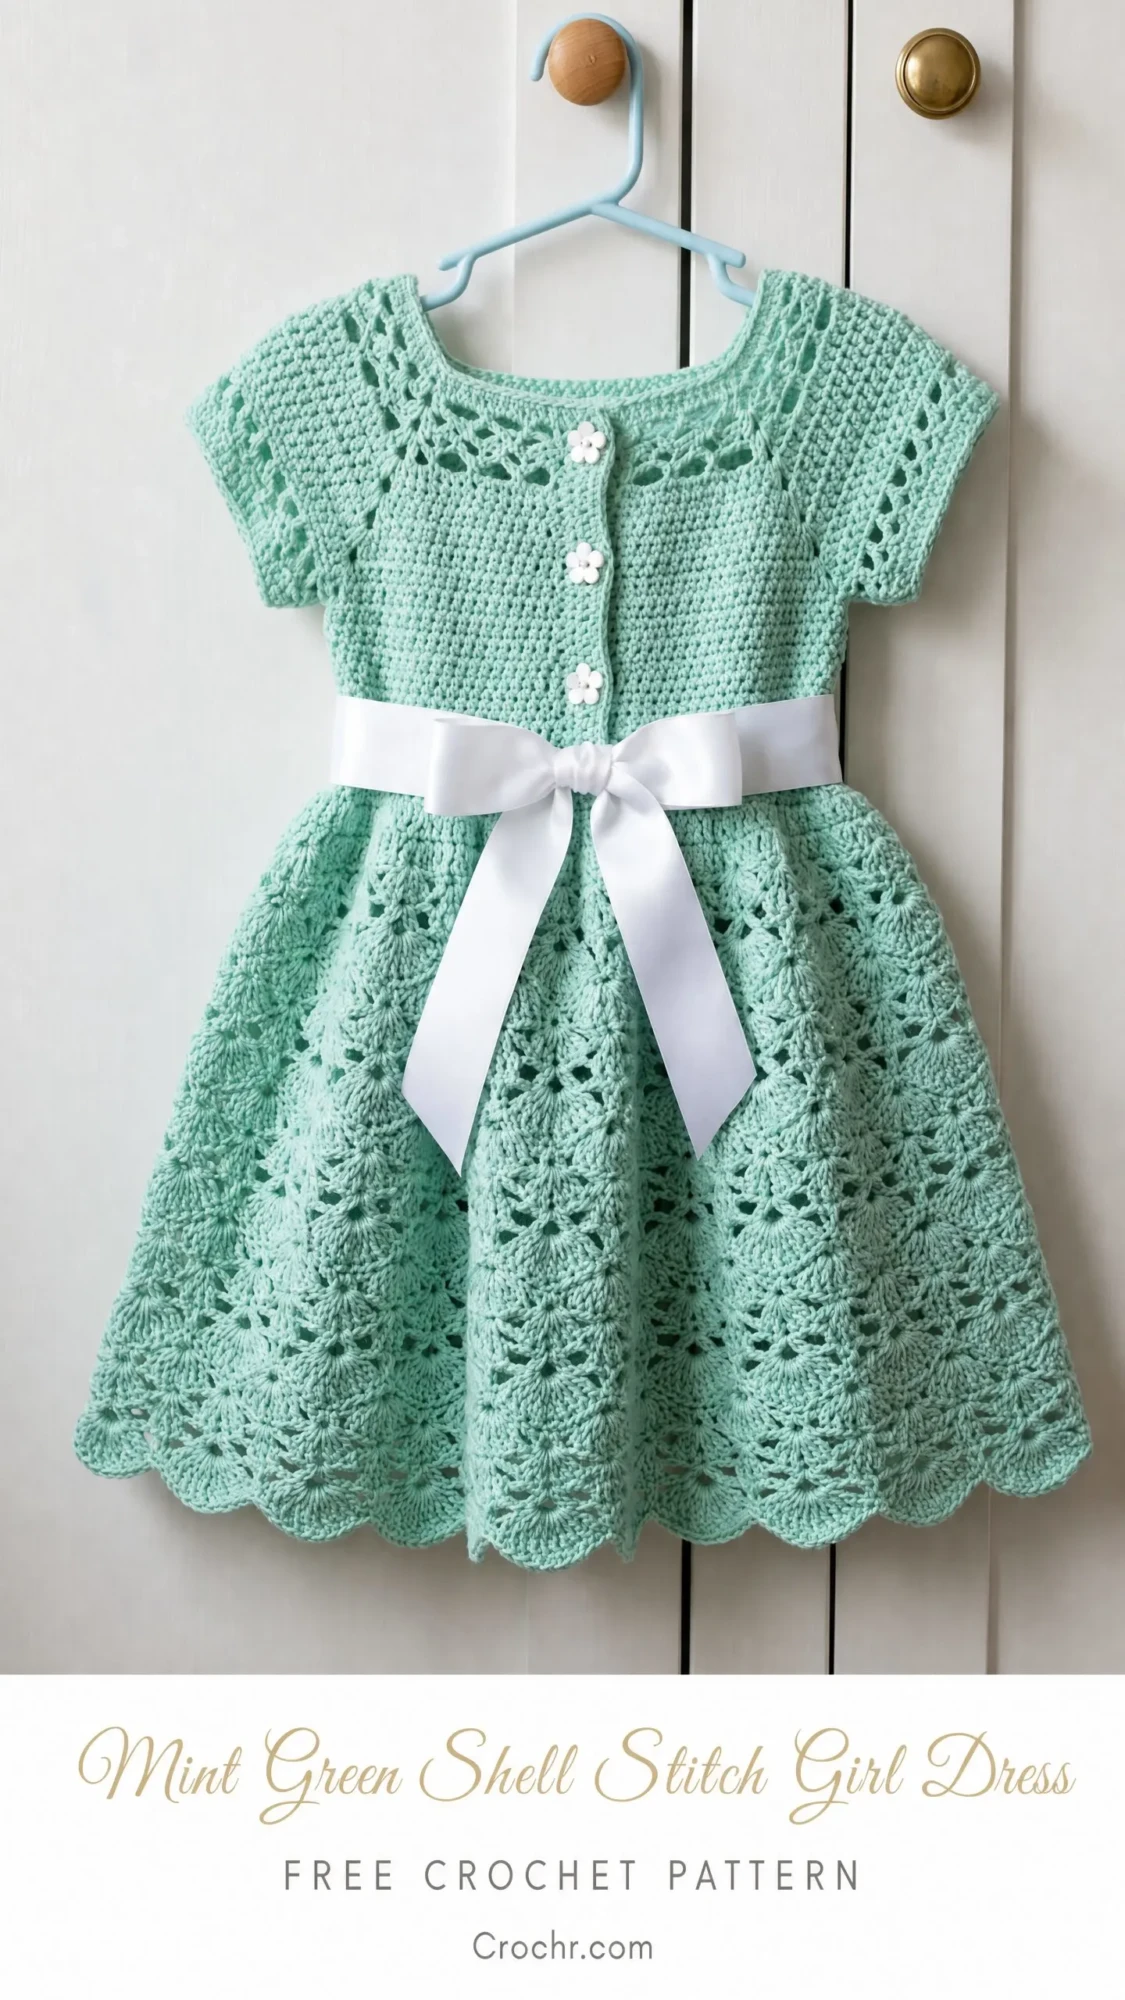
When I first spotted this design, I knew I had to share it. The construction is clever, the details are thoughtful, and the finished piece looks far more complicated than it actually is. That scalloped hem? Pure perfection.
If you’re ready to create something your little one can wear for portraits, special occasions, or Sunday visits to grandma’s house, you’re in the right place. Let me walk you through every single step.
What Makes This Dress Special
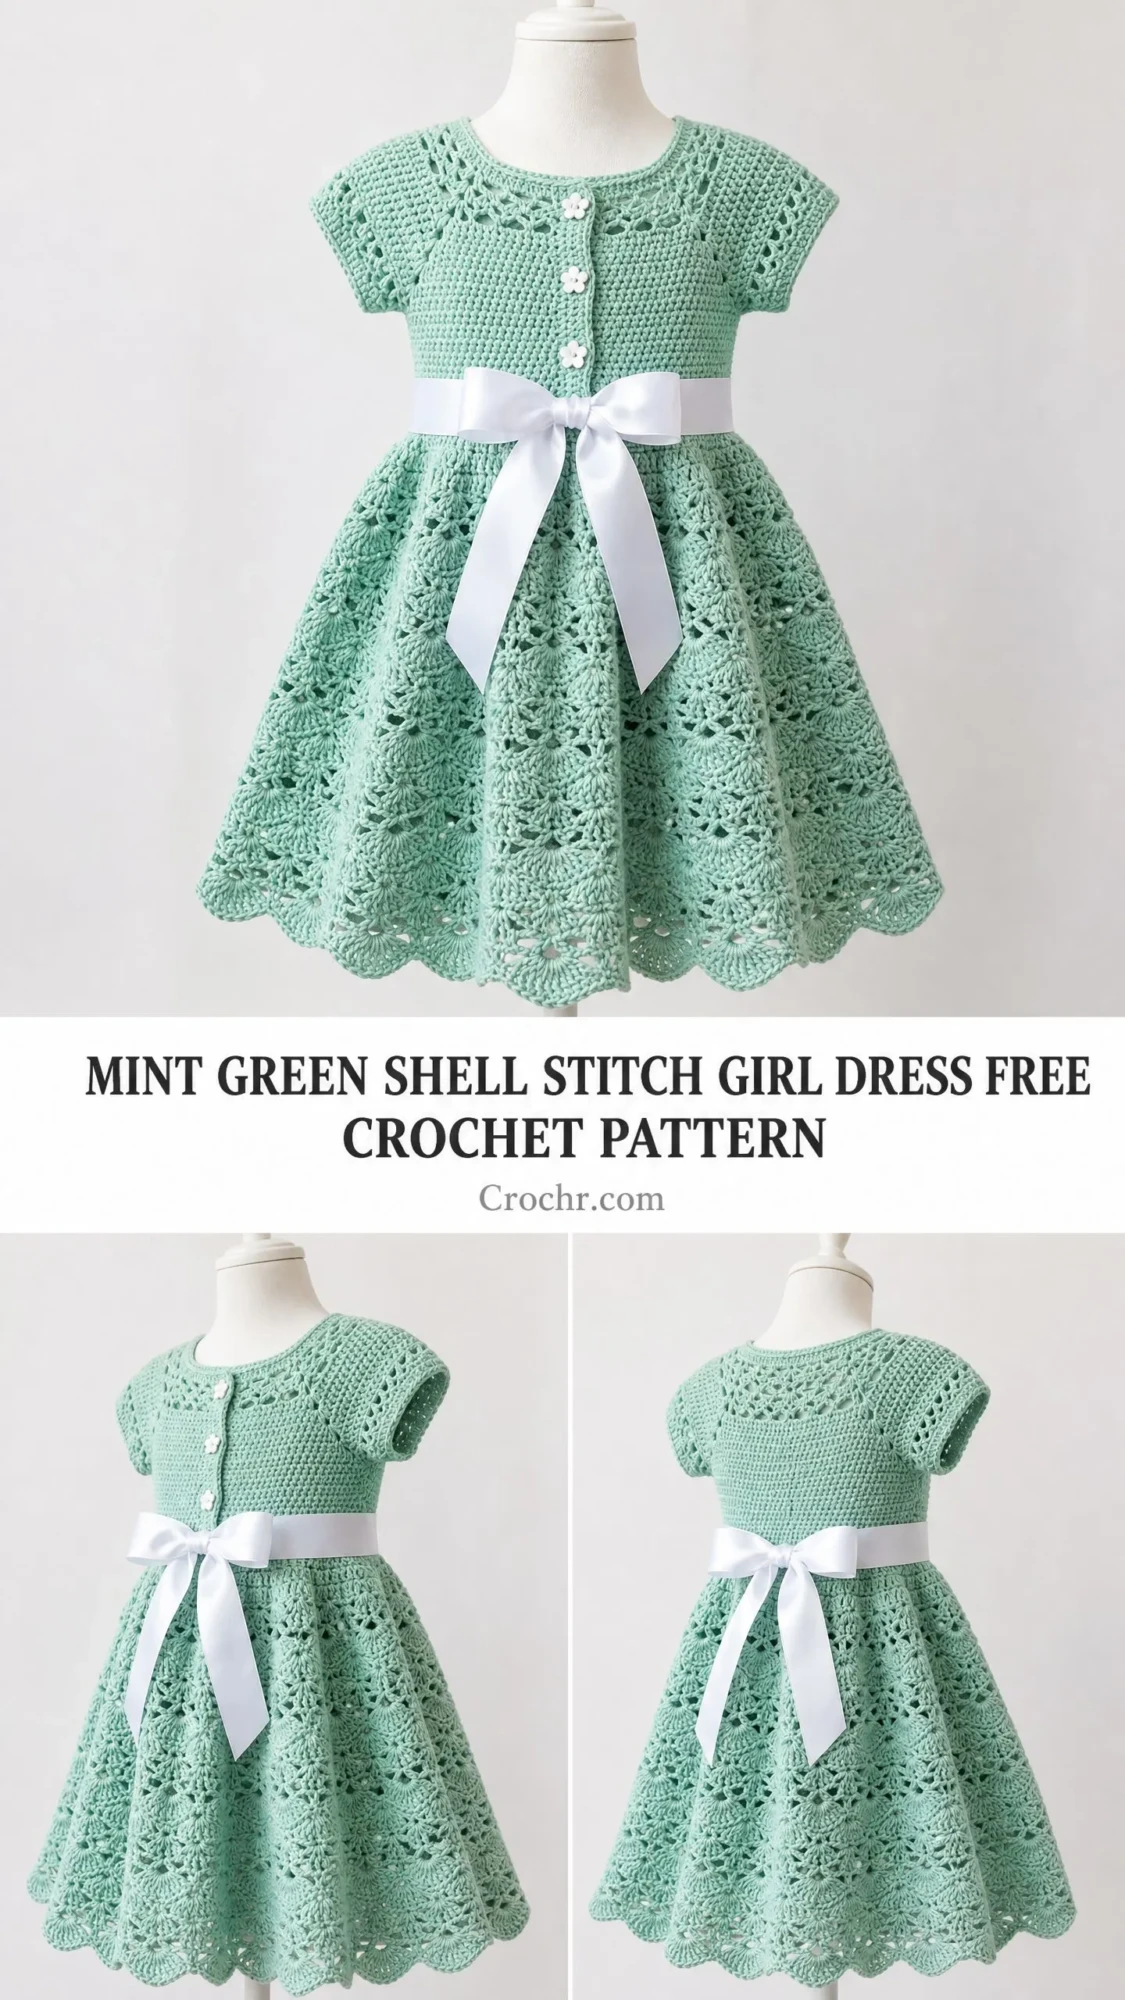
This mint green shell stitch girl dress combines two distinct textures that complement each other beautifully. The bodice features smooth single crochet with a delicate lace band across the chest, while the skirt shows off a classic shell and V-stitch pattern that creates natural fullness and movement.
The dress works from the top down, which means you can try it on as you go and adjust the length easily. The cap sleeves form naturally from the yoke shaping, so there’s no complicated sleeve construction to worry about. A white satin ribbon threads through a special channel at the waist and ties in a sweet bow at the front. Three little flower-shaped buttons secure the center front opening.
This is an intermediate-level project. You’ll need to be comfortable working in rounds, increasing evenly, dividing for armholes, and following a stitch repeat. But don’t let that intimidate you. Once you establish the shell pattern in the skirt, it practically works itself.
Finished Measurements
This pattern is written for size 2T, fitting approximately a 2-year-old child.
Chest circumference: 20 inches (51 cm)
Total dress length from shoulder to hem: 17 inches (43 cm)
Skirt length from waist to hem: 10 inches (25.5 cm)
Bodice length from neckline to waist: 7 inches (18 cm)
Sleeve opening: 4 inches (10 cm)
I’ve included size customization tips at the end if you need to go larger.
Materials You’ll Need
Yarn: DK weight (CYCA #3), 100% cotton or cotton-blend, approximately 550 to 650 yards (503 to 594 meters) in mint green
Hook: US Size E-4 / 3.5 mm, or size needed to achieve gauge
Notions:
Yarn Recommendations
Paintbox Yarns Cotton DK in Spearmint is a near-perfect color match. This 100% cotton yarn has excellent stitch definition and a soft hand. You’ll need 4 to 5 skeins.
Lion Brand 24/7 Cotton in Mint works beautifully too. It’s mercerized cotton, which gives it durability and a smooth finish. You’ll need 3 balls.
Drops Safran in Color 11 (light green) is another great choice. The slight nylon content adds a subtle sheen and extra durability. You’ll need 4 skeins.
Any DK weight yarn that meets gauge will work. Cotton or cotton-blend yarns are strongly recommended because they hold the shell structure crisp and drape beautifully for the skirt. Avoid fuzzy or high-loft yarns since they’ll obscure the lace texture.
Gauge
Getting gauge right matters a lot for a garment like this. Take the time to make a swatch.
18 single crochet (sc) = 4 inches (10 cm)
10 rows of sc = 4 inches (10 cm)
1 shell repeat (6 stitches) = 1.33 inches (3.4 cm)
4 rows of shell pattern = 2 inches (5 cm)
To make a gauge swatch: Chain 24. Work in single crochet for 12 rows. Block lightly. Measure the interior 18 stitches and 10 rows. If your swatch is too big, try a smaller hook. Too small? Go up a hook size.
Abbreviations and Stitch Definitions
Let me explain every stitch you’ll use before we start.
ch = chain: Yarn over, pull through loop on hook.
sl st = slip stitch: Insert hook, yarn over, pull through both the stitch and the loop on hook in one motion.
sc = single crochet: Insert hook into stitch, yarn over and pull up a loop (2 loops on hook), yarn over and pull through both loops.
sc2tog = single crochet two together (a decrease): Insert hook into first stitch, pull up a loop, insert hook into next stitch, pull up a loop (3 loops on hook), yarn over and pull through all 3 loops. This turns 2 stitches into 1.
dc = double crochet: Yarn over, insert hook into stitch, yarn over and pull up a loop (3 loops on hook), yarn over and pull through 2 loops (2 loops remain), yarn over and pull through remaining 2 loops.
inc = increase: Work 2 stitches into the same stitch.
sk = skip: Pass over the indicated stitch without working into it.
ch-sp = chain space: The gap or hole created by a chain in a previous row. You work into this space, not into the chain itself.
RS = right side: The front of your work, the side that faces out when worn.
WS = wrong side: The back of your work.
pm = place marker
st(s) = stitch(es)
rnd = round
Special Stitches
These two special stitches create the beautiful lace pattern in the skirt.
Shell Stitch
A shell is 5 double crochet stitches all worked into the same stitch or space. This creates a fan shape.
To work a shell: Insert your hook into the designated stitch or space. Work your first double crochet. Without moving to a new stitch, work 4 more double crochets into that same spot. You now have 5 double crochets sharing one base. That’s one complete shell.
V-Stitch
A V-stitch is (1 dc, ch 1, 1 dc) all worked into the same stitch or space. The two double crochets lean away from each other with a chain space between them, forming a V shape.
To work a V-stitch: Work 1 double crochet into the designated spot, chain 1, then work another double crochet into that same spot.
Shell and V-Stitch Pattern
In the skirt, shells and V-stitches alternate. The pattern repeat is: skip 2 stitches, shell in next stitch, skip 2 stitches, V-stitch in next stitch. This uses 6 stitches per repeat.
In following rounds, you work shells into the chain-1 space of the previous round’s V-stitch, and V-stitches into the center (3rd) double crochet of the previous round’s shell. Once you get the rhythm, it flows naturally.
Pattern Notes Before You Begin
1. This dress works from the top down, starting at the neckline.
2. The bodice is worked flat (back and forth in rows) to create the center-front button opening. The skirt is worked in joined rounds.
3. Chain 1 at the beginning of single crochet rows does NOT count as a stitch.
4. Chain 3 at the beginning of double crochet rows DOES count as the first double crochet.
5. Stitch counts in parentheses at the end of each row show your total working stitches.
6. All rounds are joined with a slip stitch to the first stitch unless otherwise noted.
7. Right side always faces you when working skirt rounds.
Step-by-Step Instructions
Part 1: Neckline and Yoke
The yoke shapes the shoulders and upper body. You’ll work flat to maintain the front opening.
Foundation chain: Ch 56.
Row 1 (RS): Sc in 2nd ch from hook and in each ch across. Turn. (55 sc)
Row 2 (WS): Ch 1, sc in each st across. Turn. (55 sc)
Row 3 (RS) – Yoke increase row 1: Ch 1. Sc in first 5 sts (this becomes the right front band area). Inc in next st. (Sc in next 7 sts, inc in next st) 5 times. Sc in last 5 sts. Turn. (61 sc)
Place a marker after the 5th stitch from each edge on this row. These mark your front band boundaries.
Row 4 (WS): Ch 1, sc in each st across. Turn. (61 sc)
Row 5 (RS) – Yoke increase row 2: Ch 1. Sc in first 5 sts. Inc in next st. (Sc in next 8 sts, inc in next st) 5 times. Sc in last 5 sts. Turn. (67 sc)
Row 6 (WS): Ch 1, sc in each st across. Turn. (67 sc)
Row 7 (RS) – Lace band row: Ch 1. Sc in first 5 sts. (Ch 2, sk 2 sts, sc in next st) across to last 5 sts. Sc in last 5 sts. Turn.
This creates the decorative openwork band visible at the upper chest in the finished dress.
Row 8 (WS) – Lace band fill row: Ch 1. Sc in first 5 sts. (2 sc in ch-2 sp, sc in sc) across to last 5 sts. Sc in last 5 sts. Turn. (67 sc)
Row 9 (RS) – Yoke increase row 3: Ch 1. Sc in first 5 sts. Inc in next st. (Sc in next 9 sts, inc in next st) 5 times. Sc in last 5 sts. Turn. (73 sc)
Row 10 (WS): Ch 1, sc in each st across. Turn. (73 sc)
Row 11 (RS) – Yoke increase row 4: Ch 1. Sc in first 5 sts. Inc in next st. (Sc in next 10 sts, inc in next st) 5 times. Sc in last 5 sts. Turn. (79 sc)
Row 12 (WS): Ch 1, sc in each st across. Turn. (79 sc)
Row 13 (RS) – Yoke increase row 5: Ch 1. Sc in first 5 sts. Inc in next st. (Sc in next 11 sts, inc in next st) 5 times. Sc in last 5 sts. Turn. (85 sc)
Row 14 (WS): Ch 1, sc in each st across. Turn. (85 sc)
Checkpoint 1: Your yoke should measure approximately 3.5 inches (9 cm) from the foundation chain and about 19 inches (48 cm) wide.
Part 2: Dividing for Armholes
Now you’ll separate the front and back sections, leaving openings for the sleeves.
Stitch distribution for size 2T:
Row 15 – Division row (RS): Ch 1. Sc in first 14 sts (right front). Ch 5 (underarm bridge). Skip next 6 sts and place them on a holder for the sleeve. Sc in next 35 sts (back). Ch 5 (underarm bridge). Skip next 6 sts and place on holder. Sc in last 14 sts (left front). Turn. (63 sc + 10 ch = 73 working positions)
Row 16 (WS): Ch 1. Sc in each st and each ch across. Turn. (73 sc)
Rows 17 through 20: Ch 1. Sc in each st across. Turn. (73 sc each row)
Checkpoint 2: The bodice from neckline to current row should measure approximately 5 inches (12.7 cm). Width should be about 16.2 inches (41 cm).
Part 3: Waist Increase and Ribbon Channel
You need a stitch count divisible by 6 for the shell pattern. Your current count is 73, so you’ll decrease by 1 to reach 72.
Row 21 – Waist join row (RS): Ch 1. Sc in first 36 sts, sc2tog over next 2 sts, sc in each remaining st. Do not turn. Join the front opening edges by folding so they overlap slightly (right over left as worn). You’ll now work in rounds for the skirt. (72 sc)
Rnd 22 – Ribbon channel round: Ch 1. (Sc in next st, ch 3, sk 2 sts) 24 times. Join with sl st to first sc. (24 sc, 24 ch-3 spaces)
This creates the channel where you’ll thread your ribbon later.
Rnd 23: Ch 3 (counts as dc). Sk first sc. (Shell in next ch-3 sp, V-st in next sc) 12 times. Shell in next ch-3 sp. Join with sl st to top of ch-3. (12 shells, 12 V-sts)
Part 4: Skirt Body
Now the magic happens. In each round, work shells into the ch-1 space of the previous V-stitch, and V-stitches into the center (3rd) dc of the previous shell.
Rnd 24: Sl st to first dc of first shell. Sl st to ch-1 sp of first V-st. Ch 3. 4 dc in same ch-1 sp (first shell complete). Ch 1. Dc in center dc of next shell. Ch 1. Dc in same st (V-st complete). Continue: (Shell in ch-1 sp of next V-st, V-st in center dc of next shell) 11 times. Join with sl st to top of ch-3. (12 shells, 12 V-sts)
Rnds 25 through 28: Repeat Rnd 24 exactly. (12 shells, 12 V-sts each round)
Checkpoint 3: The skirt should measure approximately 3 inches (7.6 cm) from the waist ribbon channel.
Part 5: Skirt Expansion Round
This round adds extra width for the A-line shape.
Rnd 29 – Expansion round: Sl st to ch-1 sp of first V-st. Ch 3, 4 dc in same sp (shell). Ch 2. V-st in center dc of next shell. Ch 2. (Shell in ch-1 sp of V-st, ch 2, V-st in center dc of shell, ch 2) 11 times. Join with sl st to top of ch-3. (12 shells, 12 V-sts with ch-2 spacers between)
Rnds 30 through 33: Ch 3 (counts as dc), 4 dc in same ch-1 sp of previous round’s V-st (shell). V-st in center dc of previous shell. (Shell in ch-1 sp of V-st, V-st in center dc of shell) 11 times. Join. (12 shells, 12 V-sts)
Checkpoint 4: The skirt should measure approximately 6.5 inches (16.5 cm) from the waist with visible A-line flare.
Part 6: Lower Skirt and Scalloped Hem
Rnds 34 through 36: Work even in shell and V-stitch pattern as established. (12 shells, 12 V-sts per round)
Rnd 37 – Hem setup: Sl st to ch-1 sp of first V-st. Ch 3, 4 dc in same sp. Sc in center dc of next shell. (5 dc in ch-1 sp of V-st, sc in center dc of shell) 11 times. Join with sl st to top of ch-3. (12 shells, 12 sc = 84 stitches)
Rnd 38 – Scallop edge: Sl st to top of first dc of shell. Ch 1. Sc in same st. Sc in next 4 dc of shell. (Sc in sc between shells, sc in each of 5 dc of next shell) 11 times. Sc in sc. Join. (84 sc)
Rnd 39 – Final scallop: Ch 1. Sc in first sc. (Sk 1 sc, 5 dc in next sc, sk 1 sc, sc in next sc) 21 times. Join. Fasten off.
Checkpoint 5: The dress should measure approximately 17 inches (43 cm) from shoulder to hem with even scallops all around.
Part 7: Cap Sleeves
Return to your held armhole stitches. Work one sleeve at a time.
With RS facing, join yarn at the underarm bridge.
Rnd 1: Ch 1. Sc evenly around the armhole opening: pick up and sc in each of the 5 bridge chains, sc in each of the 6 held stitches, pick up 3 sc along the yoke edge for shoulder shaping. Join. (14 sc)
Rnd 2: Ch 1. (Sc2tog, sc in next 5 sts) twice. Join. (12 sc)
Rnd 3: Ch 1. Sc in each st around. Join. (12 sc)
Rnd 4 – Sleeve edge: Ch 1. Sc in first sc. (Sk 1 sc, 3 dc in next sc, sk 1 sc, sc in next sc) 3 times. Join. Fasten off.
Repeat for the second sleeve.
Part 8: Center Front Button Band
The button band runs along both front edges from waist to neckline.
With RS facing, join yarn at the bottom-right corner of the opening (waist level).
Row 1: Ch 1. Work sc evenly up the right front opening edge, approximately 1 sc per row end (about 21 sc from waist to neckline). Continuing without breaking yarn, work sc evenly along the neckline foundation chain (approximately 15 sc across the back neckline). Continue down the left front opening edge with 21 sc to the waist. Fasten off. (57 sc total)
Buttonhole band (right front edge):
Rejoin yarn at bottom of right front band.
Row 2 (buttonhole row): Ch 1. Sc in first 3 sts. (Ch 2, sk 2 sts, sc in next 5 sts) twice. Ch 2, sk 2 sts. Sc in last 3 sts. Turn. (21 sts including 3 ch-2 buttonholes)
Row 3: Ch 1. Sc in each st and 2 sc in each ch-2 sp across. Fasten off. (21 sc)
Work 3 sc rows on the left front band (no buttonholes) to match the thickness.
Sew your flower buttons to the left band opposite the buttonholes.
Part 9: Ribbon Channel Finishing
Thread your satin ribbon through the ch-3 spaces at the waist (Rnd 22). Start at center front, weave in and out of each arch all the way around, and exit at center front. Pull gently to gather if desired. Tie in a bow. Trim ribbon ends at a diagonal to prevent fraying.
Finishing and Blocking
Weave in all your ends carefully with a yarn needle.
Wet blocking is highly recommended for cotton yarn. Soak the finished dress in cool water with a little wool wash for 20 minutes. Gently squeeze out excess water without wringing. Lay flat on a blocking board. Pin the hem scallops open to their fullest. Pin the sleeve scallops too. Smooth the bodice flat. Let dry completely, which takes 12 to 24 hours.
Blocking opens up the lace dramatically and really makes those scallops pop. Trust me on this step.
Size Customization
To make a larger size, increase the foundation chain in multiples of 6.
Size 3T: Foundation ch 62, bodice 7.5 inches (19 cm), skirt 11 inches (28 cm)
Size 4T: Foundation ch 68, bodice 8 inches (20.5 cm), skirt 12 inches (30.5 cm)
For each size up, add 1 to 2 additional yoke increase rows. Adjust skirt length by adding or removing full rounds of the shell and V-stitch pattern before the hem rows. Always ensure your stitch count entering the skirt is divisible by 6.
Care Instructions
Machine wash cold on gentle cycle, inside out. No bleach or fabric softener. Reshape while damp and lay flat to dry. Don’t tumble dry since heat can shrink cotton and distort the shell pattern. Remove the satin ribbon before washing and re-thread afterward. Iron on low through a damp pressing cloth if needed.
You’ve Got This
This crochet dress pattern looks impressive hanging on a tiny hanger, but the construction is completely manageable when you take it step by step. The shell stitch skirt is genuinely fun to work once you get into the rhythm. And that moment when you thread the ribbon through and tie the bow? Pure joy.
Thank you so much for choosing this pattern. I hope your little one twirls around in this dress for many special occasions to come. If you make one, I would absolutely love to see it. Tag me on Instagram or share a photo in my Facebook group.
If you loved this mint green shell stitch girl dress pattern, go ahead and pin it to your Pinterest boards so you can find it easily when you’re ready to start. And please drop a comment below if you make one. I read every single comment and it truly makes my day to see your finished projects.
You Might Also Like
- Ocean Wave Blue Striped Clutch Free Crochet Pattern
- Sage Green Boho Tiered Crochet Dress Free Pattern
- Christmas Peppermint Granny Square Blanket Free Crochet Pattern
- Moonlight Snake Plant Amigurumi Free Crochet Pattern
